Advertisement
Quick Links
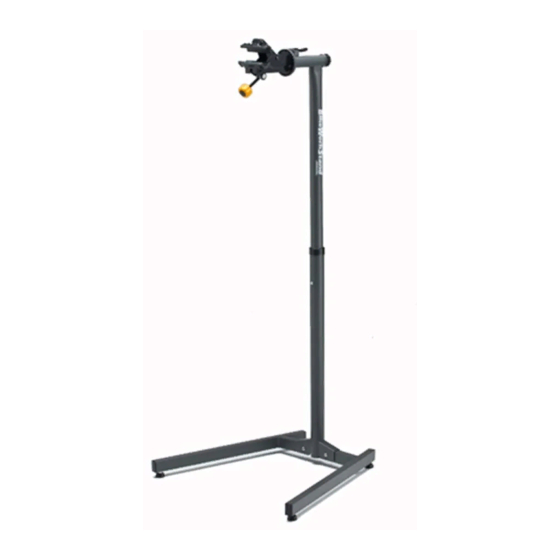
PARTS NAME
HOW TO ASSEMBLE W-3100
1
Assemble both Legs to the Lower Frame with the supplied
M8x40 bolts and M8 Nylon Nuts.
Repairstand "W-3100" instructions manual
Clamp Jaws
Clamp Adjust Knob
Upper Pillar Holding Bolt
Left Side Leg
Adjusting Screw
Required Tools:
Gear Clutch
Clamp Lever
1 x 13mm Spanner
1 x 6mm Hex Wrench
1 x 5mm Hex Wrench
M8x40 Cap Bolt
Clutch Release Lever
Back Knob
Upper Pillar
Tool Tray (option)
Lock Bolt
Lower Frame
Right Side Leg
M8 Nylon nut
Advertisement

Related Manuals for MINOURA W-3100


Summary of Contents for MINOURA W-3100
- Page 1 Repairstand "W-3100" instructions manual Gear Clutch Clutch Release Lever PARTS NAME Clamp Jaws Back Knob Clamp Adjust Knob Upper Pillar Clamp Lever Tool Tray (option) Lock Bolt Upper Pillar Holding Bolt Lower Frame Left Side Leg Right Side Leg Adjusting Screw...
- Page 2 Place the assembled Lower Frame on the floor, Assemble the clamp jaw unit to the Upper Pillar. The Back Knob should be tightened as firmly as and check if every Adjusting Screw is touching the floor perfectly. possible until the clamp jaws rotates smoothly. If not, adjust the length of the Adjusting Screw then tighten the lock nut firmly by a 13mm spanner.
- Page 3 Minoura does not owe any responsibility to any extra troubles these problems may bring. For more detail, refer the attached "MINOURA LIMITED WARRANTY POLICY" card in the package.
- Page 4 W-3100 / SMALL PARTS LIST C-11 C-10 C-11 C-3: Clamp Rubber C-4: Lock Clip C-6: Clamp Shaft C-7: Clutch Packing C-8: Clamp Space Collar C-9: M8 Flat Washer C-10: Back Knob C-11: Clamp Jaws Assy P-1: Upper Pillar P-3: Clutch Release Lever...
Need help?
Do you have a question about the W-3100 and is the answer not in the manual?
Questions and answers