Advertisement
Important Notes /注意していただきたいこと
• For normal 2-wheel bicycle only. Not
compatible with heavy electric or DH bikes
and long tandem bikes.
• Do not use BikePit for any other purposes
than instructed.
• BikePit is supported with the spring power
to the ceiling. Setup to the area where the
durable enough reinformcement ceiling
beam is located, and choose solid floor.
Failure to do so will cause serious damage
and injury while using.
Pillar Height Adjustability
支柱高さ調整範囲:
1.7 - 3.1 meter
Required Tools /必要な工具
1 x M5 Hex Wrench / M5 六角レンチ
BIKE-PIT
instructions manual /バイクピット
●バイクピットは通常の2輪自転車専用です。
電動アシスト車や DH バイクのような重い自転車や,
タンデム車のような長い自転車には使用できません。
●支柱を水平に設置してそこに自転車をぶら下げるなど,
この説明書で指示されていない用途には使用しないで
ください。
●バイクピットは天井に対してバネで押し付ける力で設
置されます。天井には梁が通り十分な強度を持つ場所
にのみ設置してください。また床もしっかりと安定し
ている必要があります。
強度不足の場所に設置すると,倒れたりして怪我や損
害の原因となります。
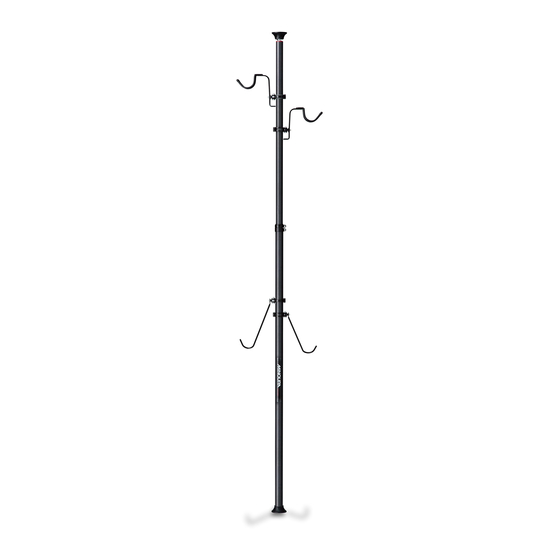
[ Parts Name ]
<各部の名称>
Upper Rubber Cup
上側ゴムカップ
Spring /バネ
Red Indicator /赤色警告表示
Upper Pillar (40mm diameter)
上支柱(直径 40 ミリ)
Upper Hook (for front wheel)
上側フック(前輪用)
Pillar Joint /中間ジョイント
Lower Pillar (45mm diameter)
下支柱(直径 45 ミリ)
Lower Hook (for rear wheel)
下側フック(後輪用)
Lower Rubber Cup
下側ゴムカップ
- 1 -
!
BikePit cannot be setup on any angled ceiling.
Choose the ceiling area where the reinforcement
beam is located. Just ceiling panel is not durable
enough and the pillar spring may break your ceiling.
バイクピットは必ず十分
な強度を持つ梁の通った
場所に設置してください。
梁がない板だけの場所だ
と,バネの力で天井を突
き破ってしまう恐れがあ
ります。
(必ず水平のこと)
!
When you setup BikePit, make sure the Red Indicator is
completely hidden in the Upper Rubber Cup.
If you see the indicator even after setting up, it means you
didn't extend the pillar long enough and BikePit cannot
support the bike weight properly.
バイクピットの支柱長さを設定する際は,設置時に上側
ゴムカップの直下にある赤い警告表示が見えなくなるま
で,十分に支柱を伸ばしてください。
!
Setup BikePit vertically between the ceiling and floor.
If the pillar has been slanted, it cannot support the bike
weight securely, and if something hit the pillar, it may fall
down and will cause serious accident.
バイクピットは天井と床との間で垂直にセットして使用
してください。傾いたまま設置されると十分な安定を確
保できなくなり,不意の地震や何かの衝撃で外れて転倒
する恐れがあります。
取扱説明書
(ver.2.2 2009/10)
Reinforcement Beam /梁
Ceiling Panel
(must be horizontal)
天井板
Make sure the Red
Indicator is invisible
赤い警告表示が見えて
いたらダメ
Advertisement
Table of Contents

Related Manuals for MINOURA BIKE PIT


Summary of Contents for MINOURA BIKE PIT
- Page 1 BIKE-PIT instructions manual /バイクピット 取扱説明書 (ver.2.2 2009/10) Important Notes /注意していただきたいこと ●バイクピットは通常の2輪自転車専用です。 • For normal 2-wheel bicycle only. Not 電動アシスト車や DH バイクのような重い自転車や, compatible with heavy electric or DH bikes タンデム車のような長い自転車には使用できません。 and long tandem bikes. ●支柱を水平に設置してそこに自転車をぶら下げるなど, • Do not use BikePit for any other purposes この説明書で指示されていない用途には使用しないで...
- Page 2 How To Setup Pillar /支柱のセットのしかた At first, tighten the lower bolt on Pillar Joint firmly, then loosen the upper bolt to extend the pillar. Place the pillar on the floor and extend Upper Pillar to the ceiling. Stop extending when Upper Rubber Cup touches the ceiling, and tighten the bolt temporally (see Fig.A).
- Page 3 Follow the steps below to install the stainless band clip; Stainless Band (40mm or 45mm) ステンレスバンド(40 ミリまたは 45 ミリ) 1) Disassemble the band clip. 2) Open the band and wind around the pillar. Plastic Bracket /樹脂ブラケット 3) Overlap the band ends as the welded nut is located inner side (see Flat Washer Fig.
- Page 4 Contact /お問い合わせ先 If you have any questions or need help, you should contact the dealer where you purchased or the Minoura distributor in your country first. The distributor can be found on our web site. Only when you cannot get enough service, you can contact us.
Need help?
Do you have a question about the BIKE PIT and is the answer not in the manual?
Questions and answers