Rexing V2 Manual
- User manual (45 pages) ,
- Getting started (6 pages) ,
- User manual (42 pages)
Advertisement
About this manual
This device provides high-quality digital recording using Rexing's high standards of design, construction and technological expertise. This user manual describes the device's functions and features in detail. Please read this manual before using the device to ensure safe and proper use. Note that all descriptions included here are based on the device's default settings.
- Images and screenshots may differ in appearance from the actual product. Content may differ from the final product or from software provided by service providers, and is subject to change without prior notice.
- For the latest version of this manual, refer to theRexing website at www.rexingusa.com.
- Available features and additional services may vary by device and software.
- Applications and their functions may vary by country, region, or hardware specifications.
- Rexing is not liable for performance issues caused by applications from any provider other than Rexing.
- Rexing is not liable for performance issues or incompatibilities caused by failure to install the device as stated in this manual. Attempting to customize the installation may cause the device or applications to work improperly, which may result in device malfunctions and data corruption or loss. These actions are violations of your Rexing agreement and will void your warranty.
- Default applications that come with the device are subject to updates and possible discontinuation of support without prior notice. If you have questions about an application provided with the device, contact an authorizedRexing Service Center.
PRODUCT SPECIFICATIONS
| Image Sensor | 5MP CMOS |
| Lens | 6-Layer Fixed-focus with full-glass elements |
| CPU | Novatek |
| LCD | 2.7 inch, 16:9 TFT |
| Audio | Built-in high-sensitivity microphone/speaker |
| External Memory | Class 10 or above MicroSD card (up to 256GB) |
| Gravity Sensor | Low / Medium / High / OFF |
| Shutter | Electronic |
| White Balance | Auto |
| Exposure | Auto ISO |
| TV Interface | None |
| Battery | 320mAh 3.7V rechargeable lithium ion battery |
| Video Format | MOV |
| Video Resolution | 1920x1080P30+1920x1080P30, 1280x720P30 + 1280x720P30, 2880x2160P24, 2560x1440P30, 1920x1080P60, 1280x720P120 |
| Languages | English, Chinese, French, Spanish, Portuguese, German, Italian, Russian, Japanese |
| USB | USB 2.0 |
| Loop Recording | 3 min / 5 min / 10 min / OFF |
| Screen Saver | 15 Secs / 1 min / 3 min / OFF |
| Auto Shutdown | 3 min / 5 min / 10 min / OFF |
| Microphone Mute | ON / OFF |
| Wi-Fi | Yes |
GETTING STARTED
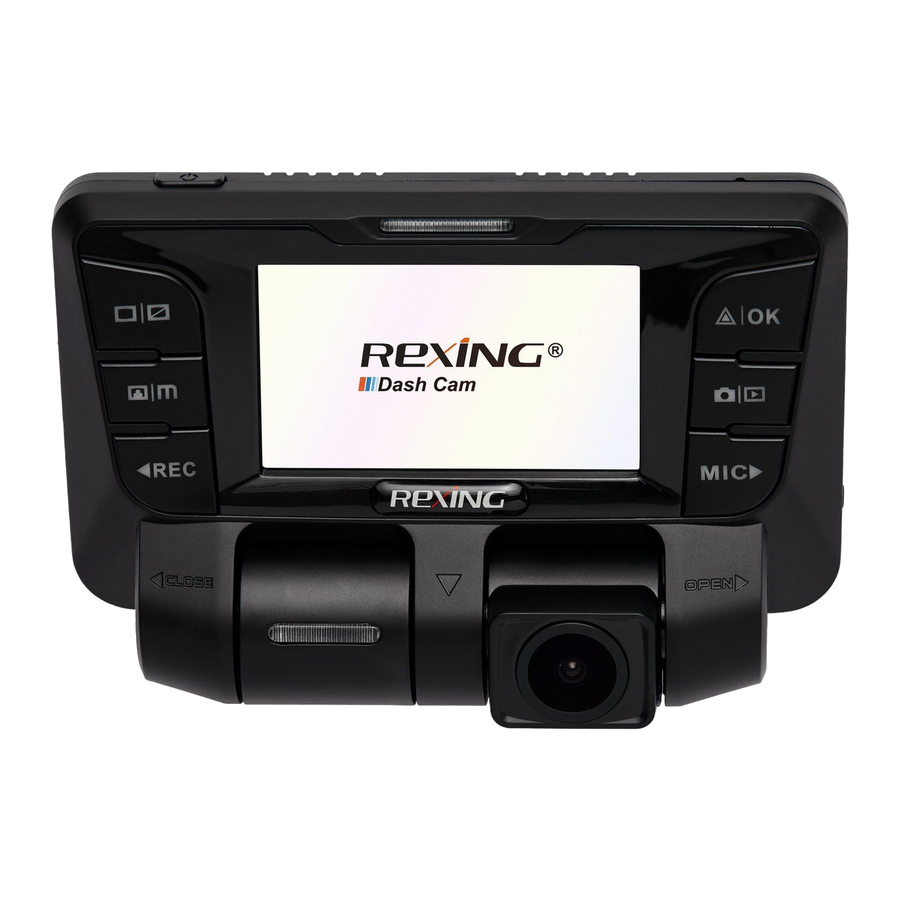
Device Layout

- Power On/Off Switch
- Screen Button
- Menu Button
- Up Navigation Button
- Rear Camera
- Front Camera
- OK (Confirm) Button
Emergency Lock Button - Mode Button
- Down Navigation Button
Mute/Unmute Button - GPS Module Port Record Button
- HDMI Port
- MicroSD Card Slot
- USB Charging Port
- AV Out
- Reset Button
Buttons
| Button | Functions |
 |
|
 |
|
 | MENU – Press to enter and exit Settings Mode |
 |
|
 |
|
 | MODE Select – Press to toggle between Recording / Photo / Playback modes |
 | SCREEN – Press to switch screen to Front, Rear, Picture in Picture |
| R | Press and hold for 4 seconds to reset the device in the event that it operates erratically, hangs up, or freezes. |
| Indicator | Solid Red – Power, Charging Flashing Blue – Recording |
Status Icons
| Icon | Meaning |
 | Video Resolution |
 | Blinking – Recording |
 | Wide Dynamic Range |
 | Charging |
 | Battery Power Level |
 | Microphone Mute |
 | Microphone On |
 | Video Recording Mode |
 | Video Playback Mode |
 | Photo Mode |
 | Loop Recording |
 | Memory Card Inserted |
 | White Balance |
 | License plate number |
 | Current video file locked |
Package Contents
Check the product box for the following items:
- V2 Dashboard Camera
- Operating manual
- Mounting holder for camera (adhesive-mount type)
- USB cable
- Car charger
- Thank you card
The items supplied with the device and any available accessories may vary depending on the region. Appearances and specifications are subject to change without prior notice. Availability of all accessories is subject to change depending entirely on manufacturing companies.
All supplied items are designed for use only with this device and may not be compatible with other devices. Malfunctions resulting from the use of unapproved accessories are not covered by the warranty service.
For more information about available accessories, refer to the Rexing website at www.rexingusa.com.
Installation
Video guide: video.rexingusa.com

- Attaching the front camera to the window mount
Before the device can be used in a car, it is essential to first install a properly attached window mount. Make sure that you place the recorder in a safe, appropriate location where it will not obstruct the driver's view.
Clean windshield before apply mount, do not attach camera for at least 20 minutes. - Inserting a memory card
You will need to insert a memory card before you can begin recording. The recorder supports MicroSD cards with a capacity of up to 256GB. For reliable operation, use a Class 10 memory card with a capacity of at least 8GB. - Connecting the charger to the car's 12V DC outlet
Be sure to connect only the Rexing-approved charger designed and supplied specifically for use with your device. Using an incompatible charger can cause serious personal injury or damage to your device. - Format the memory card
To ensure the memory card works on the dash cam, we recommend using the dash cam to format the memory card, (please refer to Formatting the Memory Card section).
DO NOT insert or remove a memory card while the device is powered on.
Charging the battery
Charge the device by connecting the camera via the USB car charger port. Use only Rexing-approved chargers. Using unapproved chargers or cables can damage the device or cause the battery to explode.
Connect the car charger's jack to the USB charging port, and then plug the charger into the car cigarette lighter or 12V DC power outlet.
- Battery is mainly used to save files in emergency. Please always connect Rexing V2 to external power while it is in use.
- When device detects no power supply, it will automatically power off after 5 seconds. To turn on the device again, you will need to do so manually by pressing the
![]() ON / OFF button.
ON / OFF button. - If the battery is completely discharged, the device will not turn on immediately when the charger is connected. Allow a depleted battery to charge for a few minutes before attempting to turn on the device.
- The device can be used while it is charging, although it may take longer to fully charge the battery.
- If the device receives an unstable power supply while charging, the screen may not function properly. If this happens, unplug the charger from the device.
- While charging, the device may heat up. This is normal and should not affect the device's performance or lifespan.
- If the device is not charging properly, take the device and the charger to an authorizedRexing Service Center.
Connecting the charger improperly may cause serious damage to the device. Any damage caused by misuse is not covered by the warranty.
Inserting the memory card
 Note: All micro SD cards have a limited life span of being rewritten about 500 times. For 32GB memory card you will need to replace your micro SD card after 3,000 hours of use to prevent any freezing issues or corruption of the card or videos.
If you are using a high endurance micro SD card this life span goes up to 2,000 times being rewritten. You will need to replace it after 12,000 hours of use to prevent any freezing issues or corruption of the card or videos.
Your device accepts memory cards with a maximum capacity of 256GB. Depending on the memory card manufacturer and type, some cards may not be compatible with your device. Using an incompatible card may damage the device or the memory card, or corrupt the data stored on it.
Use caution to insert the memory card right-side up as shown in the image below.

- Insert memory card with the gold-colored contacts facing upwards.
- Push the memory card into the slot until it locks in place.
- Click sound when memory card locks in place.
- Using a coin or other tool push memory card will make it easier.
It is recommended that you reformat a memory card after every time that images are transferred from it to a computer, or at least once a month.
Reformatting a memory card keeps important elements of data and file structure clean, helping to prevent error messages and missing images. Reformatting also restores the memory card, which can help prevent it from becoming corrupted.
Removing the memory card
Before removing a memory card from your computer, you must first unmount it for safe removal.
Before removing a memory card from your device:
- Press theREC button to stop the device from recording
- Press and hold the
![]() ON/OFF button to switch off the device
ON/OFF button to switch off the device - Gently push the memory card in and let go until it unlocks
Do not remove the memory card while the device is transferring or accessing information. Doing so can result in data loss or corruption, or damage to the memory card or device. Rexing is not responsible for losses that result from the use of damaged memory cards, including the loss of data.
Formatting the memory card
You may choose to format your memory card with either the device or a computer. To use the device for formatting a memory card:
- Press the REC button to stop the device from recording
- Press the MENU button twice to enter System Settings
- Press the DOWN button to navigate to the "Format" option
- Press OK to confirm your selection
- Press theU P button once
- Press OK when the word YES is highlighted in blue
Before formatting a memory card, always remember to make backup copies of all important data stored on the device. The manufacturer's warranty does not cover loss of data resulting from user actions.
Turning the Device On and Off
Press and hold the ![]() ON/OFF button for a few seconds to turn on the device. A welcome message will be displayed onscreen as shown in the image below.
ON/OFF button for a few seconds to turn on the device. A welcome message will be displayed onscreen as shown in the image below.

To turn off the device, again press and hold the![]() ON/OFF button for a few seconds. A goodbye message will be displayed onscreen as shown in the image below.
ON/OFF button for a few seconds. A goodbye message will be displayed onscreen as shown in the image below.
Note: The V2 Dashboard Camera will switch on and off automatically if you keep it permanently connected to the car charger. V2 will automatically start recording when power on.
***If your car cigarette lighter provides constant power to the Dash Cam, the unit will not turn on and off with the vehicle***
Basic Operating
- Rexing Dash cam will atomically start recording once power on, the indicator and the red dot icon
![]() on screen should flashing while recording.
on screen should flashing while recording. - During recording, press EMERGICY
![]() button to lock current video clip, so the loop recording will not overwrite locked video clip. All locked video clip files can be found under \CARDV\MOVIE\RO folder in memory card.
button to lock current video clip, so the loop recording will not overwrite locked video clip. All locked video clip files can be found under \CARDV\MOVIE\RO folder in memory card. - PressPOWER button to turn screen on/off
 button to lock current video clip, so the loop recording will not overwrite locked video clip. All locked video clip files can be found under \CARDV\MOVIE\RO folder in memory card.
Wi-Fi Connect
Use your mobile device to download the "Rexing Connect" app from the App Store or Google Play Store.


After you've done this, follow the instructions below:
- Dash cam: In Video Recording Mode, access the Wi-Fi function by holding
![]() (this can also be done by enabling the Wi-Fi feature in the Setup Menu).
(this can also be done by enabling the Wi-Fi feature in the Setup Menu). - Mobile device: Navigate to your device's Wi-Fi settings and connect to the Wi-Fi name that's shown on the dash cam after "SSID:". When prompted for a password, enter the password shown on the dash cam screen.
- Mobile device: Once connected to the dash cam Wi-Fi, open the Rexing Connect app. From there, press the "Connect" button to connect to the dash cam interface.
- Dash cam: Once connected, the screen should switch to the camera view and display a "WiFi Connected" message.
 (this can also be done by enabling the Wi-Fi feature in the Setup Menu).
Using the Rexing Connect app, you can view a live preview of the dash cam screen, start / stop recording, as well as view and save your captures with your mobile device.
To exit Wi-Fi, hold the  button to return to Video Recording Mode.
For further instruction regarding the Wi-Fi Connect feature, please visit www.rexingusa.com/wifi-connect/.
VIDEO SETTINGS
On Video Recording Mode, Press REC to stop recording then press MENU button once open System Settings Menu.
Resolution
Recommend setting: 1080P FHD + 1080P FHD
Use this setting to set the recording resolution:
- FHD P30 + FHD P30 (1080P+1080P, 30fps, dual channel)
- HD P30 + HD P30 (720P+720P, 30fps, dual channel)
- UHD P24 (2196P, 24fps, single channel)
- QHD P30 (1440P, 30fps, single channel)
- FHD P60 (1080P, 60fps, single channel)
- FHD P30 (1080P, 30fps, single channel)
- HD P120 (720P, 120fps, single channel)
- HD P60 (720P, 60fps, single channel)
- HD P30 (720P, 30fps, single channel)
Loop Recording
Recommend setting: 3 Minutes
With Loop Recording Mode enabled, the device will continuously erase older video as it records new video, keeping only the images captured over a userselected time range. All video older than this range will be replaced with new video. (Note: any locked video files on the memory card will remain protected, and will not be automatically deleted during Loop Recording.)
It is recommended that you reformat a memory card after every time that images are transferred from it to a computer, or at least once a month. This keeps important elements of data and file structure clean, helping to prevent error messages and missing images.
Remember to always make backup copies of all important data stored on the device. The manufacturer's warranty does not cover loss of data resulting from user actions.
WDR (Wide Dynamic Range)
Recommend setting: On
When enabled, this feature automatically adjusts exposure settings to improve recording quality in particularly bright or dim environments, providing balanced lighting and clearer recorded video.
Exposure
Recommend setting: +0.0
Adjust the camera exposure value for brighter or darker recorded video, according to your preference.
Recording Audio
Recommend setting: On
You may choose to record audio with video, or turn off the microphone so that all recorded videos will be muted.
Alternatively, you can use a hot key shortcut for this feature. During Recording Mode, press the DOWN button to mute / unmute the microphone for video recording.
Date Stamp
You have the option to display the date and time in your videos. Note that the date and time stamp cannot be removed from videos if this feature was enabled at the time of recording.
Plate Number
Enable this feature to enter your vehicle plate number for video recording. The plate number will stamp in the video.
UP/Down – Change value
OK – Move to next segment
MENU – Save Settings
Gravity Sensing
Recommend setting: Low
This feature acts as an accelerometer, measuring physical and gravitational forces acting on the camera itself. In the event that such forces are detected, the device will perform an automatic file lock. (Locked video files cannot be erased during Loop Recording; they remain on the memory card until manually deleted or the card is reformatted.)
SYSTEM SETTINGS
On Video Recording Mode, Press REC to stop recording then press MENU button twice open System Settings Menu.
Date/ Time Setup
Use this setting to change the device's time and date:
UP/Down – Change value
OK – Move to next segment
MENU – Save Settings
Note: If the battery remains fully discharged or is removed from the device, the time and date will be reset.
Auto Power Off
Recommend setting: Off
When enabled, this option allows the device to shut down automatically if Recording Mode is not engaged.
Beep Sound
Recommend setting: On
This setting allows you to turn the device's button sound effect on or off.
Language
Use the following procedure to change the device's time and date. Language availability may vary depending on the region.
TV Mode
Recommend setting: NTSC
This feature will setup video output format.
Light Frequency
Recommend setting: US - 60Hz
This option should be set according to the power supply specification used in your country or geographical region (U.S. users should select the "60Hz" option).
Format
Performing this operation will format memory card. Note: any files in the memory card will be lost.
DST
Enable/Disable Daylight Saving Time
Screen Saver
Recommend setting: 15 Seconds
Select a time duration for the screen to stay lit after recording starts.
Alternatively, you can use a hot key shortcut for this feature. During Recording Mode, press and hold ![]() to turn the LCD screen on or off.
to turn the LCD screen on or off.
GPS
Recommend setting: MI/H
Select GPS speed unit (GPS Logger required)
Update time of GPS
This feature need GPS Logger connected, select a time zone to enable automatic update time of GPS.
Restore Default Factory Settings
Performing this operation will reset all your device's settings to their original values. Note: any user-customized settings will be lost.
Version
Device firmware version information.
PHOTO SETTINGS
On Photo Mode, Press MENU button once open System Settings Menu.
Resolution
Recommend setting: 5M
This option allows you to set the pixel resolution for captured images.
Capture Mode
Recommend setting: Single
With this feature you can set a timer for automatically capturing images.
Sequence Mode
Recommend setting: Off
This feature allows you to capture a sequence of 3 quick photos with one button press.
Quality
Recommend setting: Normal
This option allows you to set the quality level of captured images. (Lower quality images take up less space on the memory card.)
Sharpness
Recommend setting: Normal
This feature will automatically enhance captured images for a clearer, more distinct picture.
White Balance
Recommend setting: Auto
This setting allows you to adjust the lighting balance for different environments.
Color
Recommend setting: Auto
This feature allows you to choose a color effect for captured images.
ISO
Recommend setting: Auto
This setting enable you to adjust the camera's sensitivity to light when taking photos. The higher the number, the greater the light sensitivity.
Exposure
Recommend setting: +0.0
This setting allows you to adjust the brightness level of captured images.
Anti-Shaking
Recommend setting: Off
This feature enables the image stabilizer function to reduce blurring of captured images.
Quick Review
Enabling this feature will allow you to immediately view each captured image for a few seconds before taking the next photo.
Date Stamp
Recommend setting: Date/Time
This feature will automatically apply a date and/or time stamp to captured images.
Updating Firmware
Please note that the firmware does not need to be updated unless you are experiencing any issues. The firmware is put in place to fix any bugs or glitches that may occur during normal use.
The following procedure will allow you to use the Rexing website to update firmware for your V2 Dashboard Camera. This is necessary for enabling all available features on your device.
- Download the firmware file to your computer
- Unzip the file
- Format your memory card in your computer (or unit)
- Copy the firmware files to the root of your memory card
- Put card into camera
- Power camera on (make sure the camera is plugged in)
- The camera will update automatically. The screen will stay off but the status light will light up; it will take 30-60 seconds
![]()
After updating, format the memory card or it will flash every time- Do not disconnect power cord, hold power button to reboot unit

Playback Mode
You can play back recorded video on your device using the following steps:
- Press REC to stop recording
- Press MODE twice to switch from Recording to Playback Mode
- Press and hold the UP or DOWN button to navigate through the stored video files
- Press OK to start playback for the selected video
- Press OK again to pause playback
- Press MODE to stop playback
- FAST FORWARD: While video is playing, press the UP button one or more times to set fast playback speed (2X / 4X / 8X)
- FAST REWIND: While video is playing, press the DOWN button one or more times to set reverse playback speed (-2X / -4X / -8X)
Deleting Files
To delete one particular file:
- Press the UP or DOWN button to navigate through the stored video files
- Press MENU to view options for the highlighted file: Delete/Protect/Slide Show
- Press the DOWN button once to select "Delete"
- Press OK once to view options for "Current MOV" file or "ALL" files. Select "Current MOV"
- Press OK twice to delete file
To delete all files:
- Press on UP or DOWN button to navigate through the video files
- Press OK to enter "Video"
- Press MENU to view options for this file: Delete/Protect/Slide Show
- Press the DOWN button once to select "Delete"
- Press OK once to view delete options for "Current MOV" file or "ALL" files. Select "ALL" and press OK
- Press OK again to delete all files
PC Playback Function
Minimum System Requirements
Windows Media Player/QuickTime Media Player
OR any media player compatible with. MOV files
Accessing Video Files
Insert the SD card into your computer, or plug your camera into the computer USB port and select "Mass Storage" to access the video files.
General Troubleshooting
| Problem | Possible Cause | Solution |
| The captured image is not stored | Memory card may be full or malfunctioning Image not being saved before the device is powered off | Reformat memory card or replace with a new one Make sure to stop recording before shutting down |
| All buttons are not responding | Processing error or faulty device operation Memory card may contain errors, or is damaged | Press the RESET button to restart the camera Reformat memory card or replace with a new card Press the buttons firmly, or hold them in; it will not always respond to a quick hit. |
| Menu Button Not responding | Unit may be recording | Press REC to stop recording so you can access the menu |
| Device will not turn on | Battery may be depleted | Charge the battery for 3 hours. Make sure unit is off while charging. |
| Not holding charge | Battery may be depleted Power cord may be defective | Charge the battery for 3 hours. Make sure unit is off while charging. Turn on the unit, unplug it. If it turns off immediately, contact customer service for assistance with a replacement. |
| Unit keep rebooting | Battery may be depleted | Charge the battery for 3 hours. Make sure unit is off while charging. |
| SD Card Won't Stay In | SD card may not be compatible SD card may be too thin | Use your nail or a coin to push the SD Card in until it clicks Use a different SD Card |
| SD Card Not Recognized (Custer error) | SD Card needs to be formatted. | Format SD Card Use a different SD Card |
| Can't find Locked files | May have saved to the RO folder When you lock a file, it only saves the current recording. The remainder of the video may be in a separate file. | Check the SD Card RO Folder |
| Screen powers off unexpectedly | Screen Saver feature is enabled Low battery | Disable Screen Saver feature Charge the battery Restore to default settings |
| Keeps Turning off | SD Card may not be compatible Might not be getting continuous power. | Use a different SD Card Restore to default settings Get a replacement power cord |
| Screen Frozen | Memory card may defect | Try a new memory card |
| Unable to record videos | Memory card may be full If Loop Recording has been enabled, memory card may be corrupted | Check remaining space on memory card and delete files if necessary Reformat your memory card; if issue persists, replace with a new one Restore to Default Settings Make sure to hold the REC button in until the red light is blinking |
| Stops Recording after 20-40 minutes | Loop Recording off | Turn Loop Recording on |
| Stops Recording at random intervals | SD Card is not Compatible | Use a different SD Card Restore default settings |
| Not Looping | G sensor may be too high SD Card full | Put G sensor on lowest setting Format SD Card |
| SD Card is full | Need more space on SD Card | Make sure G-sensor is on lowest setting Clear some locked files Format SD Card |
| Stops Recording after 1-3 looped files | SD Card may not be compatible | Restore to default settings Use a different SD Card Replace power cord |
| "File error" is encountered when trying to play back pictures or video | Memory card may be corrupted with bad sectors | Reformat the memory card. |
| Hazy images | Lens may be dirty | Carefully clean dust or fingerprints from the lens with a microfiber cloth |
| Horizontal stripes appear on images | The Light Frequency setting is incorrect | Change light frequency setting to match the power supply used in your country or geographical location: US users should select the 60Hz option. |
| Auto On/Off Not working | Car charging port has continuous flow of power. | This feature can only work if it is being used in a charging port that turns off with the vehicle. |
| Losing/resetting date | Need to update Firmware. | Update firmware Turn off "Update time of GPS" |
| GPS not Connecting | GPS logger may be too close to the unit, causing interference with the signal. | Update Firmware Make sure GPS Logger is 5" from unit to not cause interference. |
Safety information
To prevent injury to yourself or others, or damage to your device, read all safety information before using.

Failure to comply with safety warnings and regulations can result in serious injury or death.
Rexing Dash Cam is not intended to be touched, modified, or calibrated while operating a vehicle. Rexing is not responsible for any damages resulting from the user's misuse of the camera.
Do not use damaged power cords or plugs, or loose electrical sockets. Faulty connections can cause electric shock or fire.
Do not touch the car charger with wet hands or disconnect the charger by pulling the cord. Doing so may result in electrocution.
Do not use a bent or damaged car charger. Doing so may cause electric shock or fire.
Do not touch your device with wet hands. Doing so may cause electric shock.
Do not short-circuit the charger or the device. Doing so may cause electric shock or fire, or cause the battery to malfunction or explode.
Use only manufacturer-approved chargers, accessories, and supplies.
- Using generic chargers may shorten the life of your device or cause the device to malfunction. They may also cause fire or cause the battery to explode.
- Use only the manufacturer-approved charger specifically designed for your device. Using an incompatible charger can cause serious personal injury or damage to your device.
- Rexing cannot be responsible for the user's safety when using accessories or supplies that are not approved by Rexing.
Do not drop the charger or device, or subject them to impact. Handle and dispose of the charger and device with care.
- Never crush or puncture the device.
- Never dispose of the device in a fire.
- Never place the device in or on heating devices, such as microwave ovens, stoves, or radiators. The device may explode if overheated. Follow all local regulations when disposing of a used device.
- Avoid exposing the device to high external pressure, which can lead to an internal short circuit and overheating.
Protect the device and charger from damage.
- Avoid exposing your device to excessive cold or heat. Extreme temperatures can damage the device and reduce the charging capacity and life of your device.
- Do not allow children or animals to bite or chew the device. Doing so can result in fire or explosion, and small parts can be a choking hazard. If children use the device, make sure they use the device properly.
- Never use a damaged charger.
Do not handle a damaged or leaking lithium ion (Li-Ion) battery. For safe disposal of your Li-Ion battery, contact your nearest authorized service center.

Failure to comply with safety precautions and regulations can result in property damage, serious injury or death.
Do not use your device near other electronic devices. Most electronic devices use radio frequency signals. Your device may interfere with other nearby electronic devices.
Do not use your device near other devices that emit radio signals, such as sound systems or radio towers. Radio signals from these may cause your device to malfunction.
Do not expose the device to heavy smoke or fumes. Doing so may damage the outside of the device or cause it to malfunction.
If you notice strange smells or sounds coming from your device, or if you see smoke or liquid leaking from the device, stop using the device immediately and take it to a Rexing Service Center. Failure to do so may result in fire or explosion.
For your own safety, do not operate the controls of this product while driving. The window mount is needed when using the recorder in a car. Make sure that you place the recorder in a location where it will not obstruct the driver's view.
Always keep the camera lens clean, and ensure that the lens is not blocked by any object or placed near any reflective material. If the car's windshield is tinted with a dark coating, recording quality may be affected.
Do not store your device in excessively hot, cold, damp or dry locations. Doing so may cause the screen to malfunction, result in damage to the device, or cause the battery to explode. Your device is recommended for use within a temperature range of -10°C to 70°C, and a humidity range of 10% to 80%.
If your device becomes overheated, allow it to cool down before use. Prolonged exposure of skin to an overheated device may cause lowtemperature burn symptoms, such as red spots or areas of darker pigmentation.
Install mobile devices and equipment with caution.
- Ensure that any mobile devices or related equipment installed in your vehicle are securely mounted.
- Avoid placing your device and accessories in or near an airbag deployment area. Improperly installed wired equipment can cause serious injury in a situation where airbags inflate rapidly.
Do not drop your device or subject your device to impact. If the device is bent, deformed or damaged, malfunction may occur.
Take care to maximum battery and charger life:
- Your device may wear out over time. Some parts and repairs are covered by the warranty within the validity period, but damage or deterioration related to the use of unapproved accessories is not.
Do not attempt to disassemble, repair, or modify your device.
- Any changes or modifications to your device can void your manufacturer's warranty. If your device needs servicing, take it to an authorized Rexing Service Center.
Clean your device and charger by wiping with a towel or eraser. Do not use chemicals or detergents. Doing so can discolor or corrode the outside of the device, and may result in electric shock or fire.
Do not distribute copyright-protected material. Doing so without the permission of the content owners may violate copyright laws. The manufacturer is not responsible or liable for any legal issues that result from the user's illegal use of copyrighted material.
Documents / Resources
References
Download manual
Here you can download full pdf version of manual, it may contain additional safety instructions, warranty information, FCC rules, etc.
Advertisement


Need help?
Do you have a question about the V2 and is the answer not in the manual?
Questions and answers