Rexing V2 PRO-AI User Manual
Hide thumbs
Also See for V2 PRO-AI:
- Getting started (6 pages) ,
- User manual (42 pages) ,
- User manual (45 pages)

Related Manuals for Rexing V2 PRO-AI


Summary of Contents for Rexing V2 PRO-AI
- Page 1 V2 PRO-AI User Manual The information in this manual is subject to change without notice. Rexing All Rights Reserved www.rexingusa.com...
-
Page 2: Month Warranty
Activate Your 18-Month Warranty Choose Your & FREE Gift! Activate within 30 days of purchase to claim your free gift and extend your limited 12-month warranty to 18 months. Scan The QR To Activate & Select Your Free Gift https://www.rexingusa.com/productreg/... - Page 3 We hope you love your new products as much as we do. If you need any assistance, or have any suggestions to help us improve, please contact us. care@rexingusa.com (877) 740-8004 Our Support team will respond to you as soon as possible. Always a surprise in Rexing. Check us out here. http://www.facebook.com/rexingusa/ http://www.instagram.com/rexingdashcam/ http://www.rexingusa.com/support/registration/...
-
Page 4: Package Contents
User Manual Safety Guide 安全ガイド The information in this manual is subject to change without notice. Rexing All Rights Reserved Rexing V2 Pro AI Dash Camera Cable Management Kit Power Cable Safety Guide Rear Camera with Rear Camera Cable User Manual... -
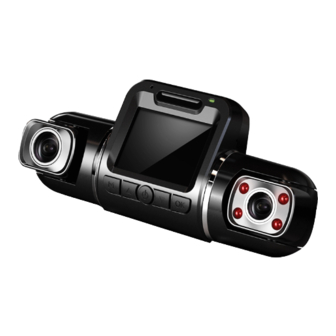
Page 5: Product Overview
Product Overview POWER 5 6 7 8 Power Port Audio Button Micro SD Card Slot Record/Confirm/Wi-Fi Button Rear Camera Port 330° Rotatable Cabin Cam with Infrared Lights Menu Button/Mode Button Power Indicator Screen View Switch Button 330° Rotatable Front Camera Power Button/Screen Button... -
Page 6: Button Function
Button Function Press to turn on or turn o the screen Press and hold to turn on/o the device manually Press to confirm a selection while in setting mode Press and hold 3 seconds to turn on/o the Wi-Fi feature Press the OK button to stop the recording first. -
Page 7: Camera Overview
Camera Overview QHD+FHD 02:13:12 FHD+FHD 00:00:39 ADAS 13:45 13:45 10/15/2021 10/15/2021 Recording Mode Microphone Recording (On) G-Sensor Sensitivity Recording Length Loop Recording Wi-Fi Remaining Available Space Resolution ADAS GPS Signal Front Camera Alignment Line When adjust the front camera, make sure Micro SD Card that this red line is aligned with the front Time... -
Page 8: Get Started
Get Started Step 1 Installing the Electrostatic Stickers 1.1 Prepare Your Windshield Thoroughly cleanse your windshield with either water or alcohol. Follow this by wiping it dry using a clean, dry cloth to ensure a spotless surface. 1.2 Position the Sticker Next, carefully peel off the protective film from the electrostatic sticker. - Page 9 Step 3 Install the Rear Camera Mount the rear camera as shown below. Use rear camera cable to connect the rear camera to the front camera. rear cabin front Step 4 Insert a Memory Card You will need to insert a memory card before recording. The dash cam supports Micro SD cards with a capacity of up to 512GB.
- Page 10 Connect to the Power and Format the Memory Card Connecting the power cable to the vehicle's 12V-24V DC outlet. Be sure to only connect using Rexing approved power cable that is designed and supplied specifically for use with your device. Using an incompatible charger can cause serious personal injury or damage to your device.
-
Page 11: Remove The Memory Card
DO NOT remove the memory card while the device is in operation, transferring, or accessing information. Doing so can result in data loss or corruption, or damage to the memory card or device. Rexing is not responsible for losses that result from the use of damaged memory cards,... -
Page 12: Basic Operations
Basic Operations Menu Settings Resolution The dash cam can record videos in two or three channels. Three-channel Mode: Front camera resolution: 1080p Cabin and rear camera video resolution: 2304x648 Two-channel Mode : Front camera video resolution: 1080p Cabin/Rear camera video resolution: 1080p Memory Card Size 1080p Resolution 720p Resolution... -
Page 13: Loop Recording
Loop Recording With the loop recording feature enabled, the device will continuously erase the oldest video as it records new videos. Note: Any locked video files on the memory card will remain protected, and will not be automatically deleted during loop recording. 1 Minute 3 Minutes 5 Minutes... -
Page 14: Record Audio
Record Audio You may choose to record audio with video, or not. G-Sensor If a change in gravitational forces is detected, such as in the event of a vehicular accident, the G-Sensor will send a signal to the camera and automatically place a file lock on the current video. - Page 15 Sensitivity Choose a desired sensitivity level for ADAS and LDW. Low Sensitivity Medium Sensitivity Sensitivity High Date/Time Use the following procedure to change the device’s time, date, and the date format. 09 / 28 / 2021 13 : 14 : 40 MM/DD/YY Auto Power O The dash cam will be powered o after a selected range of time.
- Page 16 Frequency This light frequency should be set according to the power supply specification used in your country or geographical region (U.S. users should select the "60Hz" option). Language There are multiple languages that are available to choose from the settings. English Français Español...
- Page 17 GPS Speed Units Select your preferred speed unit (KM/H, MPH) to view on the device and in the video. KM/H Screen Saver Select a time duration for the screen to stay lit after recording starts. 10 Minutes Speed Date Screensaver 1Minute 3 Minute 5 Minute...
-
Page 18: Default Setting
Note: With the Speed/Date screensaver selected, you may review the speed and date on the screen after 60 seconds without taking any actions on the device. 1:50 PM SEP .28 -TUESDAY Alternatively, you may also press the POWER button to turn the LCD screen on or o . - Page 19 Wi-Fi Connect Step 1 With your dash cam powered on, hold the OK navigation button to enable the Wi-Fi function. The Wi-Fi name (aka the SSID) and password for the dash cam should be displayed on-screen. Step 2 On your mobile device, navigate to your Wi-Fi settings. Connect to your dash cam's Wi-Fi by tapping its name when it appears.
- Page 20 Step 3 Once you're connected to the dash cam, open the Rexing Connect app on your mobile device. Please select "Keep Trying Wi-Fi" if you see the notification on the right. Step 4 In the app, hit the "Connect" button to connect to your dash cam, allowing you to access live view and view/download your recordings.
- Page 21 Easily download the app by scanning the QR code below or search via the App Store or Google Play. Wi-Fi Connect Troubleshooting If you bring up the Rexing connect app and cannot connect your phone to the dash cam please go to https://www.rexingusa.com/wifi-connect/...
-
Page 22: Gps Logger
GPS Logger You can then access this information while playing back your recordings using the GPS Video player (For Windows and Mac, available at gpsb.rexingusa.com). The dash cam will automatically search for the GPS signal once it’s connected to the power source. Press the MENU button twice and go to System Settings. - Page 23 Parking Monitor (Parking Surveillance Mode) Parking monitor provides surveillance on your parked vehicle. When the engine is o , the hardwire kit is used to provide continuous power and protect your car battery from being discharged. Option 1: Vibration Detection To enable the Parking Monitor, you'll need to connect it with a Smart Hardwire Kit (sold separately).
-
Page 24: Option 2: Motion Detection
WITHOUT connecting a smart hardwire kit. They may cause a malfunction. Option 2: Motion Detection To use this feature, you need to connect it with a Rexing Intelligent Hardwire Kit (sold separately). Make sure that the Parking Mode is turned o on your dash cam, otherwise it may cause a malfunction. -
Page 25: Video Playback
Video Playback To playback on a Computer Unplug the used MicroSD card and place it into a card reader Connect the card reader to the USB port of the computer. Open the removable disc and you will see the following file folders •... -
Page 26: Specifications
Specifications Class 10 or higher Micro SD card External memory (up to 512GB) Speaker Internal Internal high-sensitivity mic Video Format Photo Format Video Resolution UHD P24/QHD P30/THD P60/FHD P30/HD P60HDP30/FHD P30+FHD P30/HD/1.3M/VGA English, French, Spanish, German, Language Italian, Portuguese, Russian, Japanese G-SENSOR Supported Low/Medium/High/O Loop recording... -
Page 27: Troubleshooting And Faq
Troubleshooting and FAQ Problem Possible Cause Solution Images are not Memory card is full Format memory card or replace being saved or malfunctioning with a new one None of the Processing error or Press RESET to restart the faulty device operation. buttons are camera. - Page 28 Problem Solution Possible Cause Memory card Memory card isn't Use your nail or a coin to won't stay in compatible/thin push the memory card in until it clicks. Use a new memory card Memory card isn't Formatted the memory card. The memory card recognized If the issue persists, replace...
- Page 29 Problem Possible Cause Solution Loop Recording G-Sensor sensitivity Make sure the Gravity isn't functioning is too high/ card is full Sensing is set on low sensitivity Format the memory card. Auto On/O isn't The car charging port This feature can only work if it working has a continuous flow is being used in a charging port...
-
Page 30: Warranty And Support
Warranty & Support Warranty The Rexing V2 PRO-AI Dash Cam comes with a full 12-month warranty. If you register your product on our o cial site https://www.rexingusa.com/support/registration, you can extend the warranty to 18 months. Support If you have any questions regarding your product, please do not hesitate to contact us at care@rexingusa.com, or call us at... - Page 31 FCCID: 2AW5W-V2PRO This device complies with part 15 of the FCC Rules. Operation is subject to the following two conditions: (1) This device may not cause harmful interference, and (2) this device must accept any interference received, including interference that may cause undesired operation. Changes or modifications not expressly approved by the party responsible for compliance could void the user's authority to operate the equipment.
Need help?
Do you have a question about the V2 PRO-AI and is the answer not in the manual?
Questions and answers