Table of Contents
Advertisement
Advertisement
Table of Contents

Related Manuals for Arista DCS-7500-SUP2


Summary of Contents for Arista DCS-7500-SUP2
-
Page 3: Table Of Contents
Contents Contents Chapter 1: Overview................1 1.1 Scope............................1 1.2 Receiving and Inspecting the Equipment................1 1.3 Installation Process.........................1 1.4 Safety Information........................2 1.5 Obtaining Technical Assistance..................... 2 1.6 Specifications.......................... 3 Chapter 2: Preparation................7 2.1 Site Selection..........................7 2.2 Tools and Parts Required for Installation................8 2.3 Electrostatic Discharge (ESD) Precautions................ - Page 4 F.2.1 Removing Fabric Module Blank................71 F.2.2 Removing Fabric Module..................71 F.2.3 Installing Fabric Module..................72 F.2.4 Removing Service Provider 7500N Series Fan and Safety Guard......72 F.3 Touch Point Shield (Optional)....................72 F.3.1 Installing the Touch Point Shield................72 F.4 Supervisor Module........................73 F.4.1 Removing Supervisor Module Blank..............
-
Page 5: Chapter 1: Overview
Inspect the packing list and confirm that you received all listed items. Compare the packing list with your purchase 7500N Series Modular Switches order. Parts List provides a list of components included with the switch. -
Page 6: Safety Information
Refer to the Arista Networks Document Safety Information and Translated Safety Warnings available at: https://www.arista.com/en/support/product-documentation. Obtaining Technical Assistance Any customer, partner, reseller or distributor holding a valid Arista Service Contract can obtain technical support in any of the following ways: •... -
Page 7: Specifications
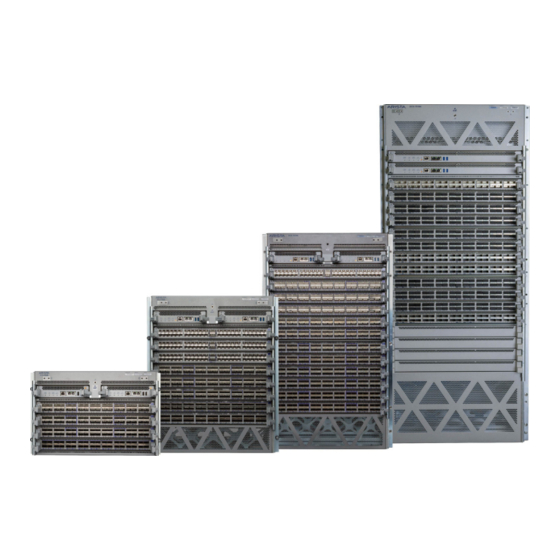
Overview Aucune pièce réparable par l'utilisateur à l'intérieur. Confiez toute réparation à un technicien qualifié. Specifications Modular Switch Specifications lists the specifications of Arista Data Center modular switches covered by this guide. Table 1: Modular Switch Specifications DCS-7504N DCS-7508N DCS-7512N... - Page 8 Table 2: 7500N Series Power Specifications lists power specifications of modular switch components. Table 2: 7500N Series Power Specifications Module Type Part Number Power Draw (Typical / {Hot} Maximum) Supervisor Modules DCS-7500E-SUP 47 W / 87 W 80 W / 120 W...
- Page 9 Overview DCS-7508R3-FM 280 W / 387 W Power Supply PWR-2700-DC-R (Fan Power) 43 W / 47 W 43 W / 47 W PWR-3KT-AC RED (Fan Power) PWR-3K-DC-RED (Fan 43 W / 47 W Power) 7504N Series System Full chassis loaded with 3150 W / 3400 W 2 DCS-7500E-SUP, 4 DCS-7504E-FM, 4...
- Page 10 12800 W / 14700 W / 15300 W 7512N Series System Full chassis loaded with 2 DCS-7500-SUP2, 6 Note: 7512N systems DCS75012R-FM, 12 support only 7500R DCS-7500R-36CQ-LC and 7500R3 Series Line cards. Full Chassis loaded 11600 W / 13300 W / 13900 W with 2 DCS-7500-SUP2, 6 DCS-7512R-FM, 9 DCS-7500R-36CQ-LC, 3...
-
Page 11: Chapter 2: Preparation
Chapter 2 Preparation The following topics are covered in this section: • Site Selection • Tools and Parts Required for Installation • Electrostatic Discharge (ESD) Precautions Site Selection The following criteria should be considered when selecting a site to install the switch: •... -
Page 12: Tools And Parts Required For Installation
Note: The accessory kit provides the required mounting brackets or shelf for each switch. • Power Requirements: Arista switches require a minimum number of operating power supplies in the top section of all chassis, AC or DC and for each power domain of switches with multiple power domains. -
Page 13: Electrostatic Discharge (Esd) Precautions
Preparation Two-post and Four-post Rack Mounts Table 5: Rack Component Requirements shows the rack components required for each of the modular switches. Table 5: Rack Component Requirements Switch Rack or Cabinet (standard 19" EIA) Rack Screws Rack Nuts Notes DCS-7504N 2-post installation 4-post installation DCS-7508N... -
Page 15: Chapter 3: Rack Mounting The Switch
Chapter 3 Rack Mounting the Switch The following topics are covered in this section: • 7504N and 7508N Rack Mounting • 7512N and 7516N Shelf Rack Mount Installation The accessory kit provides components for installing the switch in two-post and four-post racks. •... - Page 16 3.1.1.2 Inserting the Switch into the Rack (7504N) The rack mounting assembly is identical for all 7500N Series switches. 1. Move the chassis to the rack using a mechanical lift. If modules are inserted in the chassis, use the lift carefully to avoid damaging any components.
-
Page 17: Four-Post Rack Mount
Rack Mounting the Switch Figure 4: Attaching Flanges to the Rack Post 6. After completing the two-post installation, proceed to Cabling the Modular Switch. 3.1.2 Four-Post Rack Mount The switch is mounted onto a four-post rack by assembling a shelf into the rack, then placing the switch on the shelf. - Page 18 Figure 5: Left front post assembly: Four post rack mount M6 cage nut M6 nut Front Bracket M6 nut Switch Bottom M6 screw Shelf support Switch Top Front rack post 3. Repeat Step 1 on the right front rack post, assembling the parts at the same vertical level as those on the left rack post.
- Page 19 Rack Mounting the Switch Back bracket M6 screw M6 screw Rear rack post Shelf support Figure 6: Left rear post assembly and shelf support orientation Rear rack post Front rack post Shelf supports 5. Adjust the left shelf by sliding its components to fit between the front left and rear left rack posts, as shown in Figure 7: Adjusting the left shelf.
- Page 20 Figure 7: Adjusting the left shelf Rear rack post Left shelf Front rack post Figure 8: Both switch shelves installed 1 Left shelf 2 Rear rack post 3 Right shelf 4 Front rack post 3.1.2.2 Inserting the Switch into the Rack (7508N) The rack mounting assembly is identical for the 7504N and 7508N switches.
-
Page 21: 7512N And 7516N Shelf Rack Mount Installation
Rack Mounting the Switch 1. Move the chassis to the rack using a mechanical lift as shown in the following figure. Note: If modules are inserted in the chassis, use the lift carefully to avoid damaging any components. 2. Lift the chassis into the rack. Figure 9: Lifting the chassis 3. -
Page 22: Assembling The Shelf
3.2.1 Assembling the Shelf 1. For threaded racks, remove the plastic alignment spacers and use the 3 mm diameter alignment pins. Figure 11: Alignment Spacer Figure 12: Rack Mount Shelf Orientation 1 7512N Top (Front) 4 Cage nut locations 2 7516N Top (Front) 5 Switch Bottom 3 Rack (Rear - both switches) - Page 23 Rack Mounting the Switch Table 6: Cage Nut Locations on Rack Switch Cage Nut Locations 7512N Top hole 1st U (Front of the rack) Middle hole 2nd U Middle hole 4th U Bottom hole 5th U Top hole 9th U Middle hole 15th U Middle hole 17th U 7516N...
- Page 24 Figure 13: Left Front Post Assembly 1 For threaded rack, remove the plastic alignment spacer and use a 3 mm diameter alignment pin as shown. 2 Hook the alignment pin to the bottom hole of the 6th U from the bottom.
- Page 25 Rack Mounting the Switch Figure 14: Left Rear Post Assembly and Shelf Support Orientation 1 Install all four screws in the back. 6. Lift the shelf above the shelf supports installed on the left and right rack posts (step 2 and step 3). Align the holes and hook with the stubs on the brackets.
-
Page 26: Inserting The Switch Into The Rack
3.2.2 Inserting the Switch into the Rack The rack mounting assembly is identical for all 7500N Series switches. Illustrations in this chapter depict the mounting of an unpopulated 12-slot or 16-slot chassis. 1. Move the chassis to the rack using a mechanical lift... - Page 27 Rack Mounting the Switch Figure 16: Lifting the 12-slot Chassis 2. Carefully install the switch into the rack. Figure 17: Installing the Switch into the Rack...
- Page 28 Figure 18: Secure the Chassis to the Rack 3. Ensure the rack kit is firmly installed. 4. Secure the chassis by use of 10 rack screws attaching the ears of the chassis to the front flanges of the rack posts. 5.
-
Page 29: Chapter 4: Cabling The Modular Switch
• Connecting Line Card Modules and Cables Cabling the Power Supplies Before you begin, refer to the Arista Networks document Compliance and Safety Guide available at: https://www.arista.com/en/support/product-documentation. Important: Power down the switch: Remove all power cords from the power inlets. -
Page 30: Cabling Secondary Ground
Each power supply includes a fan that maintains proper power supply temperature and cools the supervisor modules. The appendices display the location of components for all switches described in this guide. Figure 19: Supported Power Supplies shows the supported power supplies for the 7500N family of switches. -
Page 31: Cabling The Ac Power Supply
Le - 48V et câbles de batterie-retour sont une paire courir à côté de l'autre et doivent être à peu près la même longueur. 4.4.1 DC Power Supplies The 7500N Series chassis supports two DC power supplies. • PWR-3K-DC-RED Power Supply. -
Page 32: Pwr-3K-Dc-Red Power Supply
Insulated wire -48V + RTN lug 1/2” Heat-shrink tubing 1/4” 5/8” • Figure 21: Ground Lug Wiring Termination (PWR-2700W-DC-R) 1 Insulated wire 3 5/16” Ø 2 Ground lug (right angle) 4 Heat-shrink tubing 2. Use agency-approved compression (pressure) lugs for wiring terminations with a single 5/16" mounting hole. -
Page 33: Dc Power Adapter Installation For Pwr-2700-Dc-R
Cabling the Modular Switch Figure 22: PWR-3K-DC-RED Power Supply 1 Status LED 3 Ejector 5 -48V terminal 2 Ground terminal 4 RTN terminal 1. Prepare the stranded wiring, see Wire and Lug Preparation. 2. Attach the power cable to the supply terminals. 3. -
Page 34: Connecting The Power Cable Lug To The Terminal Studs
2. Attach the ground cable to the ground stud. 3. Tightening Torque: 2.7 N-m (24 in.-lbs.) 4.5.2 Connecting the Power Cable Lug to the Terminal Studs 1. Prepare the stranded wiring, see Wire and Lug Preparation. 2. Remove the clear plastic cover protecting the terminal studs on the adapter by lifting the small center tab while sliding the cover off the adapter. - Page 35 Cabling the Modular Switch 1 Compression lugs 3 -48V 2 Compression lugs 4 RTN 5. Slide the cover over the terminal studs until it clicks into place. 1 Captive screw slots 6. Insert the adapter into the DC power supply.
-
Page 36: Power Supply Specifications
7. Tighten the two captive screws (on the bottom of the adapter) to the power supply module. Torque screws with #2 Posidriv to 2 N-m (17.7 in.-lbs.). 8. Attach the power cable to the DC power source. Important: Apply the ground connection first during installation and remove last when removing power. -
Page 37: Recommendations For Power Supply Usage
Power Supply Configurations , in the top section behind the supervisors. • For 8-slot and 12-slot chassis (grouped power supplies top and bottom), Arista recommends an equal number of power supplies in the top and bottom groups. • For the 16-slot chassis with two power domains, the power domain with the lowest number of power supplies prescribes the total power available, therefore, Arista recommends equal number of PSUs in each domain. -
Page 38: Connecting Supervisor Cables
• Each supply is wired to one feed, either A, or B. • The recommended installation is to alternate A, B feeds. In a four supply system configuration, you would wire ABAB, left to right. • All power supply slots must be filled with a powered supply (A or B), or a blank (X), or a non- powered power supply. - Page 39 Cabling the Modular Switch Figure 24: Supervisor DCS-7500E-SUP 1 Status LED 5 Fan module status LED 9 Active LED 2 USB ports 6 Fabric module status LED 3 Ethernet management ports 7 Linecard status LED 4 Serial console port 8 Power supply status LED Figure 25: Supervisor DCS-7500E-SUP 2 1 Status LED 5 Clock input port (optional)
- Page 40 • Console (Serial) Port: Connect to a PC with RJ-45 to DB-9 serial adapter cable. Default switch settings include: • 9600 baud • No flow control • 1 stop bit • No parity bits • 8 data bits The DCS-7516-SUP supervisor cards must be installed in one of the two slots designated for them in the DCS-7516N switch as shown in Figure 27: DCS 7516N Supervisor Slots.
-
Page 41: Connecting Line Card Modules And Cables
Flexion excessive peut endommager les câbles d'interface, en particulier les câbles optiques. Note: You must ensure that any open slots for modules, power supplies, etc. are covered by the appropriate “blank” plates. Check with your local Arista Networks representative if you have questions. -
Page 43: Chapter 5: Configuring The Modular Switch
Chapter 5 Configuring the Modular Switch Arista switches ship from the factory in Zero Touch Provisioning (ZTP) mode. ZTP configures the switch without user intervention by downloading a startup configuration file or a boot script from a location specified by a DHCP server. To manually configure a switch, ZTP is bypassed. The initial configuration provides one username (admin) accessible only through the console port because it has no password. - Page 44 11. When the management port IP address is configured, use this command to access the switch from a host, using the address configured in Step 9: ssh admin@192.0.2.8 Refer to the Arista Networks User Manual for complete switch configuration information.
-
Page 45: Appendix A: Status Indicators
Appendix A Status Indicators The following topics are covered in this section: • Supervisor Module • Line Card Module Indicators • Fabric Status Indicators • Power Supply Status Indicators Supervisor Module While the front panel of each switch can house two supervisors, switch operations require only one. Supervisors display switch component status and contain Ethernet management and console ports. - Page 46 Figure 30: Supervisor 7500-SUP 2 1 Status LED 5 Clock input port (optional) 9 Power supply status LED 2 USB ports 6 Fan module status LED 10 Active LED 3 Ethernet management ports 7 Fabric module status LED 4 Serial console port 8 Linecard status LED Figure 31: Supervisor 7500E-SUP 1 Status LED...
-
Page 47: Line Card Module Indicators
Status Indicators Component Activity Status LEDs LEDs located below the vents and left of the input ports display summary indicators for power supplies, fabric modules, fans, and line cards. Table 11: Component Activity LED States interprets the states of these indicators. When error conditions are indicated, refer to LEDs on the specified modules to determine the condition’s source. -
Page 48: Fabric Status Indicators
Line card has failed. The line card provides LEDs for each port module socket: • Each LED corresponds to a module. • A set of four LEDs correspond to each module. When the module is programmed as a 40G port, the first LED in the set reports status. -
Page 49: Power Supply Status Indicators
Status Indicators Figure 34: 7512N (left) and 7516N Fan Status and Fabric Status LEDs 1 Fabric status LED 2 Fan status LED Table 14: Fan Status and Fabric Status LEDs on Rear Panel interprets the states of the fan and fabric status LED. - Page 50 Figure 35: 7500N Power Supplies Note: The LEDs for the power supplies with three-LED status indicators are: • DC Good • Fault, and • Vin Good from top to bottom as shown above. Table 15: Power Supply Status LED States interprets the power supply setup for LED status indicators.
-
Page 51: Appendix B: Parts List
12- slot and 16-slot chassis Number of Power cords (C19 - C20 type) included Important: All provided power cables are for use only with Arista products. Câbles d’alimentation doivent être utilisés uniquement avec des produits de Arista. Warning:... -
Page 52: Parts Used In All Rack Mount Configurations
Parts Used in All Rack Mount Configurations B.1.1 Cables Table 17: Cables Provided in Accessory Kit Quantity Description RJ-45 Patch Panel Cables, 2 meters RJ-45 to DB9 Adapter Cable, 2 meters B.1.2 Getting-Started Booklet One 2-page document Two-Post Rack Mount Parts The following sections list the parts provided for the two-post rack mount installation. -
Page 53: Four-Post Rack Mount Parts For 4-Slot And 8-Slot Chassis
Parts List Figure 36: Two-Post Rack Mount Parts 1 Center-mount brackets (DCS-7508N only) 2 Center-mount brackets (DCS-7504N only) 3 M4x8 pan-head Phillips screws Four-Post Rack Mount Parts for 4-slot and 8-slot Chassis The following sections list the parts provided in the accessory kit for four-post rack mount installations of the 4- and 8-slot chassis. - Page 54 Quantity Description 7 (13) M6 Hex Nuts. 3 (9) M6 Cage Nut Square Hole Racks. M5 Hex Nuts. 11 (17) M5 pan-head Phillips screws. #12-24 Hex Nuts. 11 (17) #12-24 pan-head Phillips screws. #10-32 Hex Nuts. 11 (17) #10-32 pan-head Phillips screws.
-
Page 55: Four Post Rack Mount For 12-Slot And 16-Slot Chassis
Parts List Four Post Rack Mount for 12-slot and 16-slot Chassis The following sections list the parts provided in the accessory kit for four-post rack mount installations of the 12-slot and 16-slot chassis. Table 20: Four-Post Rack Mount Parts for the 12-slot and 16-slot Chassis Quantity Description Shelf (or cradle) - Page 56 Figure 38: Four-Post rack mount parts for the 12-slot and 16-slot chassis 1 Cradle 4 #10-32X5/8 pan-head 7 M6 cage nuts (for square Phillip screws hole racks) 2 Left telescoping arm 5 #12-24X5/8 pan-head 8 M6x16 pan-head Phillips Phillip screws screws 3 Right telescoping arm 6 M5X16mm pan-head...
-
Page 57: Appendix C: Front Panel
Appendix C Front Panel This appendix displays the front panel of all switches covered by this guide. Note: All devices are designed to fit in a 19” rack. Illustrations are not to scale. Figure 39: DCS-7504N Front Panel (fully populated) 1 Linecard ejector button 3 Supervisor ejector button 5 Ground... - Page 58 Figure 40: DCS-7508N Front Panel (fully populated) 1 Linecard ejector button 3 Supervisor ejector button 5 Ground 2 Linecard ejector handle 4 Supervisor ejector handle...
- Page 59 Front Panel Figure 41: DCS-7512N Front Panel (fully populated) 1 Linecard ejector button 3 Supervisor ejector button 5 Ground 2 Linecard ejector handle 4 Supervisor ejector handle...
- Page 60 Figure 42: DCS-7516N Front Panel (fully populated) 1 Linecard ejector button 3 Supervisor ejector button 5 Ground 2 Linecard ejector handle 4 Supervisor ejector handle...
-
Page 61: Appendix D: Rear Panel
Appendix D Rear Panel This appendix displays the rear panel of all switches covered by this guide. Figure 43: DCS-7504N Rear Panel (fully populated) 1 Fabric module screw 4 Chassis ground 7 Ground 2 Fabric module ejector 5 PSU 8 Ejector button handle 3 Fabric module status 6 Release lever... - Page 62 Figure 44: DCS-7508N rear panel (fully populated) 1 PSU bottom row (PS5) 6 Fabric module 11 Power cord clip (optional) 2 Power cord clip (optional) 7 Fabric module ejector 12 Status LEDs (PS1) handles 3 Status LEDs (PS5) 8 Chassis ground 13 Ejector button (secondary) 4 Ejector button...
- Page 63 Rear Panel Figure 45: DCS-7512N Rear Panel (fully populated) 1 PSU bottom row (PS7) 6 Fabric module 11 Power cord clip (optional) 2 Power cord clip (optional) 7 Fabric module ejector 12 Status LEDs (PS1) handles 3 Status LEDs (PS7) 8 Chassis ground 13 Ejector button (secondary)
- Page 64 Figure 46: DCS-7516N Rear Panel (fully populated) 1 Power domain 2 (PSU11- 4 Fabric module PSU20) 2 Fabric module ejector 5 Fabric module status handles LEDs 3 Chassis ground 6 Power domain 1 (PSU1- (secondary) PSU10)
-
Page 65: Appendix E: Line Cards
The 48 port 1/10GbE SFP+ line card has 48 SFP+ ports. Having 48 ports of SFP+ ports allows this line card the flexibility to utilize any existing Arista SFP+ optic or direct attach cables, and to support both 1Gb and 10Gb speeds. - Page 66 2 10G port LEDS DCS-7500E-12CM-LC The 12 x 100G MTP/MPO line card provides high density 100G using Arista Multi-speed Ports (MXP) with embedded optics. The MXP ports use 100GBASE-SR10 (Short Range) transceivers and are fully compatible with any standards compliant 100GBASE-SR10 ports. Each MXP port can be enabled in single 100Gb, triple 40Gb or twelve 10Gb Ethernet mode for up to 12 –...
- Page 67 Line Cards 100GbE the card allows each port to operate in a choice of 4 x 10GbE (using 40GbE optics), 40GbE, or 100GbE. 1 Status LED 2 40/100G port LEDS DCS-7500E-48T-LC The 48 port RJ45 10GBASE-T wire-speed line card has 48 ports of RJ45 ports that supports 10Gb speeds.
- Page 68 1 Status LED 2 Port LEDS DCS-7500R-36Q-LC The 36 port QSFP+ line card allows for a wide range of flexibility in a mixed 10G/40G environment. All QSFP+ ports can operate as either a single 40Gb Ethernet port. Additional interface flexibility is possible, with up to 24 ports able to support 4x10G mode and 6 ports of 1x100G mode.
- Page 69 Line Cards 1 Status LED 2 100G port LEDS DCS-7500R2-36CQ-LC The 36 port QSFP100 line card allows 36 x 100G of wire rate performance. 1 Status LED 2 Port LEDS DCS-7500R2A-36CQ-LC The 36 port QSFP100 line card allows 36 x 100G of wire rate performance. 1 Status LED 2 100G ports DCS-7500R2M-36CQ-LC...
- Page 70 2 100G port LEDs DCS-7500R2AM-36CQ-LC The 36 port QSFP100 line card allows 36 x 100G of wire rate performance. 1 Status LED 2 100G port LEDs DCS-7500R2AK-36CQ-LC The 36 port QSFP100 line card allows 36 x 100G of wire rate performance. 1 Status LED 2 100G ports DCS-7500R2AK-48YCQ-LC...
- Page 71 Line Cards 1 Status LED 2 CFP2 port DCS-7500R3-36CQ-LC and DCS-7500R3K-36CQ-LC The line card can support up to 36 100G ports or 72 50G ports. 1 Status LED 2 100G port LEDS DCS-7500R3-24P-LC The line card can support 24, wire speed 400G OSFP ports or up to 96 100G ports with breakout cables and optics.
-
Page 73: Appendix F: Maintenance And Field Replacement
Appendix F Maintenance and Field Replacement This appendix describes the process for replacing switch components. The following topics are covered in this section: • Power Supplies • Fabric and Fan Module (Fabric Module) • Touch Point Shield (Optional) • Supervisor Module •... -
Page 74: Removing Ac Power Supply
F.1.2 Removing AC Power Supply Perform the following steps to remove an AC power supply. 1. Put on a grounded, anti-static ESD strap. 2. Lift the retaining clip up and unplug the cable (if present). Figure 47: Unseat Power Supply 1 Status LED 3 Ejector button 2 Release lever... -
Page 75: Installing Dc Power Supply
Note: For NEBS-compliant Service Provider installations, refer to Removing Service Provider 7500N Series Fan and Safety Guard. Contact your Arista representative if needed. The fabric and fan modules are hot-swappable. They are accessible from the rear of the switch (Rear Panel). -
Page 76: Installing Fabric Module
8. Use the show environment cooling command to further verify normal operation. F.2.4 Removing Service Provider 7500N Series Fan and Safety Guard ESD GROUNDING STRAP ADDITION This product must be grounded. Never defeat the ground conductor or operate the equipment in the absence of a suitably installed ground conductor. -
Page 77: Supervisor Module
Maintenance and Field Replacement 2. Match the six screws on the Touch Point Shield to the holes on the chassis and screw in the Touch Point Shield). Figure 48: Installing the Touch Point Shield (7512N) 1 ESD port 3 Ground cable going up 2 Ground cable going down Supervisor Module The supervisor modules are hot-swappable. -
Page 78: Installing Supervisor Module
F.4.3 Installing Supervisor Module You must make space for installing the module by removing an existing one (Removing Supervisor Module) or removing a blank (Removing Supervisor Module Blank) from a supervisor module slot available on the switch. Perform the following steps to install the module. 1. -
Page 79: Appendix G: Taiwan Rohs Information
Appendix G Taiwan RoHS Information This appendix provides Taiwan RoHS information for switches covered by this guide. For Taiwan BSMI RoHS Table, go to https://www.arista.com/assets/data/pdf/AristaBSMIRoHS.pdf.
Need help?
Do you have a question about the DCS-7500-SUP2 and is the answer not in the manual?
Questions and answers