Table of Contents
Advertisement
Advertisement
Table of Contents

Related Manuals for DIEBOLD NIXDORF K31


Summary of Contents for DIEBOLD NIXDORF K31
- Page 1 DN Series K30/K31 Operator Manual 01750337353B...
-
Page 2: Table Of Contents
Special notice ........................1-2 Warning indication......................1-2 Notices ..........................1-3 Safety indication.........................1-4 2 Device overview ......................... 2-1 Device type ........................2-1 DN Series K30/31 overall view...................2-1 Internal layout........................2-2 Explanatory drawing of moving parts .................2-5 3 Basic operation .......................... 3-1 Basic operation ........................3-2 3.1.1 Opening/closing the device door................. 3-2 3.1.2... - Page 3 Environmentally and recycling-friendly product development ......7-3 7.3.2 Saving energy ..................... 7-3 7.3.3 Disposing of used consumables ................. 7-3 7.3.4 Labels on plastic case parts................7-3 7.3.5 Returning, recycling and disposing of used units and consumables ....7-3 Copyright © 2019, Diebold Nixdorf 01750337353B...
-
Page 4: Introduction
The company shall not be liable for any direct or indirect losses caused by the preceding reasons. Copyright © 2019, Diebold Nixdorf 01750337353B... -
Page 5: Special Notice
The product is only applied to the area with non-tropical climate for safety operation. • Please adopt the power supply meeting specification requirement. The power supply which does not meet specification requirement in connection may lead to product damage. Copyright © 2019, Diebold Nixdorf 01750337353B... -
Page 6: Notices
• Please do not contact product with any liquid, inflammable object, or corrosive object so as to avoid damaging the product by short circuit, disaster, and surface corrosion. Copyright © 2019, Diebold Nixdorf 01750337353B... -
Page 7: Safety Indication
Otherwise, the power supply shall be immediately turned off, and the device requires the repairing personnel to repair, or contact the supplier. • Some parts may generate heat during operation and should only be touched when it is cooled. Copyright © 2019, Diebold Nixdorf 01750337353B... -
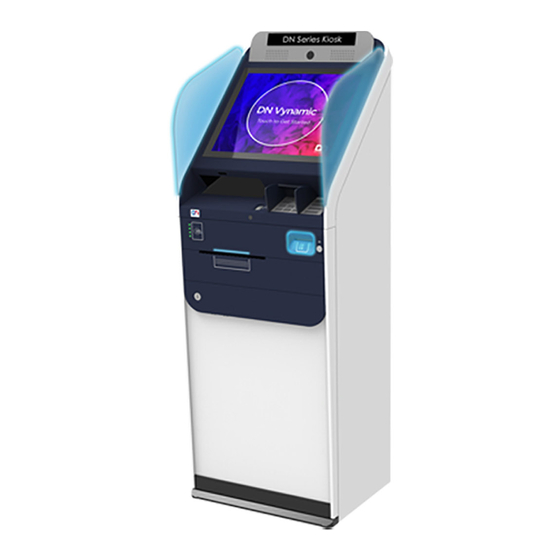
Page 8: Device Overview
This equipment is operated by special software in the connected system unit (computer). Device type The following types of equipment can be provided: • DN Series K30 is equipped without a document scanner • DN Series K31 is equipped with document scanner. DN Series K30/31 overall view... -
Page 9: Internal Layout
The equipment consists of the cabinet, cover and front door, and the layout is as follows when aperture is open: Body proximity sensor Barcode reader Display 19“ & Touch screen or Display Operation panel Fingerprint reader Copyright © 2019, Diebold Nixdorf 01750337353B... - Page 10 Forms printer TP20 Audio controller Printer control panel USB hub Power supply unit Customer relay Power distributor Special electronics Paper tray 1 ON/OFF and SOP button Personal computer Document scanner Paper tray 2 Motorized card reader Copyright © 2019, Diebold Nixdorf 01750337353B...
- Page 11 Device overview NFC card reader Card reader indicator Headset jack Maintenance keyboard TP20 shutter Copyright © 2019, Diebold Nixdorf 01750337353B...
-
Page 12: Explanatory Drawing Of Moving Parts
The following figure shows the moving parts of the system, including the front door, cover, back door, forms printer, the component tray, paper box 1 and 2. Upper cover Paper tray 1 Forms printer TP20 Paper tray 2 Handle for printer movement Back door Front door Copyright © 2019, Diebold Nixdorf 01750337353B... -
Page 13: Basic Operation
Otherwise, it will damage the equipment and cause personal injury, and strong shocks may result in death; ● Before the disassembly or installation of equipment parts, do a system shutdown and power off. Copyright © 2019, Diebold Nixdorf 01750337353B... -
Page 14: Basic Operation
Insert the key into the key hole. Turn the key clockwise as far as possible (see arrow) to open the front door Closing steps of front door Close the front door Turn the key back Copyright © 2019, Diebold Nixdorf 01750337353B... -
Page 15: Lifting Up/Pushing Down The Customer Panel Cover
Cover closing steps Depress the gas spring lock and then pull down the cover edge with hands until it falls and fits with the equipment body. Copyright © 2019, Diebold Nixdorf 01750337353B... -
Page 16: Operations Of Back Door
Fix the screw by rotating it clockwise. 3.1.4 3.1.4 Rotate the printer Opening steps of the printer Hold the green handle of the printer with right hand, and press the latch button. Meanwhile, uplift the forms printer. Copyright © 2019, Diebold Nixdorf 01750337353B... -
Page 17: Pulling Out/Pushing In The Device Carriage
Meanwhile, pull out the forms printer. Push-in steps of forms printer Ensure the customer panel cover is raised. Hold the green handle of the forms printer with right hand. Meanwhile, push the forms printer, and it is tightened. Copyright © 2019, Diebold Nixdorf 01750337353B... -
Page 18: Pulling Out/Pushing In The Pull-Out Paper Tray
When adding new papers, do take out all papers in the paper box firstly, and then stack papers orderly. Do not unfold papers. This can prevent multiple papers from entering the product and thus reduce the possibility of paper jam. Use only undamaged papers without the wrinkle and fold. Copyright © 2019, Diebold Nixdorf 01750337353B... - Page 19 Peel off the package of paper box, open the induction hole of paper quantity, put it into the drawer, and packaging carton and drawer hole coincide. Paper tray 1 on the top; paper tray 2 to the lower. Copyright © 2019, Diebold Nixdorf 01750337353B...
- Page 20 Insert into channel 1 under the printer, and the papers will be automatically aligned. The first sheet must be torn off at the folding edge so that it has a straight edge. Copyright © 2019, Diebold Nixdorf 01750337353B...
- Page 21 2 above, and the pa- pers will be automatically aligned. Hold the green handle of the printer with right hand, and press the latch button. Meanwhile, push in the forms printer. Copyright © 2019, Diebold Nixdorf 01750337353B...
-
Page 22: Description Of Status Light/Indicator Light
– paper is ready and operational (paper inside, no error) off – path is empty or has an error TP20 Paper Status LED will be controlled by the TP20 forms printer. Status will be changed after printer initialization. Copyright © 2019, Diebold Nixdorf 3-10 01750337353B... -
Page 23: Taking Paper Out From The Reject Bin
Taking paper out from the reject bin Pull out the device carriage. The paper (1) in the reject bin can be seen behind the printer. Take out paper from the reject bin. Push in the device carriage. Copyright © 2019, Diebold Nixdorf 3-11 01750337353B... -
Page 24: Switching The Device On/Off
To be able to operate the device the following switches must be pressed: ● The power switch on the power distributor must also be switched on. Open the device door (see section "Opening/closing the device door"). Copyright © 2019, Diebold Nixdorf 3-12 01750337353B... -
Page 25: Switching The Device On
Basic operation 3.4.1 3.4.1 Switching the device on Shortly press the ON/OFF button (1) and the device is switched on. Copyright © 2019, Diebold Nixdorf 3-13 01750337353B... -
Page 26: Switching The Device Off
Press and hold the ON/OFF button (1) shortly, to switch the device off defined (op- tional). NOTE The device is in its standby mode when the red LED (2) is illuminated. Copyright © 2019, Diebold Nixdorf 3-14 01750337353B... -
Page 27: Insert Of Identification Card
Volume adjustment method DN Series equipment can adjust the volume (11 levels) of the equipment by a button, which is on the right side of the front door of the system, as shown in the following figure. -
Page 28: Reading 2D Barcode
The scanning area of 2D barcode is above the document scanner and is parallel to the barcode reader lens. Place 2D barcode in the center of barcode reader. Adjust forward and backward distance. Copyright © 2019, Diebold Nixdorf 3-16 01750337353B... -
Page 29: Maintenance Keyboard Operating Instructions
Remove the two fixing screw from the front of the PC. Pull out the PC. Hold on keyboard. Insert the keyboard cable (USB cable) into an empty USB (at the behind side of the PC) interface of the system unit. Copyright © 2019, Diebold Nixdorf 3-17 01750337353B... -
Page 30: Customer Connection Box
Customer connection box 3.9.1 3.9.1 Functions of customer connection box USB DN Series K30/K31 includes a customer connection box USB, as shown in the following figure. Combining with the application software, the customer connection box can realize the following func- tions: •... -
Page 31: Wiring Diagram
Wiring diagram Relay 1 Relay 3 Remote status indicator Relay 2 Relay 4 Input port 3.9.4 3.9.4 Example of user feedback information For example, input port 2: Contact crossover = generate the feedback information. Copyright © 2019, Diebold Nixdorf 3-19 01750337353B... -
Page 32: Position Of The Type Label
Basic operation 3.9.5 3.9.5 Position of the type label Copyright © 2019, Diebold Nixdorf 3-20 01750337353B... -
Page 33: Forms Printer Tp20
Two paper paths (to increase the paper supply or to process other printed forms) • Optional blackening unit for TP20 (TRU) only on project base NOTE All functions described in this section are performed while the device is open (see the sec- tion "Basic Operation"). Copyright © 2019, Diebold Nixdorf 01750337353B... -
Page 34: Function Elements And Controls Tp20
Locking/release lever for the printer drum Paper path 1 cover Printer drum Printer control panel Thermo array Grip of document feed unit Locking/release knobs for the thermo array Paper path 2 Locking/release lever of document feed unit Copyright © 2019, Diebold Nixdorf 01750337353B... -
Page 35: Printer Control Panel
If the printer is equipped with two paper paths, paper can only be fed into rear paper path 1 if there is no paper in paper web 2. The marking must be on the rear upper left side. Copyright © 2019, Diebold Nixdorf 01750337353B... - Page 36 Feed the paper until it is drawn in automati- cally. The paper format is recognized auto- matically via the marking. If the paper moves backward and forward several times, this is for the purpose of hori- zontal alignment. Copyright © 2019, Diebold Nixdorf 01750337353B...
-
Page 37: Removing Paper
The status display for device messages is located on the printer's control panel. A flashing display indicates that an error has occurred; a static display indicates a normal operating sta- tus or signals a warning. Copyright © 2019, Diebold Nixdorf 01750337353B... -
Page 38: Error Messages And Warnings
All of the LEDs on the two 7-segment displays are activated briefly when starting the printer (LED test) Power-up test active. The end of the power-up test is indicated by the right-hand decimal point flashing briefly Printer is ready for operation Copyright © 2019, Diebold Nixdorf 01750337353B... - Page 39 (collecting tray) documents. Check whether the printer drum is open. Flashing Paper jam reject tray / blacken- Check the transition from the ing unit printer drum (collecting tray) to the reject tray and blackening unit. Copyright © 2019, Diebold Nixdorf 01750337353B...
- Page 40 (65° C / 149 ° F) / not opera- temperature if necessary (e.g. tional. Abort the transaction if prevent direct sunlight). necessary Flashing Paper jam in the output trans- Eliminate paper jam. port area Copyright © 2019, Diebold Nixdorf 01750337353B...
-
Page 41: Malfunctions
Firmware loaded, character generator (font) missing No firmware, no character generator (font) loaded PGA file not loaded Malfunctions If any other messages occur, please contact the system administrator or the service department of your local DIEBOLD NIXDORF branch office. Copyright © 2019, Diebold Nixdorf 01750337353B... -
Page 42: Eliminating A Paper Jam In The Drum
Try to eliminate the paper jam initially by pressing the EJECT key (1). If this is not possible, proceed as follows: Press the green lever (1) on the drum cover. Fold the drum cover downwards (2). Copyright © 2019, Diebold Nixdorf 4-10 01750337353B... - Page 43 If necessary, remove the documents from the document reject tray (see the section "Basic Opera- tion"). • Press the TEST key on the printer control panel to initiate a test print (see the section "Initiating a test print"). Copyright © 2019, Diebold Nixdorf 4-11 01750337353B...
-
Page 44: Eliminating A Paper Jam In The Document Feed
• Remove the paper from the document feeds (see the section "Removing paper"). Press the green levers on the document feed unit inwards (see 1). Fold the document feed unit downwards (2). Copyright © 2019, Diebold Nixdorf 4-12 01750337353B... - Page 45 Re-insert the paper (see the section "Loading paper"). The printer resets automatically. • Press the TEST key on the printer control panel to initiate a test print (see the section "Initiating a test print"). Copyright © 2019, Diebold Nixdorf 4-13 01750337353B...
-
Page 46: Remedying Poor Print Quality/Paper Jams Caused By Marking Errors
You can then tilt the thermo array forward. Remove any remaining paper from the paper path and the blade area. Remove paper dust from the thermo array (1) by using a cleaning cloth and some iso- propyl (order number: 01750104065). Copyright © 2019, Diebold Nixdorf 4-14 01750337353B... - Page 47 • Press the TEST key on the printer control panel to initiate a test print (see the section "Initiating a test print"). If this does not improve print quality, contact the service department. Copyright © 2019, Diebold Nixdorf 4-15 01750337353B...
-
Page 48: Initiating A Test Print
4.5.4 4.5.4 Initiating a test print Press the TEST key (1) on the printer control panel to initiate a test print. 4.5.4.1 4.5.4.1 Test document TP20 The test document may look as follows: Copyright © 2019, Diebold Nixdorf 4-16 01750337353B... - Page 49 2nd paper path available: "Y" (=yes), "N" (=no) Add. transport ID Additional transport ID: "Terminal", "Cash Indoor", "Cash Outdoor", "None", "Unknown" Blackening unit available: "Y" (=yes), "N" (=no) (TRU = Thermo Reject Unit) Copyright © 2019, Diebold Nixdorf 4-17 01750337353B...
- Page 50 "C" (mark C center), "D", (mark D), "CL" (mark C available left in narrow printing unit), "CR" (mark C available right in wide printing unit) Page counter Page counter, number of cut documents Copyright © 2019, Diebold Nixdorf 4-18 01750337353B...
-
Page 51: Cleaning And Care
Use the following cleaning agents: Order number 01750057331 Air duster 01750104065 Cleaning cloth with isopropyl The ordering addresses can be found in the appendix. • Switch the device on (see the section "Basic Operation"). Copyright © 2019, Diebold Nixdorf 4-19 01750337353B... -
Page 52: Paper Specifications
Single-ply Z-folded Customer-specific Thermo-sensitive front surface imprints TP20: Printed side: Color printing suitable for thermo paper Type: Printing permitted except in the area of the paper marks, see the de- tailed "Paper specifications" Rear: Copyright © 2019, Diebold Nixdorf 4-20 01750337353B... - Page 53 Forms printer TP20 NOTE Specific parameters are released for all Diebold Nixdorf papers, which must be activated. Please contact your local Diebold Nixdorf branch office for activation. Copyright © 2019, Diebold Nixdorf 4-21 01750337353B...
-
Page 54: Card Reader Chd V2Cu
The device can handle the following cards: Magnetic cards: ISO/IEC 7810/ID-1, 7811-1/2/6 (read and write) ISO 7811-6 HiCo (read) Chip cards: ISO/IEC 7816-1-3 (protocol T = 0, T = 1) EMV Version 4.0 (EMV = Europay, Mastercard, Visa) Copyright © 2019, Diebold Nixdorf 01750337353B... -
Page 55: Controls
Card reader CHD V2CU Controls Standard version Wheel for transporting the cards manually Shutter lever to operate the shutter manually Card insertion slot SAM module mounting Copyright © 2019, Diebold Nixdorf 01750337353B... - Page 56 Card reader CHD V2CU ACT version Wheel for transporting the cards manually Shutter lever to operate the shutter manually Card insertion slot SAM module mounting Lever to release an arrested ID card Copyright © 2019, Diebold Nixdorf 01750337353B...
-
Page 57: Security Access Module (Sam)
Open the fascia first, and pull the printer carriage as far as possible out of the device (see the chap- ter“Basic operation”, section “Opening / closing the device doors”). Swing the cover foil forward (1). Copyright © 2019, Diebold Nixdorf 01750337353B... - Page 58 Swing the SAM module cover of the module base forwards (2). Assure the right position of the SAM module (1) and insert it into the SAM module cover with the contacts pointing forwards as shown in the illustration (2). Copyright © 2019, Diebold Nixdorf 01750337353B...
-
Page 59: Removing An Arrested Id Card
NOTE This section only applies to the ACT version Switch the DN Series K30/K31 off (see chapter "Basic Operation"). Open the fascia and pull the printer carriage as far as possible out of the device (see the chap- ter“Basic operation” , section “Opening / closing the device doors”). - Page 60 If an ID card is no longer present or only fragments of the arrested ID card are available, get the card reader checked by the service department. Switch on the system (see chapter "Basic Operation"). Close the DN Series K30/K31. NOTE We recommend conducting an ID card transaction to check the card reader.
-
Page 61: Inserting An Id Card
The insertion of the ID card depends on the installation position of the card reader. The ID card can be inserted in the following way: Installation position: track facing down Insert the ID card into the card reader as shown in the picture. Copyright © 2019, Diebold Nixdorf 01750337353B... -
Page 62: Depositing Retained Id Cards
Every 20,000 transactions or every 6 months Cleaning utilities Part number Wincor Nixdorf wet cleaning card 01750016388 NOTE The necessary cleaning procedure depends on the installation site and the connected de- gree of contamination. Copyright © 2019, Diebold Nixdorf 01750337353B... -
Page 63: Cleaning Procedure
Card reader CHD V2CU Cleaning procedure In case the DN Series K30/31 features a service and operation function choose your cleaning function and perform the cleaning procedure as described. In case there is no service or operating function available, perform the cleaning procedure as explained below. -
Page 64: Troubleshooting
Card reader CHD V2CU Troubleshooting • Switch the DN Series K30/K31 off (see chapter "Basic Operation"). • Open the fascia of the system and pull the printer carriage as far as possible out of the device (see the chapter“Basic operation”, section “Opening / closing the device doors”). -
Page 65: 5.10 Card Reject Box
The card reader transports retained ID cards into the card reject box (see following illustration). The card reject box holds approx. 40 cards. The position of the card reject box is behind the card reader. Copyright © 2019, Diebold Nixdorf 5-12 01750337353B... -
Page 66: Cleaning Method
According to the dirt degree Cleaning products: Make the cleaning cloth a little wet Diebold Nixdorf cleaning kit Display screen cleaning Cleaning interval: According to the dirt degree Cleaning products: Cloth without fluff is slightly wet with water Copyright © 2019, Diebold Nixdorf 01750337353B... -
Page 67: Document Scanner Cleaning
Nature of printing paper: Single-sided, Z shape folding Type of printing paper Single-sided thermal paper: Thermal sensitivity: ≤ 10 mJ/mm² Weight per unit area of printing paper: 80 or 130 g/ m²(± 5 g/m²) Paper size: A4 breadth Copyright © 2019, Diebold Nixdorf 01750337353B... -
Page 68: Appendix
200VA Active power: 115W 150W Power factor: 0.74 Leakage current: <3.5 mA <3.5 mA Protection Class: Connection type of the system (wall socket)*: Country-specific safety plug Degree of protection according to EN 60529: IP20 Copyright © 2019, Diebold Nixdorf 01750337353B... -
Page 69: Approved Cleaning Materials
Diebold Nixdorf screen cleaning wipes Wet and dry cleaning set for removal of paint application (vandalism) Universal cleaning cloth Diebold Nixdorf air duster, (400 ml) Pure high pressure gas, CFC-free, for removal of loose dust and dirt particles 7.2.2 7.2.2... -
Page 70: Environmental Protection
Please do not stick any labels on plastic case parts since that would make recycling more difficult. 7.3.5 7.3.5 Returning, recycling and disposing of used units and consumables Details regarding the return and recycling of used units and consumables can be ob- tained from your local branch office. Copyright © 2019, Diebold Nixdorf 01750337353B... - Page 71 DIEBOLD NIXDORF 5995 Mayfair Road | North Canton, OH 44720 | United States © 2019 Diebold Nixdorf, Incorporated. All Rights Reserved.
Need help?
Do you have a question about the K31 and is the answer not in the manual?
Questions and answers