
Subscribe to Our Youtube Channel
Related Manuals for DIEBOLD NIXDORF BEETLE/iSCAN EASY eXpress Plus


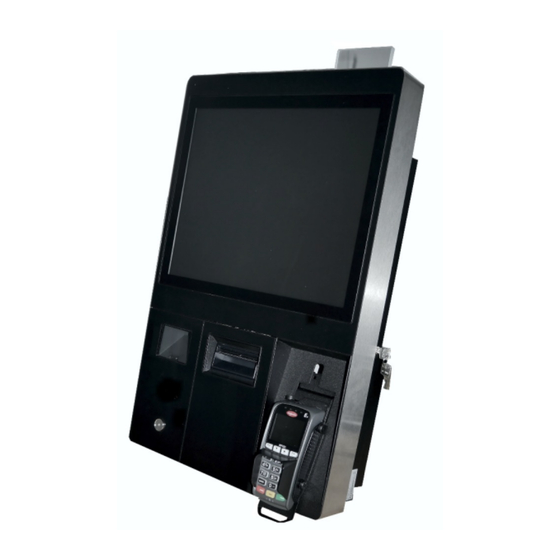
Summary of Contents for DIEBOLD NIXDORF BEETLE/iSCAN EASY eXpress Plus
- Page 1 BEETLE /iSCAN EASY eXpress Self-Checkout System Integration Manual (January 2018)
- Page 2 All of the product names mentioned in this document are registered trademarks. Copyright © Wincor Nixdorf International GmbH, 2018 All rights, including rights to full or partial translation, reprinting and transmission or copying by any means, are reserved. Offenders are liable to payment of damages. All rights, including those granted by registration of a patent, utility model or design, are reserved.
-
Page 3: Table Of Contents
Contents Notes ..........................1 Technical Data ........................2 System ............................2 Dimensions (mm) ......................3 Back Side 15” and 19” Version ....................3 15” Version ..........................4 15“ Version with Table Stand ...................... 5 19” Version ..........................6 19“ Version with table Stand ...................... 6 Bottom side .......................... -
Page 5: Notes
BEETLE /iSCAN EASY eXpress Integration Manual Notes Find further informations in the BEETLE /iSCAN Express+ installation manual on the Diebold Nixdorf Internets. Use an angled power cord when installing the unit in the table adapter or when mounting it on a column or wall. -
Page 6: Technical Data
Integration Manual BEETLE /iSCAN EASY eXpress Technical Data System Mains input voltage 100-240 V~ / 60-50Hz Power consumption 1.4-0.7A Power typical ca. 55W Power max. ca. 87W Power standby ca. 1.5W Weight 15” Version 28 Kg Weight 19” Version 30 kg Operating temperature Ambient temperature: 5°... -
Page 7: Dimensions (Mm)
BEETLE /iSCAN EASY eXpress Integration Manual Dimensions (mm) Back Side 15” and 19” Version... -
Page 8: 15" Version
Integration Manual BEETLE /iSCAN EASY eXpress 15” Version... -
Page 9: 15" Version With Table Stand
BEETLE /iSCAN EASY eXpress Integration Manual 15“ Version with Table Stand... -
Page 10: 19" Version
Integration Manual BEETLE /iSCAN EASY eXpress 19” Version 19“ Version with table Stand... -
Page 11: Bottom Side
BEETLE /iSCAN EASY eXpress Integration Manual Bottom side Device with open door Service area... -
Page 12: Vertical Mounting
Integration Manual BEETLE /iSCAN EASY eXpress Vertical mounting The BEETLE /iSCAN EASY eXpress+ may be installed vertically or at an angle of up to 23° from the ver- tical. Danger of entering liquids! When mounted vertically in a restaurant environment, a suitable device must be used to prevent drinks from being deposited on the appliance. -
Page 13: Ventilation Of The System
BEETLE /iSCAN EASY eXpress Integration Manual Ventilation of the system Keep the ventilation openings of the unit free to ensure good ventilation. This avoids excessive tem- perature rise. Even if you want to install the device, it is imperative that you maintain the minimum distances indi- cated below and ensure reliable ventilation. - Page 14 Integration Manual BEETLE /iSCAN EASY eXpress Observe the specified minimum clearances for reliable ventilation! Always keep the ventilation slots clear of obstructions to ensure proper air circulation and prevent overheating. 15“ Version 19“ Version 150mm 60mm 50mm 50mm...
-
Page 15: System Suspension
BEETLE /iSCAN EASY eXpress Integration Manual System suspension 4 positions for fastening with screws with a diameter of 6mm 4 positions for fas- tening with hook, a additional fixation with screws is necessary! -
Page 16: Cabeling Of External Devices
Integration Manual BEETLE /iSCAN EASY eXpress Cabeling of external devices Covers for the cabeling of external devices On the bottom side of the device there is an opening on the right and left side, which is closed by covers. One of the apertures allows cable entry with edge protection. The apertures can be exchanged for each other. -
Page 17: Installation Of Additional Peripherals
BEETLE /iSCAN EASY eXpress Integration Manual Installation of additional peripherals The housing of the BEETLE /iSCAN EASY eXpress+ has two M4 threads on each side of the body for attaching extensions, such as holders for hand-held scanners, advertising media etc., on both sides of the body. - Page 18 Integration Manual BEETLE /iSCAN EASY eXpress...
-
Page 19: Pole And Wall Mounting
BEETLE /iSCAN EASY eXpress Integration Manual Pole and Wall mounting Dimensions 9.1.1 Optional bottom plate 9.1.2 Pole bottom hole pattern... -
Page 20: Pole With 15" Beetle /Iscan Easy Express
Integration Manual BEETLE /iSCAN EASY eXpress 9.1.3 Pole with 15” BEETLE /iScan EASY eXpress+ 9.1.4 Pole with 19” BEETLE /iScan EASY eXpress+ and optional basket- shelves on both sides, pole light, coupon box and bottom plate... -
Page 21: Pole With 19" Beetle /Iscan Easy Express+ And Optinal Basket Scale Front
BEETLE /iSCAN EASY eXpress Integration Manual 9.1.5 Pole with 19” BEETLE /iScan EASY eXpress+ and optinal basket scale front 9.1.6 Wallmount with 15” BEETLE /iScan EASY eXpress+... -
Page 22: Wallmount With 19" Beetle /Iscan Easy Express
Integration Manual BEETLE /iSCAN EASY eXpress 9.1.7 Wallmount with 19” BEETLE /iScan EASY eXpress+... -
Page 23: Assembling Instructions: Pole Mounted Self Checkout
BEETLE /iSCAN EASY eXpress Integration Manual Assembling Instructions: pole mounted self Checkout 9.2.1 Self-Checkout with floor cabling The installation including the floor mounting has to be carried out by a trained technician after the assessment and evaluation of the constructional conditions on site. Mounting kit contains: 4x impact anchor M10 4x hexagon head screw DIN 933 M10x60-8.8... - Page 24 Integration Manual BEETLE /iSCAN EASY eXpress 3. Position the pole above the floor cable outlet ensuring that cables can be guided through the hole in the middle of the bottom plate. All 4 holes need to be on solid ground. 4.
- Page 25 BEETLE /iSCAN EASY eXpress Integration Manual 5. Slide all necessary cables (power cable, LAN cable, etc.) through the opening in the base plate posi- tioned above the floor cable out- let. Now align the base plate in the position over the drilled holes with the dowels. Fix the pole securely to the ground with the enclosed hexagon head- screws.
- Page 26 Integration Manual BEETLE /iSCAN EASY eXpress 7. Screw in the both upper M6x10 pan head screws to the half of their length. 8. Set the kiosk chassis on the pole by placing the openings in the housing onto the hooks and the upper screws of the pole [1].
- Page 27 BEETLE /iSCAN EASY eXpress Integration Manual 9. Move the cables into the housing of the EASY eXpress and secure them with cable ties like cable tie PLP1.5S-M to the pole on the inside hole pattern. For connection of the cables to the EASY-eXpress please see chapter 9 of BEETLE /iScan...
-
Page 28: Self-Checkout With Floor Cabling With Optional Bottom Plate
Integration Manual BEETLE /iSCAN EASY eXpress 10. Mount the optional bas- ketshelves/basketscales/cou- pon-box/pole light and apply the backpanel in reverse order of step 2 and proceed with ap- plying frontpanel in reverse order of step 1. For connec- tion of the system pleas follow chapter 14.1 of the installa- tion manual. -
Page 29: Mark The 4 Holes As Bearing Points
BEETLE /iSCAN EASY eXpress Integration Manual 2. Mark the 4 holes as bearing points. Do not mark or drill bearing points on the floor cable outlet! Caution: The kiosk with optional bottom plate needs to be screwed to the floor to avoid un- wanted moving on e.g. -
Page 30: Self Checkout With Over-Floor Cabling
Integration Manual BEETLE /iSCAN EASY eXpress Slide all necessary • cables (power cable, LAN cable, etc.) through the opening in the base plate positioned above the floor cable outlet. Now align the pole with base plate in the position over the drilled holes with the dowels. - Page 31 BEETLE /iSCAN EASY eXpress Integration Manual Slide all necessary cables • (power cable, LAN cable, etc.) through the opening at the bottom of the pole Follow step 7-10 of chapter • 12.1...
-
Page 32: Assembling Instruction: Wall-Mounted
Integration Manual BEETLE /iSCAN EASY eXpress Assembling Instruction: Wall-mounted 9.4.1 Requirements The installation including the wall-mounting has to be carried out by a trained technician after the assessment and evaluation of the constructional conditions on site. For the integration of the BEETLE /iScan EASY eXpress in the wallmount 2 persons are required. -
Page 33: Mounting The Wall-Adapter
BEETLE /iSCAN EASY eXpress Integration Manual 9.4.3 Mounting the wall-adapter 5. Drill the holes for the suitable dowels as given in the hole pattern of the wallmount. Then screw in the lower two screws into the dowels in the wall. Hook the wallmount to the •... - Page 34 Integration Manual BEETLE /iSCAN EASY eXpress Screw in the upper two • M6x10 pan head screws to the wallmount to the half of their length Place the closed BEETLE • /iScan EASY eXpress in the wallmount and push it to the top end first and then let it slide down till it sits on the hooks and the both screws of...
-
Page 35: Block Diagram
BEETLE /iSCAN EASY eXpress Integration Manual Block diagram Optional components are marked green. - Page 37 Diebold Nixdorf D-33094 Paderborn Order No: 01750301911A...
Need help?
Do you have a question about the BEETLE/iSCAN EASY eXpress Plus and is the answer not in the manual?
Questions and answers