Table of Contents
Advertisement
Quick Links
Advertisement
Table of Contents

Related Manuals for Compliance West MegaPulse Defib-5


Summary of Contents for Compliance West MegaPulse Defib-5
- Page 1 MegaPulse series Impulse Tester Instruction Manual COMPLIANCE WEST...
- Page 2 To fully appreciate all the features of your new instrument, we suggest that you take a few moments to review this manual. Compliance West USA stands by your instrument with a full one-year warranty. If the need arises, please don't hesitate to call on us.
-
Page 3: Table Of Contents
Table of Contents An Introduction to Impulse Testing with the MegaPulse series tester ............1 Safety Precautions........................1 Test Personnel........................1 Testing Area........................1 Safety Techniques......................2 Using the MegaPulse Impulse Tester...................2 Introduction and Specifications........................5 Introduction..........................5 Figure 1..........................5 Specifications ..........................5 Table 1. MegaPulse series specifications..............6 Operation..............................7 Setting up your Tester ........................7 AC Line Voltage Requirements ....................7... -
Page 5: An Introduction To Impulse Testing With The Megapulse Series Tester
Section 1 An Introduction to Impulse Testing with the MegaPulse series tester The impulse test is designed to simulate impulse surges which occur in everyday life due to nearby lightning strikes, switching transients, and other high-frequency faults on the power distribution network. -
Page 6: Safety Techniques
Safety Techniques The high voltage circuit of the MegaPulse can be shut off at any time by turning OFF the rear power switch. Note that there are residual voltages inside the equipment that may take up to 5 minutes to bleed off to safe levels. - Page 7 Note that the peak amplitude of the measured output waveform is proportional to the voltage that is read on the front panel of the MegaPulse, but it will always be somewhat lower. This is because the meter on the MegaPulse is measuring the voltage on the main impulse storage capacitor (C1 in Figure 1). This voltage will intentionally dissipate to some extent before reaching the output leads.
-
Page 9: Introduction And Specifications
Specifications This manual contains complete operating, maintenance and calibration instructions for the Specifications for each individual model in the Compliance West USA MegaPulse series MegaPulse series are listed in Table 1. Impulse Tester. Component designations referenced in Table 1 are as shown in Figure 1. -
Page 10: Table 1. Megapulse Series Specifications
Current duration (D) is defined (per ANSI/IEEE C62.41 and other standards) as the time between virtual origin and the time of the 50% pint on the tail. The virtual origin is the point where a straight line between the 10% and 90% points on the leading edge of the waveform intersects the I = 0 line. ∂ Indicates Models using Compliance West USA IEC 65 Switch. Note 1: 32 uF capacitor in series with a 500uH inductor having a DC resistance no greater than 10 Ohms. -
Page 11: Operation
Fuse Replacement Compliance West USA. The container should There is a user-replaceable fuse (F1) located on include the following: the rear panel of the instrument. It is located •... -
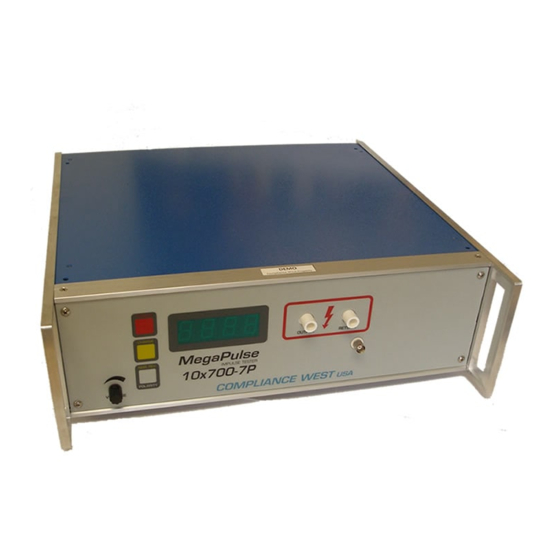
Page 12: Figure 2. Controls, Indicators, Connectors – Megapulse Series Front Panel
Figure 2. Controls, Indicators, Connectors – MegaPulse series Front Panel... -
Page 13: Table 2. Controls, Indicators, Connectors – Megapulse Series Front Panel
ITEM NAME FUNCTION VOLTAGE Adjust Knob Turn Clockwise to increase the output voltage after the CHARGE button has been pressed. Turn the knob fully counterclockwise (lowest voltage setting) before the start of each test, and after the end of each test. POLARITY switch The polarity switch only operates when the CHARGE indicator is lit, i.e. -
Page 14: Figure 3. Controls, Indicators, Connectors – Megapulse Series Rear Panel
Figure 3. Controls, Indicators, Connectors – MegaPulse series Rear Panel... -
Page 15: Table 3. Control, Indicators, Connectors – Megapulse Series Rear Panel
Table 3. Control, Indicators, Connectors – MegaPulse series Rear Panel ITEM NO. NAME FUNCTION Appliance Inlet / Fuse holder / Use supplied cordset to connect Tester to appropriate source of supply. Fuse holder provides access for Power Switch Fuse replacement, and the Power Switch is used to turn the tester ON and OFF. Fuse replacement warning / Specifies replacement fuse and required supply voltage. -
Page 16: Figure 4. Controls, Indicators, Connectors – Megapulse Series Breakdown Detection
Figure 4. Controls, Indicators, Connectors – MegaPulse series Breakdown Detection... - Page 17 ITEM NO. NAME FUNCTION Pass Light Indicates no Arc and Leakage Current through insulation lower than Sensitivity Control’s setpoint. Fail Light Indicates Arc and/or Leakage Current through insulation higher than Sensitivity Control’s setpoint. Sensitivity Control Sets Pass/Fail point for the Breakdown Detection circuit. See “Breakdown Detection Circuit” for details in control operation.
-
Page 18: Initial Checkout Procedure
Adjust the VOLTAGE knob so that the Initial Checkout Procedure front panel LED display is reading a The following procedure will verify that the voltage that is suitable for the measuring Tester is working correctly. We recommend that instrument that is being used. Push the red this procedure be conducted periodically to TRIGGER button, and view the resulting ensure proper operation of the Tester. -
Page 19: Testing
shunt. Connect the ends of the test leads to the optional 1000:1 voltage sense jack on the front panel (if provided). Alternatively, connect appropriate measuring instrument (typically an oscilloscope with a high-voltage probe) to the equipment under test in order to monitor the results of the impulse test. -
Page 20: Testminder Operation
changed. For best results, a known good and a TestMinder Operation known bad sample of the insulation system can be used to set the Sensitivity Control. If these TestMinder computer operation is described in a samples are not available, a starting setpoint can specific manual included with your tester, if so be set with the supplied calibration resistor (50 equipped. -
Page 21: Defib-5 Checkout And Operation
result in repeatability problems during the test driven by the impedance of the oscilloscope, setup. We recommend using the 50 ohm resistor which is typically 1 MegOhm. In this case, the at first, until the operator is familiar with the decay time would have a time constant of 1 MegaPulse operation;... - Page 22 Figure D-1: Defib-5 Connections 1...
- Page 23 Figure D-2: Y1 Y2 Test Output 1...
-
Page 25: Technical Assistance
Section 4 Technical Assistance For Technical Assistance Phone: (800) 748-6224 Technical Assistance is available from Compliance West USA between the hours of 8:30 AM and 5:00 PM Pacific Time. Compliance West USA 7915 Silverton Ave. #315 San Diego, CA 92126... -
Page 27: Maintenance And Calibration
Section 5 Maintenance and Calibration WARNING THESE SERVICE INSTRUCTIONS ARE FOR USE BY QUALIFIED PERSONNEL ONLY. TO AVOID ELECTRIC SHOCK, DO NOT PERFORM ANY SERVICING OTHER THAN THAT CONTAINED IN THE OPERATING INSTRUCTIONS UNLESS YOU ARE QUALIFIED TO DO SO. Introduction This section of the manual contains maintenance The manufacturer is also available for calibration... -
Page 28: Cleaning
Grasp the top of the enclosure clamshell Plug the Output and Return test leads in and lift it off the front and rear panels. to the jacks on the front panel. Connect the ends of the test leads to the All calibration adjustments are now optional 1000:1 voltage sense jack on the accessible. -
Page 29: Calibration Procedure
capacitor (C1 in Figure 1). This voltage Repeat steps 14 through 17, except this will intentionally dissipate to some extent time toggle the POLARITY switch so before reaching output leads. that the REV indicator is lit. Note that the Therefore, it is important to measure the impulse waveform will now be a negative peak amplitude of the output waveform, pulse, so it will probably be necessary to... - Page 30 plugged into the tester. Also verify the location of the positive (red) and negative (black) Voltage Output Test Points, which are used to measure the output voltage. Plug in the power cord. Adjust the front panel VOLTAGE knob fully counterclockwise to the minimum position. Turn the rear-panel power switch ON.
-
Page 31: Figures 4-9
origin is the point where a straight line between Figures 4-9 the 10% and 90% points on the leading edge of the waveform intersects the I = 0 line. Figures 4 to 9 follow this page. The individual figures may not be identified with the Figure number, but are in order as follows: Figure 4: Actual measured waveform of the Voltage rise time.
Need help?
Do you have a question about the MegaPulse Defib-5 and is the answer not in the manual?
Questions and answers