Advertisement
- 1 DESCRIPTION
- 2 THINGS TO KNOW
- 3 INTRODUCTION
- 4 FILTERS SUPPLIED
- 5 FIRST INSTALLATION
- 6 BREWING AN ESPRESSO USING GROUND COFFEE
- 7 BREWING AN ESPRESSO USING COFFEE PODS
- 8 PREPARING A CAPPUCCINO
- 9 DISPENSING HOT WATER
- 10 HOW TO LOWER THE BOILER TEMPERATURE
- 11 AUTOMATIC SWITCH-OFF FUNCTION
- 12 CLEANING AND MAINTENANCE
- 13 DESCALING
- 14 IN CASE OF MALFUNCTION
- 15 Documents / Resources
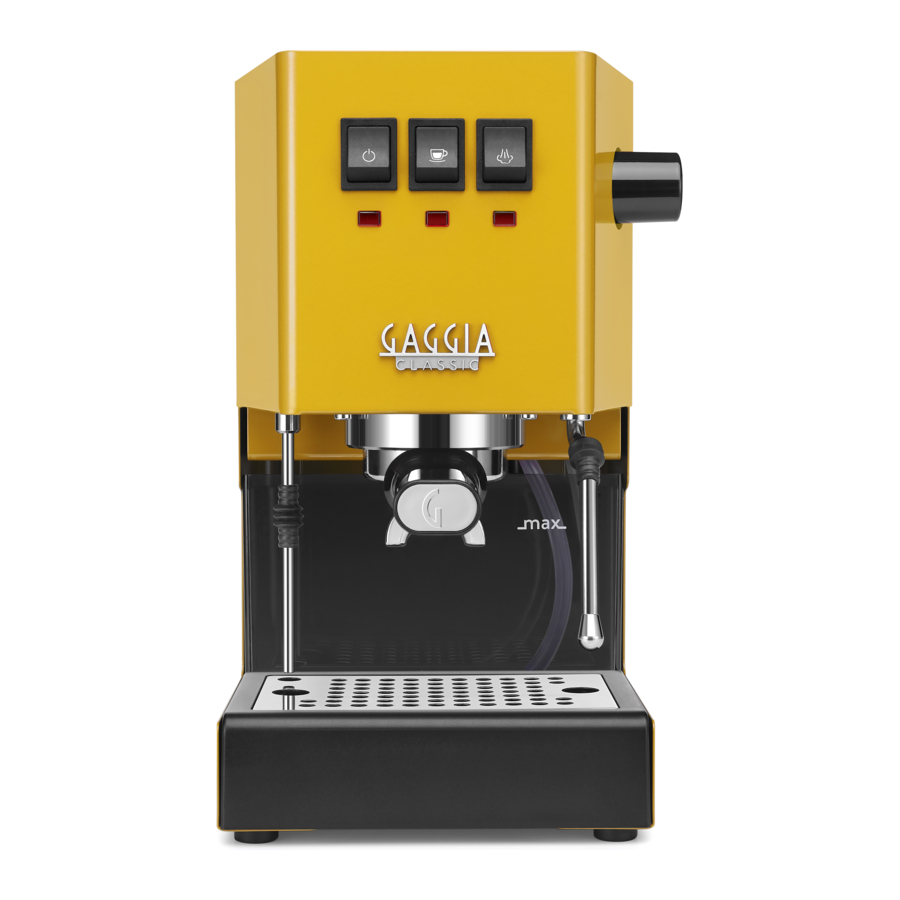
DESCRIPTION
When using Classic Coffee machine, it is important to pay attention to every detail, just like when using a professional bar machine: the machine must be very hot and the filter holder must always be installed to maintain a homogeneous temperature in the brew unit. Furthermore, the coffee must be ground finely but not too much, the right amount of ground coffee must be placed in the filter and it must be pressed with just the right intensity, to prevent the coffee from coming out too quickly, but not too much as this would make brewing very difficult.
The new Classic Evo features a filter holder unit and a steam wand just like professional machines.
OVERVIEW OF THE MACHINE (FIG.1)

- Brew button
- On/off button
- Steam button
- Power indicator light
- Coffee temperature light
- Steam temperature light
- Steam / hot water knob
- Coffee brew unit
- Drain pipe
- Grill
- Drip tray
- Water tank lid
- Water tank (removable)
- Hot water/steam wand with rubber tip
- "Crema perfetta" filter for 1 and 2 cups.
To be used only with a frothing jet device (Fig.1-16) - Frothing jet device
- Filter holder
- Traditional filter for 2 cups
- Traditional filter for 1 cup / pods
- Measuring scoop
- Tamper
- Power cord and plug
- Steam nozzle
THINGS TO KNOW
- The taste of espresso depends on the amount and type of coffee used.
- The particular taste of a coffee bean depends on several factors, but its taste and aroma are the result of the roasting process. Coffee beans roasted for a longer time and at higher temperatures are darker in colour. Darker coffee beans release more flavour than lighter ones. You will find different coffee qualities on the market. Each type of roasting is characterised by a mixture of beans roasted at a certain temperature and with a certain type of aroma. There are decaffeinated coffees containing only 2% caffeine. Try different types of coffee with your espresso machine. You will probably discover a better aroma than the one previously used.
- Pump espresso machines require a finely ground blend. Be sure to purchase the desired blend with a grinding degree that can be used with espresso machines. It is preferable to use a grinder mill rather than a blade mill because the latter releases too much coffee powder and produces an irregularly ground blend.
- It would be ideal to grind the coffee just before use. Do not forget that it must be ground for the pump espresso machine.
- We recommend storing the coffee in an airtight container, in a cool, dry place, away from heat sources.
- Real espresso can be recognised by its dark colour, rich taste and typical "natural cream".
- Cappuccino is a special combination of espresso and hot frothed milk. It can be served with a sprinkling of cinnamon, nutmeg or cocoa.
- Serve espresso coffee immediately after preparing it.
- Serve espresso in coffee cups and cappuccino in breakfast cups.
INTRODUCTION
Before using your machine for the first time, please read the safety manual provided separately very carefully and store it for future reference.
FILTERS SUPPLIED
"Crema perfetta" filter for 1 or 2 cups (Fig.5).

This filter is already installed on the filter holder and allows you to obtain an espresso with cream even when using the machine for the first time.
 Note. This filter must be used only together with the frothing jet device. (Fig.1-16).
Traditional filter for 2 cups (Fig.7).

Traditional filter for 1 cup / single-dose pod (Fig.6).

These filters are like those used in professional bar machines and require manual skills and experience.
Note. These filters must not be used with the frothing jet device. (Fig.1-16).
Our advice is to start with the "crema perfetta" filter and then, once you have acquired manual skills and experience, move on to traditional ones to appreciate real barista use.
FIRST INSTALLATION
- Remove the water tank cover (Fig.2) and fill it with cold water up to the MAX level of the tank (Fig.1-13).

- Insert the plug into the outlet at the back of the machine (Fig.9) and the other end of the power cord into a wall socket with suitable voltage. Press the on / off button (Fig.1-2), the power indicator light turns on(Fig.1-4).


Loading the circuit.

Do not activate the brew button without loading the circuit first.
- Place an empty cup under the brew unit (Fig.1-8) without inserting the filter holder and press the brew button (Fig.1-1). You will hear the sound of the pump being activated and after a few seconds the water will start to come out of the brew unit (Fig.1-8).
- After filling the cup (about 150cc), press the brew button again (Fig.1-1).
Note.The pump self-primer might not work temporarily because of an "air bubble".
If water does not come out of the brew unit (Fig.1-8), continue as follows:
- Place a cup under the steam wand (Fig.1-14).
- Turn the knob (Fig.1-7) counter-clockwise to open the steam/hot water dispensing knob.
- Press the brew button (Fig.1-1) to activate the pump.
- After a few seconds, water will start coming out of the steam wand. Dispense about a cup of water.
- Close the steam/hot water dispensing knob (Fig.1-7).
- Press the brew button again (Fig.1-1).
![information]() Note. After priming the circuit and when hot water is dispensed from the steam wand, there might be some water left inside. To drain it, we recommend dispensing some steam for a few seconds.
Note. After priming the circuit and when hot water is dispensed from the steam wand, there might be some water left inside. To drain it, we recommend dispensing some steam for a few seconds.
When using for the first time or after a period of inactivity of more than 2 weeks.
Note. The water dispensed during this process must be thrown away and is not suitable for food use. If the container fills up during the cycle, stop dispensing water and empty the container before resuming the operation.
- Rinse the water tank (Fig.2) (see section "Cleaning the Water Tank") and fill it with fresh drinking water.
- Place a container under the steam wand (Fig.1-14).
- Open the steam/hot water knob (Fig.1-7) slowly by turning it counter-clockwise.
- Press the brew button (Fig.1-1) and the steam button (Fig.1-3).
- Dispense the whole water tank content through the steam wand.
- To stop dispensing, press the brew button (Fig.1-1) and the steam button (Fig.1-3) again.
- Close the knob (Fig.1-7) by turning it clockwise.
- Fill the water tank with fresh drinking water (Fig.2).
- Insert the filter holder into the brew unit from the bottom (Fig.3) and turn it from left to right until it locks into place (Fig.4).


- Place a suitable container under the filter holder.
- Press the brew button (Fig.1-1) and dispense all the water in the tank.
- Once the water tank is empty, stop dispensing by pressing the brew button again (Fig.1-1) and empty out the container.
- Remove the filter holder from the unit by turning it from right to left and rinse it with fresh drinking water.
- The machine is now ready for use.


BREWING AN ESPRESSO USING GROUND COFFEE
The filter holder supplied features the "crema perfetta" filter to prepare one or two coffees.
If the "crema perfetta" filter is used without the frothing jet device, the machine will squirt out the coffee, which may result in burns.
Note. If you prefer to use the traditional filter (Fig.6/7), remove both the "crema perfetta" filter (Fig.5) and the frothing jet device (Fig.1-16).
To brew the first coffee, it is necessary to preheat the filter holder first (Fig.1-17):
- Insert the filter holder (Fig.1-17) into the brew unit (Fig.1-8) with a 45° movement to the left and turn it to the right to lock it in place. The filter holder handle must be perpendicular to the machine or slightly tilted towards the right.
- Place a large cup under the filter holder (Fig.1-17) and press the brew button (Fig.1-1)
- After the cup of water has been filled (about 150cc), press the brew button again and wait a few minutes for the machine to reach the correct temperature with the filter holder inserted.
Note.Any residual water inside the filter holder must be removed before filling the filter with ground coffee.
Continue preparing the espresso:
- Remove the filter holder (Fig.1-17) and fill it with ground coffee using the measuring scoop provided with the machine (Fig.1-20).
Add one measuring scoop of coffee for each cup.
Note.It is recommended to ask roasting companies for finely ground coffee suitable for use in coffee machines or to purchase it from large retailers.
- Press the coffee using the dedicated tamper (Fig.1-21). The coffee must be pressed evenly to obtain a well levelled and flat surface.
- Remove any coffee residues from the edge of the filter holder (Fig.1-17).
- Insert the filter holder (Fig.1-17) into the brew unit (Fig.1-8) with a 45° movement to the left and turn it to the right to lock it in place. The filter holder handle must be perpendicular to the machine or slightly tilted towards the right.
- Wait until the indicator light turns on (Fig.1-5).
- Press the brew button (Fig.1-1).
- When the cups are 3/4 full, press the brew button again (Fig.1-1).
The coffee will be more or less intense depending on the amount of water used and, if prepared following the correct procedure, it will have the typical hazelnut/brown coloured "natural cream". At the end of the dispensing, the excess water will be eliminated from the drain pipe (fig.11).

To brew another espresso, slowly and carefully remove the filter holder, moving it to the left. Be careful not to burn yourself with the water left on the coffee grounds. Once the filter holder has been removed, some water will still drip. This is due to the water pressure in the system. Remove the grounds from the filter and any residues from the screen (Fig.16).
Note. Keep the clean filter holder installed on the machine without tightening it too much, so that the entire brew unit is always at the correct temperature.
BREWING AN ESPRESSO USING COFFEE PODS
Note. To use coffee pods, remember to only use the traditional 1 cup filter (Fig.6).
Follow the instructions to make an espresso with ground coffee using the single-dose pre-ground coffee pod instead of ground coffee. Insert the pod into the filter holder (Fig.1-17); make sure that the paper of the pod does not stick out of the filter holder.
PREPARING A CAPPUCCINO
To prepare a traditional cappuccino, we recommend:
- using fresh whole milk at a cold temperature, preferably high quality. The density of the frothed milk will depend on the milk fat content.
- using stainless steel, circular, rounded milk jugs, narrower at the top, with a spout, necessary to make cappuccino decorations.
The steam wand (Fig.1-14) will dispense all the steam required to froth the milk without bringing it to a boil. With two or three attempts and a little effort you will become experts in preparing cappuccino.
Before starting, it is important to slightly move the steam wand outwards in order to insert the jug directly under it and facilitate the movements required to froth the milk correctly.
At this point continue as follows:
- Prepare the espresso in a large cappuccino cup as indicated in the paragraph "Brewing an espresso using ground coffee".
- Press the steam button (Fig.1-3).
- After 15-20 seconds and when the steam temperature indicator light (Fig.1-6) turns on.
- Turn the steam/hot water knob slightly counterclockwise to eliminate any condensation from the wand then close the knob again.
- Place the jug, half-filled with cold milk, under the steam wand.
- Place the steam nozzle just below the surface of the milk; if it has been inserted too deep, the milk will not be frothed; if it has not been inserted deep enough, big bubbles will be produced and then disappear immediately. It is important to keep the nozzle not at the centre but close to the edge of the jug, with an appropriate angle to produce a stronger vortex (Fig.8-1).

- Turn the steam dispensing knob (Fig.1-7) counterclockwise to let the steam come out. During this phase there is maximum air absorption and the milk must be frothed almost cold.

Note.The steam pressure increases as the knob is turned.
Note. The dispensing operation should last no longer than 60 seconds.
Dispensing steam continuously for more than 60 seconds can empty the boiler out completely. In this case, continue as indicated in the section "Loading the circuit".
Note. To froth the milk correctly, the steam nozzle (Fig.1-23) must always be in contact with the milk and not with the froth (Fig.8-2). Therefore, as the layer of froth increases, the jug must be slightly raised trying to keep the nozzle in contact with the milk, without touching the bottom of the jug (Fig.8-A).
- Once the desired frothing has been achieved, the steam nozzle must be pushed further to heat the milk well.
![information]() Note.It is advisable to always keep a hand on the rounded part of the jug to feel the temperature increase of the unfrothed milk.
Note.It is advisable to always keep a hand on the rounded part of the jug to feel the temperature increase of the unfrothed milk. - Once the desired result has been achieved, close the steam knob, by turning it clockwise, to stop dispensing steam and remove the jug.
Note.After frothing the milk, to make the froth more compact, it is advisable to lightly tap the jug on a flat surface and leave it to rest for at least 30 seconds. The milk will become more homogeneous.
It is important to froth only the milk you need. The remaining hot milk in the jug should not be reused; it would damage the quality of the froth and above all the taste of the cappuccino. It should therefore be used in other ways.
- Press the steam button (Fig.1-3).
Pour the frothed milk into the coffee. Decorate as desired with cinnamon, cocoa, nutmeg.
To prepare another coffee immediately, lower the boiler temperature by dispensing hot water from the coffee brew unit (Fig.1-8). Follow the instructions in the paragraph "How to lower the temperature"; otherwise, the coffee may taste burnt.
The steam wand may be very hot during and after use. To avoid burns, move it only by placing your fingers on the rubber tip fitted on the steam wand.
If coffee is brewed without reducing the temperature by dispensing water, you may get burnt!
DISPENSING HOT WATER
- Turn the machine on and wait a few minutes until the correct coffee temperature indicator light (Fig.1-5) turns on.
- Place a cup under the professional wand.
- Slowly turn the steam knob (Fig. 1-7) counterclockwise and press the brew button (Fig.1-1) and the steam button (Fig.1-3) at the same time to allow for hot water to be dispensed.
- Once the desired amount of hot water has been dispensed, stop dispensing by pressing the brew button (Fig.1-1) and the steam button (Fig.1-3) again and turn the steam knob clockwise.
Note. After priming the circuit and when hot water is dispensed from the steam wand, there might be some water left inside. To drain it, we recommend dispensing some steam for a few seconds.
To prepare another coffee immediately, lower the boiler temperature by dispensing hot water from the coffee brew unit (Fig.1-8). Follow the instructions given in the paragraph "How to lower the boiler temperature", otherwise the coffee may taste burnt.
Note. The dispensing operation should last no longer than 60 seconds.
The steam wand may be very hot during and after use. To avoid burns, move it only by placing your fingers on the rubber tip fitted on the steam wand.
HOW TO LOWER THE BOILER TEMPERATURE
- Do not insert the filter holder.
- Place an empty cup on the grill.
- Press the brew button (Fig.1-1) and fill the cup with water.
- Press the brew button again (Fig.1-1).
The machine is now ready to brew another coffee.
AUTOMATIC SWITCH-OFF FUNCTION
The machine is equipped with an energy saving function. After 20 minutes of inactivity, the machine turns off automatically. To reactivate it, press the on/off button.
CLEANING AND MAINTENANCE
Regular cleaning and maintenance keep the machine in perfect conditions and ensure perfect coffee flavour, a constant coffee flow and excellent milk froth for a long period of time.
Cleaning the steam wand
After each milk frothing:
- Clean the steam wand with a damp cloth. To clean it more thoroughly, you can unscrew the nozzle (Fig.13) and wash it with running water.

- Open the steam knob, allowing the steam to escape for one or two seconds to clear the nozzle hole (Fig.1-23).

Cleaning the filter holder and the filters
The filters should be kept clean to guarantee perfect results.
The filter must only be replaced when the filter holder cup has cooled down completely to avoid burns.
Every day, remove the filter from the filter holder as described in (Fig.14) and wash it with warm water.


If you notice a malfunction when brewing coffee, immerse the filters in boiling water for 10 minutes and then rinse them with running water.
To clean the filters more thoroughly, we recommend using the GAGGIA cleaning tablets specifically designed to keep your machine in perfect working order.
Cleaning the grill and drip tray
Remove the drip tray and the grill (Fig.1-10,11) and wash them with water. Do not use abrasive cleaning tools.
Cleaning the water tank
To avoid burns, the tank should be cleaned only when the machine is turned off. The drain hose (Fig. 11) may reach high temperatures during operation.
Remove the water tank (Fig.1-13) and wash it with fresh water.
To remove the water tank, first remove the drip tray (Fig 1-11), and then remove the drain pipe (Fig.11) by pulling it downwards.
Note. When reinserting the tank, make sure that the silicone tubes are inside the tank and that they are neither twisted nor blocked (Fig.12).

Cleaning the screen
Regularly remove any residual coffee grounds from the screen (Fig.16) using a brush and wash with hot water following the instructions given in the section "How to lower the temperature".

Cleaning after a long period of inactivity
When the machine is not used for a long time (more than two weeks), follow the instructions given in the section "When using for the first time or after a period of inactivity of more than 2 weeks".
DESCALING

Limescale normally builds up with the use of the appliance. Use the GAGGIA descaling product only. Its formula has been designed to ensure better machine performance and operation for its whole operating life. If correctly used, it also avoids alterations in the brewed product. Never use vinegar or other descaling agents.
Descaling should be performed every 2 months.
Never drink the descaling solution or any products dispensed until the cycle has been carried out to the end.
- Remove the filter holder from the unit by turning it from right to left.
- Remove and empty the water tank (see the chapter "Cleaning the water tank").
- Pour HALF the content of the descaling solution into the water tank and fill it with fresh water up to the max level.
- Turn on the machine by pressing the on / off button (Fig.1-2)
Dispense 2 cups of water (approximately 150 ml each) (see chapter "Hot Water Dispensing") from the steam wand and then another two cups of water (approximately 150 ml. each) from the coffee brewing unit, by pressing the coffee button (Fig.1- 1).
Turn off the machine by pressing the on / off button (Fig.1-2).
- Let the descaling solution take effect for approximately 20 minutes with the machine turned off.
- Turn on the machine by pressing the on / off button (Fig.1-2).
Dispense 2 cups of water (approximately 150 ml. each) from the steam wand and then another two cups of water (approximately 150 ml. each) from the coffee brewing unit.
Turn off the machine by pressing the on / off button (Fig.1-2) and leave it off for 3 minutes.
- Repeat the water dispensing described in step 6, until the water tank is completely empty.
- Rinse the water tank and fill it with fresh drinking water. Empty the drip tray.
- Place a container under the steam wand. Open the steam/hot water knob (Fig.1-7) slowly by turning it counter-clockwise.
Press the brew button (Fig.1-1) and the steam button (Fig.1-3).
- Dispense the whole water tank content through the steam wand. To stop dispensing, press the brew button (Fig.1-1) and the steam button (Fig.1-3) again and close the knob by turning it clockwise.
- Fill the water tank with fresh drinking water. Insert the filter holder into the brew unit (Fig.1-8) and turn it from left to right until it locks into place.
- Place a suitable container under the filter holder.
- Press the coffee button (Fig.1-1) and dispense all the water in the tank. Once the tank is empty, stop dispensing by pressing the coffee button again (Fig.1-1) Finally, empty the container.
- Remove the filter holder from the unit by turning it from right to left and rinse it with fresh drinking water.
- Repeat the operations from step 8 once again, for a total of 4 tanks. The machine is now ready to be used.
- The descaling cycle is now complete.
- Refill the water tank with fresh water. If necessary, load the circuit as described in the chapter "Loading the Circuit".
IN CASE OF MALFUNCTION
| Problem: | Make sure that: |
| No brewing. | There is water in the tank. The filter is not clogged because the mixture is too fine or the coffee is too pressed. The screen is clean. |
| The coffee brews too fast (less than 20 seconds). | The coffee has not been ground too coarsely. The coffee has been pressed with the tamper. |
| The pump is too noisy. | There is water in the tank. The pump has been activated (see circuit loading). There is enough coffee. |
| Excessive loss of water from the filter holder. | The filter holder has been inserted correctly (Fig.1-17). The seal is not dirty (Fig.16). There are no coffee residues on the edge of the filter holder. |
| The espresso is not creamy enough. | The coffee has not been ground too coarsely. The coffee has been pressed with the tamper. The coffee is not too old or dry. The traditional filter has been used with the frothing jet device (Fig.1-16). |
| The coffee is too cold. | The machine has been heated. The coffee has not been ground too coarsely. The coffee has been brewed in cold cups. It is recommended to always brew coffee in warm cups. The filter holder has not been preheated (Only for the 1st coffee). |
| The milk does not froth enough. | The steam nozzle is not clogged. The steam nozzle has not been inserted too deep in the jug. The milk is not too hot. |
| The machine squirts coffee out from the filter holder. | The frothing jet device was installed with the "crema perfetta" filter. |
| The machine housing and the drain hose are hot. | The steam button is off. |
Documents / ResourcesDownload manual
Here you can download full pdf version of manual, it may contain additional safety instructions, warranty information, FCC rules, etc.
Advertisement


Need help?
Do you have a question about the CLASSIC EVO RI9481 and is the answer not in the manual?
Questions and answers