
Related Manuals for Gaggia Milano CADORNA PRESTIGE EG5603


Summary of Contents for Gaggia Milano CADORNA PRESTIGE EG5603
- Page 1 ENGLISH NEDERLANDS POLSKI GAGGIA CADORNA PRESTIGE EG5603 (SUP 049EU) Operating instructions Gebruiksaanwijzing Instrukcja obsługi...
- Page 3 Control panel / Controlepaneel / Panel sterowania ESPRESSO COFFEE CAPPUCCINO LATTE MACCHIATO ON/OFF my favourites HOME clean/setting START/STOP Beverage menu / Menu dranken / Menu napojów Ristretto Flat white Coffee / Koffie / Kawa 30 ml Coffee / Koffie / Kawa 40x2 ml Milk / Melk / Mleko 80 ml Espresso Café...
- Page 4 First installation / Eerste installatie / Pierwsza instalacja Welcome LANGUAGE LANGUAGE CECO SLOVENIJA SLOVENIJA LIETUVOS ENGLISH LIETUVOS ITALIANO ENGLISH ITALIANO DEUTSCH DEUTSCH FRANÇAIS FRANÇAIS ESPAÑOL ESPAÑOL PORTUGUÊS ON/OFF clean/setting START/STOP my favourites HOME ON/OFF my favourites HOME clean/setting START/STOP ON/OFF my favourites HOME clean/setting...
- Page 5 Congratulations on purchasing the Gaggia Cadorna Prestige! This easy-to-use machine guarantees excellent coffee drinks, every day. With its intuitive interface, you can choose from among 15 beverages, customise them and save them to the 4 available profiles, where they can be instantly brought up whenever you want.
- Page 6 English Table of Contents Machine Overview (Fig.2) ..................................................................................................................................................................................................Control Panel and Display .................................................................................................................................................................................................. Control panel overview (Fig. 1) ............................................................................................Multifunction buttons ..........................................................................................................First Installation ..................................................................................................................................................................................................................................Manual rinse cycle ............................................................................................................Measuring water hardness ................................................................................................INTENZA+ Water Filter ......................................................................................................................................................................................................
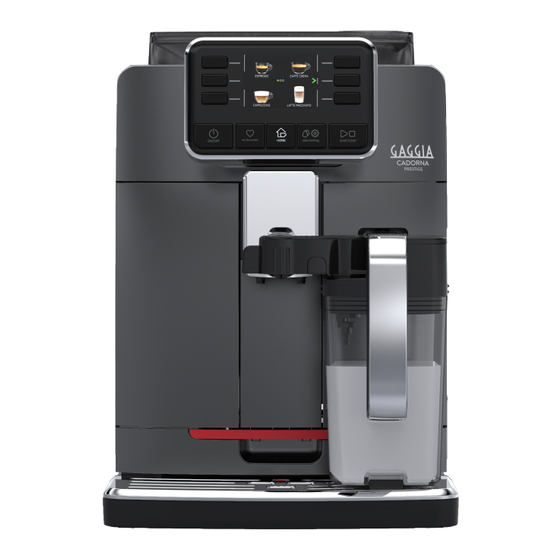
- Page 7 English Machine Overview (Fig.2) Coffee bean container lid Espresso tray Coffee bean container Power cord Power cord socket Drip tray mat Water tank Lubricant Pre-ground coffee compartment Pre-ground coffee measuring scoop Coffee grinder adjustment knob Water hardness tester Control panel Service door Adjustable coffee dispensing spout Coffee residues drawer...
- Page 8 English Control Panel and Display This coffee machine features an easy-to-use, intuitive display. Please see below for an in-depth explanation of each button. Control panel overview (fig. 1) Selects the function shown on the display. 1/2 MULTIFUNCTION buttons To switch the machine on or off. ON/OFF button ON/OFF...
- Page 9 English First Installation Before using the machine, it is essential to follow a few simple steps, clearly described in the explanatory drawings found in the quick guide at the beginning of this instruction manual. Note: To make the best-tasting coffee, you should brew 5 coffees initially to allow the machine to complete its self-adjustment.
- Page 10 English Measuring water hardness You’ll need to set the water hardness when you install your machine. Take the water hardness measuring strip that you find in the box and follow the steps shown on the display during installation. To adjust the water hardness setting later, press the CLEAN/SETTING button, select "...
- Page 11 English Installing the INTENZA+ water filter Remove the small white filter from the water tank and store it in a dry place. Immerse the INTENZA+ water filter vertically (with the opening pointing up) in cold water and gently press its sides to let any air bubbles out. Remove the INTENZA+ water filter from the water.
- Page 12 English Types of Beverage Beverage name Description Ristretto A ristretto, served in a small cup, is an espresso whose brewing time is shorter than a regular espresso. As such, a ristretto is a shorter shot and lower in caffeine. Espresso The espresso is known around the globe as true "Italian coffee".
- Page 13 English Espresso tray This machine was designed to guarantee flawless results, from a traditional espresso to a number of different beverages. If you wish to try a traditional Italian espresso, with a delicious layer of natural crema on the surface, we recommend using the "Espresso Tray", which has been specifically designed for and integrated into the machine.
- Page 14 English Brewing coffee using pre-ground coffee Use the measuring scoop provided to insert the correct dose in the pre-ground coffee compartment. 1 Lift the lid of the pre-ground coffee compartment and add one level measuring scoop of pre-ground coffee. Warning: do not insert anything other than pre-ground coffee in the pre-ground coffee compartment, for not damage the machine.
- Page 15 English Preparation of frothed-milk based coffee beverages Filling the milk carafe Note: Before using the milk carafe, clean it thoroughly as described under the "Cleaning the milk carafe" chapter. The milk carafe can be filled before or during use. Lift the lid like in the figure (milk carafe). Pour the milk into the carafe.
- Page 16 English Tilt it slightly and slide it completely into the machine’s guides until it hooks onto the drip tray. Note: do not force the carafe while inserting it. Removing the milk carafe Rotate the carafe upwards until it is naturally released from the insert in the drip tray.
- Page 17 English Dispensing Hot Water Warning: when the machine starts preparing hot water, the hot water dispensing spout may spray steam and hot water. Wait until the end of the preparation before removing the hot water dispensing spout. 1 Insert the hot water dispensing spout. 2 Press the HOME button and browse the various screens using the green "...
- Page 18 English Beverage Customisation and Profile Creation This machine makes it possible to modify the settings of a beverage according to your preferences and save it to one of four available profiles. Customisation Press the HOME button. HOME Select your beverage. All the settings that can be adjusted and/or selected are displayed on the COFFEE screen.
- Page 19 English To adjust the aroma intensity, press " ". Each time you press the button, the aroma intensity changes by one degree. The display shows the chosen intensity. 1 Very light Light Normal Strong Very strong Note: this function is not available for pre-ground coffee. With over ice coffee you can select the coffee boost function "...
- Page 20 English The saved beverage is now present in the list of your preferences and marked with a small heart in the same colour as the selected profile. ESPRESSO ADD DRINK Note: Once used, the " " profile icon will change colour. ON/OFF my favourites HOME...
- Page 21 English Cleaning and Maintenance Regular cleaning and maintenance keep the machine in perfect condition and ensure perfect coffee flavour, a constant coffee flow and excellent milk froth. Please refer to the following table to know when and how to clean the removable parts of the machine.
- Page 22 English Part description When to clean How to clean the cycle Pre-ground coffee Weekly Clean the upper part using the handle of a spoon, compartment/coffee as shown below. outlet duct Espresso tray Depending on usage Remove the espresso tray and clean it with running water.
- Page 23 English Accurate cleaning of the milk carafe under running water To carefully clean the milk carafe, you must disassemble it completely and wash it under running water, following these steps: Press the release buttons to remove the lid (fig. 23). Rotate the milk carafe’s dispensing spout to the "...
- Page 24 English Press the PUSH lever (1) and pull the handle of the brew group (2) to remove it from the machine. Cleaning the brew group under running water Clean the coffee outlet duct thoroughly with a spoon handle or with another round-tipped kitchen utensil.
- Page 25 English Reinserting the brew group Before reinserting the brew group into the machine, ensure that the two yellow reference indicators on the side coincide. If this is not the case, perform the following step: Make sure that the lever is in contact with the base of the brew group. Make sure that the yellow locking hook of the brew group is in the right position.
- Page 26 English Lubricating the brew group In order to ensure the perfect performance of the machine, it is necessary to lubricate the brew group. Refer to the following table for the frequency of lubrication. Number of beverages prepared Frequency of Frequency of use daily lubrication Every 4 months...
- Page 27 English Descaling Descaling procedure Descaling needs to be carried out when the machine signals it. Use only the Gaggia descaling solution designed to guarantee the machine’s excellent performance. The use of other products could damage the machine and leave residue in the water. Failure to descale the machine will void the warranty. Press the CLEAN/SETTING button and select the "...
- Page 28 English What to do if the descaling process is interrupted You can exit the descaling procedure by pressing the ON/OFF button on the control panel. If the descaling procedure is interrupted before its completion, ON/OFF proceed as follows: Empty the water tank and wash it thoroughly. Fill the water tank with fresh water up to the CALC CLEAN notch and switch the machine on again.
- Page 29 English Water filter When " WATER FILTER " is selected, follow the instructions on the display and those described under the "Installing the INTENZA+ water filter" and "Replacing the LANGUAGE WATER FILTER INTENZA+ water filter" chapters. TIMER STAND-BY UNITS my favourites HOME clean/setting START/STOP...
- Page 30 English Error Code Key The list below reports the error codes that the display can show, their meanings and how to solve the problem. If the indicated solutions are ineffective (the display keeps showing the error code icon and the machine does not function correctly), or if further error codes are displayed, please contact an authorised service centre or a distributor center or yur local vendor.
- Page 31 English Troubleshooting This chapter summarises the most common problems you may encounter while using the machine. If you are unable to resolve the problem using the information given below, visit the FAQ sections on www.gaggia.com or www.gaggia.it or contact the Customer Service Centre in your country. Problem Cause Solution...
- Page 32 English Problem Cause Solution The brew group cannot The brew group is not in the correct The brew group has not been positioned be inserted. position. correctly before being placed back. Ensure that the lever is in contact with the base of the brew group and that the hook of the brew group is in its correct position.
- Page 33 English Problem Cause Solution The "INTENZA+" filter Remove the air from the filter. Let the air bubbles flow out of the filter. cannot be inserted. The tank still contains some water. Empty the water tank before installing the filter. The rubber seal is not inserted on Check the packaging and insert the seal on the the "INTENZA+"...
- Page 34 English Technical Specifications Nominal voltage - Power rating - See data plate on the inside of the Power supply service door Housing material Thermoplastic type Dimensions 260 x 380 x 440 mm Weight 7.5 kg Power cord length 1200 mm Control panel Front panel Cup size...
- Page 35 Nederlands Inhoudsopgave Overzicht van de machine (afb. 2) ....................................................................................................................................................................Bedieningspaneel en display ....................................................................................................................................................................................Overzicht van het controlepaneel (afb. 1) ..............................................................................Multifunctietoetsen ..........................................................................................................Eerste installatie ............................................................................................................................................................................................................................Handmatige spoelcyclus .................................................................................................... Meting van de waterhardheid .............................................................................................. Waterfilter INTENZA+ ..........................................................................................................................................................................................................Installatie van het waterfilter INTENZA+ ................................................................................
- Page 36 Nederlands Overzicht van de machine (afb. 2) Deksel van de koffiebonenreservoir Espresso-lade Koffiebonenreservoir Voedingskabel Aansluiting voor voedingskabel Lekbakje mat Waterreservoir Smeervet Compartiment voorgemalen koffie Maatlepel voor voorgemalen koffie Afstelknop van de koffiemolen Tester van de waterhardheid Controlepaneel Servicedeur Afstelbare koffietuit Koffieopvanglade Koffieresidureservoir Zetgroep...
- Page 37 Nederlands Bedieningspaneel en display Deze koffiemachine heeft een intuïtief en gebruiksvriendelijk display. Lees de volgende paragrafen voor een beter begrip van de toetsen. Overzicht van het controlepaneel (afb. 1) Om de op het display aangegeven functie 1/2 MULTIFUNCTIETOETSEN te selecteren. Om de machine aan of uit te schakelen.
- Page 38 Nederlands Eerste installatie Voordat u de machine gebruikt, is het van essentieel belang dat u een paar eenvoudige stappen volgt, duidelijk beschreven in de beknopte handleiding aan het begin van deze handleiding met verklarende tekeningen. Opmerking: om een nog heerlijkere koffie te verkrijgen, raden we u aan eerst 5 kopjes koffie te zetten zodat de machine de zelf-afstelling kan uitvoeren.
- Page 39 Nederlands Meting van de waterhardheid Tijdens de eerste installatie, moet de waterhardheid ingesteld worden. Neem het meetstrookje van de waterhardheid uit de verpakking en volg de stappen die op het display weergegeven worden tijdens de installatiefase. Om de waterhardheid later te veranderen, drukt u op de CLEAN/SETTING -knop, selecteert u "INSTELLINGEN"...
- Page 40 Nederlands Installatie van het waterfilter INTENZA+ Verwijder het witte filtertje dat zich in het waterreservoir bevindt en bewaar het op een droge plaats. Dompel het waterfilter INTENZA+ in verticale positie (met de opening naar boven) in koud water en druk zachtjes op de zijkanten om de luchtbelletjes eruit te laten komen.
- Page 41 Nederlands Type drank Naam van de drank Beschrijving Ristretto De ristretto, geserveerd in een klein kopje, is een espresso met een kortere afgiftetijd in vergelijking met de klassieke espresso, wat resulteert in een kortere en minder cafeïnehoudende koffie. Espresso De espresso is in heel de wereld gekend als de echte "Italiaanse koffie". Hij wordt geserveerd in een klein kopje, met als onmiskenbare kenmerken een volledig en intens aroma en een toplaag van compacte, natuurlijke room.
- Page 42 Nederlands Espresso-lade Deze machine is ontworpen om onberispelijke resultaten in het kopje te garanderen, van de traditionele espresso tot tal van andere beschikbare dranken. Als u een Italiaanse espresso wilt proeven zoals de traditie vereist, met een heerlijke laag natuurlijke room op het oppervlak, raden we aan de "Espresso-lade" te gebruiken, speciaal ontworpen en geïntegreerd in de machine.
- Page 43 Nederlands Afgifte van de koffie met voorgemalen koffie Gebruik de speciale meegeleverde maatlepel en voeg de juiste dosis in het compartiment voor voorgemalen koffie. Open het deksel van het reservoir voor voorgemalen koffie en voeg een afgestreken maatlepel voorgemalen koffie toe. Let op: voeg geen andere stoffen in dan de voorgemalen koffie om de machine niet te beschadigen.
- Page 44 Nederlands Bereiding van dranken op basis van koffie en opgeschuimde melk Vullen van de melkkan Opmerking: Voordat men de melkkan gebruikt, dient men deze eerst zorgvuldig te reinigen, zoals beschreven in het hoofdstuk "Reiniging van de melkkan". De melkkan kan voor of tijdens het gebruik gevuld worden. Til het deksel van de eenheid voor afgifte van melk op.
- Page 45 Nederlands Kantel het iets en plaats het volledig in de geleiders van de machine, totdat het aan het lekbakje is vastgehaakt. Opmerking: plaats de kan niet met kracht. Verwijdering van de melkkan Draai de kan naar boven totdat deze soepel uit de inzet op het lekbakje loskomt. Verwijder ze vervolgens.
- Page 46 Nederlands Afgifte van heet water Let op: wanneer de voorbereiding begint, kan de schenkinrichting voor heet water stoom en heet water afspuiten. Alvorens de schenkinrichting van het heet water te verwijderen, moet u wachten tot de voorbereiding voltooid is. 1 Plaats de schenkinrichting voor heet water. 2 Druk op de toets HOME , doorloop de verschillende schermen met de groene toetsen "...
- Page 47 Nederlands Aanpassing van de dranken en creatie van de profielen Met deze machine kunt u de instellingen van een drank aanpassen aan uw voorkeuren en de gewijzigde drank opslaan in een van de 4 beschikbare profielen. Aanpassing van de dranken Druk op de toets HOME HOME Kies uw drank.
- Page 48 Nederlands Druk op de toets " " om de intensiteit van het aroma te wijzigen. Bij elke druk, wordt de intensiteit van het aroma met een graad gewijzigd. Het display geeft de gekozen intensiteit weer. 1 Zeer mild Mild Normaal Sterk Zeer sterk Opmerking: deze functie kan niet gebruikt worden met de voorgemalen koffie.
- Page 49 Nederlands De opgeslagen drank is nu aanwezig in de lijst met uw favorieten en wordt gemarkeerd door het hartje in de kleur die overeenkomt met het gekozen ESPRESSO ADD DRINK profiel. Opmerking: Na gebruik wordt het pictogram van het profiel " "...
- Page 50 Nederlands Reiniging en onderhoud Regelmatige reiniging en onderhoud houden de machine in optimale staat en garanderen een constante, uitstekende koffie, constante toevoer en uitstekend melkschuim. Raadpleeg de onderstaande tabel om te weten wanneer en hoe u alle verwijderbare delen van de machine moet reinigen. Lees de desbetreffende hoofdstukken voor meer gedetailleerde informatie.
- Page 51 Nederlands Beschrijving deel Wanneer reinigen Hoe reinigen Waterreservoir Wekelijks Reinig het onder stromend water. Compartiment van de Wekelijks Reinig het bovenste deel met de steel van een voorgemalen koffie/ lepel zoals hierna aangegeven. koffieleiding Espresso-lade In functie van het type gebruik Verwijder de espresso tray en reinig deze met stromend water.
- Page 52 Nederlands Grondige reiniging van de melkkan onder stromend water Om de melkkan zorgvuldig te reinigen, moet u ze volledig demonteren en onder stromend water wassen, volgens de volgende stappen: Druk op de ontgrendelingsknoppen om de deksel te verwijderen (afb. 23). Verdraai de schenkinrichting van de melkkan op positie "...
- Page 53 Nederlands Druk op de PUSH-hendel (indrukken) (1) en trek aan de hendel van de zetgroep (2) om deze uit de machine te halen. Reiniging van de zetgroep onder stromend water Reinig de koffieleiding grondig met de steel van een lepeltje of met een ander afgerond keukengereedschap.
- Page 54 Nederlands Herplaatsing van de zetgroep Voordat u de zetgroep opnieuw in de machine plaatst, moet u ervoor zorgen dat de twee gele referentietekens aan de zijkant overeenkomen. Indien dit niet zo is, doet u als volgt: Zorg ervoor dat de hendel in aanraking komt met de basis van de zetgroep. Verzeker u ervan dat de gele ontgrendelhaak van de zetgroep op de correcte positie is.
- Page 55 Nederlands Invetten van de zetgroep Voor optimale machineprestaties moet de zetgroep gesmeerd worden. Raadpleeg de volgende tabel voor de frequentie voor invetten. Dagelijks aantal bereide Frequentie voor Frequentie van gebruik dranken invetten Laag Om de 4 maanden Normaal 6-10 Om de 2 maanden Hoog >10 Elke maand...
- Page 56 Nederlands Ontkalking Frequentie van de ontkalking Wanneer de machine dit vereist, moet de ontkalking van de machine uitgevoerd worden. Gebruik alleen de ontkalkingsoplossing van Gaggia die ontworpen is om optimale prestaties van de machine te garanderen. Het gebruik van andere producten zou schade aan de machine kunnen veroorzaken en resten in het water achterlaten.
- Page 57 Nederlands Wat te doen in geval van onderbreking van de ontkalkingsprocedure U kan de ontkalkingsprocedure verlaten door op de toets ON/OFF op het controlepaneel te drukken. Als de ontkalkingsprocedure wordt onderbroken ON/OFF voordat deze is voltooid, voert u het volgende uit: Leeg het waterreservoir en reinig het zorgvuldig.
- Page 58 Nederlands Waterfilter Nadat "WATERFILTER" is geselecteerd, volgt u de instructies op het display en zoals beschreven in het hoofdstuk "Installatie waterfilter INTENZA" en in het LANGUAGE WATER FILTER hoofdstuk "Vervanging waterfilter INTENZA+". TIMER STAND-BY UNITS my favourites HOME clean/setting START/STOP Timer stand-by Na "TIMER STAND-BY"...
- Page 59 Nederlands Betekenis van de foutcodes Hieronder staan een aantal foutcodes die het display kan weergeven, hun betekenis en hoe het probleem op te lossen. Als de aangegeven oplossingen niet zouden werken en het display het pictogram van de foutcode blijft weergeven en de machine niet correct werkt, of als er andere foutcodes worden weergegeven, moet u contact opnemen met een erkend servicecentrum of met de dealers in uw land.
- Page 60 Nederlands Oplossing van problemen Dit hoofdstuk vat de meest voorkomende problemen samen die u kunt aantreffen bij de machine. Als u het probleem niet kunt oplossen met de onderstaande informatie, ga dan naar www.gaggia.com of www.gaggia.it voor een lijst met veelgestelde vragen of neem contact op met het Customer Service Center of de dealers in uw land.
- Page 61 Nederlands Probleem Oorzaak Oplossing De zetgroep kan niet De zetgroep bevindt zich niet in de De zetgroep werd niet in positie geplaatst geplaatst worden. correcte positie. alvorens hij terug gepositioneerd werd. Zorg ervoor dat de hendel contact maakt met de basis van de zetgroep en dat de haak van de zetgroep in de juiste positie staat.
- Page 62 Nederlands Probleem Oorzaak Oplossing Het filter “INTENZA+” U moet de lucht uit het filter laten Laat de luchtbellen uit het filter komen. kan niet geplaatst gaan. worden. Het reservoir bevat nog water. Leeg het waterreservoir alvorens het filter te installeren. De rubberen afdichting is niet op Controleer de verpakking en plaats de het filter “INTENZA+”...
- Page 63 Nederlands Technische gegevens Nominale spanning - Nominaal Zie plaatje aan de binnenkant van vermogen - Voeding de servicedeur Materiaal behuizing Thermoplast Afmetingen 260 x 380 x 440 mm Gewicht 7,5 kg Kabellengte 1200 mm Bedieningspaneel Front Afmetingen kopjes Tot 150 mm Waterreservoir 1,8 liter - Uitneembaar Inhoud koffiebonenreservoir...
- Page 64 Polski Spis treści Główne elementy urządzenia (Rys. 2) ........................................................................................................................................................Panel sterowania i wyświetlacz ..............................................................................................................................................................................Główne elementy panelu sterowania (rys. 1) ..........................................................................Przyciski wielofunkcyjne ....................................................................................................Pierwsza instalacja .................................................................................................................................................................................................................... Ręczny cykl płukania ........................................................................................................Pomiar twardości wody ....................................................................................................Filtr wody INTENZA+ ......................................................................................................
- Page 65 Polski Główne elementy urządzenia (Rys. 2) Pokrywka pojemnika na kawę ziarnistą Espresso tray Pojemnik na kawę ziarnistą Kabel zasilający Gniazdo do kabla zasilającego Mata do tacy ociekowej Zbiornik na wodę Smar Pojemnik na kawę wstępnie zmieloną Miarka do kawy wstępnie zmielonej Pokrętło regulacji młynka Tester twardości wody Panel sterowania...
- Page 66 Polski Panel sterowania i wyświetlacz Niniejszy ekspres do kawy posiada intuicyjny i łatwy w obsłudze wyświetlacz. Aby lepiej zapoznać się z poszczególnymi przyciskami, należy przeczytać poniższe paragrafy. Główne elementy panelu sterowania (rys. 1) Aby wybrać funkcję wskazaną na 1/2 Przyciski WIELOFUNKCYJNE wyświetlaczu.
- Page 67 Polski Pierwsza instalacja Przed użyciem urządzenia należy przestrzegać kilku prostych wskazówek wyraźnie opisanych w skróconej instrukcji na początku niniejszego podręcznika, gdzie zamieszczono ilustracje objaśniające. Ważne: aby kawa smakowała lepiej, zalecamy przygotowanie początkowo 5 filiżanek kawy, aby urządzenie wykonało automatyczną regulację. Ręczny cykl płukania Podczas pierwszej instalacji lub po długim okresie nieużywania urządzenia należy wykonać...
- Page 68 Polski Pomiar twardości wody Podczas pierwszej instalacji należy ustawić twardość wody. Wyjąć z opakowania pasek testowy do pomiaru twardości wody i postępować zgodnie z instrukcjami widniejącymi na wyświetlaczu podczas fazy instalacji. Aby zmienić twardość wody w innym momencie, należy nacisnąć przycisk CLEAN/ SETTING , wybrać...
- Page 69 Polski Instalacja filtra wody INTENZA+ Wyjąć mały biały filtr znajdujący się w zbiorniku na wodę. Przechowywać go w suchym miejscu. Zanurzyć filtr wody INTENZA+ w zimnej wodzie w pozycji pionowej (otworem ku górze) i nacisnąć delikatnie na brzegi, aby wypuścić pęcherzyki powietrza. Wyjąć...
- Page 70 Polski Rodzaje napojów Nazwa napoju Opis Ristretto Mocna kawa, serwowana w małej filiżance, to espresso, którego czas dozowania jest krótszy w porównaniu z czasem dozowania klasycznego espresso, czego efektem jest kawa w mniejszej ilości i mniej bogata w kofeinę. Espresso Espresso znane jest na całym świecie jako prawdziwa „kawa we włoskim stylu”.
- Page 71 Polski Espresso tray Niniejsze urządzenie zaprojektowano z myślą o przyrządzaniu doskonale smakujących napojów, od tradycyjnego espresso po liczne inne dostępne napoje. Jeśli pragniesz zasmakować włoskiego espresso zgodnie z tradycją przyrządzania tego rodzaju napoju, z delikatną warstwą naturalnej pianki na powierzchni, zachęcamy Cię do korzystania z „Espresso Tray”, podstawki specjalnie opracowanej i dostosowanej do tego urządzenia.
- Page 72 Polski Parzenie kawy na bazie kawy wstępnie zmielonej Za pomocą specjalnej dołączonej miarki wsypać prawidłową porcję do pojemnika na kawę wstępnie zmieloną. 1 Otworzyć pokrywkę pojemnika na kawę wstępnie zmieloną i wsypać jedną pełną miarkę kawy wstępnie zmielonej. Uwaga: nie wsypywać innych substancji niż kawa wstępnie zmielona, aby nie uszkodzić...
- Page 73 Polski Przygotowywanie napojów na bazie kawy i spienionego mleka Napełnianie dzbanka na mleko Ważne: przed użyciem dzbanka na mleko należy go dokładnie wyczyścić zgodnie z opisem w rozdziale „Czyszczenie dzbanka na mleko”. Dzbanek na mleko można napełnić wcześniej lub podczas użycia. Podnieść...
- Page 74 Polski Pochylić go delikatnie i włożyć całkowicie do prowadnic urządzenia, aż zostanie zamocowany na tacy ociekowej. Ważne: nie wciskać dzbanka na siłę. Wyjmowanie dzbanka na mleko Obrócić dzbanek do góry, aż odczepi się od wkładki umieszczonej w tacy ociekowej. Następnie wyjąć go. Nalewanie napojów na bazie kawy i spienionego mleka Wskazówka: aby napój był...
- Page 75 Polski Nalewanie gorącej wody Uwaga: podczas etapu przygotowywania z dozownika gorącej wody może się wydostawać para i gorąca woda. Przed wyjęciem dozownika gorącej wody należy poczekać na zakończenie etapu przygotowywania. 1 Włożyć dozownik gorącej wody. 2 Nacisnąć przycisk HOME , przewinąć poszczególne ekrany za pomocą zielonych przycisków „...
- Page 76 Polski Indywidualne ustawienia napojów i tworzenie profili Niniejsze urządzenie pozwala na zmianę ustawień napoju w zależności od własnych preferencji oraz zapisanie zmodyfikowanego napoju w jednym z 4 dostępnych profili. Indywidualne ustawienia napojów Nacisnąć przycisk HOME HOME Wybrać swój napój. Na ekranie wyświetlane są wszystkie ustawienia, które można dostosować i/ COFFEE lub wybrać...
- Page 77 Polski Aby zmienić intensywność aromatu, należy nacisnąć przycisk „ ”. Przy każdorazowym naciśnięciu przycisku intensywność aromatu zmienia się o jeden stopień. Na wyświetlaczu pojawia się wybrana intensywność. 1 Bardzo lekki Lekki Regularny Mocny Bardzo mocny Ważne: z funkcji tej nie można korzystać w przypadku kawy wstępnie zmielonej. Podczas przygotowywania kawy over ice można wybrać...
- Page 78 Polski Zapisany napój jest w tym momencie widoczny na liście ulubionych napojów i zaznaczony serduszkiem w kolorze odpowiadającym wybranemu profilowi. ESPRESSO ADD DRINK Ważne: Po zastosowaniu ikona profilu „ ” zmieni kolor. ON/OFF my favourites HOME clean/setting START/STOP CHOOSE YOUR PROFILE Napój zapisany we własnym profilu będzie można zmodyfikować...
- Page 79 Polski Czyszczenie i konserwacja Regularne czyszczenie i konserwacja pozwalają na utrzymanie urządzenia w optymalnym stanie i gwarantują zawsze doskonały smak kawy, stały przepływ kawy oraz doskonałą piankę mleka. Zapoznać się z poniższą tabelą, aby dowiedzieć się, kiedy i jak czyścić wszystkie wyjmowane części urządzenia. W celu uzyskania bardziej szczegółowych informacji należy przeczytać...
- Page 80 Polski Opis części Kiedy czyścić Jak czyścić Pojemnik na fusy Kiedy wymaga tego urządzenie Opróżnić pojemnik na fusy i wyczyścić go pod bieżącą wodą. Upewnić się, że podczas tej czynności urządzenie jest włączone, w przeciwnym razie pojemnik na fusy nie zostanie zresetowany.
- Page 81 Polski Dokładne czyszczenie dzbanka na mleko pod bieżącą wodą Aby dokładnie wyczyścić dzbanek na mleko, należy zdemontować poszczególne jego części i umyć je pod bieżącą wodą w następujący sposób: Nacisnąć przyciski zwalniające, aby zdjąć pokrywkę (rys. 23). Przekręcić dozownik dzbanka na mleko w położenie „ ”...
- Page 82 Polski Nacisnąć dźwignię PUSH (pchnij) (1) i pociągnąć uchwyt bloku zaparzającego (2), aby wyjąć go z urządzenia. Czyszczenie bloku zaparzającego pod bieżącą wodą Wyczyścić dokładnie przewód wylotowy kawy uchwytem łyżeczki lub innym zaokrąglonym przyrządem kuchennym. Przepłukać dokładnie blok zaparzający letnią wodą. Umyć dokładnie górny filtr. Pozostawić...
- Page 83 Polski Wkładanie bloku zaparzającego na miejsce Przed włożeniem bloku zaparzającego do urządzenia należy się upewnić, że dwa żółte znaki odniesienia na części bocznej pokrywają się. Gdyby tak nie było, należy: Upewnić się, że dźwignia styka się z podstawą bloku zaparzającego. Upewnić...
- Page 84 Polski Smarowanie bloku zaparzającego Aby zapewnić optymalne działanie urządzenia, należy smarować blok zaparzający. Z częstotliwością smarowania można się zapoznać w poniższej tabeli. Częstotliwość Liczba napojów Częstotliwość użytkowania przygotowywanych codziennie smarowania Niska 1 - 5 Co 4 miesiące Normalna 6 - 10 Co 2 miesiące Wysoka >...
- Page 85 Polski Odwapnianie Procedura odwapniania Gdy wymaga tego urządzenie, należy wykonać jego odwapnienie. Stosować wyłącznie roztwór odwapniający Gaggia, który opracowano w celu zapewniania optymalnego działania urządzenia. Stosowanie innych produktów może spowodować uszkodzenie urządzenia i obecność ich resztek w wodzie. Brak odwapniania urządzenia spowoduje utratę gwarancji. Nacisnąć...
- Page 86 Polski Co robić w przypadku przerwania procedury odwapniania Z procedury odwapniania można wyjść, naciskając przycisk ON/OFF na panelu sterowania. Gdyby procedura odwapniania została przerwana przed ukończeniem ON/OFF jej, należy: Opróżnić zbiornik na wodę i dokładnie go umyć. Napełnić zbiornik na wodę świeżą wodą do poziomu CALC CLEAN i ponownie uruchomić...
- Page 87 Polski Filtr wody Po wybraniu opcji „FILTR WODY” postępować zgodnie z instrukcjami na wyświetlaczu i z opisem w rozdziale „Instalacja filtra wody INTENZA+” oraz w LANGUAGE WATER FILTER rozdziale „Wymiana filtra wody INTENZA+”. TIMER STAND-BY UNITS my favourites HOME clean/setting START/STOP Timer stand-by Po wybraniu opcji „TIMER STAND-BY”...
- Page 88 Polski Znaczenie kodów błędów Poniżej wymieniono niektóre kody błędów, jakie mogą się pojawiać na wyświetlaczu, ich znaczenie oraz instrukcje rozwiązania problemów. Jeśli wskazane rozwiązania okażą się nieskuteczne (na wyświetlaczu nadal będzie wyświetlana ikona kodu błędu i urządzenie nie zacznie działać prawidłowo), lub gdyby pojawiły się...
- Page 89 Polski Rozwiązywanie problemów W niniejszym rozdziale podsumowano najczęstsze problemy, jakie mogą występować w tym urządzeniu. Jeśli problemu nie uda się rozwiązać, korzystając z podanych poniżej informacji, należy wejść na stronę www.gaggia.com lub www. gaggia.pl, aby zapoznać się z często zadawanymi pytaniami lub skontaktować się z Centrum obsługi klienta bądź...
- Page 90 Polski Problem Przyczyna Rozwiązanie Nie można włożyć bloku Blok zaparzający znajduje się w Blok zaparzający nie został ustawiony zaparzającego. nieprawidłowym położeniu. prawidłowo na swoim miejscu. Upewnić się, że dźwignia styka się z podstawą bloku zaparzającego i że haczyk bloku zaparzającego znajduje się w prawidłowym położeniu.
- Page 91 Polski Problem Przyczyna Rozwiązanie Nie da się włożyć filtra Należy usunąć powietrze z filtra. Poczekać, aż pęcherzyki powietrza wydostaną „INTENZA+”. się z filtra. Zbiornik zawiera jeszcze wodę. Opróżnić zbiornik na wodę przed zainstalowaniem filtra. Gumowa uszczelka jest nałożona Sprawdzić opakowanie i nałożyć uszczelkę na na filtr „INTENZA+”.
- Page 92 Polski Dane techniczne Napięcie nominalne - Moc Patrz tabliczka umieszczona po nominalna - Zasilanie wewnętrznej stronie drzwiczek serwisowych Materiał obudowy Tworzywo termoplastyczne Wymiary 260 x 380 x 440 mm Ciężar 7,5 kg Długość kabla 1200 mm Panel sterowania Przedni Rozmiar filiżanek Do 150 mm Zbiornik na wodę...
- Page 96 GAGGIA S.p.A. reserves the right to make all the necessary changes. GAGGIA S.p.a. behoudt zich het recht voor om alle wijzigingen die zij noodzakelijk acht aan te brengen. GAGGIA S.p.a. zastrzega sobie prawo do wprowadzania dowolnych zmian. GAGGIA S.p.A. Administrative Office Via Torretta, 240 40041 Gaggio Montano - Bologna - Italy +39 0534 771111 / Fax +39 0534 31025...
Need help?
Do you have a question about the CADORNA PRESTIGE EG5603 and is the answer not in the manual?
Questions and answers