VeriFone MX925 Manual
- User manual & setup manual (11 pages) ,
- Reference manual (66 pages) ,
- Manual (51 pages)
Advertisement
Overview
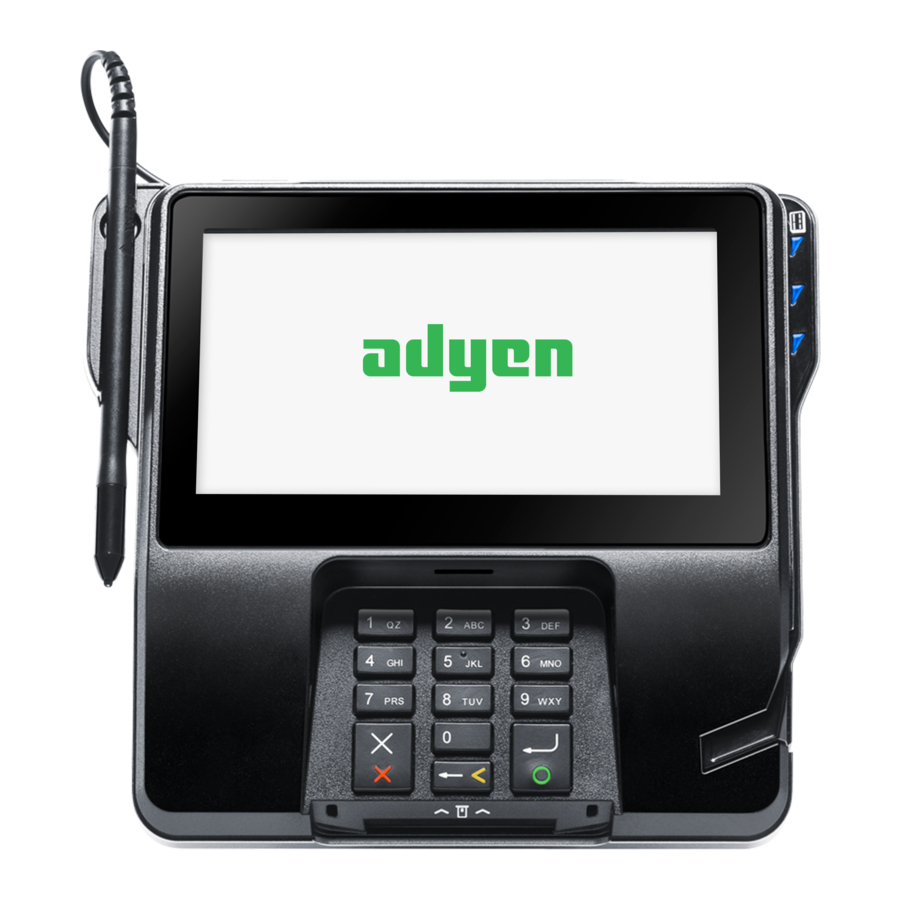
The Verifone Mx925 supercharges your checkout experience with speed and ease! This versatile device boasts a powerful 400 MHz processor, allowing it to handle transactions efficiently with 512 MB of memory. Equipped with card reader functions including MSR, Smart Card, Contactless, and an EMV chip, the MX925 pin pad is designed to be multifunctional for you and your customers. Stream colorful multimedia promotions on a stunning 7' display and connect with your customers. Bring cutting-edge technology into your payment solutions today.
Click here to purchase the Verifone Mx925 terminal from our online shop.
Setup
Power & Set Up
- Connect your Ethernet cable to your device's auxiliary module (the cable is connected via the leftmost RJ45 port on the back of the device).
- Plug your module into the open compartment on the back of your Verifone Mx925.
- Next, plug your 12v power cable into your Mx925's power port.
- Ensure that your power cable is plugged into a working power source.
- Your Verifone Mx925 should begin powering on shortly. Note: An ACTIVATION CODE will appear on your screen after powering on. Merchants are advised to save this code for when they have to activate their terminal.
How to Load Paper Roll
The Verifone MX925 lacks a built-in printer. Therefore, thermal receipt paper rolls cannot be loaded into it.
How to Turn On/Off
- Power ON: Your device will power on when you plug your 12v power cable into the matching 12v power port (as well as a working external source).
- Power OFF: Disconnect your Verifone Mx925 from its power source.
How to Set Up an Ethernet Connection
Upon plugging your Mx925 cables into their requisite ports, your device should connect to the network. For connection instructions, see the POWER & SETUP section of our guide.
How to Enter System Mode
- Press the 1, 5, and 9 keys at the same time.
- Select CONTROL PANEL, then SYS MODE.
- When prompted, enter the supervisor password (either 166832 or 166831).
- You are now in SYSTEM MODE.
Verifone Mx925 - Default Password
The default password for the Verifone MX925 is 9416557. The password required for merchants to enter SYSTEM MODE is either 166832 or 166831. To reset your password, visit the RESET YOUR PASSWORD page at Verifone.com.
Accept Payments
The Verifone Mx925 can accept EMV chip and magstripe payments and select contactless and smart card options. Its abundant features include a dynamic, multi-use color screen, triple-track MSR capabilities, standard stereo audio, and a Linux OS bolstered by PCI-enhanced Verifone security. It accepts all the major card brands: Visa, Mastercard, Discover, and American Express.
The Verifone Mx925 package includes a utility cable, a power adapter, and an Ethernet cable. It does not include a USB cable.
How to Process a Sale
Chip Credit Sale
- Go to your point-of-sale/inventory management database and select CREDIT.
- An alert displaying the total amount for the sale will appear on your screen.
- When ready, select PAY.
- You will see a display on your screen reading WAITING FOR PAYMENT. Cardholders will then be prompted to insert their EMV chip card to proceed with the sale.
- Cardholders then insert their EMV chip card into the Mx925's chip card reader. Merchants should note that EMV settings must be configured appropriately before their MX915 device can process EMV sales.
- Cardholders will then be prompted to sign for their purchase.
Manual Entry Credit Sale
- Go to your point-of-sale/inventory management database and select CREDIT.
- Select OPTIONS.
- Select MANUAL ENTRY.
- Select PAY.
- The merchant will be prompted to enter manual card details, including card number and expiration date. Upon entering, the merchant will receive an alert indicating that the manual transaction was approved.
Debit Sale
- Go to your point-of-sale/inventory management database and select CREDIT.
- An alert displaying the total amount for the sale will appear on your screen.
- When ready, select PAY.
- You will see a display on your screen reading WAITING FOR PAYMENT. Cardholders will then be prompted to swipe or insert their debit card to proceed with the purchase.
- Cardholders then swipe or insert their debit card before entering PIN information on the Verifone Mx925's keypad. Merchants should note that debit settings must be configured appropriately before their Mx925 device can process debit-based transactions.
- Cardholders will then be prompted to sign for their purchase. Note: For merchants using Touchbistro, you can accept credit cards in one of two modes: REGISTER or TABLESIDE.
TouchBistro Register Sale
- Select CHECKOUT from the REGISTER menu.
- Instead of selecting GIFT CARD or CREDIT CARD, select PAYMENT TERMINAL.
- Select PAY IN FULL.
- Cardholders will tap, swipe, or insert their card to initiate payment.
- Merchants then position the PIN pad to face the cardholder. At this juncture, the cardholder can opt to leave a tip.
TouchBistro Tableside Sale
- Select PAYMENT TERMINAL from your checkout menu.
- Select PAY IN FULL.
- Cardholders will tap, swipe, or insert their card to initiate payment.
- Upon authorization, cardholders may be prompted to sign for their purchase.
How to Process a Refund
- From the home menu, select ORDERS.
- Select the order you wish to perform a refund for.
- Select MORE.
- Select REFUND or REFUND SALE.
- Select FULL REFUND (merchants can also administer a PARTIAL REFUND).
- When prompted, select INTEGRATED REFUND and enter the authorization code for the transaction in question. The code is on a copy of the original transaction receipt.
How to Void Transaction
Void Credit Transaction (Card Not Present)
- Go to your point-of-sale/inventory management database and select the invoice for the transaction you wish to void.
- From the menu, select VOID or VOID COMMAND.
- Note that the VOID menu option may no longer be available if a transaction is voided outside of a 24-hour window.
Settings
How to Install the Verifone Driver
- To begin, disconnect your Mx925 from your Windows host device.
- Download the official Verifone driver on your Windows host device. If you are using a PC, move the files to your desktop once downloaded.
- Go to your Downloads folder.
- You will want to select the folder corresponding to your Windows' specific processor and operating system. For instance, if you are working with a 32-bit Windows device, you will choose the 32-BIT folder.
- Select SILENT_INSTALL.BAT.
- Select RUN AS ADMINISTRATOR.
- The installation will begin. To check the progress of your installation, check either ADD/REMOVE PROGRAMS or APPS and FEATURES.
- Post-installation, you can reconnect your Mx925 to your Windows device.
How to Calibrate Touchscreen
- In SYSTEM MODE, select SUPERVISOR.
- If prompted, enter the default password (either 166832 or 166831)
- From the SUPERVISOR main menu, select ADMINISTRATION.
- Once in the admin menu, select TOUCH PANEL.
- Make sure there is no liquid or dust on your Mx915 touchscreen.
- When your touchscreen is ready, select GO.
- The terminal will begin the recalibration process.
- Press ENTER to stop the test at any time.
If the actions above fail, try these steps:
- Turn your Verifone Mx925 on.
- If your device has been preloaded with an application, the merchant will want to press the 1, 5, and 9 keys simultaneously to proceed. You are now in SYSTEM MODE.
- If prompted, enter the default password (either 166832 or 166831)
- Once you arrive at the LOGIN MENU, you will be presented with a series of menu options: 1.) RUN APPLICATION, 2). CALIBRATION OPTION/PERFORM CALIBRATION, and 3.) RETURN TO LOGIN SCREEN. When ready, press the red X button.
- Select 2 for the CALIBRATION OPTION/PERFORM CALIBRATION option. Do not touch or interact with your screen while calibration is underway.
- Upon completion of calibration, press the green button to return to the login screen.
Troubleshooting & Tips
Verifone Mx925 Common Error Messages
Below is a list of other common messages you may receive on your Verifone Mx925 screen, alerting you of an error that needs to be addressed. These usually appear along with corresponding error codes:
- CRITICAL ERROR: FAILED TO GET NETWORK PARAMETERS: No internet connection.
- FORM AGENT - TCPIP-SSL: Router or firewall is obstructing terminal. When troubleshooting this code, do not select the CONNECT TO KLD option.
- MAINTENANCE REQUIRED - UT: Attempted tampering/ Defective hardware.
- SYNCHRONIZING WITH XPI APP, PLEASE WAIT...: Screen is stuck or frozen on SYSTEM INFORMATION page mid-reboot. This error code can usually be fixed by unplugging from power and reconnecting after about a minute.
- TAMPER DETECT: Verifone card reader cannot process or detect card/someone may be attempting to tamper with device. Device will have to be sent back to Verifone for clearance and re-loading.
How to Clean Your Terminal and Display
For best results cleaning your Verifone Mx925, use a warm, damp cloth and a conservative amount of soap. In rare instances, you may want to use an alcohol-based cleaning agent. Verifone also offers an in-house cleaning kit designed to help merchants with Verifone device maintenance.
Regarding your Verifone Mx925 display, refrain from applying any liquid or spray-based cleaning agents directly to your screen. Instead, use a non-scrubbing cleaner and a light cloth for best results.
Pre-Disposal Disassembly
To disassemble your mounted Verifone Mx925 before disposing of it, follow these steps:
- Locate the pushpin on the back of your mounted Verifone device.
- Set your Mx925 on a flat, stable surface.
- Simultaneously twist and pull the pushpin outward and away from the device.
- At this point, the mounting stand should detach from the rear compartment of your Mx925 without much effort.
- Locate the three mounting bolt pieces on the back of your Verifone Mx925. To remove these pieces, press down on either side of your Verifone Mx925 using your index fingers and thumbs.
- Pull upwards until the larger piece detaches from your Verifone Mx925.
- To remove the data cable, gently press down on the two tabs above it.
- Remove the auxiliary module.
How to Reset
- Press the 1, 5, and 9 keys simultaneously. You are now in SYSTEM MODE.
- You will see text on your screen reading APPLICATION HALTED.
- When prompted, enter the supervisor password (either 166832 or 166831.
- You will be redirected to SYSTEM MODE, where you will be offered different menu options: REBOOT, LOG OUT, etc. Select REBOOT.
- Your device will begin the rebooting process.
A Note on Factory Resets
If you are experiencing difficulties with your Verifone Mx925, such as lagging response times or difficulty turning the device on, you may need to perform a factory reset. Merchants considering performing a factory reset on their Verifone Mx925 are encouraged to contact Verifone for assistance.
Note: Performing a factory reset will erase all data on the device, including transaction history and customized settings. Be sure to back up any important data before proceeding with a factory reset.
A Note about the Verifone Mx925's End-Of-Life Status
Verifone no longer provides repair updates or critical security alerts for the Verifone Mx925, as the device is end-of-life. Merchants using an Mx925 with PCI 4. x level security will still receive support until April 2026. The Verifone M400 effectively serves as the Mx925's replacement device.
How to Reach Customer Service
If you have any customer service issues with your Verifone device, contact Verifone support via their website (support.verifone.com) or telephone (1-800-837-4366).
Documents / Resources
References
Download manual
Here you can download full pdf version of manual, it may contain additional safety instructions, warranty information, FCC rules, etc.
Advertisement


Need help?
Do you have a question about the MX925 and is the answer not in the manual?
Questions and answers