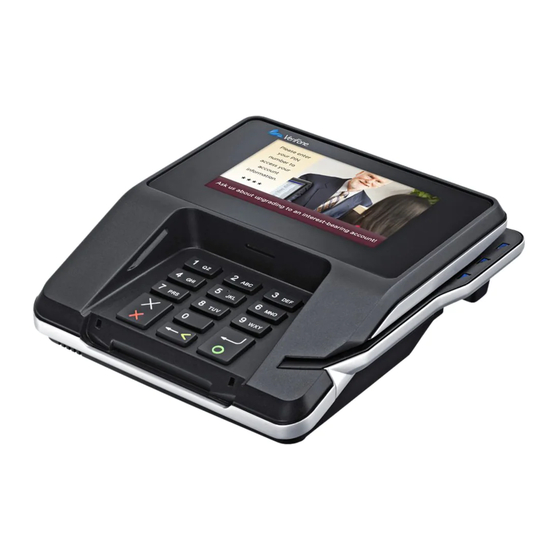
VeriFone MX 915 Installation Manual
Mx 900 series
Hide thumbs
Also See for MX 915:
- Reference manual (66 pages) ,
- Installation manual (39 pages) ,
- Manual (51 pages)
Table of Contents
Advertisement
Advertisement
Table of Contents

Related Manuals for VeriFone MX 915


Summary of Contents for VeriFone MX 915
- Page 1 MX 900 Series Installation Guide Date: May 13, 2015...
- Page 3 - without written permission of the publisher. The content of this document is subject to change without notice. The information contained herein does not represent a commitment on the part of Verifone. All features and specifications are subject to change without notice.
-
Page 5: Table Of Contents
Contents 1. Introduction......1 Intended Audience ......1 Document Organization . - Page 6 MX 900 Series Installation Guide Calibrate Touch Screen ......31 3. Terminal Specifications ....33 Terminal Specifications .
-
Page 7: Introduction
This installation guide is your primary source of information for setting up and ™ ™ installing the MX 900 Series terminals, the MX 915 and MX 925 Intended Audience This guide is useful for anyone installing and configuring the MX 900 Series terminals. - Page 8 MX 900 Series Installation Guide May 13, 2015...
-
Page 9: Hardware Installation
ARDWARE NSTALLATION This chapter describes the MX 900 Series installation procedures and includes connection examples. Unpacking Open the shipping cartons and carefully inspect the contents for possible tampering or shipping damage. Warning: Do not use a damaged terminal. Berg Retainer To unpack the shipping carton 1. -
Page 10: Selecting A Location
2. Place the MX 900 Series terminal on a flat surface, such as a table or countertop, or mount it on a mounting stand supplied by Verifone. Avoid areas with: –... -
Page 11: Stand Mount
MX 900 Series Installation Guide Warning: Do not use the MX 900 Series terminal near water, including a bathtub, wash bowl, kitchen sink, or laundry tub. Do not use in a wet basement or near a swimming pool. 3. Before connecting the terminal to the power pack, complete the installation by connecting all the cables (see Connecting the Device and Power Up with the Multiport Cable). -
Page 12: Wall Mount
MX 900 Series Installation Guide Wall Mount The MX 900 Series terminal can be mounted on a wall. To wall mount the MX 900 Series terminal: 1. Create a template of the three key hole slots on the bottom of the MX 900 Series terminal. -
Page 13: Pin Protection Measures
MX 900 Series Installation Guide 4. Prepare holes for screw placement. For mounting into drywall use 1/8” Hollow Wall Anchors. Other stud mountings use #6 trim screws. After installation apply 30 pounds force downward to ensure proper mounting. a. Create a small hole in which to screw in self-tapping wood screws, or b. -
Page 14: Privacy Shield
MX 900 Series Installation Guide The following table shows the combinations of methods that must be used when installing the MX 900 Series terminal to protect the cardholder's PIN during PIN entry. Observation Corridors Method Customer Customers On-Site Cashier Queue elsewhere Cameras Countertop... -
Page 15: Removing And Installing Optional Components
MX 900 Series Installation Guide Removing and Installing Optional Components This section discusses the installation procedures for the optional components available for the MX 900 Series terminal. Your terminal may already have some of these options, as modules can be installed at the factory or in the field. Installing Countertop Wedge The countertop wedge raises the rear section of the MX 900 Series terminal by an angle of 10 degrees to facilitate use of the screen. - Page 16 MX 900 Series Installation Guide 2. If the I/O module has a Berg connection, remove the Berg Retainer after sliding out the I/O module. May 13, 2015...
- Page 17 MX 900 Series Installation Guide 3. To install, slide in the I/O module until it locks into place. Note: Make sure that the Berg Retainer is secure before inserting the I/O module. If any excessive force is needed, the retainer may not be properly aligned.
-
Page 18: Installing Msam Or Sd Cards
MX 900 Series Installation Guide Installing MSAM or SD Cards Often merchants are issued MSAM or SD cards to run small applications, such as loyalty programs. The MX 900 Series terminals support microSD cards up to 32GB and up to three MSAM cards. MSAM and SD cards are used only with MX 900 Series terminal smart card configurations. - Page 19 MX 900 Series Installation Guide 4. Remove any previously installed MSAM or SD card by sliding the card from the cardholder. Note: Before inserting the SD or MSAM card, position it with the card’s gold contacts facing the smart card reader end of the terminal. The cardholder connector base has a set of contacts and a notch on one corner to ensure the card is positioned correctly.
- Page 20 MX 900 Series Installation Guide 6. Reinstall the compartment cover and door screw. May 13, 2015...
-
Page 21: Installing The Optional Contactless Module On The Mx 925
MX 900 Series Installation Guide Installing the Optional Contactless Module on the MX 925 Use the following steps to install the Optional Contactless Module on the MX 925. MX 925 Contactless Module, P/N P132-913-00-R 1. Remove the screw. 2. Lift the cover and slide out. 3. - Page 22 MX 900 Series Installation Guide 4. Attach the Contactless Module using the two screws. 5. Attach the ribbon cable from the Contactless Module to the MX 925 terminal. Note: If more room is needed to attach the ribbon cable, temporarily remove the top mounting plate.
- Page 23 MX 900 Series Installation Guide 6. Attach the ribbon cable cover using the screw. May 13, 2015...
-
Page 24: Replacing The Stylus And Holster
MX 900 Series Installation Guide Replacing the Stylus and Holster Use the following steps to replace the stylus and its holster. 1. Turn the MX 900 Series terminal over and loosen the two screws that secure the holster. Note: The screws are held within the plastic and cannot be separated. 2. - Page 25 MX 900 Series Installation Guide 3. Loosen the screw that secures the stylus plug. Unplug the stylus cable from the bottom of the terminal. Note: The screw is held within the plastic and cannot be separated. 4. Plug in the stylus and secure it with the screw. May 13, 2015...
-
Page 26: Connecting The Device
MX 900 Series Installation Guide 5. Locate the two screw holes for attaching the holster. Route the stylus cable through a channel in the holster. The white stripe on the stylus cable must be aligned with front edge of the holster. The cable should be in the channel between the holster and the terminal. -
Page 27: I/O Modules
AUD, BERG ONLY, NO TAILGATE 132-601-00-R PWR, AUD, BERG W/ TAILGATE, 132-602-00-R ETH, USB OTG, COM 2 MX 915 PWR, AUD, POE, USB OTG, USB 132-603-00-R HOST, COM 1, COM 2 P/N M132-409-01-R PWR, AUD, ETH, USB OTG, COM 1,... - Page 28 MX 900 Series Installation Guide Module Module Module Module Module Module Connection Power Jack Audio Jack Berg with Tailgate Berg without Tailgate Ethernet Power Over Ethernet USB 2.0 OTG USB 1.1 Host USB 2.0 Device COM1 COM2 WiFi/Bluetooth Additional I/O Module Functionality All but the first and fifth I/O modules have the same DC power jack ■...
- Page 29 MX 900 Series Installation Guide Serial and Ethernet Ports Up to three serial ports ■ – COM 1 and 2 are connected in parallel with the same serial port on the berg connector. – COM 3 is available only when I/O modules 2 or 5 are used with a Berg cable that supports this feature.
-
Page 30: I/O Modules With Port Names
MX 900 Series Installation Guide I/O Modules with Port Names Module 1 with Black Label, P/N P132-601-00-R Berg Audio Module 2 with Red Label, P/N P132-602-00-R COM 2 Ethernet Audio Berg Power Module 3 with Grey Label, P/N P132-603-00-R COM 2 COM 1 Ethernet USB Audio Power Module 4 with Purple Label, P/N P132-604-00-R... - Page 31 MX 900 Series Installation Guide Module 5 with Orange Label, P/N P132-605-00-R Berg Audio Module 6 with Green Label, P/N P132-606-00-R COM 2 Ethernet Power (CBL132-009-XX-A Only) May 13, 2015...
-
Page 32: Optional I/O Module Cables
MX 900 Series Installation Guide Optional I/O Module Cables USB OTG Device Cable, P/N CBL132-002-XX-A USB OTG Host Cable, P/N CBL132-003-XX-A Power Over USB, P/N CBL132-004-XX-A Powered Serial, P/N CBL132-005-XX-A USB/Power Splitter, CBL132-006-XX-A USB PLUS POWER 12V , CBL132-009-XX-A (I/O Module 6 Only) May 13, 2015... -
Page 33: Multiport Cable
MX 900 Series Installation Guide Multiport Cable The MX 900 Series terminals can use a multiport cable to make the following connections: ECR Tailgate ■ Ethernet LAN ■ Serial cable ■ USB Host ■ USB device ■ Power input ■ Audio output ■... -
Page 34: Connecting Ecr In Tailgate Mode
MX 900 Series Installation Guide Connecting ECR in Tailgate Mode To connect an ECR to the MX 900 Series terminal, insert the multiport cable plug into the bottom socket on the terminal and install the retainer. Then connect the SDL tailgate connector to the desired 12-volt port on the back of the IBM register, such as 9A or 9B. -
Page 35: Using The I/O Module
MX 900 Series Installation Guide Using the I/O Module 1. Make all other connections before connecting the power pack. 2. Insert the plug from the power pack into the +12V receptacle on the I/O module. 3. Plug the power pack into an indoor electrical power outlet. AUD ENET COM2 USB BERG May 13, 2015... -
Page 36: Using The Multiport Cable
MX 900 Series Installation Guide Using the Multiport Cable 1. Make all other connections before connecting the power pack. 2. Insert the multiport cable connector into the port on the back of the terminal and secure with the Berg retainer. 3. -
Page 37: Mx 900 Series Installation Guide
MX 900 Series Installation Guide Calibrate Touch Screen The MX 900 Series terminal requires a touch screen calibration at the time of installation. The terminal should be powered on and allowed to stabilize at normal operating temperature; usually this takes no longer than 30 minutes, even if the terminal was previously in a cooler or warmer location. - Page 38 MX 900 Series Installation Guide May 13, 2015...
-
Page 39: Terminal Specifications
• Depth: 225 mm (8.9 inches) MX 925 • Height: 56 mm (2.2 inches) • Width: 218 mm (8.6 inches) • Depth: 230 mm (9.1 inches) Weight MX 915: 1.3 lbs. (0.6 kg) MX 925: 2.0 lbs. (0.9 kg) May 13, 2015... - Page 40 MX 900 Series Installation Guide May 13, 2015...
-
Page 41: Maintenance
AINTENANCE The MX 900 Series terminal has no user-maintainable parts. The smart card implementation is a proprietary hardware solution that has no serviceable parts. Cleaning the Terminal To clean the terminal, use a clean cloth slightly dampened with water and a drop or two of mild soap. -
Page 42: Magnetic Stripe Cleaner
MSR cleaning card made specifically for POS MSR Card reader terminals or Petroleum MSR card readers. Smart Card Reader Do not attempt to clean the smart card reader. Doing so may void the warranty. For smart card reader service, contact your Verifone distributor or service provider. May 13, 2015... - Page 43 NDEX specifications 33 stand mount 5 audience 1 location for MX 900 Series 4 wall mount 6 connecting maintenance ECR Tailgate 28 cleaning a terminal 35 Ethernet LAN 28 smart card reader 36 I/O module 21 MSAM cards, installing 12 multiport cables 27 multiport cables countertop wedge 9...
- Page 44 MX 900 Series Installation Guide May 13, 2015...
Need help?
Do you have a question about the MX 915 and is the answer not in the manual?
Questions and answers