Advertisement
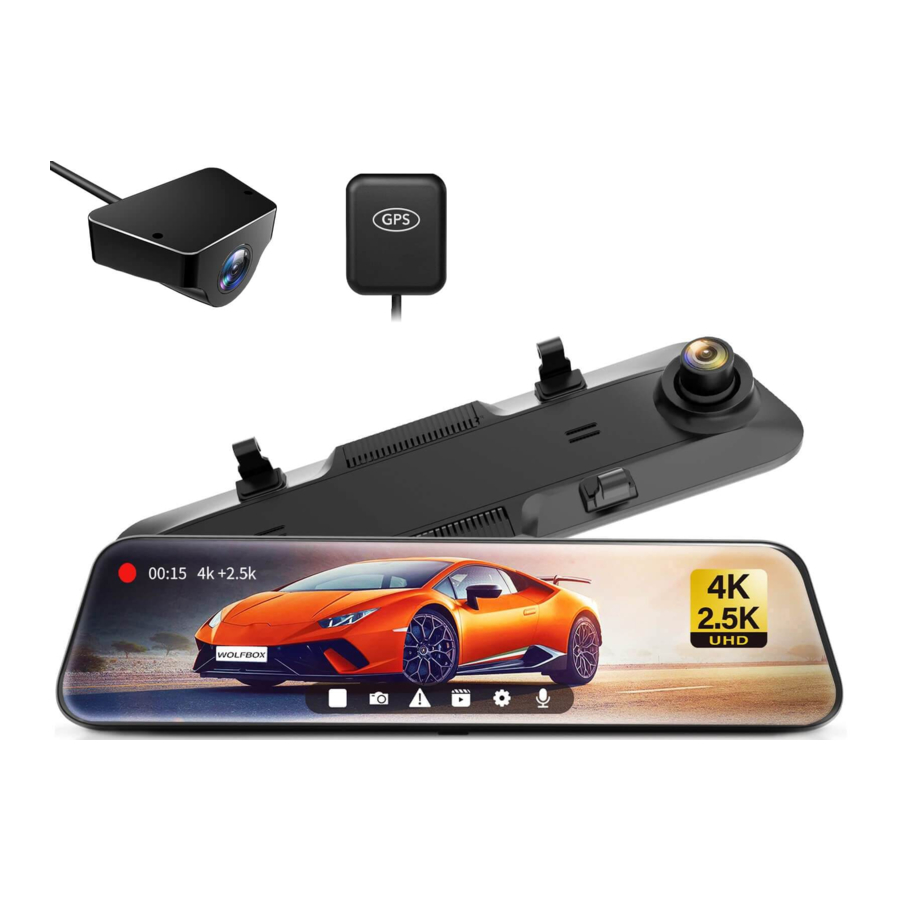
PACKAGE CONTENTS

OVERVIEW

| NO. | Name | Description |
| 1 | Front Camera | Record the front view of the vehicle |
| 2 | Power connector | Power Supply Port (Type-C) |
| 3 | Rear Camera Port | Port used to connect the rear camera |
| 4 | TF card slot | Provide extensible storage (class 10 Max 128GB) |
| 5 | GPS port | Used to connect GPS port (GPS function requires optional GPS antenna) |
| 6 | Fasteners | The machine can be fixed with 2 straps |
| 7 | Power button | Short press to wake and turn off the screen, long press to turn on and off the power |
| 8 | Display screen | 11.8 inch touch screen display |

 | Start/Stop Recording: Record and save every precious moment |
 | Photograph: Take photos one moment |
 | Click for emergency recording |
 | Video/Photo Playback: Playback the video & Photo |
 | Menu Settings: Touch and select the appropriate settings and functions |
 | Sound Record is on Sound Record is off |
 | Display time/ date |
 | GPS icon: green, when it has GPS signal; white, when it has no signal |
 | Recording status |
 | GPS Status: Once GPS antenna connected, the GPS icon on the home screen will show |
About the Micro SD Card
When using a new MicroSD card, be sure to format it on the main body.
- Do not remove or insert a MicroSD card while the power is on.
- For stable use, it is recommended to format the microSD card regularly
Recommend: Once a month
Pay attention to the orientation of the MicroSD card and insert it into the slot (the side with the metal strip faces the back of the dash cam)
Make sure that the microSD card is securely inserted inside the slot.
- Insert until you hear a click.
When removing the microSD card, push in the microSD card first and then pull it out after the microSD card pops out a little.

Installation
Please check the functionality of dash cam with its all accessories before installation.

How to install the rear camera
We recommend install the rear camera above the license plate.

- Fix camera with screws
Find a best location, use screws to fix the rear camera nearby the car license plate lamp.
![]()
- Remove the Panel
Remove the inner panel of the trunk to expose the rear wiring compartment of the car. Open the trunk and l00k for a sturdy inner panel covering the other side of the license plate installation area. Then, insert a decorative removal t00l or another thin device behind the panel and pry it apart.
![]()
- Snake the cable
Use a trim removal t00l to pop out tailgate trim, then run the cable from outside of the car into the trunk of your car.
![]()
- Connect the rear cameras power cable to the extension cable.
After snaking your rear camera's extension cable, connect the power cable to your rear camera's extension cord.
![]()
- If you need to install a trigger cable to activate the reversing guidelines, please find the positive cable of the reversing lamp, or ask a professional for help.


Placement of rear lens inside car
We suggest to install outside car, not inside
Confirm the accessories
1pc mount bracket (2 pcs black iron sheets)
4 pcs screws (2 pcs small screws, 2 pcs large screws)
- Place a iron sheet over the rear camera, aim it at the hole, and screw it on.

- Join the two iron sheets together and turn on the screws.

- Stick the bracket to the rear windshield with 3M glue
![]()


Placement of rear lens outside car
We suggest to install outside car, not inside
- Tear off the release paper of 3M sticker on Rear lens.
![]()
- Paste the rear lens directly above the license plate.
![]()


How to install the mirror dash cam
- Attach the upper end of the straps to the retaining h00ks on the top of the rear-view mirror.

- Extend the straps around the back of the rear-view mirror and attach them to the bottom retaining h00ks.


- Route your rear camera's power cable to the front of the car. If you'd like, use a trim removal t00l to pop out the headlining panel directly above your windshield. Then, run you cable through the exposed chamber.

- Power on the dash cam with box included car charger, don't charge it with your own chargers.

- Test the camera to make sure everything works.

- Installation method (Note: GPS module is facing up, placed on the instrument panel).


Q: Why is the front lens picture so dark?
A: Please check if your front camera is facing the sky. If the lens is facing the sky, it will automatically reduce the light reception, causing the screen to darken.

How to install the GPS
- GPS front and back

- Installation location
Considering the use effect and installation convenience, we usually recommend customers to install it at position 1. Of course, you can also try to install it in other locations for testing and ch00se the location you think is most suitable.


GPS Working
When GPS is not connected: There's nothing there

When GPS is connected

| No signal |  | |
| White icon | ||

| Great signal |  | |
| GREEN icon | ||
Q: Why is my GPS not working?/How to use GPS?
A: If you cannot receive the signal after inserting the GPS, please follow the steps below.
- The vehicle must be within a large area.
- Insert the GPS plug again.
- Place the GPS plug upward.
- Restart
- It will be recognized after about 40 seconds.
If still cannot receive the signal, it may be a GPS problem. Please CONTACT US and we will help you solve this problem.
Date & Time Setting
Time Zone Setting
It will automatically update the time according to your location and time zone due to GPS, so you do not need to manually change the time. But you can adjust the daylight saving time by changing the time zone.

Time Zones - GMT (Greenwich Mean Time) Values
UTC/GMT-12: 00
UTC/GMT-11: 00
UTC/GMT-10: 00
UTC/GMT-09: 30
UTC/GMT-09: 00
UTC/GMT-08: 00
UTC/GMT-07: 00
UTC/GMT-06: 00
UTC/GMT-05: 00
UTC/GMT-04: 30
UTC/GMT-04: 00
UTC/GMT-03: 30
UTC/GMT-03: 00
UTC/GMT-02: 00
UTC/GMT-01: 00
UTC/GMT+00: 00
UTC/GMT+01: 00
UTC/GMT+02: 00
UTC/GMT+03: 00
UTC/GMT+03: 30
UTC/GMT+04: 00
UTC/GMT+04: 30
UTC/GMT+05: 00
UTC/GMT+05: 30
UTC/GMT+05: 45
UTC/GMT+06: 00
UTC/GMT+06: 30
UTC/GMT+07: 00
UTC/GMT+08: 00
UTC/GMT+08: 40
UTC/GMT+09: 00
UTC/GMT+09: 30
UTC/GMT+10: 00
UTC/GMT+10: 30
UTC/GMT+11: 00
UTC/GMT+11: 30
UTC/GMT+12: 00
UTC/GMT+12: 45
If you need a special time zone or need any help, please CONTACT US

With GPS connected

 | Speed & Driving Direction: Once GPS is connected, the information will show |
 | Settings: Touch to enter the menu setting |
 | File Playback: Playback the video & Photo |
 | Start/Stop Recording |
 | Snapshot: Take a Snapshot |
 | Date & Time |
 | Recording Status: Yellow flashing meansLock Recording |
 | Audio Record is on |
 | Button's beep sound status |
 | GPS Status: Once the GPS signal is successfully received, the icon will, turn GREEN. Otherwise, it turns WHITE. |
On the LEFT side of the screen: Slide up and down to adjust the angle of view.
On the RIGHT side of the screen: Slide up and down to adjust the brightness.

Anywhere on the screen: Swipe the screen left or right to switch between front view, rear view, or split-screen view.

Power ON/OFF
- If you turn on the engine (ACC on) while the cigar power adapter is connected, the power will be turned on automatically and the opening screen will be displayed.
- Press and hold the power button to turn off the power during startup, and then briefly press the power button again to turn on the power of the unit and display the opening screen.
- Briefly press the power button to turn off the screen.
Menu Settings
After powering ON the camera, press the  button to enter the setup process.


| Icon | Function | Function options |
 | Adjust the video recording resolution. | 4k (3840*2160) + 2.5k (2560*1440) 2.5k (2560*1440) + 2.5k (2560*1440) |

| Icon | Function | Function options |
 | Adjust the loop recording duration. | 1min/3mins/5mins |

| Icon | Function | Function options |
 | Adjust the sensitivity of G-sensor. It is recommended to adjust to "Low". | OFF LOW Middle High |
G sensor detects the impact and performs fixed time video recording for 20 seconds.
Emergency video recording time is the video file before impact + 20 seconds of emergency video.

When the car crashes at 28 seconds, the normal recording time is 28 seconds, and then the G-sensor detects the impact for 20 seconds, so the emergency recording time is 48 seconds.

| Icon | Function | Function options |
 | / | 50Hz 60hz |

| Icon | Function | Function options |
 | Set the status of the screen display when recording. | OFF: No Turn Off Screen: 15s/1min/3mins Time Screensaver: 15s/1min/3mins |

| Icon | Function | Function options |
 | / | OFF ON |

| Icon | Function | Function options |
 | Flip the recording direction up and down or horizontally | Rear Flip Rear Mirror |

| Icon | Function | Function options |
 | 12-Hour/24-hour time format | 12-Hour 24-Hour |

| Icon | Function | Function options |
 | Screen display when reversing | Full-Screen display Panorama display |


| Icon | Function | Function options |
 | / | YY-MM-DD DD-MM-YY MM-DD-YY |

| Icon | Function | Function options |
 | When you have been driving for a long time, the recorder will remind you to rest every 2 hours. | / |

| Icon | Function | Function options |
 | Set the vehicle speed displaymode. | KM/H MPH |
The following 2 icons will appear only after the GPS is connected

| Icon | Function | Function options |
 | Set the current time zone (Default Time Zone GMT - 5:00). | All time zones. |

| Icon | Function | Function options |
 | Set the common language, the default is English. | English/Francais/Espanol/Deutsch |

| Icon | Function | Function options |
 | Format SD at once? | Cancel Confirm |

| Icon | Function | Function options |
 | Restore the initial settings. | Cancel Confirm |

| Icon | Function | Function options |
 | Check the product model and firmware version. | / |
NOTE
- We will continue to update the firmware based on customer feedback.
About Hardwire Kit
The Parking Mode function requires a G900 hardwire kit activate.
If you need this function, please connect the hardwire kit.(CONTACT US to get G900 hardwire kit)

When G900 Hardwire Kit is not connected

When you click into  there will be the following options:

Entering Time-Lapse
| Entering time-lapse: | ||
| Option 1 | OFF | |
| Option 2 | G-sensor working: | Low/Middle/High |
| Option 3 | Lapse Record: | 12h/24h/48h |
| Lapse Interval: | 1s/2s/3s | |
Entering time-lapse... :
OFF/Low/Middle/High
(the Sensitivity of G-sensor)
Lapse Record:
OFF/12H/24H/48H
(Set the continuous shooting duration of the time-lapse video "Up to 48 hours")
Lapse Interval:
1S/2S/3S
(Set the frame rate of shooting per second)
Collision Boot Recording
When a car is hit or rubbed, the G sensor detects the impact and saves the next 20 seconds of video (Urgent Album)
Working Process:
G sensor detects vehicle impact > Power on > Emergency video recording > Power off

Playback Mode
When you turn on the power, the dash cam will start recording automatically. Click  to enter the playback mode.
Playback menu


- Front Normal Album
- Front Urgent Album
- Front Photo
- Rear Normal Album
- Rear Urgent Album
- Rear Photo
Play on Computer
Correct Video Player to Play 4K Videos
We recommend GPS Media player which can view google maps. You can get it free.
Mac/Win Version Download: https://wolfbox.com/gps-player/

NOTE
- If you encounter problems during use please CONTACT US.
E-mail: service@wolfbox.com
Website: https://www.wolfbox.com/
Documents / Resources
References
Download manual
Here you can download full pdf version of manual, it may contain additional safety instructions, warranty information, FCC rules, etc.
Advertisement


Need help?
Do you have a question about the G900 and is the answer not in the manual?
Questions and answers