Advertisement
- 1 Product Overview
- 2 Product Specifications
- 3 Getting Started
- 4 Package Contents
- 5 Appearance
- 6 About the Micro SD Card
- 7 Installation
- 8 Power ON/OFF
-
9
Menu Settings
- 9.1 Home-interface
- 9.2 Video playback interface
- 9.3 Function interface
- 9.4 Movie Clip Time
- 9.5 Parking Monitor
- 9.6 Principle
- 9.7 Advantage
- 9.8 Screen saver mode
- 9.9 G-Sensor sensitivity
- 9.10 Default booting display
- 9.11 Volume setting
- 9.12 Clock settings
- 9.13 Time Style
- 9.14 Speed unit
- 9.15 Daylight Saving time
- 9.16 Time zone
- 9.17 Mirror flip and upside down of rear image on/off
- 9.18 Format SD card
- 9.19 Show reversing line
- 9.20 Reversing line
- 9.21 GPS Information
- 9.22 Product information
- 10 Video Playback on PC
- 11 Trouble Shootings
- 12 Pre-cautions
- 13 Warnings
- 14 Documents / Resources
Product Overview
- We have been selling G840S (the 1080P model) for about 3 years, According to the different opinions of customers, we have developed this model-G850, the resolution of front camera improved to 4K. Thank you for your continued support.
Product Specifications
| CPU | > SSC8826Q | Picture Format | > JPG |
| RAM | > DDR3 256M | WDR Techology | > Support |
| Display Size | > 11.8 inch | Loop Recording | > Support |
| Display Type | > IPS | GPS Tracking | > Support |
| Full Touch Screen | > Support | Parking Monitoring | > Support |
| Resolution(Rear Cam) | > 1920*1080P | Power interface | > Type C |
| Resolution(Front Cam) | > 3840*2160P 2560*1440P 1920*1080P | Input voltage Working Temperature | > 5V > -20℃~70 ℃ |
| Video Format | > TS | Storage Temperature | > -30 ℃~80℃ |
Getting Started
Please read the instructions before operating.
- Please use the original power adapter provided in package, do not use other power adapter.
- You will need to insert a memory card before you can start recording. Please insert a Class-10, U3 or higher speed Micro-SD card up to 128 GB for reliable operation. (64G-Memory card is included in the package).
- Before the G850 starts running, please check the SD card and format it to ensure the smooth operation of the mirror dash cam.
- If the dash cam cannot be turned on after powering, please keep the power on and press the hole marked "R" (on the back of the mirror unit) to reset the dash cam. Please CONTACT US if it still doesn't work.
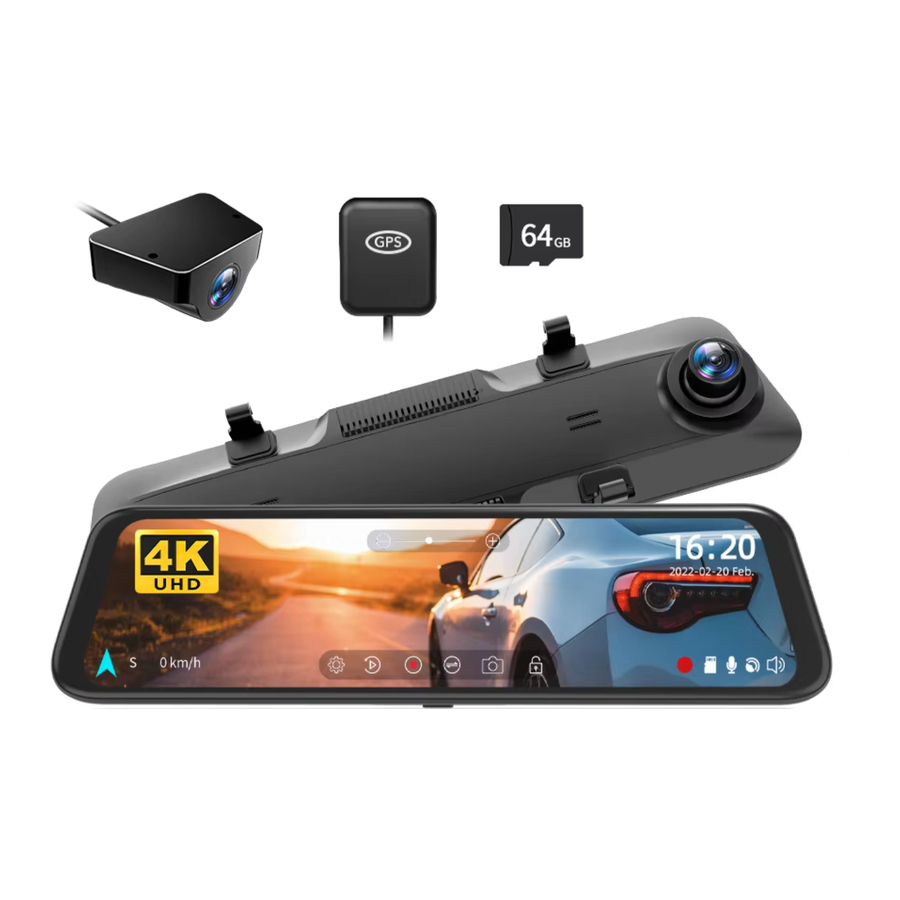
Package Contents
Tip: In addition to the original accessories in the package, we also provide separate Hardwire-Kit (used for parking monitoring and replacement of car chargers), rear camera extension cable (approximately 10m long), and the rear camera mounting bracket in the car (you can use this to install the rear camera in the car). If you need these accessories, please feel free to contact us.


Appearance

| NO. | Name | Description |
| 1 | lens | Front lens, record the front image of the car |
| 2 | Fasteners | The machine can be fixed with 2 straps |
| 3 | Reset hole | When the machine failure cannot be eliminated, you can try to restart the machine by clicking here |
| 4 | USB C | Port for charging |
| 5 | AV-IN | Port used to connect the rear lens |
| 6 | TF card slot | Provide extensible storage (class 10 Max 128GB) |
| 7 | GPS port | Used to connect GPS module (GPS function requires optional GPS antennal) |
| 8 | Power button | Short press to wake and turn off thescreen, long press to turn on and off thepower |
| 9 | Display screen | 11.8 inch touch screen display |

 | Recording status: During normal recording, it is red, turns yellow while emergency recording |  | Rear view/Front view switchable: Switch between front |
 | Click on it, the clock setting appears on the screen |  | Emergency Lock: Lock videos as event files so it won't be overwritten by loop recording |
 | Menu Setting: Touch and enter to set the screen in your favor (Please pause recording first) |  | Sound Record is on |
 | Start/Stop Recording: Record and save every precious moment |  | File Playback: Playback the video & Photo |
 | Photograph: Take photos one moment |  | Adjust the screen brightness |
About the Micro SD Card
When using a new MicroSD card, be sure to format it in the dash cam.
- Do not remove or insert a Micro SD card while the power is on.
- Use a Micro SD card with Class 10 or higher(32GB-128GB). We Recommend 64GB SAMSUNG Class 10, U3 Speed Micro-SD Card.
- For stable use, it is recommended to format the micro SD card regularly. Recommend: Once a month.
- This product will check the Micro SD card at startup and will announce if it is not inserted or damaged, that can prevent missed shots.
- Please note that memory cards have their self life span, after so many uses of overwriting data, eventually they will become inoperable. When that happens, please replace your memory card.
- Formatting will erase all recorded data.
SD card insertion and removal
- Make sure the dash cam is off when inserting or removing the SD card.
- Please press the SD card with your fingernail and you will hear a Click sound. This will keep the SD card stuck in the slot.

- Please note the insertion direction of the SD card.

Installation
Please check the functionality of dash cam with its all accessories before installation.
When you use the dash cam for the first time, the dash cam comes with factory default settings and you do not need to set it manually.
Host installation
- Piace the host on the rear-view mirror by hand, be sure to separate the silicone brackets on both sides of the rear-view mirror

- Buckle the product in the rearview mirror by silicone button

- Adjust the front lens to the right position


Rear camera installation

NOTE:
- We recommend installing the rear camera outside the car, the effect inside the car is far worse than outside the car.
- If your car is an RV or a pickup truck, you can install the rear camera forward, turn on the"mirror flip of rear image"and turn off the "Upside down of rear image" to adjust the image.
- If the rear camera cable is short for your car, we have a 33ft extension cable ( B082RZNJFY), or you can CONTACT US to get one.
- Fix the rear camera with 3M adhesive
Find the best position, tear off the 3M adhesive on the rear camera and install the rear camera near the license plate lamp.

- Remove the panel
Remove the inside panel of the trunk to expose the car's rear wiring room. pop up your trunk and look for a solid interior panel that covers the other side of the license plate mount area. Then, insert a trim removal tool or other thin device behind the panel and pry it open.

- Hide the cable
Use the trim strip removal tool to pop up the tailgate trim strip, then the cable is inserted from the outside into the trunk of the car.

- Connect the rear lens power cord to the extension cord
Connect the power cord to the rear camera extension cord after plugging in the rear camera extension cord.

- Connect the red line with Reversing control line. Reversing control lines are usually located at the rear of the car, although their position may vary, so be sure to refer to the car's manual, use pliers or a wire stripper to strip the rubber and expose live wires.

- Connect the power cord of the rear camera to the front of the car
If desired, use the trim tool to pop the windshield panel directly above the windshield. Then, pass the cable through the exposed chamber.

- Connect the car charger to the charger adapter to supply power for the dash cam

![]()
Connect the cigar plug cord connector in the correct orientation. Connecting in the wrong direction may cause malfunction or damage. If you cannot connect successfully, check the connection part carefully before connecting.
- Ignite the car and light the dash cam


How to install the GPS

GPS front and back
Installation location

Considering the use effect and installation convenience, we usually recommended customers to install it at the position specified in the picture. Of course, you can also try to install it in other locations for testing, and choose the location you think is most suitable.

Installing step
- Install the GPS Antenna onto the camera, the GPS Antenna will start to search for a GPS signal.

- Once the GPS is installed, the GPS icon on the home screen will show. After the GPS signal has been received, it will show direction and speed.


Q: Why is my GPS not working? /How to use GPS?
A: If you cannot receive the signal after inserting the GPS, please follow the steps below.
- The vehicle must be within a large area.
- Insert the GPS plug again.
- Place the GPS plug upward.
- Restart
- It will be recognized after about 40 seconds. If still cannot receive the signal, it may be a GPS problem. Please CONTACT US and we will help you solve this problem.
Hardwire Kit Installation
Dedicated Hardware Kit ASIN: B09X1L1GMX
Step:
- Stop the engine.
- Open the fuse box.
- Use a power detector to detect the constant power and ACC power (emergency power).
*note: Use an ACC power supply of 15A to 25A.Use a constant power supply below 30A. - Connect the yellow fuse to the constant power source, the red fuse to the ACC power source, and the ground terminal (black wire) to the metal part of the body.
Installation - Connect the following three cables to the car fuse box.(The position of the fuse box differs depending on the model)
Yellow cable (BATT/B+)
The yellow cable should be connected to the fuse of the constant power supply in the car fuse box. If you are looking for a constant power supply in the fuse box: Use a voltage tester to check the fuse to ensure it still have electricity even if the car engine is off.

Red cable (ACC)
Connect the red cable supply power only when the car engine starts. Testing method: The tester bulb will light when the engine is on and won't light when the engine is off.

Black cable (GND)
Connect this black cable(GND) to the metal part of the vehicle. Most cars have screws or metal parts next to the fuse box. Connect the black cable to the screw or metal part.(As in the picture below)

NOTE:
- If you can't install it, please CONTACT US, you can send us a photo of your fuse box, and we have professional technicians who can help you wire it.
Power ON/OFF
- If you turn on the engine (ACC on) while the cigar power adapter is connected, the power will be turned on automatically and the opening screen will be displayed.
- Press and hold the power button to turn off the power during startup, and then briefly press the power button again to turn on the power of the unit and display the opening screen.
- Short press the power button to wake and turn off the screen.
Menu Settings
Home-interface
After turning on the power, the machine will automatically turn on and enter the main interface, and the camera will start recording at the same time.
- Swipe the left/right screen up and down to adjust the angle of view.

- Swipe left or right to switch between front and rear cameras.

- Click the top of the screen, to adjust the brightness.


Video playback interface

| NO. | Overview | NO. | Overview |
| 1 | Normal Video: Select it to view recorded videos | 5 | Delete |
| 2 | Locked Video: Select it to check locked videos | 6 | Lock the video |
| 3 | Photos: Select it to check photos | 7 | View videos on full screen |
| 4 | Front/Rear Video Switch: Click it to switch to front/rear video |
Function interface

After powering ON the camera, press the  button to enter the setup process.(If the camera is recording video, press the
 ![]() button to stop recording before pressing the button.)
button to stop recording before pressing the button.)
- Resolution: 4K/2.5K/1080P
The front camera supports 4K/2.5K/1080P, and rear camera supports 1080P.

- Movie clip time: 1min/2min/3min
Select the recording duration for each video.


Movie Clip Time
Q: Why is every video recording so short?
A: We set the recording interval of each video to 1min/2min/3min. This is for the convenience of finding the locked video later. The main function of the recorder is to record, especially to record emergency video. If each video is too long and the G-Sensor triggers emergency recording when a collision occurs, the video will be locked and cannot be covered by the loop recording, and customers will be difficult to find the video in the subsequent search. You need slide the longer progress bar to find this locked video. And the capacity of the Micro SD card is limited, if the locked video is too long, the normal video capacity that can be stored will decrease.
Parking Monitor
(Avaliable after correctly installing the hardwire kit)
- Parking Mode: Off/12Hours/24Hours
You can choose the time of parking monitoring according to the actual situation, we have 12 hours and 24 hours.


Principle
When the hardwire kit is correctly connected and the Parking mode lapse Recording mode is turned on, the acc is out of power when the car is turned off (bat is always charged), and the dash cam detects that the acc is out of power and will stop normal recording and enter the "Lapse Recording mode". When the engine is started and the acc is powered, the machine will boot into the normal recording mode.
Advantage
- Save electricity, will not drain the car battery.
- Save the SD card space, which is 1/30 of the normal recording.
NOTE:
- This function needs to connect the hardwire kit(ASIN: B09X1L1GMX), you can buy it yourself or CONTACT US.
- If you need the introduction and installation video of the hardwire kit, please CONTACT US.
- These two modes can't be implemented simultaneously.
Screen saver mode
Off/1min/2min/3min.
If you want it to automatically turn off the screen or use it as a rearview mirror, you can set the screen saver mode.

G-Sensor sensitivity
Off/High/Middle/Low
After turning on the G-Sensor, the dash cam will lock the video when it detects bumps while driving.

NOTE:
- Recommended to adjust to medium/low
Default booting display
Choose the default camera image to display when powering on
Volume setting

Set the volume of the dash cam
Clock settings
Clock settings
Time Style
12/24H time style
Speed unit
MPH/KMH: Select the unit you need.
Daylight Saving time
ON/OFF
Time zone
(Available after installing GPS )
After plugging in the GPS, you need to set the time zone to get the correct time. After a factory reset, the time zone also needs to be reset.

| UTC -12:00 | UTC -11:00 | UTC -10:00 | UTC -09:30 |
| UTC -09:00 | UTC -08:00 | UTC -07:00 | UTC -06:00 |
| UTC -05:00 | UTC -04:30 | UTC -04:00 | UTC -03:30 |
| UTC -03:00 | UTC -02:00 | UTC -01:00 | UTC +00:00 |
| UTC +00:00 | UTC +01:00 | UTC +02:00 | UTC +03:00 |
| UTC +03:30 | UTC +04:00 | UTC +04:30 | UTC +05:00 |
| UTC +05:30 | UTC +05:45 | UTC +06:00 | UTC +06:30 |
| UTC +07:00 | UTC +08:00 | UTC +08:45 | UTC +09:00 |
| UTC +09:30 | UTC +10:00 | UTC +10:30 | UTC +11:00 |
| UTC +11:30 | UTC +12:00 | UTC +12:45 |
Mirror flip and upside down of rear image on/off
If you are installing rear camera in a forward direction (fixing the bracket downwards), please turn on "Upside down of rear image" and turn off "Mirror flip of rear image" to adjust the view.

Format SD card
Clean all the data. It is recommended to manually format the SD card once a month. Please format the SD card before first use.
This is used to restore factory settings.
Show reversing line
ON/OFF
Reversing line
(Auxiliary function)
If your car does not have a reversing system and you need a backup reversing system as an aid, you need to connect the red cable of the rear cam to the positive pole of your reversing lamp. If your car already has a reversing system, you just ignore the red cable on the rear cam.
When you shift to "r" gear, the rear view will automatically show on the screen with reversing lines for easy and safe parking. You can enter the "Reversing line" option in the settings, then adjust the angle of the reversing image and the reversing line. Also when in reversing, you can adjust the viewing angle of the image. (This function activate after the red wire of the rear camera be connected to the positive pole of the reversing light.)
When reversing, the reversing line will automatically appear on the screen, and the screen will automatically be pressed down 15° horizontally. However, due to the different installation location of each guest, manual adjustment is required.
You can adjust the viewing angle and the positions of the four corners of the reversing line in the "Reversing line" option of the settings.
The reversing line has three colors of red, yellow and green. When the object behind the car reaches the red distance, it means you can stop reversing.
Q: How do I use the reversing system when reversing the car?
A: First, you should turn on the "Show reversing line", then you can enter the "Reversing line" option in the settings to adjust the angle of the reversing image and reversing line.
GPS Information
Please install the GPS first.
To track the Location, Speed, status, Signal Strength, please go to info on the Menu Setting.

Product information
Check your version number here.
Video Playback on PC
If you need to track GPS information, please download the dedicated player, The G850 GPSPlayer download link as follows: https://wolfbox.com/gps-player/

Player interface
Please install the GPS first.
To track the Location, Speed, status, Signal Strength, please go to info on the Menu Setting.
- Click File in the upper left corner
- Click "Open" to select the file
- Start playing
NOTE:
- If you encounter problems during use, please CONTACT US.
Trouble Shootings
Please feel free to contact our customer support at service@wolfbox.com.
Why the front lens image is tilted
Please rotate the front lens to adjust the front image.
Why doesn't the rear camera work? Why can't the rear camerabe detected?
- Please confirm whether the rear cable is installed correctly, pay attention to whether the 4pin connection position is loose and whether the position of the host and the rear camera mouth is loose. Please try to reconnect.
- If still not work after reconnection, there may be a problem with the cable. Because when wiring in the car, it may cause the metal wire in the rubber to bend and cause a short circuit. Please CONTACT US and we will solve it for you.
Why can't it automatically switch to the rear camera when reversing or why can't the reversing line appear?
- Check if the 4pin is loose, and if the rear camera port of the dash cam is loose.
- Check whether the red wire of the rear camera cable is connected to the positive pole of the reverse light, please do not connect it to the brake light or other.
- If the connection is correct, please use a tester to measure whether the voltage is output from the reversing light when in reverse gear.
Why dash cam does not work/cannot be turned on/freezes/restarts repeatedly?
- Unplug the GPS, card, and rear camera cable, reset after power on again, and try to see if it can be turned on.
- If the above does not work, please contact us.
Pre-cautions
- After receiving the product, please insert the GPS, and then adjust the time zone in the "Time Zone" setting to make the time correct. If you choose to restore factory settings, you need to reset the time zone to adjust the time.
- If you have any questions or want accessories, Please CONTACT US (service@wolfbox.com), we will solve it for you and send you the accessories.
- Please read this manual carefully before using or installing the camera. Plug in the camera before installing it and verify its functionality, especially if you hire a professional to install it.
- Use the accessories provided in the box to ensure compatibility. When the power supply is plugged into a power splitter the camera will not have enough current to power on.
- Do not attempt to extend the camera wire by splicing in more wire or the camera may not work. The length of original cable for rear camera is 20 feet, suitable for most types of cars. We also have 33 feet rear camera extension cables (ASIN: B082RZNJFY) sold separately.
- If you use micro SD card capacity > 32GB, Please change micro SD card [Class10 (10MB/ sec) required] format to FAT 32 on PC (a 64GB card is inciuded in the package ).
- If you want 24H parking monitor function to guide your car parking safety, dedicated hardwire-kit(ASIN:B09X1L1GMX ) is needed.
- Please confirm whether your cigar power port is ACC.(if the cigarette lighter is still charged after the car is turned off, please use the hardwire kit or manually unplug the car charger while parking, otherwise it may exhaust your car's power supply.(Note: This happens in some Ford/Audi cars, and electric cars).
Warnings
Please use our products as required. Incorrect installation may lead to serious consequences.
- Please carefully read the instructions provided by us. If you have any doubts, please contact our staff and they will solve them for you. Please do not install incorrectly without understanding. The company will not be responsible for any consequences arising therefrom.
- Keep small accessories out of the reach of children.
![burn hazard]()
![shock hazard]()
Be sure to use included accessories and parts. Using other parts may damage the equipment or cause fire, electric shock, or malfunction.![burn hazard]()
![shock hazard]()
If this product is damaged or malfunctions, stop using it immediately and consult your dealer. Continued use may cause fire, electric shock or vehicle failure.- If the location or use of the camera interferes with driving, please do not install it. This may cause an accident.
- This product is intended to be used for reference material in the event of an accident. We do not guarantee its effectiveness as complete evidence.
- Please note that this product may infringe on privacy and other rights depending on how it is used. We are not responsible for these cases.
- Since this product uses a wide-angle lens, part of the image may be distorted. It also differs from the actual perspective. This is a characteristic of wide-angle lenses and is not a malfunction.
- If the lens needs to be cleaned, we recommend gently wiping it with a soft damp cloth to avoid scratching the lens and affecting the clarity of the video.
- This product is for DC12V/24V vehicles only.
- The specifications and appearance of this product are subject to change without notice.
- If the driving recorder is faulty or has a black screen during use, please be sure to contact us or go to a professional store for repair, please do not repair it yourself, otherwise the seller will not be responsible for the consequences.
- Do not use the charger if the cord is broken or damaged.
![burn hazard]()
![shock hazard]()
Do not disassembie or modify this product. Otherwise, it may cause a fire, electric shock or malfunction.- Please comply with local laws while using this product. Some countries have legal provisions prohibiting the installation of items on the windshield or specific areas of the windshield.
- The company is not responsible for errors in the user's installation area.


Check us out here!
We have professional customer service!
E-mail: service@wolfbox.com
Phone: +1 888 296 8399
Documents / Resources
References
Download manual
Here you can download full pdf version of manual, it may contain additional safety instructions, warranty information, FCC rules, etc.
Advertisement


Need help?
Do you have a question about the G850 and is the answer not in the manual?
Questions and answers