Table of Contents
Advertisement
Quick Links
Advertisement
Table of Contents

Related Manuals for Deye Spring RW-L5.1


Summary of Contents for Deye Spring RW-L5.1
- Page 1 User Manual Spring series LFP Battery RW-L5.1 Issue: 02 Date:20250108...
- Page 2 How to Use This Manual Read the manual and other related documents before performing any operation on the battery. Documents must be stored carefully and be always available. Contents may be periodically updated or revised due to product development. The information in this manual is subject to change without notice.
-
Page 3: Table Of Contents
Contents 1 Safety Instructions ................................3 1.1 Terms and Symbols ...............................3 1.2 Safety Rules ................................5 2 Product Description ................................6 2.1 Product Features ..............................6 2.2 Application Scenarios ............................6 2.3 Product Overview ..............................7 3 Preparation for Installation ............................10 3.1 Unpacking List .................................10 3.2 Required Tools .............................. -
Page 4: Safety Instructions
1 Safety Instructions Warning! Read and follow carefully all safety warnings and all instructions . Failure to do so may result in electrical shock, fire, serious injury, or death. Save these instructions for future reference. 1.1 Terms and Symbols Terms /Symbols Description Indicates a hazard with a high level of risk which, if not avoided, will Danger... - Page 5 Attention! The risk of explosion. Li-ion battery Do not tread Do not run and chase Do not touch with your palm Symbol for the marking of electrical and electronics devices according to Directive 2002/96/ EC. Indicates that the device , accessories and the packaging must not be disposed as unsorted municipal waste and must be collected separately at the end of the usage .
-
Page 6: Safety Rules
1.2 Safety Rules After unpacking, please check product and packing list first, if product is damaged or lack of parts, please contact with the local retailer. Before installation, be sure to cut off the grid power and make sure the battery is in the turned-off mode. -
Page 7: Product Description
2 Product Description 2.1 Product Features The lithium iron phosphate battery is one of new energy storage products, which can be used to support reliable power for various types of equipment and systems.The whole module is non-toxic, non-polluting, and environmentally friendly. This product has built-in BMS battery management system, which can manage and monitor cells information including voltage, current and temperature. -
Page 8: Product Overview
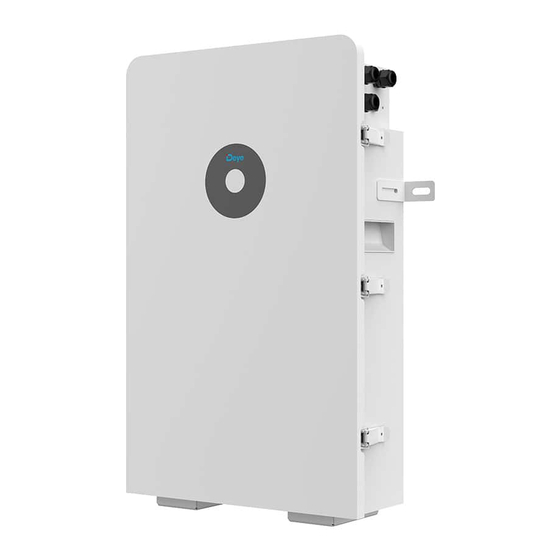
2.3 Product Overview 1. Battery parallel port + 5. Service switch (inside the protective cover) 2. Battery parallel port - 6. Protective cover 3. COM port 7. LCD screen 4. BMS switch 8. Breather valve Table-2 Product Introduction Battery parallel port+ Connect“+”port of previous or next battery among multiple parallel batteries. - Page 9 COM port Follow the CAN protocol (baud rate: 500K), used to output battery information to the PCS through connection between COM port of the battery and BMS1 port of the PCS. BMS switch To turn ON/OFF the BMS of the battery. Service switch To power on /off the battery.
- Page 10 Error Code Connotation Error Code Connotation Cell over voltage EEPROM error Cell under voltage Internal communication fails Ultimate_Protection PCS communication fails Charge over current Master address repeat Discharge over current Cur Limit Mos Adhesion Cell over temperature Mos Adhesion Susp Cell under temperature Heat Mos adhesion Cell voltage over difference...
-
Page 11: Preparation For Installation
3 Preparation for Installation After unpacking, check that packing contents are intact and complete , and free from any damage. If any item listed in the Unpacking List is missing or damaged, contact your vendor. 3.1 Unpacking List PCS communication Battery pack*1 Ground wire*1 line*1... -
Page 12: Required Tools
Hanging plate*1 Backplane*1 3.2 Required Tools These tools are required to install the battery. Hammer Drill Tape measure Hex wrench Phillips screwdriver Marker Note! Use properly insulated tools to prevent accident tale electric shock or short circuits. If insulated tools are not available, cover the entire exposed metal surfaces of the available tools, except their tips, with electrical tape. -
Page 13: Safety Gear
Safety Gear It is recommended to wear the following safety gear when dealing with the battery pack. Insulated gloves Safety goggles Safety shoes... -
Page 14: Installation Instructions
4 Installation Instructions 4.1 Installation Personnel Lithium battery is designed for outdoor use. But please avoid direct sunlight, rain exposure, snow laying up during installation and operation. Make sure that the installation location meets the following conditions: The installation area shall avoid of direct sunlight. The floor and walls are completely water proof. - Page 15 Caution! Moving heavy objects. Be careful to prevent injury when moving heavy objects. Select an suitable way to moving heavy objects according to product weight. Refer to the table-5. Weight Method Recommendation <18 kg (40lbs) Manual handling 1 person 18~32 kg (40~70lbs) Manual handling 2 persons 32~55 kg (40~70lbs)
-
Page 16: Selection Of Installation Sites
4.2 Selection of Installation Sites Caution! Batteries should be installed in a clean flat place with no direct sunlight, away from water and fire sources, and at a suitable temperature. The installation location is recommended to meet the size requirements of the figure below:(0≤N≤29)... -
Page 17: Installing The Battery
4.3 Installing the Battery 4.3.1 Wall-mounted 1) Choose appropriate locations on the wall for drilling holes. Make sure to keep the bottom of the battery away from the ground when the entire installation is finished . 2) Drill 4 holes on the wall,with a diameter of 10mm and depth of 100~110mm. 3) Fix the hanging plate onto the wall with 4 expansion bolts (M6*100). -
Page 18: Floor-Mounted
4.3.2 Floor-mounted 1) Use 2 screws of M6 to secure two fixed supports to the left and right side of the battery. 2) Make the back side of the battery close to the wall, and then mark locations of two assembly holes. Drill two holes and secure the battery to the wall in the same way as mentioned above in 4.3.1. -
Page 19: Electrical Connection
5 Electrical Connection 5.1 Wiring When batteries need to be used together in parallel, you have to open the front panel and then carry out wire connection. Buckle Positive Negative Hook Definition of IN Definition of Definition of PCS port pin OUT port pin port pin IN port... -
Page 20: Parallel Mode 1 ( The Power Of The Pcs ≤ 6Kw)
5.2 Parallel Mode 1 ( the power of the PCS ≤ 6kW) Note! When connecting battery to PCS, battery lines are allowed to be wired to ports on two sides respectively or to ports on one side at the same time. However, to wire in order, it is recommended to be the latter one. -
Page 21: Parallel Mode 2 ( The Power Of The Pcs > 6Kw)
5.3 Parallel Mode 2 ( the power of the PCS > 6kW) Schematic diagram of connection of multiple batteries system:... -
Page 22: Grounding
5.4 Grounding Your battery system must be well grounded. Proceed as follows: 5.5 Tips on Wiring Note the positive and negative ends of cables. Be careful to avoid misuse of lines used for communication between PCS and battery, battery and ... -
Page 23: Inspection, Cleaning And Maintenance
7 Inspection, Cleaning and Maintenance 7.1 General Information The battery product is not fully charged. It is recommended that the installation be completed within 3 months after arrival; During the maintenance process, do not re-install the battery in the battery product. Otherwise, the ... -
Page 24: Maintenance
7.4 Maintenance The Li-Ion battery is maintenance-free. Charge the battery to approximately > 80% of its capacity at least once every year to preserve the battery capacity. 8 Storage The battery product should be stored in a dry, cool, and cool environment; ... -
Page 25: Troubleshooting
9 Troubleshooting To determine the status of the battery system, users must use additional battery status monitoring software to examine the protection mode. Refer to the installation manual about using the monitoring software. Once the user knows the protection mode, refer to the fol- lowing sections for solutions. Fault Type Phenomenons Possible Causes... - Page 26 protection fails than 0◦C Discharge low The minimum cell The battery ambient temperature temperature is less Same as above. temperature is too low. protection fails than -20◦C Table 7: Troubleshooting By checking the above data and sending the data to the service personnel of our company, the service personnel of our company will reply the corresponding solution after receiving the data.
-
Page 27: Technical Specifications
10 Technical Specifications Main Parameter RW-L5.1 Battery Chemistry LiFePO Built-in Circuit Breaker 125A 1P, 60Vdc Capacity (Ah) Scalability Max.32 pcs in parallel Nominal Voltage (V) 51.2 Operating Voltage(V) 44.8~57.6 Nominal Energy (kWh) 5.12 Usable Energy (kWh@90% DoD) 4.61 Max. Continuous 100/120 Charge/Discharge Current (A) Peak... -
Page 28: Environmental Disposal
11 Environmental Disposal Used batteries can not be disposed of as household waste. You are obliged to handle waste batteries, such as removal of privacy on product, and return them to designated or authorized recovery point according to applicable regulations and standards on waste battery disposal. Attention: 1. -
Page 29: Transportation Requirements
12 Transportation Requirements 1. The battery products should be transported after packaging and during the transportation process. Severe vibration, impact, or extrusion should be prevented to prevent sun and rain. It can be transported using vehicles such as cars, trains, and ships. 2.
Need help?
Do you have a question about the Spring RW-L5.1 and is the answer not in the manual?
Questions and answers