Bosch Professional GLH 18V-60 Manual
- Original instructions manual (255 pages)
Advertisement
Safety Instructions
General Power Tool Safety Warnings

Read all safety warnings, instructions, illustrations and specifications provided with this power tool. Failure to follow all instructions listed below may result in electric shock, fire and/ or serious injury.
Save all warnings and instructions for future reference. The term "power tool" in the warnings refers to your mains-operated (corded) power tool or battery-operated (cordless) power tool.
Work area safety
- Keep work area clean and well lit. Cluttered or dark areas invite accidents.
- Do not operate power tools in explosive atmospheres, such as in the presence of flammable liquids, gases or dust. Power tools create sparks which may ignite the dust or fumes.
- Keep children and bystanders away while operating a power tool. Distractions can cause you to lose control.
Electrical safety
- Power tool plugs must match the outlet. Never modify the plug in any way. Do not use any adapter plugs with earthed (grounded) power tools. Unmodified plugs and matching outlets will reduce risk of electric shock.
- Avoid body contact with earthed or grounded surfaces, such as pipes, radiators, ranges and refrigerators. There is an increased risk of electric shock if your body is earthed or grounded.
- Do not expose power tools to rain or wet conditions. Water entering a power tool will increase the risk of electric shock.
- Do not abuse the cord. Never use the cord for carrying, pulling or unplugging the power tool. Keep cord away from heat, oil, sharp edges or moving parts. Damaged or entangled cords increase the risk of electric shock.
- When operating a power tool outdoors, use an extension cord suitable for outdoor use. Use of a cord suitable for outdoor use reduces the risk of electric shock.
- If operating a power tool in a damp location is unavoidable, use a residual current device (RCD) protected supply. Use of an RCD reduces the risk of electric shock.
Personal safety
- Stay alert, watch what you are doing and use common sense when operating a power tool. Do not use a power tool while you are tired or under the influence of drugs, alcohol or medication. A moment of inattention while operating power tools may result in serious personal injury.
- Use personal protective equipment. Always wear eye protection. Protective equipment such as a dust mask, non-skid safety shoes, hard hat or hearing protection used for appropriate conditions will reduce personal injuries.
- Prevent unintentional starting. Ensure the switch is in the off-position before connecting to power source and/or battery pack, picking up or carrying the tool. Carrying power tools with your finger on the switch or energising power tools that have the switch on invites accidents.
- Remove any adjusting key or wrench before turning the power tool on. A wrench or a key left attached to a rotating part of the power tool may result in personal injury.
- Do not overreach. Keep proper footing and balance at all times. This enables better control of the power tool in unexpected situations.
- Dress properly. Do not wear loose clothing or jewellery. Keep your hair and clothing away from moving parts. Loose clothes, jewellery or long hair can be caught in moving parts.
- If devices are provided for the connection of dust extraction and collection facilities, ensure these are connected and properly used. Use of dust collection can reduce dust-related hazards.
- Do not let familiarity gained from frequent use of tools allow you to become complacent and ignore tool safety principles. A careless action can cause severe injury within a fraction of a second.
Power tool use and care
- Do not force the power tool. Use the correct power tool for your application. The correct power tool will do the job better and safer at the rate for which it was designed.
- Do not use the power tool if the switch does not turn it on and off. Any power tool that cannot be controlled with the switch is dangerous and must be repaired.
- Disconnect the plug from the power source and/or remove the battery pack, if detachable, from the power tool before making any adjustments, changing accessories, or storing power tools. Such preventive safety measures reduce the risk of starting the power tool accidentally.
- Store idle power tools out of the reach of children and do not allow persons unfamiliar with the power tool or these instructions to operate the power tool. Power tools are dangerous in the hands of untrained users.
- Maintain power tools and accessories. Check for misalignment or binding of moving parts, breakage of parts and any other condition that may affect the power tool's operation. If damaged, have the power tool repaired before use. Many accidents are caused by poorly maintained power tools.
- Keep cutting tools sharp and clean. Properly maintained cutting tools with sharp cutting edges are less likely to bind and are easier to control.
- Use the power tool, accessories and tool bits etc. in accordance with these instructions, taking into account the working conditions and the work to be performed. Use of the power tool for operations different from those intended could result in a hazardous situation.
- Keep handles and grasping surfaces dry, clean and free from oil and grease. Slippery handles and grasping surfaces do not allow for safe handling and control of the tool in unexpected situations.
Battery tool use and care
- Recharge only with the charger specified by the manufacturer. A charger that is suitable for one type of battery pack may create a risk of fire when used with another battery pack.
- Use power tools only with specifically designated battery packs. Use of any other battery packs may create a risk of injury and fire.
- When battery pack is not in use, keep it away from other metal objects, like paper clips, coins, keys, nails, screws or other small metal objects, that can make a connection from one terminal to another. Shorting the battery terminals together may cause burns or a fire.
- Under abusive conditions, liquid may be ejected from the battery; avoid contact. If contact accidentally occurs, flush with water. If liquid contacts eyes, additionally seek medical help. Liquid ejected from the battery may cause irritation or burns.
- Do not use a battery pack or tool that is damaged or modified. Damaged or modified batteries may exhibit unpredictable behaviour resulting in fire, explosion or risk of injury.
- Do not expose a battery pack or tool to fire or excessive temperature. Exposure to fire or temperature above 130°C may cause explosion.
- Follow all charging instructions and do not charge the battery pack or tool outside the temperature range specified in the instructions. Charging improperly or at temperatures outside the specified range may damage the battery and increase the risk of fire.
Service
- Have your power tool serviced by a qualified repair person using only identical replacement parts. This will ensure that the safety of the power tool is maintained.
- Never service damaged battery packs. Service of battery packs should only be performed by the manufacturer or authorized service providers.
Safety Instructions for Hydraulic Cordless Punch Presses
WARNING!

Wear safety goggles.

Never reach into the work area of the tool head, unless a safe operational stop is ensured. You can only ensure that the power tool is at a safe operational stop if the punch press is fully open and the battery has been removed.
- The power tool must only be operated by trained professionals who are aged 16 or over. This will reduce the danger to persons.
- The power tool must only be operated by one person. Direct other persons out of the hazardous zone of the power tool. This will reduce the danger to persons.
- Only operate the power tool if the tool head is visible and you can ensure that no limbs are in the danger zone. This will allow you to avoid injury.
- Stop the power tool by releasing the on/off button if there is danger to persons or the machine while you are working.
- In emergencies and before starting work with the power tool, you can move the power tool into the starting position by using the mechanical return. Before setting the power tool down or after finishing work, shut down the pressing tool and depressurise it. Press the reset button to depressurise the power tool.
- Only operate the power tool by hand. The on/off button and the reset button must be within reach so that they can be pressed in an emergency.
- It is prohibited to use the power tool in a fixed position. It must be neither placed on the ground nor clamped in a clamping device for use.
- Before starting work, ensure that there are no live parts in the work area. If there are live parts in the vicinity, take appropriate protective measures. The power tool is not suitable for working on live parts.
- Remove the battery before you insert the punch press template. This safety measure prevents the power tool from being started accidentally.
- Do not operate the power tool in an explosive environment.
- Do not open the power tool. Safe operation is then no longer guaranteed and the warranty claim becomes void.
- In order to prevent the power tool from overheating, do not use the power tool in continuous operation for more than 15 minutes. The power tool is not designed for continuous operation.
- Do not touch the punching head until it has cooled down. The punching head may become hot when operated continuously.
- If you are working in an elevated position, secure the power tool sufficiently using a fall protection system and ensure that there are no persons below the work area. Wear protective headgear when carrying out overhead work. This will enable you to avoid material damage and personal injury if you inadvertently drop the power tool.
- In the event of oil loss, the power tool must be sent back to the manufacturer.
- Avoid contact with leaking hydraulic fluid. Clean your skin thoroughly with soap and water in the event of any contact. Rinse your eyes immediately with plenty of water for at least 10 minutes in the event of any contact. Contact with hydraulic fluid can cause irritation and allergic reactions.
- Only remove the battery once the power tool has been shut down safely.
- In case of damage and improper use of the battery, vapours may be emitted. The battery can set alight or explode. Ensure the area is well ventilated and seek medical attention should you experience any adverse effects. The vapours may irritate the respiratory system.
- Do not modify or open the battery. There is a risk of short-circuiting.
- The battery can be damaged by pointed objects such as nails or screwdrivers or by force applied externally. An internal short circuit may occur, causing the battery to burn, smoke, explode or overheat.
- Only use the battery in the manufacturer's products. This is the only way in which you can protect the battery against dangerous overload.
 Protect the battery against heat, e.g. against continuous intense sunlight, fire, dirt, water and moisture. There is a risk of explosion and short-circuiting.
Ensure that the coin cell is kept out of the reach of children. Coin cells are dangerous.
- Coin cells must never be swallowed or inserted into any other part of the body. If you suspect that someone has swallowed a coin cell or that a coin cell has entered the body in another way, seek medical attention immediately. Swallowing coin cells can result in severe internal burns and death within 2 hours.
Product Description and Specifications

Read all the safety and general instructions. Failure to observe the safety and general instructions may result in electric shock, fire and/or serious injury.
Please observe the illustrations at the beginning of this operating manual.
Intended Use
The power tool is intended for punching holes in sheet metal.
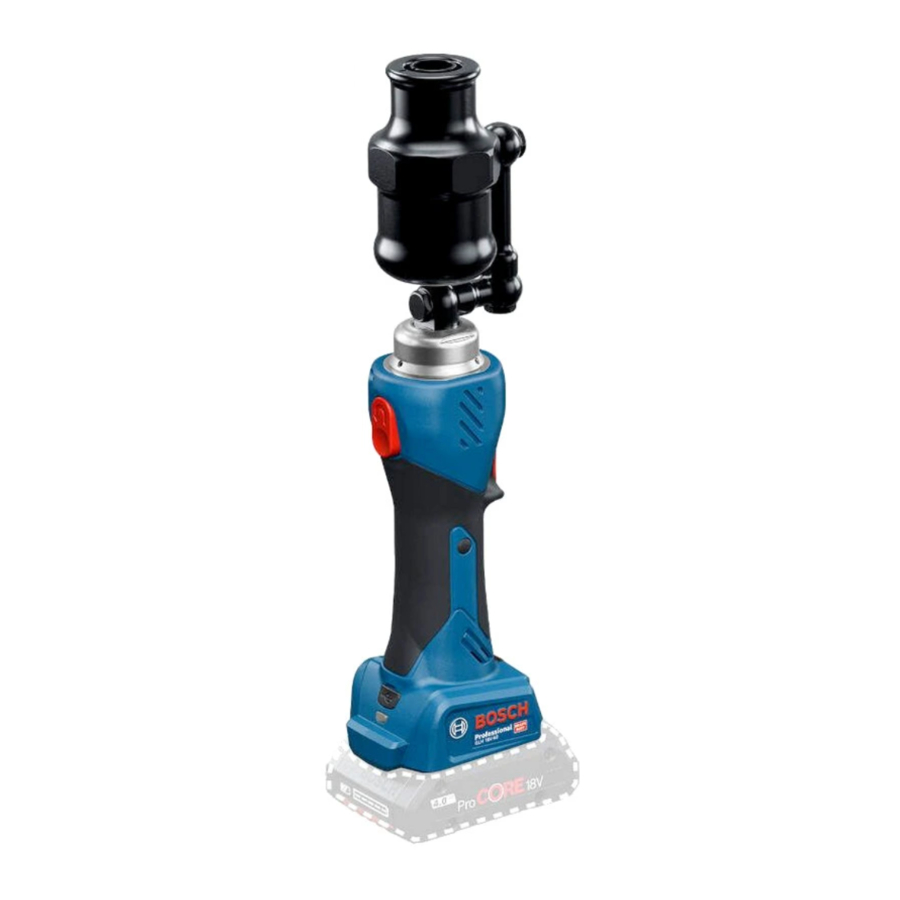
Product Features

- Punching head
- Reset button
- Status indicator
- USB port
- Rechargeable batterya)
- Battery release buttona)
- Worklight
- Handle (insulated gripping surface)
- On/off button
- Tension bolt
- Spacer bushing
- Diea)
- Puncha)
a) This accessory is not part of the standard scope of delivery.
Technical Data
| Hydraulic cordless punch press | GLH 18V‑60 | |
| Article number | 3 601 JP0 2.. | |
| Rated voltage | V | 18 |
| Max. pressing force | kN | 60 |
| Max. sheet thickness | ||
| mm | 3 |
| mm | 2.5 |
| Punch head turning range | ° | 360 |
| USB standard for power tool | USB 2.0 | |
| USB cable for data transfer (commercially available) | USB Type-C®A) | |
| WeightB) | kg | 2.2 |
| Recommended ambient temperature during charging | °C | 0 to +35 |
| Permitted ambient temperature during operationC) | °C | –10 to +50 |
| Permitted ambient temperature during storage | °C | −20 to +50 |
| Recommended rechargeable batteries | GBA 18V... ProCORE18V... | |
| Recommended battery chargers | GAL 18... GAX 18... GAL 36... | |
A) USB Type-C® and USB-C® are trademarks of USB Implementers Forum.
В) Weight without rechargeable battery (Weight of rechargeable battery can be found on http://www.bosch-professional.com)
C) Limited performance at temperatures < 0°C
Values can vary depending on the product, scope of application and environmental conditions. To find out more, visit www.bosch-professional.com/wac.
Noise/Vibration Information
Noise emission values determined according to EN 62841‑1.
Typically the A-weighted sound pressure level of the product is less than 70 dB(A). The noise level when working can exceed the declared values.
Wear hearing protection!
Vibration total values ah (triax vector sum) and uncertainty K determined according to EN 62841‑1:
ah < 2.5 m/s², K = 1.5 m/s².
The vibration level and noise emission value given in these instructions have been measured in accordance with a standardised measuring procedure and may be used to compare power tools. They may also be used for a preliminary estimation of vibration and noise emissions.
The stated vibration level and noise emission value represent the main applications of the power tool. However, if the power tool is used for other applications, with different accessories or is poorly maintained, the vibration level and noise emission value may differ. This may significantly increase the vibration and noise emissions over the total working period.
To estimate vibration and noise emissions accurately, the times when the tool is switched off or when it is running but not actually being used should also be taken into account. This may significantly reduce vibration and noise emissions over the total working period.
Implement additional safety measures to protect the operator from the effects of vibration, such as servicing the power tool and accessories, keeping their hands warm, and organising workflows correctly.
Rechargeable battery
Bosch sells some cordless power tools without a rechargeable battery. You can tell whether a rechargeable battery is included with the power tool by looking at the packaging.
Charging the battery
- Use only the chargers listed in the technical data. Only these chargers are matched to the lithium-ion battery of your power tool.
 Note: Lithium-ion rechargeable batteries are supplied partially charged according to international transport regulations. To ensure full rechargeable battery capacity, fully charge the rechargeable battery before using your tool for the first time.
Inserting the Battery
Push the charged battery into the battery holder until it clicks into place.
Removing the Battery
To remove the rechargeable battery, press the battery release button and pull the battery out. Do not use force to do this.
The rechargeable battery has two locking levels to prevent the battery from falling out if the battery release button is pressed unintentionally. The rechargeable battery is held in place by a spring when fitted in the power tool.
Battery charge indicator
Note: Not all battery types have a battery charge indicator.
The green LEDs on the battery charge indicator indicate the state of charge of the battery. For safety reasons, it is only possible to check the state of charge when the power tool is not in operation.
Press the button for the battery charge indicator  or
or  to show the state of charge. This is also possible when the battery is removed.
If no LED lights up after pressing the button for the battery charge indicator, then the battery is defective and must be replaced.
Battery model GBA 18V...

| LED | Capacity |
| 3× continuous green light | 60–100% |
| 2× continuous green light | 30–60% |
| 1× continuous green light | 5–30% |
| 1× flashing green light | 0–5% |
Battery model ProCORE18V...

| LED | Capacity |
| 5 × continuous green light | 80–100% |
| 4 × continuous green light | 60–80% |
| 3 × continuous green light | 40–60% |
| 2 × continuous green light | 20–40% |
| 1 × continuous green light | 5–20% |
| 1 × flashing green light | 0–5% |
Recommendations for Optimal Handling of the Battery
Protect the battery against moisture and water.
Only store the battery within a temperature range of −20 to 50°C. Do not leave the battery in your car in the summer, for example.
Occasionally clean the ventilation slots on the battery using a soft brush that is clean and dry.
A significantly reduced operating time after charging indicates that the battery has deteriorated and must be replaced. Follow the instructions on correct disposal.
Assembly
- Before carrying out any work on the power tool (e.g. maintenance, tool change etc.), remove the battery from the power tool. There is risk of injury from unintentionally pressing the on/off switch.
Fitting the Punching Tool
(see figures A−B)

Select the parts to be fitted to match the size of the required punched hole. The punching tools are designed for sheet steel up to 3 mm thick and stainless steel up to 2.5 mm thick.
Further information about the recommended Bosch punching tools can also be found at www.bosch-pt.com or via a sticker in the power tool's XL-BOXX.

Ensure that the tension bolt, spacer bushing, die and punch are clean and in perfect technical condition.
Lightly grease the threads of the tension bolt (10) (grease tube: 1 615 430 010). Screw the tension bolt (10) into the punching head (1).
First place the appropriate spacer bushing (11) and then the die (12) onto the tension bolt.
Note: For smaller thread sizes (in accordance with the specifications in the table), the appropriate spacer bushing (11) must be used. However, their use is also recommended for larger thread sizes, as the spacer bushing shortens the working path and thus the punching process.
Operation
Punching Preparation and Punching Process
- Only insert the rechargeable battery into the power tool just before starting the punching process. If, for example, you inadvertently press the on/off button (9) during the preparations for punching, there is a risk of injury.
- Do not operate the power tool without inserting the punching tool or without sheet metal between the die and the punch.
- In order to prevent the power tool from overheating, do not use the power tool in continuous operation for more than 15 min.
Punching preparation:
- Drill a hole in the sheet metal that is approx. 0.5 mm larger than the diameter of the mounted tension bolt(10) (e.g. with a step drill).
- Insert the tension bolt through the pre-drilled hole. Turn or swivel the punching head(1) so that the die (12) is flat on the sheet metal.
- Screw the punch(13) that matches the mounted die onto the tension bolt until it rests against the sheet metal with slight pressure.
Punching process:
- Insert the rechargeable battery into the power tool.
- To switch on and start the punching process, press and hold the on/off button (9). The worklight (7) lights up.
- Once the power tool has detected a complete punching operation, the tension bolt (10) retracts with the punch (13) and the motor switches off automatically. Release the on/off button (9). The worklight will go out automatically after approx. 10 s.
End the punching process manually:
- To end the punching process prematurely, release the on/ off button(9) during the punching process. The punching process stops.
- If the punching process is stopped prematurely or if the tension bolt(10) does not retract automatically after the end of the punching process, press the reset button (2). Press and hold the reset button until the tension bolt has returned to its starting position.
Remove the battery from the power tool. Unscrew the punch (13) from the tension bolt and remove the punch remnant from the die (12).
If the status indicator (3) lights up green at the end of the punching process, the maximum pressure has been reached and a full punching operation is detected. If the punching was not successful, the status indicator lights up red.
Sleep Mode and Restart Protection
For safety reasons, the power tool will be put into sleep mode in the following cases:
- If it has been more than 5 min since the battery was inserted or the tool has not been used for more than 5 min after the last punching process,
- If the on/off button (9) is pressed while the battery is being inserted (as restart protection). In this case, briefly press the on/off button (9) once to activate the power tool. Then start the punching process as usual.
Status indicators
| Colour of the status indicator (3) | Meaning | Corrective measure |
| After inserting the rechargeable battery/waking up from sleep mode: | ||
| Green (3 s) | Power tool ready for use | − |
| Yellow (3 s) | There are fewer than 1000 work cycles remaining until the end of the maintenance interval. | Schedule maintenance with an authorised Bosch after-sales service centre. |
| Red (3 s) | Battery too weak for punching process | Charge/change battery |
| Battery and/or power tool outside the operating temperature range | Allow the battery and the power tool to reach the correct temperature range | |
| After completion of the punching process/during operation: | ||
| Green (3 s) | Punching successful | − |
| Yellow (continuous) | Maintenance interval of 20,000 work cycles exceeded | Send the power tool to an authorised Bosch aftersales service centre for maintenance. |
| Red (3 s) | No complete punching operation, internal fault of the power tool or power tool outside the operating temperature range |
|
The specific error messages can also be accessed via the Bosch Read-Out Software.
Reading Out Work Results with the Bosch Read-Out Software
The power tool saves data such as pressure and working time for each work process. To read out this data, you need the Bosch Read-Out Software, which you can download free of charge from www.bosch-professional.com. Install the software and follow the installation instructions. In the software, you can also see how many work cycles are still outstanding until the next maintenance interval.
To transfer log entries, open the flap for the USB port (4) and connect the power tool with your PC via a USB Type-C® cable. A rechargeable battery must be inserted into the power tool to access the log entries.
Maintenance and Service
Maintenance and Cleaning
- Before carrying out any work on the power tool (e.g. maintenance, tool change etc.), remove the battery from the power tool. There is risk of injury from unintentionally pressing the on/off switch.
- To ensure safe and efficient operation, always keep the power tool and the ventilation slots clean.
Keep the power tool dry. Only wipe off any dirt using a damp cloth.
Only store and transport the power tool in the XL‑BOXX. To ensure that the power tool is operating safely for as long as possible, the power tool requires maintenance after 20,000 work cycles, or after 4 years at the latest. Once 20,000 work cycles have been exceeded, the status indicator (3) will light up yellow continuously. Send the power tool to an authorised Bosch after-sales service centre for maintenance.
Documents / Resources
References
Download manual
Here you can download full pdf version of manual, it may contain additional safety instructions, warranty information, FCC rules, etc.
Advertisement


Need help?
Do you have a question about the Professional GLH 18V-60 and is the answer not in the manual?
Questions and answers