Xtool P2 Manual
- Instructions manual (26 pages) ,
- Quick start manual (13 pages) ,
- User manual (8 pages)
Advertisement
Overview
Note: Accessories do not come with the machine and need to be purchased separately.
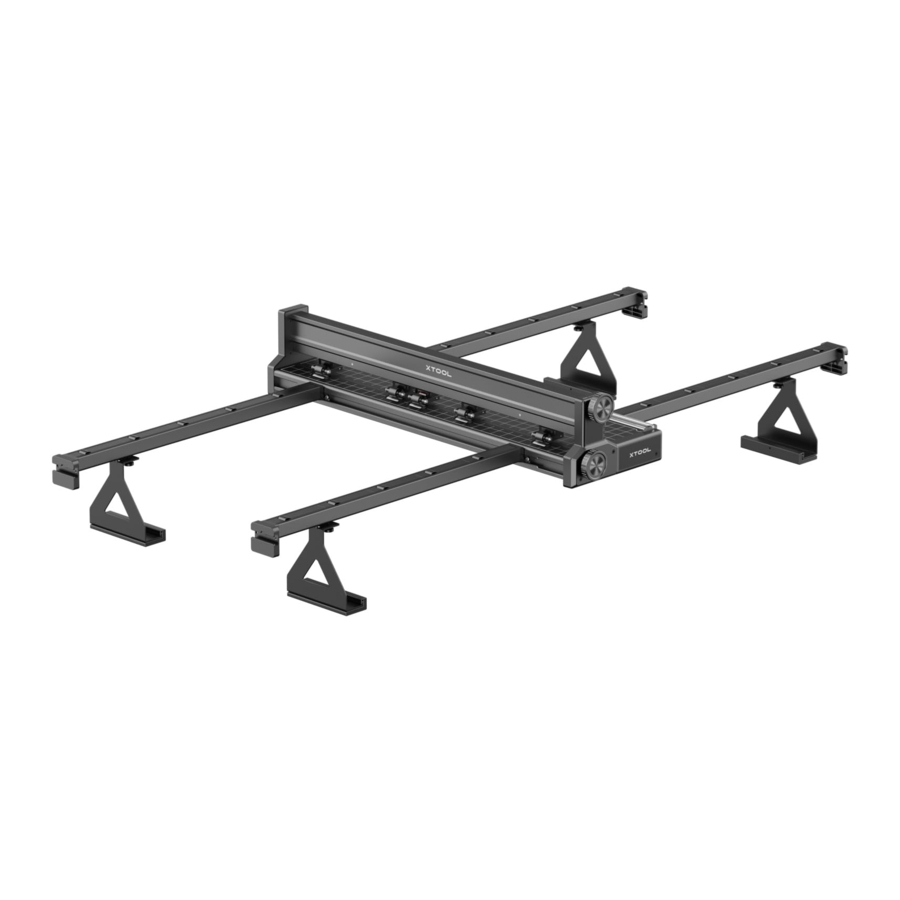
xTool conveyor feeder is designed for xTool laser processing machines to feed materials in conveying mode, allowing the machines to process materials that are too long for them. With xTool conveyor feeder, you can create larger and cool works.
Specification
| Applicable to | Maximum material length supported | Maximum material thickness supported |
| xTool P2 | 3 m | 14 mm |
List of items
 Conveyor feeder |  Conveyor rail |
 Conveyor rail riser |  Conveyor rail riser block |
 Motor cable clamp |  Level adapter |
 Material pressing rod |  Cable tie |
 Cable tie holder |  Screw M4*20 |
 Screw M3*8 |  Screw M4*12 |
 Hex key |  User manual |
Meet your conveyor feeder

Assemble the conveyor feeder
Tips: It is recommended that you read - Tips for using the product before using the product.

For materials of thickness 0

- Press and open the front and rear door panels of xTool P2.

- Place the baseplate of xTool P2 at level 2a to help assemble the conveyor feeder.

Tips: DO NOT put the baseplate into xTool P2 totally. You need to keep a distance of 10cm from the left front corner of the riser base.

- Prepare the screws M4*20.
Place the conveyor feeder on the baseplate of xTool P2. Tighten screw A first, but do not tighten it fully.

- Tighten screw B.

- Tighten screw A fully.

- Put the conveyor rail riser block to the bottom of the conveyor rail riser and tighten the screw clockwise.

- Turn over the conveyor rail.

- Place the conveyor rail riser on the rear part (on the fourth section of the conveyor rail) of the conveyor rail.

- Determine the position of the riser on the conveyor rail and tighten the screw on the riser.

- Fit the other rail risers and their blocks on the other two conveyor rails in the same way.

- Put two conveyor rails into the groove of the conveyor feeder.

- Slide the conveyor rails left and right according to the width of the material to be processed.

- Determine the position of the conveyor rails and tighten four screws (M4*12) to the conveyor feeder.

- Peel off the tape to stick the cable tie holder on the back of xTool P2 (right side of the smoke exhaust pipe).


- Insert the cable tie into the cable tie holder.

- Arrange the smoke exhaust pipe with the cable tie holder, and make it not block the conveyor rails.

- Fit the other two conveyor rails on the other side of the conveyor feeder.
Note: Fit the conveyor rails with marks on this side, or they may be damaged due to the incorrect position.

Tips: Ensure that the width between the rails is the same on both the left and right sides of the conveyor feeder.

- Assembly completed!


For materials of thickness 8 ≤ H ≤ 14 mm

- Press and open the front and the rear door panel of xTool P2.

- Place the baseplate of xTool P2 at level 2a to help assemble the conveyor feeder.

Tips: DO NOT put the baseplate into xTool P2 totally. You need to keep a distance of 10cm from the left front corner of the riser base.

- Assemble the level adapter and screws on the conveyor feeder and tighten the screws clockwise.
![]()
Put the screw on the first and third holes (count from the left) of the level adapter.

- Prepare the screw M4*20.
![]()
Place the conveyor feeder on the baseplate of xTool P2. Tighten screw A first, but do not tighten it fully.

- Tighten screw B.

- Tighten screw A fully.

- Turn over the conveyor rail.

- Put the conveyor rail riser on the rear of the conveyor rail. (on the fourth section of the conveyor rail)

- Make sure the position of the conveyor rail riser and put it on the conveyor rail, then tighten the screw clockwise.

- Fit the other rail risers on the other two conveyor rails in the same way.

- Find the groove in the conveyor feeder and insert two conveyor rails into it.

- Move the conveyor rails left and right according to the width of materials.

- Tighten the conveyor rails to the conveyor feeder with four screws.

- Peel off the tape of the cable tie holder and stick to the back of xTool P2.
(right side of the smoke exhaust pipe)


- Insert the cable tie to the cable tie holder.

- Arrange the smoke exhaust pipe and make it not block the conveyor rail.

- Fit the other two conveyor rails on the other side of the conveyor feeder.
![]()
Note: Fit the conveyor rails with marks on this side, or they may be damaged due to the incorrect position.

Tips: Ensure that the width between the rails is the same on both the left and right sides of the conveyor feeder.

- The assembly of the conveyor feeder completed!


Use the conveyor feeder
- Connect the conveyor feeder to your device.
![]()
Peel off the tape from the back of the cable clamp. Stick the cable clamp on the top of the right guide rail panel (at a distance of 10 cm from the motor cable port).

Arrange the motor cable around the cable clamp and make it not block the conveyor rails. Then connect the motor cable to the port.

- Place a material
Turn the upper knob anticlockwise to raise the pinch rollers and place a material in.

Put the material to be processed in the conveyor feeder.

Tips: Align the material with the grids on the conveyor feeder and convey the material to the device, so that the material is parallel to the conveying direction.

Turn the upper knob clockwise to lower the pinch rollers to press the material in place, so that it won't slip or run away during processing.
For the pressure level, refer to "Pressure levels recommended for common materials".
You can rotate the lower knob to slightly adjust the position of the materials, if needed.

Here is the processing area of laser module:

- Power on the device and connect it to XCS
Connect to the power supply that on the back of xTool P2 and turn on the power switch.

Power on the device and connect it to XCS.
Tips: For details about how to use XCS, visit support.xtool.com. You can join the xTool community at community.xtool.com to obtain more tutorials, tricks and tips, and creation inspiration.


You can visit Unboxing xTool P2 Conveyor Feeder to find the tutorial video.
Tips for using the product
About the pinch rollers
- Do not set the pressure of the pinch rollers too high, or the conveyor feeder may fail to work properly.
- Set the pressure of the pinch rollers according to the material to be processed. For details, see "Pressure levels recommended for common materials".
- Cover the pinch rollers with the material fully. If the material is close to the edge of pinch rollers, interference is caused between the conveyor feeder and pinch rollers.


About the conveyor rails
- When you process a soft and thin material (such as kraft paper), the material pressing rod, instead of the conveyor rails, is needed. The material can be hung down on both sides of the working area of conveyor feeder, and therefore no interference is caused by the gaps between the rails.

- Place the conveyor rails parallel to the conveying direction of a material, when possible.
- Add conveyor rails according to the length of the material to be processed.
Make sure that the part of a material hung in the air is no longer than 30 cm. To use more conveyor rails, you need to purchase them. You can visit xtool.com to purchase them. - Adjust the distance between the rails according to the width of a material to be processed. Make sure that each part of the material is evenly pressed, when possible. Otherwise, material distortion may be caused and thus pattern deformation is caused.

About materials
- Use flat materials.
- Make sure that the edges of materials are not warped.
- Soft materials are easy to distort and may not be accurately conveyed. When you process a soft and thick sheet (such as cork board and EVA foam board), stick PET tape on its back and before processing. Ensure that the whole material is covered by the PET tape.
PET tape is not included in the pack. You can visit xtool.com to purchase them.
![]()

About cleaning
- If there are many residues under the pinch rollers (such as wood chips), you can turn over the conveyor feeder, and clean the pinch rollers with a brush while turning the knob.

- If the smoke produced from the materials and working area can't emit in time and cause the baseplate dirty. You can clean it with the cleaning cloth and alkaline cleanser.


Others
- Before you use the conveyor feeder, arrange the connection cables, power cables, and other items that may block the feeding of materials.
- The distance between the pinch rollers and the working area is 20 cm. Ensure the length of the material is at least 20 cm longer than that of the pattern to be processed. Otherwise, the material can't return when the processing is completed.


Pressure levels recommended for common materials
You can find the pressure level window from the middle of the conveyor feeder (on the back of the middle pinch roller).

Tips: The color you see in the pressure level window indicates the pressure level.

| Material name | Thickness | Pressure level |
| Plywood | 3 mm |  |
| Plywood | 6 mm |  |
| Plywood | 9 mm | |
| Plywood | 14 mm |  |
| Acrylic | 3 mm |  |
| Acrylic | 7 mm | |
| Acrylic | 12 mm | |
| Fiberboard | 3 mm |  |
| Fiberboard | 6 mm | |
| Fiberboard | 12 mm | |
| EVA board | 5 mm |  |
| EVA board | 10 mm |  |
| Felt board | 5 mm |  |
| Felt board | 9 mm | |
| Cork board | 12 mm | |
| Kraft paper | 300 g | |
After-sales services
If your problem is still unsettled, contact us at support@xtool.com.
Documents / Resources
References
xTool Support Center
xTool Community
Unboxing xTool P2 Conveyor Feeder - xTool Support Center
![xtool.com]() xTool Laser | Desktop CO2, Fiber & Diode Laser Cutter
xTool Laser | Desktop CO2, Fiber & Diode Laser Cutter
Download manual
Here you can download full pdf version of manual, it may contain additional safety instructions, warranty information, FCC rules, etc.
Advertisement


Need help?
Do you have a question about the P2 and is the answer not in the manual?
Questions and answers