
Subscribe to Our Youtube Channel
Related Manuals for Xtool Anycut KNC81


Summary of Contents for Xtool Anycut KNC81
- Page 1 Anycut KNC81 Key Cutting Machine User Manual Shenzhen Xtooltech Intelligent Co., LTD...
-
Page 2: Trademarks
Intelligent CO., LTD. In countries that the trademarks, service marks, domain names, logos and the name of the company are not registered, Xtool claims that it still reserves the ownership of the unregistered trademarks, service marks, domain names, logos and the company name. -
Page 3: Copyright
ECLARATION This manual is designed for the usage of Anycut KNC81 Key Cutting Machine, and provides operating instructions and product descriptions for users of the Anycut KNC81 Key Cutting Machine. No part of this manual can be reproduced, stored in a retrieval... - Page 4 All information, specifications and illustrations in this manual are based on the latest configurations and functions available at the time of printing. Xtool reserves the right to make changes at any time without notice. PERATION NSTRUCTIONS...
-
Page 5: Cautions
If you are not using the machine for a long time, please pull out the power supply. Do not put this machine into humid, greasy, or dusty areas. Do not put any tools or containers on the machine. ... -
Page 6: Table Of Contents
ONTENT TRADEMARKS............................I COPYRIGHT............................II DECLARATION............................. II OPERATION INSTRUCTIONS......................III CAUTIONS!............................IV AFTERSALES-SERVICES.........................IV GENERAL INTRODUCTION......................3 KNC81 Main Unit................4 Front View of Machine ........................4 Back View of Machine ........................5 Clamp....................6 Technical Specifications..............7 GETTING STARTED........................8 How To Install..................8 Installing Cutter & Probe ......................... 8 Installing Clamp .......................... - Page 7 Machine Information................23 Process Settings................24 Height Level Adjustment..............24 Motor Test..................26 Probe & Cutter Sensor Test............27 UPDATE............................28 KEY CUTTING..........................29 Vehicle Database................29 Key Code Processing..............31 All Key Lost Search................. 32 Quick Copy..................34 SETTINGS............................. 36 REMOTE SUPPORT........................37 MAINTENANCE INSTRUCTIONS.................... 38 SHENZHEN XTOOLTECH INTELLIGENT CO., LTD..............39...
-
Page 8: General Introduction
ENERAL NTRODUCTION Anycut KNC81 key cutting machine is a professional device that is customized for global locksmith communities. It’s portable, lightweight, fast and accurate, designed to cut various car mechanical keys precisely. As an innovative portable key cutting machine, Anycut has these following features: ... -
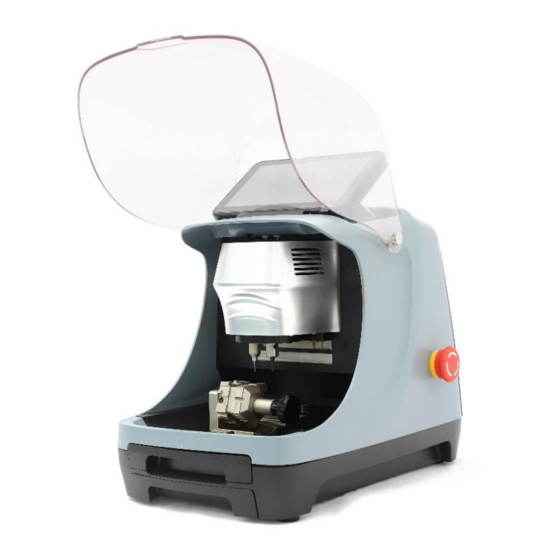
Page 9: Knc81 Main Unit
KNC81 MAIN UNIT The main unit of the Anycut is the key cutting machine itself. It is used to finish the cutting process. FRONT VIEW OF MACHINE Protection Cover: Close it to avoid debris spattering around when the machine is working. ... -
Page 10: Back View Of Machine
Emergency Start/Stop Button: Rotate the button clockwise to start the machine, push the button to emergency shut down the machine. Clamp Holder: Used to hold and lock the clamp. It’s controlled by X/Y-axis motors for cutting keys. Debris Tray: Used to collect debris when cutting keys. ... -
Page 11: Clamp
CLAMP To cut the keys properly, Anycut needs a clamp to hold the keys and key blanks tight. The picture below shows the 5-side clamp that is fitted with the Anycut key cutting machine. Markers: Align the keys to the markers to hold the key in place. Tightness Adjustment Screw: Use a hex wrench to adjust the tightness of the clamp. -
Page 12: Technical Specifications
TECHNICAL SPECIFICATIONS Description Item Android 5.1 Quad-core processor 1.8GHz Processor 7-inch touch screen, 1024×600 resolution Display OTA Update via Wi-fi Upgrade 705×349×380 mm Size (Package) 397×256×303 mm Size (Main Unit) 18Kg Net Weight Ball screw motors for XY axis Motors ... -
Page 13: Getting Started
ETTING TARTED HOW TO INSTALL Before you are using Anycut Key Cutting Machine, you need to install all the components properly to make it works. INSTALLING CUTTER & PROBE 1) Take out the cutter and the probe and take the screw out from the holders. -
Page 14: Installing Clamp
The uninstallation process is almost the same – take the screw out and pull the probe and cutter out. The cutter is a sharp object so please protect your hands when installing or uninstalling. INSTALLING CLAMP 1) Make sure the clamp holder is on the left side of the machine, and the switch is unlocked (heading right). -
Page 15: Changing Sides Of The Clamp
CHANGING SIDES OF THE CLAMP 1) Rotate the knob clockwise on the clamp until the limit marker comes out from the right of the clamp. 2) Rotate the clamp to the suitable side. INTRODUCTION TO THE CLAMP There are 5 sides for the clamp. Each side could be used for different key or key blanks. - Page 16 1) Side A: Used for side milling keys & face milling keys. 2) Side B: Used for inner milling keys. 3) Side C: Used for inner milling keys. 4) Side D: Used for inner milling keys & side milling keys.
- Page 17 5) Side E: Used for side milling keys & face milling keys. Please make sure that the key blank is leveled to the surface of the key blank and the head (or shoulder) of the key is basically aligned with the marker. The pictures below are some examples of the wrong placements.
-
Page 18: Guide To Activation
GUIDE TO ACTIVATION After first time users turn on the system, the system will automatically enter the guide process and request the user to select the system operating language. After selecting the system language, click Next to enter the Wi-Fi connection page, as shown below:... - Page 19 Select a network to connect to on the Wi-Fi connection page. After successful network connection, the automatic system will jump to Factory mode to download the software: Once the software has been downloaded, the tablet will automatically reboot and request the system language selection again.
- Page 20 After setting the system language, you will enter the activation page, as shown in the figure below. You can also click the "Trial" button in the upper right corner to try it out before activation. Click Start Activate to enter the activation page, as shown below:...
- Page 21 A pop-up window showing Activation Success indicates that you have completed the first boot setup, click OK to enter the KeyMachine app and start using the machine. If you failed to register the device, please check your network or contact Xtool aftersale services.
-
Page 22: Main Interface
MAIN INTERFACE ANDROID SYSTEM As shown in the figure below, this interface is the main page of the operating system of the device. You can also return to this interface at any time by clicking【 】on the bottom navigation bar. The icons on the right, from top to bottom, are browser, photo album, application menu, file manager, system settings, as shown below:... - Page 23 TeamViewer a) Browser: Click on the browser icon to enter the browser to view the official website of Xtool or search for other information. b) Gallery: Click the Gallery icon to enter the album to quickly view the pictures or screenshots stored in the device. You can...
- Page 24 select the picture you need, click the share button on the upper right, and send the picture to your mobile phone or PC via Bluetooth or USB connection. c) Application Menu: Here you can check all the apps installed in this machine and you can manage the apps. d) ES File Explorer: Here you can manage the files in the device, and you can also use Local/Home/Cleaner to clean up files.
- Page 25 g) KeyMachine: The App allows you to finish the key cutting process.
-
Page 26: App Menu
APP MENU Once activated, you will automatically enter the KeyMachine app with the following main screen. Or you can click the icon on the menu, the main interface will be shown as below: 1) Vehicle Database: Get access to our vehicle database and cut key by the vehicle you’re choosing. -
Page 27: Navigation Buttons
Quick copy will not be shown in this menu. 7) Favorites: Shows the key types that you marked as favorites. 8) Upgrade: Shows updates for app, database and firmware. 9) Settings: Shows settings for the app, like language settings. NAVIGATION BUTTONS Instructions for operating the navigation bar buttons at the bottom of the screen, as described in the table below:... -
Page 28: Process
ROCESS The “Process” button in the main menu shows various settings, tests and adjustment methods of the machine itself. We suggest to check this menu before you start the machining process. MACHINE INFORMATION Here it will show the machine information of the machine, like the serial number, activation date, software version, etc. -
Page 29: Process Settings
PROCESS SETTINGS Here you can select the options when machining, such as revolution speed for spindle motor, the size of the cutter, and you can select whether the protection is on or off. Please change the cutter diameter whenever you changing to a different cutter. HEIGHT LEVEL ADJUSTMENT This should be done before you use this machine for the first time, and every time after you installed a new cutter or probe. - Page 30 Follow the instruction on the screen and adjust the height of the cutter and probe using hex wrench, then click “start” to start the adjustment process. After the probe touched the surface of the clamp and stopped, please follow the instructions on the screen and adjust the cutter until it’s aligned to the probe, then click “next”.
-
Page 31: Motor Test
Click “save settings” and finish the adjustment process. MOTOR TEST Here you can test the motors in the machine and check if they can move properly. If there are any issues with the motors, please contact Xtool aftersales services. -
Page 32: Probe & Cutter Sensor Test
PROBE & CUTTER SENSOR TEST Normally the probe and the cutter can detect metal like keys or clamp. This menu can test if the sensors of the probe and cutter are working properly. To do that, press “start testing” and put a key (or key blank) between the probe (or cutter) and the clamp, and check the status on the screen. -
Page 33: Update
PDATE After activating the machine, we suggest updating the software in "Update”. When connected to network, it will search for the latest app/firmware/database update, and you can download them as needed. To get the latest update, open the app and click UPDATE, shown as below: When you get into this menu, it will check update manually and shows you what’s in this update. -
Page 34: Key Cutting
UTTING In this section we will show you how to cut keys via different menus. VEHICLE DATABASE Click “Vehicle Database” menu and select the brands. After selecting the brands, get in the model selection menu. Here we take 2010+ Honda Accord as an example:... - Page 35 Click the correct model year and you will get into the operation menu. Now follow the instructions on the right and install the key. Under the instruction diagram you can see these options: a) Start cutting key: Input the cutting code of the key (on the left) and insert the key blank to start cutting key by the code.
-
Page 36: Key Code Processing
b) Key learning: Input a key that’s with the vehicle. The machine will detect the cutting code of the key and will show it on the left. After learning, press “start cutting key” to copy the original key. c) Missing teeth search: For some vehicles, the door lock missed some of the teeth compared to the ignition lock. -
Page 37: All Key Lost Search
Select the key type and you will get to the operation menu. Then you can work as the same, choose an option and start machining. ALL KEY LOST SEARCH When in an all-key-lost situation, you can find the cutting code from the database by the key code provided by the manufacturer or carved on the lock. - Page 38 Then follow the instruction and insert the key code, click “search”. Select the type of key from the searching result menu, click it and get into key operation menu. The screen will show the cutting code automatically, start machining by clicking “start cutting key”.
-
Page 39: Quick Copy
QUICK COPY When you have an existing key on your hand, you can simply copy it via “quick copy” menu. To do that, click “Quick Copy” menu and choose the key type that you’re copying. Select the alignment method and the correct side of the clamp. - Page 40 Confirm the key type and the side of the clamp, put the original key into the clamp and click “key duplication” to copy it. After copying the key, remove the original key, put the correct key blank into the clamp, and click “cutting key” to start the process. ...
-
Page 41: Settings
ETTINGS Here you can change the universal settings like the brightness of the screen, the time that the screen shuts down automatically, the network status, and language settings. -
Page 42: Remote Support
EMOTE UPPORT When you meet any issues, you can contact Xtool aftersales services that can help you to deal with the problem. Sometimes our engineers will ask you for remote control. To do that, please connect your machine to the Internet, find “Teamviewer Quicksupport”... -
Page 43: Maintenance Instructions
AINTENANCE NSTRUCTIONS 1. To keep the precision of this key cutting machine, please make sure that you clean it often and clear away the debris inside the machining area. 2. Do not use oil-based products to clean the components of the machine, or it might damage or corrode the parts in it. -
Page 44: Shenzhen Xtooltech Intelligent Co., Ltd
., L HENZHEN TOOLTECH NTELLIGENT Company address: 17&18/F, Building A2, Creativity City, Liuxian Avenue, Nanshan District, Shenzhen, China Factory address: 2/F, Building 12, Tangtou Third Industrial Zone, Shiyan Street, Baoan District, Shenzhen, China Service Hotline: 0086-755-21670995/86267858 Email: marketing@Xtooltech.com Fax: 0755-83461644 Website: www.Xtooltech.com...
Need help?
Do you have a question about the Anycut KNC81 and is the answer not in the manual?
Questions and answers