Advertisement
List of items

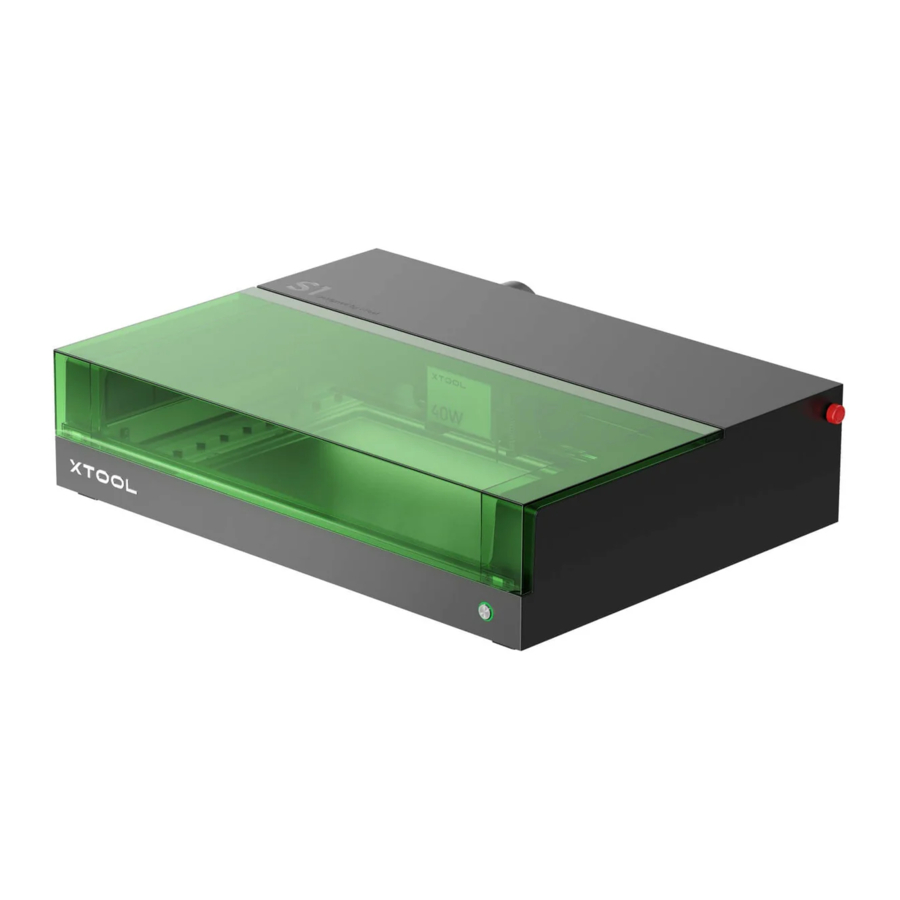
Meet your xTool S1


Preparations
Get the following tools ready:

- Remove the blocks that fix the x-axis guide rail


- Install the laser module


- Install the distance sensor

- Install the smoke exhaust pipe
![]()
![warning]() Harmful smoke and fumes may be produced during laser processing. Therefore, you are advised to install the smoke exhaust pipe and connect it to a purifier or inline duct fan or place the outlet outside through a window.
Harmful smoke and fumes may be produced during laser processing. Therefore, you are advised to install the smoke exhaust pipe and connect it to a purifier or inline duct fan or place the outlet outside through a window.

- Insert the key

- Check and ensure that the emergency stop switch is not pressed

- Connect to a power supply


Use your xTool S1
For computers
- Connect xTool S1 to a computer and power it on.

- Download and install the free xTool Creative Space (XCS) or the paid third-party software LightBurn.
![]()


For details about how to use the software to operate xTool S1 for material processing, scan the QR code or visit https://support.xtool.com/product/24.

For mobile devices
Scan the QR code or search for xTool Creative Space in Google Play or App Store, or visit https://www.xtool.com/pages/software to download the app and install it.


For details about how to use the software to operate xTool S1 for material processing, scan the QR code or visit https://support.xtool.com/product/24.

Example projects
Scan the QR code to find example projects and tutorials.
https://support.xtool.com/article/1328

Alternatively, you can visit https://support.xtool.com/product/24 and go to Try Some Projects to view example projects and tutorials.
 xTool S1 is delivered with a material pack that allows you to start your creation.

Understand the annular indicator
| Buzzer | Annular indicator | Machine state | Button operation |
| / |  Solid white | Standby | / |
 Blinking purple | Network setting (device disconnected from the software) | Long press to set the network | |
 Solid purple | Standby, connected to the software via Wi-Fi | / | |
 Blinking white slowly | Starting | / | |
| Auto focusing | Long press to cancel auto focus | ||
| Measuring curved surface | Long press to cancel curved surface measurement | ||
| Framing | / | ||
 Solid blue | Locating the material | Short press to mark a vertex; long press to cancel material locating | |
 Blinking green slowly | Performing a task | Short press to pause the processing; long press to cancel the processing | |
 Blinking purple slowly | Firmware updating | / | |
 Blinking yellow for 3 times | TF card exceptions occur | / | |
 Buzzing for once | Solid blue | Ready for framing | Short press to start framing; long press to cancel framing |
| Ready to work | Short press to start the processing; long press to cancel the processing | ||
 Blinking blue slowly | Task paused | Short press to continue the processing; long press to cancel the processing | |
 Blinking red | Exceptions occur on movement | Short press to stop the warning | |
Blinking yellow | The lid is not fully closed during operation. | / | |
Buzzing for 3 seconds | Blinking yellow | Exceptions occur | Short press to stop the warning |
 Blinking red | Exceptions occur on Wi-Fi communication | / | |
Keeping buzzing | Blinking red | Flame detected | Short press to stop the warning |
Knowledge about parts and accessories
Access-control key
For laser machines, the key is a physical security device used to control processing access. You need to insert it into the machine to unlock the processing and related functions. You can remove it to prevent others from using the machine without your consent.


- Keep the key properly. When you don't use the machine, remove the key and keep it in a safe place to avoid loss or theft. Only authorized people can possess and use the key.
- Perform regular checks. Check the status of the key regularly. If it can't be inserted properly, repair or replace it promptly.
- Follow the operation instructions when using a laser machine. Use the key to lock or unlock laser processing functions at the right time.
Emergency stop switch
Emergency stop switches are very important safety devices in mechanical machines. An emergency stop switch cuts off the power supply of a machine in an emergency and thus protects the operator and the machine.
Generally, they are red buttons and some of them may be labeled "STOP" to warn operators. They may be in the shape of a mushroom or cylinder, and some of them may come with LEDs to stand out.

How to use
- When an emergency occurs, press the switch down hard for a while to cut off the power supply of the machine.
- After the emergency is over, turn the button clockwise about 45° to release it, and then restart the machine.
Exhaust fan
Cleaning the exhaust fan can:

- Maintain the cooling efficiency: Whether the exhaust fan is clean affects its rotation speed and cooling effect. If too much dust and dirt accumulate in the exhaust fan, they will obstruct the airflow and reduce the heat dissipation efficiency, and may even cause the laser to overheat, affecting the proper operation of the machine.
- Maintain system stability: Keeping the exhaust fan clean and working properly helps maintain the stability of the thermal management system in the laser module, preventing the laser module from degradation or malfunctioning due to heat dissipation problems.
- Extend its service life: Keeping the exhaust fan clean prevents it from being damaged too quickly. Dust and dirt may cause the exhaust fan to rotate unevenly, increase wear, and shorten its service life.
![information]() If the exhaustion of smoke slows down during processing, the exhaust fan may have accumulated too much dust. You need to clean it promptly.
If the exhaustion of smoke slows down during processing, the exhaust fan may have accumulated too much dust. You need to clean it promptly.
Cleaning steps
- Turn off the machine and remove the louver or smoke exhaust pipe from the machine.
- Clean the exhaust fan with a tissue or cotton swab moistened with clean water or alcohol.
- Install the louver or smoke exhaust pipe back to the machine. Otherwise, laser beams may leak out, and your hands may get hurt if touching the fan.
Laser safety goggles
Laser safety goggles are designed to prevent or minimize laser harm to eyes. Laser beams are of high energy. Human eyes are very sensitive to laser beams, especially the retina and other tissues. They can absorb laser beams of various wavelengths. Therefore, the damage threshold of laser beams to eye tissues is much lower than other organs, and the macular region of eyes is particularly sensitive.
With special optical design, laser safety goggles can reflect or absorb laser beams, preventing direct exposure of eyes to laser beams, and thus preventing or minimizing laser harm to eyes.
Note that even with the safety goggles, you should not look directly into laser beams. Looking directly into laser beams may cause irreversible and permanent eye damage.
Some laser machines are equipped with protective enclosures and interlocking devices to meet the standards of Class 1 laser machines, which can be used without the use of safety goggles. For Class 4 laser machines, you need to wear laser safety goggles and follow other safety instructions.

Air assist set
An air assist set draws in air and blows it into a laser machine through an air tube. The airflow can be adjusted. Generally, a small airflow is used to clean the processing area and cool the processed material part during laser engraving, and a large airflow is used in laser cutting not only for cleaning and cooling but also for smoke exhaustion and residue blowing. For better processing results, you are advised to use an air assist set. You can go to https://www.xtool.com/ to purchase one.

- Cleaning the processing area
When a high-energy-density laser beam falls on a material, smoke, dust, and debris may be generated. The airflow generated by the air assist set can disperse them to keep the processing area clean and thus improve the processing efficiency and processing results. - Cooling the processed material part
When a high-energy-density laser beam falls on a material, the temperature of the processed material part rises rapidly. The material may deform, melt, develop cracks, or get scorched. The airflow generated by the air assist set can blow away some of the heat to prevent material damage and thus improve the processing stability, precision, and results. - Facilitating smoke exhaustion
Harmful smoke or fumes may be produced during laser cutting of certain materials. The large airflow generated by the air assist set helps to exhaust them from the machine, keeping the workspace safe. - Blowing away residues
During laser cutting of thick or hard materials, the large airflow generated by the air assist set can blow away residues in the cutting gap, making the cuts smoother and more precise.
Lens protector
Laser processing often produces a large amount of smoke, which may cause the lens protector to get dirty or block the nozzle. If you do not clean the laser module in a timely manner, the laser power may be reduced and the laser module may be damaged.

Maintenance
- Avoid scratches. The surface of the lens protector is fragile and may easily get scratched. When installing, replacing, or cleaning the lens protector, be very careful and avoid sharp objects contacting the protector.
- Pay attention to the working environment. Poor environmental conditions may accelerate the aging and damage of the lens protector. Therefore, keep the inside of the machine dry without dust and corrosive gas and ensure that the exhaust fan works properly.
- Check its status regularly. Ensure that the lens protector is installed firmly in place. If it is loose or displaced, adjust and fix it promptly.
- Clean it regularly. The lens protector may accumulate dust, dirt, or other impurities that reduce the laser transmission rate. You need to clean it regularly.
- Replace it regularly. Excess wear may reduce the transmission rate of the lens protector or even cause machine faults. You need to replace it regularly based on the use of the machine and the wear of the lens protector.
Cleaning
Get the following ready: Detergent (alcohol, anhydrous acetone, etc.), cleaning tool (lint-free cloth, specialized wiping swab, etc.)
Steps
- Turn off the machine and remove the laser module from the machine.
- Remove the nozzle from the laser module.
- Clean the lens protector and nozzle in order with a lint-free cloth moistened with alcohol.
Frequency
- 10 W laser module: clean it after every 4 hours of processing
- 20 W laser module: clean it after every 4 hours of processing
- 40 W laser module: clean it after every 1 hours of processing
With the air assist set, you can clean the laser module at a lower frequency.
Documents / Resources
References
xTool S1 - xTool Support Center
![www.xtool.com]() XCS Software Download
XCS Software Download![www.apple.com]() App Store - Apple
App Store - Apple![play.google.com]() Google Play
Google Play(XCS V2.1) xTool S1 Example Project — Making a Stone Coaster - xTool Support Center
![www.xtool.com]() xTool Laser | Desktop CO2, Fiber & Diode Laser Cutter
xTool Laser | Desktop CO2, Fiber & Diode Laser Cutter
Download manual
Here you can download full pdf version of manual, it may contain additional safety instructions, warranty information, FCC rules, etc.
Advertisement


Need help?
Do you have a question about the S1 and is the answer not in the manual?
Questions and answers