Advertisement
Quick Links
User Guide
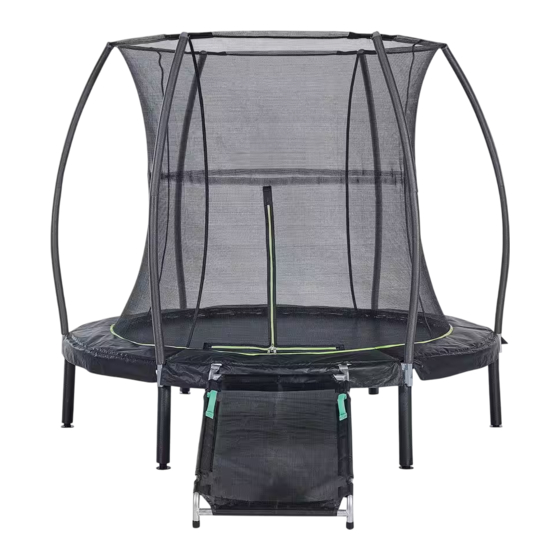
7ft Trampoline & Enclosure
with Climbing Ramp
Model: JK7R
The trampoline / enclosure is designed for users weighing 68kg (150lbs) or less.
Got a Problem building your trampoline?
Please contact us at contact@jumpking.com
WARNING: Read these assembly instructions carefully
before attempting to assemble or use this product. Keep
this user guide in a safe place for future reference.
Jumpking
3970 Lindbergh Drive Addison, TX 75001
®
Advertisement

Related Manuals for Jumpking JK7R


Summary of Contents for Jumpking JK7R
- Page 1 Model: JK7R The trampoline / enclosure is designed for users weighing 68kg (150lbs) or less. Got a Problem building your trampoline? Please contact us at contact@jumpking.com WARNING: Read these assembly instructions carefully before attempting to assemble or use this product. Keep this user guide in a safe place for future reference.
- Page 3 7ft Trampoline & Enclosure with Climbing Ramp Model: JK7R If you have questions after reading this manual, please email us at contact@jumpking.com. The trained technicians will provide immediate assistance.
- Page 4 WARNING: This product is intended for use by children above 3 years of age. This enclosure is to be used only in connection with this trampoline. Read and follow all warnings and instruction. This product is intended to be assembled by an adult. Maximum weight limited 68 kg / 150 lbs.
-
Page 5: What You Will Need
BUILDING YOUR TRAMPOLINE 1. This is a 2 person build. 2. Time for build is approximately 2 hours. 3. Choose a good location: (wood chippings, sand or grass). (7.3m) from ground level, away from wires, trees and other possible hazards. (2.5m) around sides, away from walls, fences, structures, roads and other hard surfaces and play areas. -
Page 6: Parts List
PARTS LIST Part Part Part Part Description: Description: Straight Leg Description: Top Tube T-Connector with foam sleeve Plastic foot cap JK7R-TR JK7R-TCAS JK7R-LE JK7R-FC Quantity: Quantity: 6 Quantity: 6 Quantity: 6 Part Part Part Part Description: Description: Description: Description: Springs... -
Page 7: Step 1 : Assembling The Frame
STEP 1 : ASSEMBLING THE FRAME You will need the following parts to complete Top tube section 1: 6 x Top Tube - Part A T-connector 6 x T-connector - Part B Straight leg - Part C Straight leg - Part D 6 x Plastic foot cap - Part K 6 x Self-tapping screw... - Page 8 STEP 2 : FITTING THE STITCHED BED This step will require 2 people who must be wearing gloves and protective eye wear. Lay the stitched bed (with the V-Rings) part E out inside the frame of the trampoline. Yellow stitching Locate the 2 V-Rings with the yellow stitching.
- Page 9 Attach a spring to the opposite of V-ring. Important: You will now need to use the spring tool part G to attach the spring to the frame. Hook the spring tool onto end of spring, and pull until the spring can be slotted into the spring slot on the top of the frame.
- Page 10 STEP 3 : FITTING THE FRAME PAD This step will require 2 people. Lay the frame pad - Part H out over the edge of the frame with the ties facing downwards. Align the openings in the frame pad with the T-connectors on the frame.
- Page 11 STEP 4: FITTING THE ENCLOSURE TUBES You will need the following parts to complete step 4: 6 x Top enclosure tube - Part I 6 x Bottom enclosure tube - Part J 6 x Self-tapping screw - Part K Self-tapping screw Slot the thin end of one of the bottom enclosure tubes into the open end of one of the top enclosure tubes.
- Page 12 Slot the bottom enclosure tube into the tubes in the T-connector visible through the slots in the frame pad. Slot the remaining enclosure tubes with hemisphere caps into the remaining T-connector B’s on the frame. completed this step.
- Page 13 STEP 5 : FITTING THE ENCLOSURE NETTING You will need the following parts to complete step 5: 1 x Enclosure netting - Part P Lay the enclosure netting out on the trampoline. Please find the two holes on safety pad. Please make sure the zipper entrance is facing the two holes on the safety pad to assemble the Climbing Ramp.
- Page 14 Find the ROD on top of enclosure netting. Stand on the trampoline and insert one of the exposed sections of the rod into a plastic grip on top of one of the enclosure tubes. Attach the three other exposed sections of the rods to the other enclosure tubes in the order shown in the diagram.
- Page 15 STEP 6 : ATTACHING THE BOTTOM OF THE NET You will need the following parts to complete step 6: 4 x Cord - Part M . Tie the end of the cord around a V-Ring and loops. Push the end rope through a hole in the bottom of the netting.
- Page 16 STEP 7 : ATTACH THE CLIMBING RAMP You will need the following parts to complete step 7: 1 x Climbing Ramp mat - Part P 2 x horizontal tube - Part Q - Part R 2 x 2 side tube - Part S 1 x Upper left connector with hook 1 x Upper right connector with hook...
- Page 17 Use the self-tapping screw part K to screw together. Insert the 2 side tubes into both side tunnel sleeves. Use the self-tapping screw part K to screw together. Join the lower left (part U) and lower right (part V) legs to the horizontal tube (part Q).
- Page 18 Use the self-tapping screw part K to screw together. Please cover the tubing with velcro flap. The Climbing Ramp is completed. Now you need to assemble the climbing ramp to the trampoline. Please find the 2 holes on safety pad then the hook of climbing ramp can insert and fix to the trampoline top tube.
- Page 19 CARE AND MAINTENANCE Care sleeves. - punctures, frays, tears, or holes worn in the bed, frame Do not allow pets or animals on the trampoline or pad, netting, foam sleeves. inside the enclosure, as claws may snag and pull the - deterioration in the stitching or fabric of the bed, frame bed material or damage the frame pad or netting.
Need help?
Do you have a question about the JK7R and is the answer not in the manual?
Questions and answers