
Related Manuals for Levolor PREMIER Cordless


Summary of Contents for Levolor PREMIER Cordless
- Page 1 Wood Blinds Collection Cordless & Simple Cordless Installation Instructions 24-0025-062 January 2025...
-
Page 2: Table Of Contents
CONTENTS GETTING STARTED ................1 Product View — Cordless and Simple Cordless ........1 Tools and Fasteners Needed ..............2 Unpack the Blind ..................2 INSTALLATION ..................3 Installation Overview ................3 Mount the Installation Brackets — Inside or Ceiling Mount ....4 Mount the Installation Brackets —... -
Page 3: Getting Started
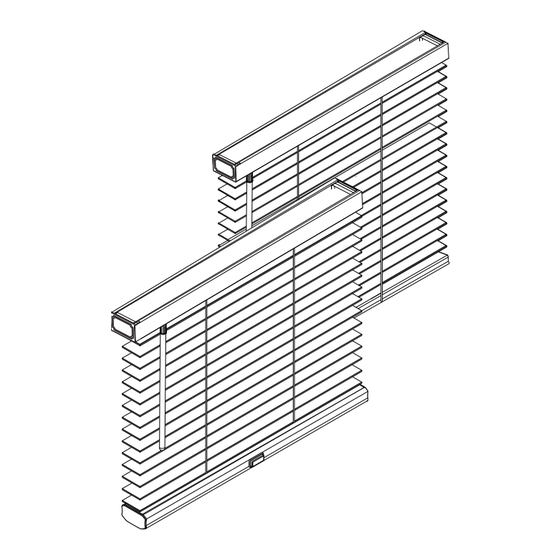
GETTING STARTED Product View — Cordless and Simple Cordless Valance End Bracket Spacer Block Bracket Shim Bracket (Optional) Intermediate Bracket Intermediate Bracket Spacer Block (If Required) End Bracket Spacer Block Bracket Valance Splice (If Required) 2" or 4" Extension Brackets (Optional) Corner Clips for Valance Returns (If Required) -
Page 4: Tools And Fasteners Needed
GETTING STARTED Thank you for purchasing LEVOLOR PREMIER Wood Blinds Collection. With proper installation, operation, and care, your new blinds will provide years of ® ™ beauty and performance. Please thoroughly review this instruction booklet and the enclosed packing list before beginning the installation. -
Page 5: Installation
INSTALLATION INSTALLATION Installation Overview Two end brackets are used to mount horizontal blinds. Wider blinds also require one or two intermediate brackets, as ■ shown in the table below. Intermediate Bracket Bracket Intermediate Bracket Chart Width of Blind Intermediate Brackets Up to 48"... -
Page 6: Mount The Installation Brackets - Inside Or Ceiling Mount
INSTALLATION INSTALLATION One Shim Mount the Installation Brackets — Inside or Ceiling Mount Folded Over Bracket Shims (Optional) Intermed Bracket Brack Bracket shims are used to gain clearance for valance clips with inside or ceiling mounts. One shim for each end bracket and two shims for each intermediate bracket are included. -
Page 7: Mount The Installation Brackets - Outside Mount
INSTALLATION INSTALLATION Attach the Intermediate Brackets (If Required) Evenly space the intermediate bracket(s) between the two end brackets. ■ Adjust spacing if needed to avoid interference with internal headrail mechanisms. ➤ Space Evenly Space Evenly Intermediate Bracket Bracket Bracket Attach the intermediate bracket(s) with two screws through diagonal top holes. ■... - Page 8 INSTALLATION INSTALLATION Attach the Intermediate Brackets (If Required) Evenly space the intermediate bracket(s) between the two end brackets. ■ Adjust spacing if needed to avoid interference with internal headrail mechanisms. ➤ IMPORTANT: The tops of the end brackets and intermediate bracket(s) must align. Intermediate Bracket Bracket...
-
Page 9: Install The Blind
INSTALLATION INSTALLATION Install the Blind Adding Projection to the Valance The magnetic valance clips have a projection adjustment feature. By pulling the clips outward, the clips can provide an additional ⁄ " projection. The clips offer two projection positions. When the clips are fully compressed, the narrowest projection is ⁄... - Page 10 INSTALLATION INSTALLATION Attach the Magnetic Valance Clips to the Valance There are at least two clips per valance. For valances narrower than 36," position clips 5 ⁄ " in from the ends of the valance. For valances 36" or wider, position the clips 10"...
- Page 11 INSTALLATION INSTALLATION Attach the Corner Clips (If Required) Miters Meet If the valance came with returns, connect the returns Valance to the valance using the corner clips provided. Notch The notches on the back of the valance and valance returns fit into the grooves of the corner clips. Valance Slide one end of each clip onto the back of the valance until the center of the clip aligns with the edge of the ■...
-
Page 12: Complete The Installation
INSTALLATION INSTALLATION Adjust the Headrail Tightness If the headrail is loose in the end brackets, bend the tabs on the end brackets outward. ■ NOTE: The tabs may also be bent inward if the headrail is difficult to install into the end brackets. Close the End Brackets Push the cover down until it snaps over the locking ■... - Page 13 INSTALLATION INSTALLATION Attach the Valance with Magnetic Valance Clips to the Headrail Align the valance to the headrail. ■ Hold the valance securely from the front side with both hands. ■ Position the clips to the top-front lip of the headrail until it is level and in position. ■...
-
Page 14: Operation
INSTALLATION OPERATION Operate the Blind Tilting the Slats Wand tilt: Rotate the wand to tilt the slats to the desired angle. ■ Raising and Lowering the Blind — Cordless Operating System IMPORTANT: The slats must be in the open position when raising or lowering the blind. Grasp the bottom rail and push up to raise the blind. -
Page 15: Troubleshooting
INSTALLATION TROUBLESHOOTING Troubleshooting If your blind is not operating correctly: Refer to the following troubleshooting procedures for specific solutions for your blind. ■ If questions remain, please contact LEVOLOR PREMIER at 1-800-478-1538 ® ™ Problem The blind will not fit into the installation brackets. -
Page 16: Care
■ luster. IMPORTANT: LEVOLOR PREMIER does not recommend ultrasonic cleaning of wood or alternative wood blinds. A Note About Wood and Alternative Wood Products Blinds may feature subtle variations in color, grain, and texture. These variations are within established industry standards and should be expected. -
Page 17: Year Limited Warranty
• LEVOLOR PREMIER motorization components reinstallation. are covered for 5 years from the date of purchase. LEVOLOR PREMIER (or its licensed fabricator/distributor) will repair or replace the product or components found to be defective. TO OBTAIN WARRANTY SERVICE: • Contact your original dealer (place of purchase) for warranty assistance.
Need help?
Do you have a question about the PREMIER Cordless and is the answer not in the manual?
Questions and answers