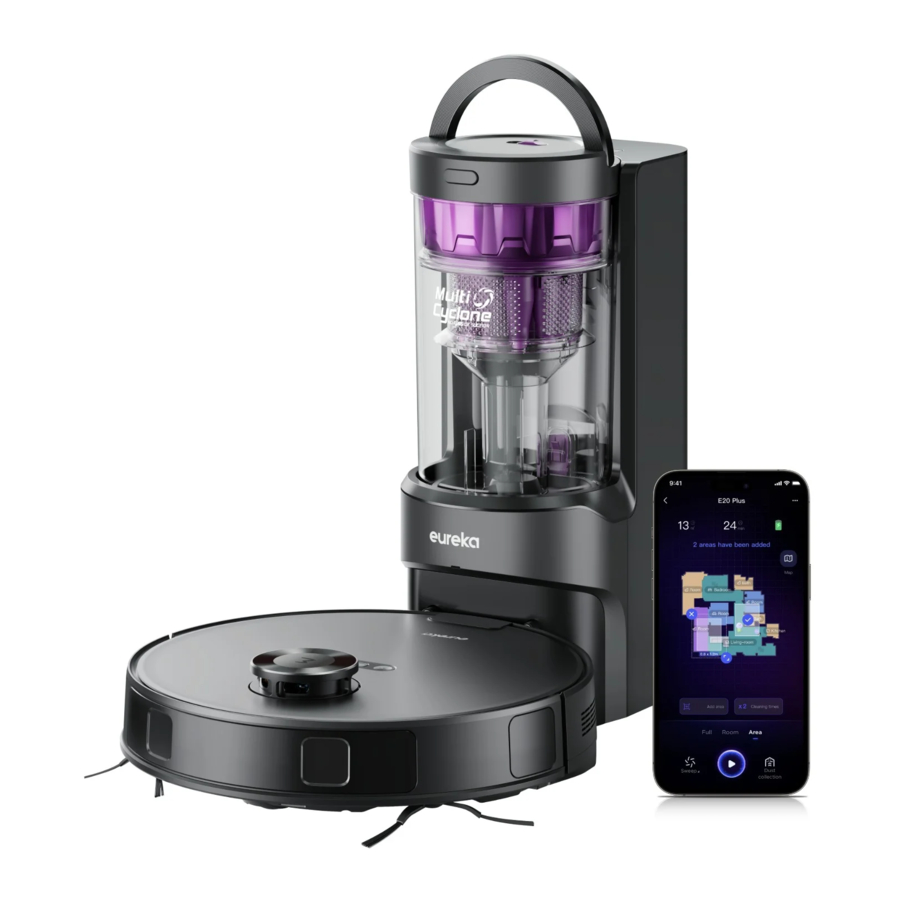
Advertisement
- 1 SYMBOLS
- 2 TECHNICAL DATA
- 3 What comes in the box
- 4 How to identify parts of your robot
- 5 Assembling and charging robot
- 6 How to use your robot
- 7 How to use your robot
- 8 How to set up App, connect the device and use App
- 9 How to maintain your robot
- 10 Other routine maintenance
- 11 Troubleshooting
- 12 SAFETY INSTRUCTIONS
- 13 Documents / Resources
SYMBOLS
 | [symbol IEC 60417-5957 (2004-12)] | for indoor use only |
 | [symbol ISO 7000-0790 (2004-01)] | read operator's manual |
 | [symbol IEC 60417-5031 (2002-10)] | direct current |
 | time-lag miniature fuse-link where X is the symbol for the time/current characteristic as given in IEC 60127 | |
 | [symbol IEC 60417-5032 (2002-10)] | alternating current |
 | [symbol IEC 60417-5172 (2003-02)] | class II equipment |
TECHNICAL DATA
| Product Model | NERE20PLUSBK NERE20PLUSWH |
| Host Charging Voltage | 16.7V ⎓ |
| Host Rated Voltage | 14.4V ⎓ |
| Host Rated Power | 55W |
| Self-emptying Base Model | BS2302-1 |
| Self-emptying Base Input | 220-240V~, 50-60Hz, 850W |
| Self-emptying Base Output | 16.7V ⎓, 1A |
| Battery Model | BP14452H |
| Battery Rated Voltage | 14.4V ⎓ |
| Battery Capacity | 5200mAh 74.88Wh |
| Charging Limit Voltage | 16.8V ⎓ |
What comes in the box

How to identify parts of your robot

Assembling and charging robot

Remove excess clutter and cables on the floor before cleaning.
Quick Assembly
- Installation of side brushes
Turn the main unit over. Attach the side brush to its color-matched post and press down until they fit into place.
![]()
- Filter installation
Robot comes with filter installed. Before use, remove dustbin from robot, pull up lid of dustbin and make sure filter is installed well. Ensure dustbin lid is securely closed and place back dustbin onto robot. When using the mopping function, open the tank lid, fill the water tank with cool tap water, and securely close the lid.
![]()
Please do not add any detergent into the water tank to prevent potential clog. - Setting up self-emptying base
- Place the self-emptying base flat against the wall on a level surface. If there is any charging base for other robot vacuum cleaners in the room, please put it away before use of our self-emptying base to avoid mismatching.
- Place the self-emptying base in an area covered with wireless network signal to ensure stable network connection of the robot and proper function of the App. Store the excess cables into the slot at the back of the charging base to avoid affecting the proper function of the robot vacuum.
- Plug the power plug into a power outlet.
![]()


Charging
NOTES
- Avoid placing the robot and the base under direct sunlight.
- Be sure to keep the charging area dry.
Press and hold " " for 3 seconds to power on the robot vacuum. After the power indicator turns on, press the recharging button or manually put the robot back into the self-emptying base for charging, as shown. We recommend you charge the robot for at least 6 hours before using it for the first time.

| Indicator Light | Status | ||
 | |  | |
| off | stable light | off | Robot is in standby mode, or cleaning in progress, or robot is fully charged. |
| off | stable light | stable light | Battery level 20%, robot has finished its mission and is going to recharge |
| off | stable light | flash quickly | Battery level < 20%, robot is going to recharge |
| off | flash slowly | off | Robot is charging |
| off | flash quickly | off | Error. Please troubleshoot according to the actual performance of the robot, refer to 'Troubleshooting' |
| off | off | off | Robot is in sleep mode or turn off. |
NOTES
- When the battery level is too low, the robot cannot be turned on. Please manually put the robot onto the charging base.
- The robot will not be turned off when placed on the charging base. To turn the robot, remove the robot from the base, press and hold for 3s to shut it down. All indicators will be turned off.
- To ensure the optimal performance of the lithium-ion battery, please keep the robot charged.
- If you manually put the robot vacuum into the base, ensure that the charging contacts of both the robot and the base are connected.
- For long-term storage, remove the robot from the base turn it off and store it in a cool, dry place. lf the robot is not used for more than 3 months, allow it to get charged for at least 12 hours before using. To preserve the battery lifespan, we suggest you fully charge the battery at least once every six months.
How to use your robot
| Operation | Button | ||
| | | |
| Short Press | Start/pause/ resume | Return to the base | Start spot cleaning |
| Press and hold for 3s | Shut down | / | Enter the network pairing state |
- Start/Pause/Resume
Briefly Press "![]() " to start/pause/resume cleaning or use your App to control.
" to start/pause/resume cleaning or use your App to control. - SPOT Cleaning
When the robot vacuum is in standby/pause mode, press "![]() " to start spot cleaning. The robot will begin to clean an area of one square meter centered on itself. After spot cleaning, the robot will automatically return to the charging base to recharge. Note that starting the spot cleaning mode will automatically stop the current cleaning cycle.
" to start spot cleaning. The robot will begin to clean an area of one square meter centered on itself. After spot cleaning, the robot will automatically return to the charging base to recharge. Note that starting the spot cleaning mode will automatically stop the current cleaning cycle.
![]()
- Recharge
- When the robot vacuum is in standby mode, press "
![]() " and the robot vacuum will start recharging.
" and the robot vacuum will start recharging. - When the robot vacuum is in cleaning process, pressing "
![]() " can stop cleaning, and then press "
" can stop cleaning, and then press "![]() " can start recharging.
" can start recharging.
- When the robot vacuum is in standby mode, press "

Under special circumstances (such as power depletion, robot vacuum jamming, etc.), the robot vacuum may not be able to recharge automatically. Please manually place the robot vacuum back to the charging base.
NOTES
- The robot vacuum will enter sleep mode when it is in standby mode for more than 10 minutes. In sleep mode, press any key to wake up the robot vacuum.
- Do not immerse the robot in water. Doing so may damage the equipment, causing short-circuit or current leakage.
How to use your robot
Self-Emptying Function
- After cleaning, the robot will return to the charging base and automatically begin self-emptying.
- Press the recharging button (the recharge interval between two times should be longer than 5 minutes) to trigger self-emptying.
- Adjust manual self-emptying function on the App. Avoid manual self-emptying frequently.
Status Indicators of Self-Emptying Base
| Indicator Light | Status |
| Off | Self-emptying base is powered off. Self-emptying base is in sleep mode. |
| White light stays on | Self-emptying base is powered on. |
| White light flashes slowly | Self-emptying is in progress. |
| White light flashes quickly | The air duct of the dust cup may be clogged. Please check and empty the dust cup in time. |
How to set up App, connect the device and use App
Setting Up App and Connecting the Device
- Setting Up App
NOTES- The app supports iOS versions 13.0 and above and Android versions 8.0 and above. The app is not available for use with tablets.
- This model does not support a WEP encrypted router.
- The home wireless network name and password must contain only letters, numbers and standard symbols.
- The network accessing configuration of the robot requires a wireless network of 2.4 GHz frequency range.
- The robot must be connected to wireless network to enable controlling the robot using the app. Once you have set up the app and connected the robot to wireless network, the app can be used to control the robot in wireless network /2G/3G/4G/5G network environment.
- If your home wireless network password is changed or the router is replaced, the robot will show as offline in the app: you will need to reconnect the robot to wireless network following the wireless network connection instructions.
- Download the App
Scan the following QR code or search for eureka robot to download the App. Follow the instructions in the app to create a new account or login.


- Add Device
Click "+" or "Add Device" in the App to add the device. Choose E20 Plus.
Follow the instructions on the app and continue until the app prompts that the connection is successful.
![]()
- Connect the Device
- Connect your robot to the network that you plan to use for operating the robot. Make sure the robot is placed within good wireless network coverage.
- Connect your robotic vacuum to your wireless network. After assembling and powering on the robotic vacuum, press and hold the "
![]() " button for 3 seconds until a beep is heard. The network indicator light should start flashing white. Follow instructions on App for next steps.
" button for 3 seconds until a beep is heard. The network indicator light should start flashing white. Follow instructions on App for next steps.

Using Eureka Robot App
NOTE:
If the wireless network in your home is unstable, it may cause issues with the operation of the Eureka Robot App. The content of the Eureka Robot App may change when the version is updated. Please refer to the Eureka Robotic Vacuum interface for details. This interface will be upgraded later, this interface is for reference only.


NOTE:
When you start clean, the machine automatically scans and creates a map.
How to maintain your robot

Never operate robot without all filters, filter screen and dustbin in proper position.
Moving parts! Recharge robot vacuum cleaner after each use.
- Dustbin/Water tank maintenance (clean as needed)
- Take out the dustbin: Press the dustbin release button as shown and take out the dustbin.
![]()
- Open the lid of the water tank and clean out the remaining water. Open the lid of the dustbin and take out the filter.
![]()
- Remove debris by tapping the filter against your garbage bin. You can clean the dustbin, the filter and filter mesh with water, but remember to dry them THOROUGHLY before reinserting them into the robot (Do not clean the filter elements with detergents).
![]()
- Reinsert the dustbin into the robot. It is recommended to clean the filter elements every week and replace them every 1-3 months.
- Take out the dustbin: Press the dustbin release button as shown and take out the dustbin.
- Cleaning the mop assembly
- Release the mop assembly and clean it.
![]()
- Remove the mopping cloth from the mop holder.
![]()
- Wash the mopping cloth with water and dry it.
![]()
- Place the cleaned mopping cloth back to the mop holder and re-install the mop assembly to the robot.
![]()
- Release the mop assembly and clean it.


Washable brushroll – clean frequently
Make sure robot is turned off and not plugged into a power source.
Do not attempt to remove belt.
- Cleaning brush
How to use the cleaning brush:
![]()
- Cut the hair entangled on the main brush with the blade.
- Bush off the hair.
- Main brush maintenance (weekly cleaning recommended)
- Turn the main unit over. Release the cover plate of the main brush and pull it out, and lift the right side of the main brush to take it out.
![]()
- Clean the main brush and its cover plate with the cleaning brush or a soft cloth.
![]()
- Rinse the main brush and dry it before putting it back.
![]()
- After cleaning, press the end cover back to the main brush body. Install the main brush body into the main unit according to the direction shown in the figure. It is recommended to clean the main brush every week and replace them every 6 months.
![]()
- Turn the main unit over. Release the cover plate of the main brush and pull it out, and lift the right side of the main brush to take it out.


Other routine maintenance
Main wheels and side brushes cleaning
- Main wheels cleaning (weekly cleaning recommended)
Rotate the main wheels back and forth to remove debris or dust - remove and take out the hair or debris with the cleaning brush or a soft cloth.
![]()
- Side brushes cleaning (weekly cleaning recommended)
- Pull out the side brush. Remove dust on the side brush.
![]()
- It is recommended to clean the side brush every week and replace them every 6 months.
![]()
- Pull out the side brush. Remove dust on the side brush.


Maintenance of Self-Emptying Base
- How to empty the dust cup
- Flip the slide switch to the left so that the dust cup is detachable.
![]()
- Empty as soon as dirt reaches the MAX mark. Remove the dust cup by moving it vertically upwards.
![]()
- Hold the dust cup over a bin. Press the lower dust cup release tab and empty the trash into the bin.
![]()
- Close the tab, and place the dust cup straight down back into the self-emptying base.
![]()
- Flip the slide switch to the right to lock the dust cup.
![]()
- Flip the slide switch to the left so that the dust cup is detachable.
- How to clean the cyclone
- Press the upper release tab to open the top of the dust cup.
![]()
- Take out the sponge filter and the cyclone (use the handle) as shown in figure.
![]()
- Rinse the cyclone with clean water and make sure it is completely dry before putting it back.
Note: Do not use detergents, polishes or air fresheners to clean the dust cup and cyclone to avoid corrosion.
![]()
- Place the cyclone and sponge filter back down into their regular positions. Close the dust cup so it clicks into place.
![]()
- Place the dust cup back into the self-emptying base.
![]()
- Flip the slide switch to the right to lock the dust cup.
![]()
- Press the upper release tab to open the top of the dust cup.
- How to clean the filter
![]()
- Press the release tab of the cover of the filter on the back of the base to remove the cover.
- Rinse the filter with clean water until it is clean. Make sure the filter is completely dry before putting it back.
- How to clean the dust collection air duct
- Turn the self-emptying base upside down and check whether the dust collection air duct has been clogged.
![]()
- If the air duct has been clogged, use a screwdriver to unscrew the air duct cover plate and take off the air duct cover plate.
![]()
- Clean and wipe the air duct and air duct cover plate with a dry cloth.
![]()
- After cleaning, reinstall the air duct cover and tighten the air duct cover.
![]()
- Turn the self-emptying base upside down and check whether the dust collection air duct has been clogged.
- Sensors and charging contacts cleaning
Wipe the sensors on the robot and charging contacts on both the robot and the base with a dry, soft cloth.
![]()


Troubleshooting
 Make sure robot is off and charging plug is unplugged.
| Scenarios | Possible Causes | Solutions |
| The robot vacuum cannot be recharged | The robot vacuum is not in contact with the charging contacts. | Place the robot vacuum 1m in front of the selfemptying base and press the recharging button. |
| The robot vacuum cannot return for charging | The self-emptying base is placed improperly. | Place the self-emptying base on a level surface that is free of obstacles. |
| The robot vacuum is trapped | The robot vacuum is entangled/stuck by objects (such as cords) on the floor. | Please put away the scattered cords and objects on the floor. |
| The side brush/main brush is stuck so that the robot vacuum cannot move normally. | Remove the objects that caused the main/side brush to be stuck and place the robot flat on the floor and restart. | |
| The robot vacuum is stuck by obstacles. | Remove the obstacles and proceed with cleaning, or set No-go zones in App. | |
| Cleaning process has not been completed, but the robot vacuum returns for charging | The battery level of the robot vacuum is running low. | Let the robot vacuum return for charging. |
| Fail to clean as scheduled | Scheduled Appointment has been cancelled. | Reset Scheduled Cleaning in the App. |
| The robot vacuum is in Do Not Disturb Mode. | Turn off "Do Not Disturb Mode" or adjust the "Do Not Disturb". | |
| The robot vacuum does not work |
| Put the robot back to the base to charge. After fully charge, press the start button to clean. If the wheels are stuck, please clean the blockage or obstacles and restart the robot to clean again. |
| The robot vacuum moves backward | The LiDAR cover is stuck. | Gently tap the LiDAR cover to check if it's able to rebound. |
| There is obstacle ahead. | Remove the obstacle ahead. | |
| The bumper is stuck. | Gently tap the front bumper to check if it's able to rebound. | |
| There is dust on the cliff sensors. | Clean the surface of cliff sensors. | |
| The robot vacuum has no sound | The sound is muted. The robot vacuum is in Do Not Disturb Mode. | Turn up the volume. Turn off "Do Not Disturb Mode". |
| The App shows the connection is disconnected | The phone is not connected to the network normally. The router is not working properly. The robot vacuum is not turned on. The network is removed. Wireless network password or network has been changed. | Restart the router. Reconnect the phone with a 2.4 GHz network. Turn on the robot. Add new Appliances in the App. Reset the network by pressing and holding the " " button for 3 secondsAdd the device again following the phone's instructions. |
| App operation response delays | Wireless network signal is weak. The network bandwidth is insufficient. | Restart the router to reduce the number of access users. Check the phone settings. Increase the network bandwidth. |
| After the robot vacuum returns to the self-emptying base, the self-emptying process fails to start automatically | The dust cup is full. | Empty the dust cup of the base. |
| The lid of dust cup is not closed. The dust cup is not installed correctly. | Close the lid. Reinstall the dust cup correctly. |
SAFETY INSTRUCTIONS
Warning for the machine
- This appliance can be used by children aged from 8 years and above and persons with reduced physical, sensory or mental capabilities or lack of experience and knowledge if they have been given supervision or instruction concerning use of the appliance in a safe way and understand the hazards involved. Children shall not play with the appliance. Cleaning and user maintenance shall not be made by children without supervision.
- Plug must be removed from the socket-outlet before cleaning or maintaining the Appliance. Switch off before cleaning or maintaining the Appliance.
- If the supply cord is damaged, it must be replaced by the manufacturer, its service agent or similarly qualified persons in order to avoid a hazard.
![]()
For the purposes of recharging the battery, only use the detachable supply unit provided with this Appliance. Use only with BS2302-1 supply unit.- This Appliance contains batteries that are only replaceable by skilled persons.
- Do not bring the smart robot close to heat source, radiation or burning cigarette butts. It is strictly forbidden to vacuum the following objects:
- All liquids such as water and solvents;
- Lime, cement dust and other construction dust and garbage;
- Heat generating objects, such as unextinguished carbon butts, cigarette butts;
- Sharp fragments, such as glass, etc.;
- Flammable and explosive items, such as gasoline and alcohol products.
- Before using, please remove all fragile items from the ground (such as glasses, lamps, etc.), and items that may be tangled with the side brush, Roller brush and drive wheels (such as wires, curtains and other easily-entangled materials).
- Please pay attention to your hair and avoid entanglement on wheels or roller brushes when using, cleaning and maintaining the robot.
- Do not use this product at an altitude of more than 2000m.
Warning for Self-emptying Base
- "IMPORTANT SAFETY INSTRUCTIONS – SAVE THESE INSTRUCTIONS" and "DANGER – TO REDUCE THE RISK OF FIRE OR ELECTRIC SHOCK, CAREFULLY FOLLOW THESE INSTRUCTIONS".
- This appliance can be used by children aged from 8 years and above and persons with reduced physical, sensory or mental capabilities or lack of experience and knowledge if they have been given supervision or instruction concerning use of the appliance in a safe way and understand the hazards involved. Children shall not play with the appliance. Cleaning and user maintenance shall not be made by children without supervision.
- Plug must be removed from the socket-outlet before cleaning or maintaining the Appliance. Switch off before cleaning or maintaining the Appliance.
- If the supply cord is damaged, it must be replaced by the manufacturer, its service agent or similarly qualified persons in order to avoid a hazard.
- Self-emptying Base is only Applicable to the product NERE20PLUSBK/NERE20PLUSWH. (Battery pack type: Li-ion, DC 14.4V, 5200mAh) The Self-emptying Base will automatically start charging after Robot Vacuum Cleaner returned to the base.
![]()
The battery charger (Self-emptying Base) is not intended to charge non-rechargeable batteries.![]()
In order to avoid a hazard due to inadvertent resetting of the thermal cut-out, this Appliance must not be supplied through an external switching device, such as a timer, or connected to a circuit that is regularly switched on and off by the utility.
Warning for battery
- The product must be powered off before removing the battery.
- Please note that do not disassemble the battery by yourself.
- lf you need to replace it, please contact the after-sales service center.
- Please dispose of used battery according to local laws and regulations.
- Do not dismantle, open or shred the battery.
- Do not expose batteries to heat or fire. Avoid storage in direct sunlight.
- Do not short-circuit a battery.
- Do not store batteries haphazardly in a box or drawer where they may short-circuit each other or be short-circuited by other metal objects.
- Do not subject batteries to mechanical shock.
- In the event of a leaking, do not allow the liquid to come in contact with the skin or eyes. lf contact has been made, wash the affected area with copious amounts of water and seek medical advice.
- Do not use any charger other than that specifically provided for use with the equipment.
- Do not use any battery which is not designed for use with the equipment.
- Do not mix different manufacture, capacity, size or type within a device.
- Keep batteries out of the reach of children.
- Seek medical advice immediately if the battery has been swallowed.
- Keep batteries clean and dry.
- Do not leave a battery on prolonged charge when not in use.
- After extended periods of storage, it may be necessary to charge and discharge the batteries several times to obtain maximum performance.
- The batteries give their best performance when they are operated at normal room temperature (20°C + 5°C).
- Retain the original product literature for future reference.
- The battery may be irreversibly damaged if the battery is in low power for a long time. lt is recommended that the battery retain sufficient power before storage.
Documents / Resources
References
Download manual
Here you can download full pdf version of manual, it may contain additional safety instructions, warranty information, FCC rules, etc.
Download Eureka E20 Plus (NERE20PLUSBK, NERE20PLUSWH) Manual
Advertisement


Need help?
Do you have a question about the E20 Plus and is the answer not in the manual?
Questions and answers