Advertisement
- 1 PREFACE
- 2 Remote Control Functions
- 3 Drone Diagram
- 4 Dual-Setting Remote Controller
- 5 REMOTE CONTROL OPERATING METHOD
- 6 Install the Contixo F35 App
- 7 Flight
- 8 APP INTRODUCTION
- 9 WayPoint Flight
- 10 Orbit Mode
- 11 Flight Setting
- 12 CAMERA FUNCTIONS
- 13 How To Find a Lost Drone
- 14 Micro SD Card
- 15 SPECIFICATIONS
- 16 PARTS LIST (Included)
- 17 COMMON PROBLEMS AND SOLUTIONS
- 18 Technical Support
- 19 SAFETY PRECAUTIONS
- 20 Documents / Resources
PREFACE
The Contixo F35 Drone is a quadcopter that's purposely built for drone application developers to enable you to get your applications airborne quickly.
This Development platform is intended to be modified by developers according to their professional judgment. Contixo has not established operation limitations for the kit or tested any configurations other than the base configuration that is shipped as configured default from the factory. Developers are responsible for testing and ensuring the safety of their own configuration, and establishing the operating limits of those configurations.
F35 Drone is designed and engineered by Contixo, Inc. in Southern California, USA. Made in China.

Never allow children or young teenagers to operate the drone and keep them away while it is operating. Never allow adults to operate the drone without fully understanding the instructions.

It's important to understand basic flight guidelines, for the safety of both you and those around you. Don't forget to read the safety guidelines before flight.
Remote Control Functions

- Throttle Stick
- Direction Stick
- Click once speed switch
- Click once then hold 3 seconds to emergency stop
- Power Button:
ON – Click Once, White Light Comes ON
OFF – Click Once, Then Hold 3 Seconds Until White Light Turns Off When there is no operation in 10 minutes, the remote controller will be automatically powered off. - Click once to RTH mode; Keep pressing for 5 seconds switch to normal mode/GPS mode.
- Zoom in and out
- Gimbal Dial: Controls the camera's lt
- Shooting
- Recording

 Tip: When the transmitter is in low power, the power indicator light on the transmitter will keep flashing, now you need to charge the transmitter.
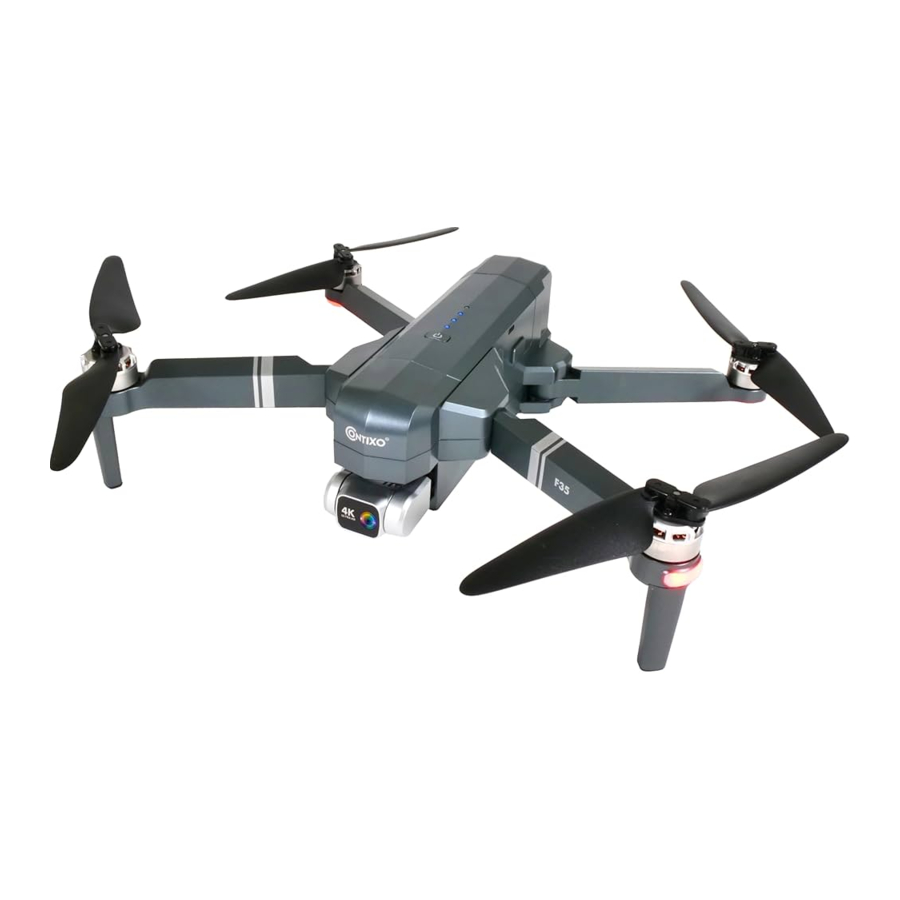
Drone Diagram

- 2-Axis stable Gimbal 4K Wi-Fi camera
- Propeller
- Motor
- LED indicator
- Intelligent battery
- Open the gimble cover buckle.
![]()
- Pull the gimble cover up then gently take it off.
![]()


 Drone Unfold
Unfold the front arm first, then unfold the back arm.

 Drone Fold
Fold the back arm first, then fold the front arm.

- Install the Propellers
![information]() Tip! Both the propellers and motors are marked with A, B (propeller A with motor A and propeller B with motor B.
Tip! Both the propellers and motors are marked with A, B (propeller A with motor A and propeller B with motor B.


- Intelligent Flight Battery

- Power Button
- Battery Power Indicator
- USB Charging Port
- To power ON, hold the button for 3 seconds. To power OFF, hold the button for 3 seconds.
- When the battery is at low power, the blue power indicator will start flashing. At this me, return the drone immediately and charge the Battery to avoid unnecessary power failures.
- Charge the Battery

![]()
Phone Adapt er: 5V/ 3A(Not include )
![]()
Charging Time: About 4.5 hours
![]()
Remote Control Charging Estimation me: Around 25 minutes
![information]() Tip: When the remote control Battery is low, the power indicator light on the remote control will keep flashing. Please charge the remote control.
Tip: When the remote control Battery is low, the power indicator light on the remote control will keep flashing. Please charge the remote control. - Lithium Battery Charging instructions
- Charging: Either power on or power off, the aircraft can be charged. Insert the USB cable into the USB port of the charger and connect to the charging port of the Battery to charge. The indicator on the drone will begin blinking blue when charging. When fully charged, the indicator on the drone will turn to a solid blue.
- The drone can be charged by a travel or car charger.
- The drone Battery takes about 4.5 hours for a full charge. Flight me is about 26 minutes.
- The remote control lithium Battery takes about 25 minutes for a full charge.


(While charging, the indicator on the remote control is Red. When fully charged, the indicator on the remote control will turn to solid Blue).
Dual-Setting Remote Controller

- Power off the remoter control. Hold
![]() (camera) then press
(camera) then press ![]() (power) at the same me. Two beeping sound means the Right Joystick has switched to the throttle stick, the LED indicator
(power) at the same me. Two beeping sound means the Right Joystick has switched to the throttle stick, the LED indicator ![]() OFF.
OFF. - Power off the remoter control. Hold
![]() (camera) then press
(camera) then press ![]() (power) at the same me. Two beeping sound means the left Joystick has switched to the throttle stick, the LED indicator
(power) at the same me. Two beeping sound means the left Joystick has switched to the throttle stick, the LED indicator ![]() OFF.
OFF.

 OFF.
OFF. (camera) then press
 Note: When the drone is indoors with a weak GPS signal, (lights rapidly blinking Blue + White), holding
  (RTH) for 5 seconds to turn off GPS mode and the drone can be operated under the normal mode. All GPS functions will be disabled.
REMOTE CONTROL OPERATING METHOD
Throttle Joystick

Direction Joystick

Install the Contixo F35 App
QR code for "Contixo F35" application for Apple IOS system (Please scan this QR code to install this software).

QR code for "Contixo F35" application for Android system (Please scan this QR code to install this software).

Scan the following code with your smart phone in order to download the flight control app.
Flight
Step 1: Turn on the drone and set down on a level surface
- The drone will auto-trim to this level surface.
- All lights blinking red.


Step 2: Turn On The Remote Control & Pair With Drone
- Power on the remote control and link the aircraft automatically.
- When rear lights flash blue and front lights white, pairing is successful.
NOTE: You can connect to the drone Wi-Fi signal at this me to view the current drone on the Contixo F35 app, or wait until after GPS is calibrated.
Step 3: Connect App

- Connect your smartphone to the Wi-Fi of the drone and check the drone's status on the "Contixo F35" app.
- Open the "Contixo F35" application on your smartphone to access the control interface.
Click the "CONTROLS" button to enter he APP interface.

APP INTRODUCTION
Wait until the Drone Status at the boom right of the screen reads "Ready to Fly" before initiating flight. This will ensure that your GPS is synced and your drone is ready to fly.


Step 4: Compass Calibraon

Part 1: Compass Calibraon
- Move and position left joysticks to 1 o'clock & right joystick to 11 o'clock.
- Rear lights will rapidly blink Blue/Red and White/Red in front.
- App Drone Status: "Compass Calibration".
![]()

Part 2: Compass Calibraon
- Keeping the drone level and parallel to the ground, pick it up from the back and rotate your body in one full circle (360°).
- Back lights will turn to solid blue.
NOTE: If using the app, the on-screen instructions may guide you.

Part 3: Compass Calibraon
- From the boom, hold the drone vertically so the camera is facing toward the ground. Rotate your body in one full circle (360°).
- Front lights will turn to solid white.
- App Drone Status: "Compass Calibration Okay"
NOTE: If compass does not calibrate quickly, tap the screen on the Contixo F35 App and restart the calibration process.
Step 5: Reset to factory Setting/Calibrate Gyroscope

- Push the joysticks into the 11 o'clock (le joystick) & 1 o'clock (right joystick) position.
- Lights will rapidly blink Blue (rear) and White (front).
- App Drone Status: "Gyroscope is Being Calibrated" then "Gyroscope okay".
Step 6: GPS Searching (DO NOT use GPS Mode Indoors)

- Set the drone back down on a level surface.
- Lights will return to rapid-blinking Blue (rear) and White (front). This means the drone is searching for the GPS signal.
- This process can take a few minutes.
- App Drone status: "Waiting for GPS Signal"
NOTE: Wait for rear lights to be solid blue and front lights white before initiating takeoff.
Starting/Stopping motors

Starting Motors:
- Push the joysticks into the 5 o'clock (le joystick) & 7 o'clock (right joystick) position.
- Motors will start working. Push the left joystick up to takeoff.
![warning]() NOTE: Start the motors before drone takeoff.
NOTE: Start the motors before drone takeoff.
Rotating propellers can be dangerous. DO NOT start the motors when there are people nearby.
Stopping Motors:
- Push the joysticks back into the 5 o'clock (le joystick) & 7 o'clock (right joystick) position and the motors will shut off.
- The motors will go idle if they are not operated after 20 seconds.
Once the lights have switched to all solid, you are ready to fly!
- Blue (rear) and white (front) lights are all solid (no blinking).
- App Drone Status: "Ready to fly".
Emergency Stop: Click once and hold ![]() for 3 seconds and the drone will immediately shut off and stop flying if the altitude of drone within 42 feet. An air-born unit will drop from the sky. If the drone's altitude is higher than 42 feet, the emergency stop will not activated.
for 3 seconds and the drone will immediately shut off and stop flying if the altitude of drone within 42 feet. An air-born unit will drop from the sky. If the drone's altitude is higher than 42 feet, the emergency stop will not activated.

Emergency Stop

When using the emergency stop feature during flying operation, it may cause the damage if the drone crashes or can injure people underneath the drone.
Follow Me Mode
When the Follow Me function is activated, the drone will follow the GPS in your smartphone wherever you go (Make sure your smartphone is connected with the drone successfully and using the Contixo F35 App).
- Be sure to keep the drone within 32.8-328 feet.
- Click
![]() (running person) on the app interface.
(running person) on the app interface. - Wait for Drone Status on the app to display "Follow Me Ready" boom right corner of the screen. The drone will then follow the phone's GPS coordinates.
- Click the
![]() (running person) on the app interface again to exit the Follow Me mode.
(running person) on the app interface again to exit the Follow Me mode.
Common Issues:
Follow Me mode may not work if your phone's GPS signal is too weak. This could be due to signal loss from surrounding buildings and trees or congestion from too many mobile phones in the area.
Always fly in open and clean area, the F35 drone does not have obstacle avoidance capability when the drone returns back to assigned area.

Follow Object
Click ![]() then click
then click  (box around person or Object ). Tap on the object or person you want to track, then tap again to confirm your selection.
NOTE: Make sure the size of the frame you mark is the same as the object or person you tap, the frame should not exceed the object or person in the capture frame.

Selfie Mode


Click  (hand with two fingers) on the App, follow the "Warm Tip" on the App Screen. Hold up 2 fingers to take a picture. Wave your hand to begin recording video. There is a 3 second countdown before taking a video or picture.
NOTE: Hand gestures are based on your right hand.
This function can only be used when there is adequate light. Low light or dimly lit areas may prevent the camera from detecting your hand gestures.
Return-to-Home (RTH)
The Return to Home (RTH) function brings the drone back to the Take Off Point.
This function can only be achieved under GPS mode.
There are 3 types of RTH: Smart RTH/Low-Battery RTH/Fail connection RTH.
Return-to-home GPS Feature Description
When the drone is doing The Return to Home feature, it will first fly straight up to the according to the return to home altitude Setting. When you take the drone out of beginner mode, you must set the return altitude so that it will clear any objects (buildings or trees) in the area. After the drone reaches this height, it will then relocate to the home (take off) position and then descend and land to the starting point.
 Smart Return To Home

 RTH Button
RTH Button in App
")
 Low-Battery Return-to-Home
Low-Battery RTH is triggered when the flight Battery is depleted to a point that may affect the safe return of the drone. The drone flies back to about 100 feet from the last known home location.
 Fail connection Return-to-Home (RTH)
The drone will enter Return-to-Home Mode if the signal to the remote control is lost. Re-sync the remote control to the drone if the drone flies back into your view. Pull the throttle down to land the drone in a safe area.
Adjusng Trim in No GPS Mode
If the drone flies in None GPS Mode, you can trim the drone to obtain more balanced flight. Press and hold  until beep once, it will enter trim mode.
Holding the button and pushing the direction joystick to the opposite side at the same me, the drone drifts to rebalance it. For example, if the drone drifts to the left, push the joystick to the right to make the drone balanced. Release to exit trim mode.
WayPoint Flight
- To start a WayPoint Flight, first download and save your local map in your smartphone. (Connect your smartphone to network via Wi-Fi or 4G LTE, open the F35 App and enable the Waypoint mode, you will see a map then zoom in to the maximum, when the map is fully displayed.)
- Successfully connect the drone Wi-Fi with your smartphone, click
![]() (2 rectangles) on the App. Find the Red Circle (LIMITED FLIGHT RANGE) / TAKEOFF POSITION / DRONE CURRENT POSITION on the map. Mark the points (up to 16) you plan to fly within the Red Circle range on the map. If you would like to reset the points or flight path, click
(2 rectangles) on the App. Find the Red Circle (LIMITED FLIGHT RANGE) / TAKEOFF POSITION / DRONE CURRENT POSITION on the map. Mark the points (up to 16) you plan to fly within the Red Circle range on the map. If you would like to reset the points or flight path, click ![]() or
or ![]() . Click
. Click ![]() and confirm to start the WayPoint Flight. Push the right joystick at anytime to cancel the WayPoint Flight function.
and confirm to start the WayPoint Flight. Push the right joystick at anytime to cancel the WayPoint Flight function.

 or
or  . Click
  and confirm to start the WayPoint Flight. Push the right joystick at anytime to cancel the WayPoint Flight function.
Orbit Mode

- Hover the drone around the center point.
- Press
![]() (camera) +
(camera) + ![]() (video camera) on the remote control at the same me.
(video camera) on the remote control at the same me. - Move and set the drone in the radius range you prefer (within 6 feet – 328 feet) using the direction joystick.
- Press
![]() (camera) +
(camera) + ![]() (video camera) on the remote control at the same me again. The drone will begin to fly according to the radius range you set in STEP 3 (Note: If the radius range is less than 6 feet, the drone will fly to 6 feet automatically). Move the direction joystick to cancel the Orbit mode.
(video camera) on the remote control at the same me again. The drone will begin to fly according to the radius range you set in STEP 3 (Note: If the radius range is less than 6 feet, the drone will fly to 6 feet automatically). Move the direction joystick to cancel the Orbit mode.
 (video camera) on the remote control at the same me.
 NOTE: Press ![]() (camera) +
(camera) + ![]() (video camera) on the remote control at the same me and the Orbit function can be activated if the drone and remote control successfully paired and the drone flies up.
(video camera) on the remote control at the same me and the Orbit function can be activated if the drone and remote control successfully paired and the drone flies up.
Flight Setting
The Default GPS Mode is Beginner Mode. In Beginner Mode:
- Flight Distance from remote control is limited to between 0 – 90 feet.
- Flight altitude from remote control is limited to between 0 – 90 feet.
- Return-To-Home altitude is below 65 feet.
You can turn off the Beginner Mode to modify the parameters in the App on your phone.

CAMERA FUNCTIONS

App Icons

Take Photo

Take Video
Press  (camera) on the remote control or tap
  (camera) on the App to take a picture. The the indicator
  on the screen of remote control will flash once, indicating the camera took a photo.
Press  (video camera) on the remote control or tap
  (video camera) on the App to record a video. The the indicator on the screen of remote control will keep flashing, indicating the camera is recording video.
Press (video camera) again to save the video. DO NOT take photos while recording video.
NOTE: When using the "Contixo F35" App, the original photos and videos will be compressed and saved to your smartphone.
How To Find a Lost Drone
 Connue to click
  to open the MAP surface to search the drone.

 The last position of the lost drone will appear on the map, and you can find the last position of the drone according to the label on the map (about 30 feet error). If you reach the last known point on the map, and are still unable to locate the drone, you can try to toggle the drone Wi-Fi connection off/on. Reconnecting to the drone Wi-Fi would establish a live feed connection and give you a further clue to locating the drone. The drone Wi-Fi will broadcast as long as the Battery still has power.
Note: The APP must remain open all the me. If the APP is closed, the last position of the drone will disappear on the map.
- One-Button Media Sharing

Figure 1. One Button Media Sharing

Figure 2. Control Buttons

Figure 3. Viewing Photos

Figure 4. AirDrop Photo Sharing- Open the App, click
![]() (gallery) to access your picture and video files (Pic 1.)
(gallery) to access your picture and video files (Pic 1.) - Click once or press
![]() (checkmark list) to choose the photos you want to share. Click
(checkmark list) to choose the photos you want to share. Click ![]() (box with arrow) to choose the platforms to share to (Pic 3).
(box with arrow) to choose the platforms to share to (Pic 3).
Reminder: You can share up to 9 pictures at the same me, but you can only choose one video for sharing at a me.
- Open the App, click
- Save the photo and video to the mobile APP album
Open the APP and connect the Wi-Fi with the drone, click the![]() and enter the media gallery (Pic.1).
and enter the media gallery (Pic.1).

APP gallery: Choose photo and video and save them in the mobile album, click, photo and video are saved in the mobile gallery.

SD card: Click, choose photo and video and save them in your mobile, click, photo and video are saved in the mobile gallery.

![warning]() NOTE: After shooting and recording finished, photo and video will be saved in the APP gallery or SD card, the resolution of photo and video saved in the APP gallery is different from in SD card.
NOTE: After shooting and recording finished, photo and video will be saved in the APP gallery or SD card, the resolution of photo and video saved in the APP gallery is different from in SD card.


 (gallery) to access your picture and video files (Pic 1.)
 (checkmark list) to choose the photos you want to share. Click
  (box with arrow) to choose the platforms to share to (Pic 3).
 and enter the media gallery (Pic.1).


Micro SD Card
You can use up to a 128GB memory card with your drone.

The original images and videos are saved on the Micro SD card. Push the Micro SD card slightly to release the memory card. Next, insert the card into the card reader. Insert the card reader into the USB outlet of a computer to retrieve the photos and videos from the Micro SD card. The images can be also viewed in the App.
There are a few restrictions for recording over Wi-Fi. The best quality possible transmitting via Wi-Fi is 720p. Wi-Fi signal loss from interference will cause the jumps or delays in video recordings. The best soluotin is to add a micro SD card to capture uninterrupted video.
A micro SD card helps ensure best video quality is recorded. The largest size capacity is 128GB, which will hold a good amount of recording me. A high quality, brand name micro SD is recommended for optimal performance, some lower quality brands may not be compatible. This drone can only support a file system of FAT32.
If the micro SD card is new, first make sure the card is readable in your laptop or other device. Format the micro SD card on the first use if your unable to read the memory card.
SPECIFICATIONS
Drone
MODEL: F35
Weight (Including Battery): 585g/20.6 oz
Flight Time: About 26 minutes
Wi-Fi Camera Distance: 300m~700m( 980feet~2200 feet) (Outdoors and unobstructed, depending on conditions and your mobile device)
Motor Model: 1806
Auto-Hovering: Enabled
Operating Temperature Range: 32°to 104°F ( 0°to 40°C)
Satellite Systems: GPS / GLONASS
Dimensions:
Unfolded – 17.7" L x 15.9" W x 3.14" H
Folded – 6.92" L x 4.13" W x 3.14" H
Camera
Controllable Range: Pitch: -90°to 0°
Lens: FOV 100°
Still Photography Mode: Single shot
Photo: JPEG
Video: MP4
Supported External Memory: Micro SD Card up to 32GB-128GB (Class10/U1 or later, not included)
Supported File Systems: FAT32
operating Temperature: 32°to 104°F ( 0°to 40°C )
App / Live View
Mobile App: "Contixo F35" in App Store & Google Play Store
Frequency Range: 5 Ghz
| CONFIGURATION | STORAGE METHOD | RESOLUTION | TRANSMISSION FRAME RATE | |
| 4K | Phone | Photo | 3840X2160P | |
| Video | 1280X720P | 30 fps | ||
| TF card | Photo | 3840X2160P | 30 fps | |
| Video | 3840X2160P | |||
Latency: Low Latency Video (depend on conditions and mobile device)
Required Operating Systems: IOS 9.0 or later / Android 5.0 or later
Recommended Devices: 4.7" to 6.5" Smartphones
Micro USB Cable
Voltage: 5V/3A
Rated Power: ≤15 W
Remote Control
Operating Frequency: 2.4 GHz
Battery Capacity: 300 mAh
Operating Voltage: 3.7V
Max Control Distance: Up to 1500M (4900 feet) (Outdoor and unobstructed)
Max Charging Time: About 25 minutes
Battery life on control: 11 hours Max
Mobile Device Holder: 4.7" to 6.5" Smartphones
Operating Temperature: 32°to 104°F ( 0°to 40°C )
Drone Battery
Capacity: 2500 mAh
Voltage: 11.1V
Battery Type: Li-polymer
Energy: 27.75Wh
Net Weight: 195 g / 6.8 oz
Max Charging Power: 15W
Max Charging Time: About 4.5 hours
PARTS LIST (Included)

COMMON PROBLEMS AND SOLUTIONS
| THE PROBLEM | REASON | TROUBLESHOOT |
| Drone lights flashing and no response from the drone when operating. |
|
|
| The blades spin, but the drone cannot takeoff. |
|
|
| The drone shakes heavily. | The blades distorted. | Replace the blades. |
| Drone cannot stay balanced in flight. |
|
|
| Drone is unstable in flight like in Follow Me mode | Three-axis acceleration sensor is unbalanced | Restart and re-calibrate the drone. |
| Drone will not auto hover in one place | Unstable magnetic field | Recalibrate compass / do factory reset |
How to fix Android Not Connecting to Wi-Fi Problem
Tip 1. Restart Phone
Tip 2. Toggle Wi-Fi Off and on
Tip 3. Turn Airplane Mode Off
Tip 4. Turn Bluetooth off while troubleshooting
Tip 5. Turn Power Saving Mode off
Tip 6. Turn off Smart Network Switch
Tip 7. Adjust Auto-Reconnect Settings
Tip 8. Use a Wi-Fi connection Manager app if necessary
Tip 9. Make sure your phone supports 5 Ghz Wi-Fi
Technical Support
Have questions?
E-mail: support@contixo.com
Mon-Fri 9:00 am - 4:00 pm PST
In order to make sure that your drone meets the requirements of the electromagnetic environment of the aviation radio station, flying within the scope of 7 miles on each side by taking the airport runway center line as the middle line is HIGHLY FORBIDDEN.Flying within the scope of 13 miles by taking both ends of the runway as the center is HIGHLY FORBIDDEN. Flying on the route of the airline is also PROHIBITED. Do not use drone or other flying drones in areas that are forbidden or prohibited by your local laws and regulations.

Website: www.contixo.com
SAFETY PRECAUTIONS
Safety: F35 drone was designed and manufactured with safety in mind. Your safety also depends on proper training and thoughtful operation. Do not set up, operate, maintain, or repair the drone without reading and understanding this manual and the labels on the unit.
Owner Responsibility: In order to maintain your drone properly and to ensure operator safety, it is the responsibility of the drone owner to read and follow these instructions:
Follow all setup, operation, and maintenance instructions.
Read and follow all safety instructions. Keep them readily available for operators. Make sure all operators are properly trained, know how to safely operate, and are properly supervised.
Do not operate the drone until you are certain that all parts are in place and operating correctly.
Carefully inspect the drone on a regular basis and perform all maintenance as required.
Service and maintain the drone only with approved replacement parts.
Keep all instructions permanently with the product.
Only use this product if it can be used safely!
PRODUCT SHOULD ONLY BE USED BY ADULTS AND CHILDREN 14 YEARS AND OLDER. ADULT SUPERVISION REQUIRED FOR CHILDREN UNDER 14 YEARS OF AGE.
CHARGING OF THE DRONE BATTERY MUST BE SUPERVISED AT ALL TIMES BY AN ADULT. UNPLUG THE BATTERY WHEN FULLY CHARGED. DO NOT OVER-CHARGE THE BATTERY.
Flight Safety

Avoid flying over or near obstacles, crowds, high voltage power line s, trees, airport s or water.
DO NOT fly near strong electromagnetic sources such as power lines and base stations as it may affect the onboard compass.

DO NOT use the drone in adverse weather conditions such as rain, snow, fog and wind speeds exceeding 7 m/s or 16 mph.
- Stay away from the rotating propellers and motors.

- No Fly Zone
![]()


Documents / Resources
References
Download manual
Here you can download full pdf version of manual, it may contain additional safety instructions, warranty information, FCC rules, etc.
Advertisement


Need help?
Do you have a question about the F35 and is the answer not in the manual?
Questions and answers