Advertisement
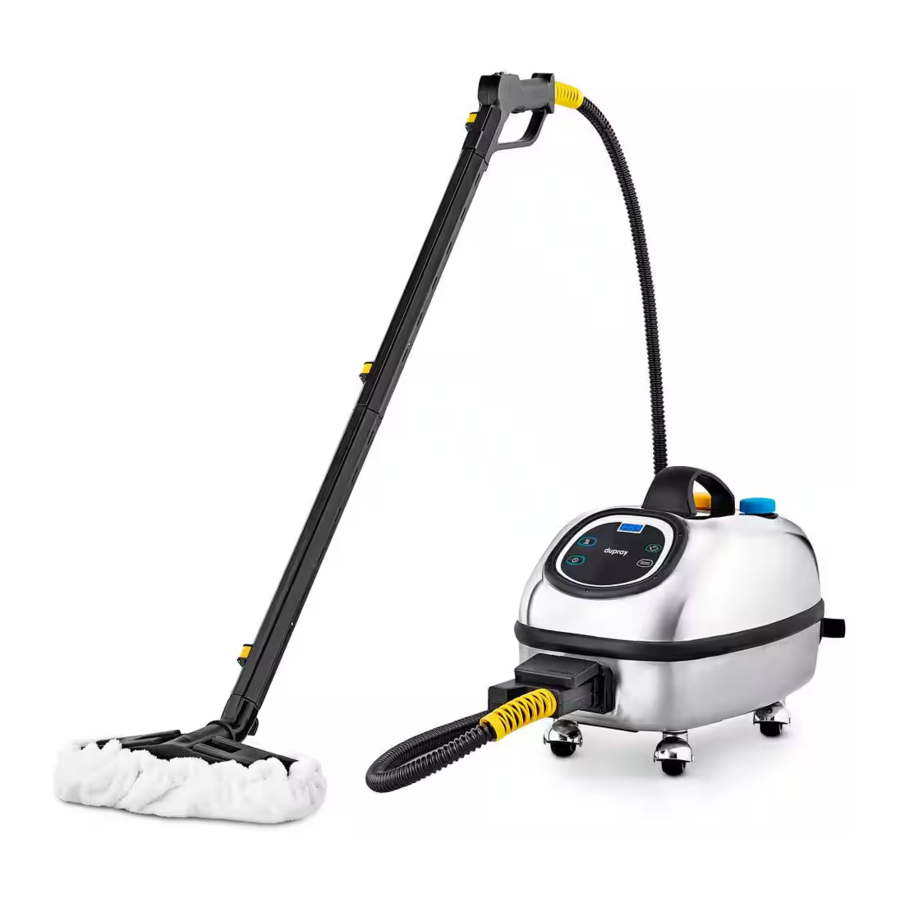
DESCRIPTION

- WATER TANK CAP
1A. DETERGENT TANK CAP - POWER BUTTON
2A. MAIN POWER SWITCH - BOILER ACTIVATION BUTTON
- LOW WATER INDICATOR
- STEAMREADY™ INDICATOR
- ADI™ DISPLAY
- STEAM HOSE CONNECTION OUTLET
- BOILER DRAIN CAP
- ELECTRICAL CORD
ACCESSORIES

- STEAM HOSE
- STEAM RELEASE TRIGGER
- STEAM PRESSURE BUTTON
- STEAM PRESSURE INDICATORS
- ACCESSORY LOCK / RELEASE
- STEAM HOSE CONNECTOR
- HOSE LOCKING PIN
- EXTENSION TUBES
- EXTENSION TUBES LOCKING PIN
- RECTANGULAR TOOL
- CLOTH HOLDING CLIPS
- TRIANGULAR TOOL
- WINDOW TOOL
- LANCE
- LARGE NYLON BRUSH
- SMALL NYLON BRUSH
- SMALL BRASS BRUSH
- SMALL STAINLESS STEEL BRUSH
- STEAM SCRAPPER
- PLUNGER TOOL
- STEEL WOOL
- REFILLING BOTTLE
- MICROFIBER CLOTH
- MICROFIBER PAD
- DETERGENT INJECTION
- STEAMMOP™
- TRIANGULAR TOOL MICROFIBER BONNET
- RECTANGULAR TOOL MICROFIBER BONNET
HOW TO USE YOUR STEAM CLEANER
- Remove the water tank cap (1) and fill the tank with up to a maximum of 0.8 gal / 3 L of regular tap water. Securely replace the water tank cap. The refilling bottle (31) is 30 oz / 900 ml.
- To add diluted detergent to the detergent tank, please refer to the REFILLING WITH DETERGENT section.
- Unravel completely the electrical cord (9). Connect the electrical cord to a 15 or 20 amp 110V/120V power outlet. (make sure the circuit is not already used by another high wattage appliance).
- Turn ON the main power switch (2A), press the power button (2), and then press the boiler activation button (3).
The SteamReady™ indicator (5) will light up when the steam cleaner is ready to use, after approximately 7 minutes of heat up time. This light is only ON when the unit is at maximum operating pressure. While in use, the light will turn OFF automatically, indicating that the boiler is producing steam. - Connect the steam hose (10) by inserting the steam hose connector (15) in the steam hose connection outlet (7) and press firmly.
- Select the desired steam pressure (on the hose handle) between minimum, medium and maximum (12).
- Connect the steam hose (10) to the accessory that you want to use.
- To release steam, press the steam release trigger (11) on the hose handle.
- When you are done using your steam cleaner, turn the unitOFF by pressing on the power button (2).
Turn OFF the main power switch (2A) and unplug the machine. Your steam cleaner is now ready for storage after cool down.
![]()
Always turn OFF the main power switch (2A) when leaving the machine unattended. - It is safe to leave water in the boiler when the steam cleaner is not in use. If it is for an extended period of time (months), then it is best to flush out the remaining water. To do so, follow the water removal instructions as outlined in the maintenance of the boiler section.
REFILLING WITH WATER
Equipped with CST™ (Continuous Steam Technology), your steam cleaner can be refilled at anytime during operation. When the water level inside the tank is low, the red low water indicator light (4) will turn ON and the low water alarm will sound. You can simply refill the water tank using the refilling bottle (31) up to a maximum of 0.8 gal / 3L and press the boiler activation button (3).

Never put anything else other than clean water in the boiler.
REFILLING WITH DETERGENT
You can refill the yellow detergent tank (1A) at any time. Do not put anything else than authorized non-foaming diluted detergent in the tank. Always dilute the solution to approximately 1 part concentrated detergent to 10 parts water. Putting only water in the detergent tank can cause faults to the mixing circuit. If the detergent doesn't come out, you need to prime the pump. Please refer to the troubleshooting section.

Once heated to temperatures above 100°C, some detergents available in commerce will emanate highly dangerous toxic gases. Always use the detergent injection feature in a well ventilated area. Always consult the MSDS data sheet from the manufacturer.
Detergents used in extraction systems are foamy and will cause damages to the machine.
Never put any solvents or acidic detergent inside the detergent tank.
This machine has been designed for use with cleaning agent supplied or recommended by the manufacturer. The use of other cleaning agents or chemicals may adversely affect the safety of the machine.
FEATURES
This model is equipped with the following features:
LOW WATER INDICATOR (4)
A red warning light signals that the water needs to be refilled. If you wish to continue steam cleaning, see the "Refilling with Water" instructions.
ADJUST THE STEAM PRESSURE (12)
With the steam pressure regulator, it is possible to select the steam pressure that you wish to use during your cleaning from minimum, medium and maximum (12).
DETERGENT INJECTION (34)
To release a blast of soap in the steam, press the detergent injection button (34) on the hose handle and hold the steam release trigger (11) at the same time. Do not use the detergent injection for more than 3 seconds at a time.
STEAMREADY™ INDICATOR (5)
Lets you know when the steam cleaner is operating at optimal pressure and ready to use.
ADI™ DISPLAY (6)
TEMPERATURE AND PRESSURE DISPLAY
While the steam cleaner is ON (number 2A, 2 and 3), the temperature indicated on the display is in Farenheit. To display the operating pressure in psi, press and hold the button (3). After 10 seconds, the display will return to the operating internal temperature.
HOUR COUNTER
This device is equipped with two hour counter; C1 and C2. C1 is fixed and C2 is resettable by the user. To display them, turn off the unit with the power button (2), then press the boiler activation button (3); every time you will press the button (3) the display will show respectively the hour counter C1 and the hour counter C2.
RESETTING THE HOUR COUNTER C2
Turn the steam cleaner off by pressing the main power switch (2A) located in the rear side of the unit.
Press both buttons (2) and (3) and hold them; in the meantime turn the machine on by pressing the main power switch (2A).
MAINTENANCE REMINDER DESCALE BOILER
The steam cleaner is equipped with a maintenance reminder which indicates DESCALE BOILER on the display alternating with the temperature. When the display indicates DESCALE BOILER, it is time to perform a boiler maintenance. Let the steam cleaner cool down for at least 8 hours before proceeding. Please refer to the maintenance instructions to complete the boiler maintenance.
USING THE ACCESSORIES
CONNECTING THE HOSE (10)
Insert the steam hose connector (15) into the steam hose connection outlet (7) all the way, making sure it cannot be pushed in further. Ensure the hose locking pin (16) is in place.
This hose contains electrical connections, do not immerse in water for cleaning.
EXTENSION TUBES (17)
Connect the steam hose (10) to the extension tubes (17), until the accessory lock (14) snaps in. All the accessories are connected the same way.
RECTANGULAR TOOL (19)
The rectangular tool (19) is used to clean walls, floors and carpets. Use it with the microfiber cloth (32) or microfiber bonnet (37) to glide smoothly over the surface by attaching it to the cloth holding clips (20). Change the cloth when saturated with dirt. Use the rectangular tool directly when you need additional scrubbing action, for example when cleaning ceramic or porous tiles.
STEAMMOP™ (35)
The SteamMop™ is also used to clean floors, walls and ceilings. Its rotating head allows for easier access under low furniture. Use it with the microfiber pad (33).
MICROFIBER PAD (33)
The microfiber pad (33) is used to glide smoothly over floors and carpets. To use this accessory, you can attach it to the SteamMop™ or place the rectangular tool directly over it. Wrap the extremities of the cloth around the tool and under the cloth holding clips (20).
Always respect the surface that you are cleaning, adhere to the surface cleaning instructions and do a colour test on a hidden section before you begin cleaning.
WINDOW TOOL (22)
The window tool (22) makes the cleaning and degreasing of windows easy. Attach the window tool to the extensions (17) or directly on the steam hose (30). Use the foam side to steam and scrub and vacuum the window and flip the tool to wipe off dirt and condensation using the squeegee side. Wipe corners with a cloth.

During cold weather, warm up the windows with the window tool from a 2"-4" distance and with very little steam flow before starting the actual cleaning ( to prevent possible damage to the window ).
TRIANGULAR TOOL (21)
The triangular tool (21) is used where it is impossible or awkward to use the rectangular tool. It is the best tool to use for cleaning, as steam gets insulated by a thick microfiber cloth (32) or microfiber bonnet (36). The cloth attached to the triangular tool will pick up dirt and clean any surface. Change the cloth when saturated with dirt.
UPHOLSTERY, DRAPERY, BEDDING, ETC.
Cover the tool with a clean dry cloth attaching it under the triangular tool cloth holding clips. Use a rapid back and forth motion, making sure that you do not over saturate the material with steam.
Always respect the surface that you are cleaning, adhere to the surface cleaning instructions and do a colour test on a hidden section before you begin cleaning.
LANCE (23) WITH BRUSHES (24 TO 27)
(NYLON, BRASS, STAINLESS STEEL)
The lance (23) can be used with or without one of the detail brushes supplied with the steam cleaner. For items that are particularly prone to scratches, it is best to use the lance without a brush. For all other areas, start with the nylon brush (25) (least abrasive) and carefully work your way up to the brass (26), then the stainless steel brush (27). It is always best to be careful when using the brushes to prevent damage or scratching of delicate surfaces.
The use of the lance alone is particularly good for cleaning and degreasing many working surfaces, ventilation hoods, oven doors, ventilation grating, kitchen furniture, stainless steel or enamel sinks, hand-basins, bath-tubs, water taps (to remove scale and water residue), doors, metal frames, car wheel rims, pet areas etc. The nylon brush, because of its softness, is ideal for removing the dirt from grout, sinks and other surfaces where you need some light scrubbing action, but need to be careful not to scratch the surface. Use the large nylon brush (24) with or without the steel wool (26) to clean larger surfaces.
Tougher cleaning jobs may require the use of the brass brush that is supplied. Please make sure you are careful that this tool does not scratch the surface. Brass is tougher than nylon, but softer than stainless steel. For surfaces (grout for example) where the dirt is not being properly lifted with the nylon brush, carefully using the brass brush may give the best results.
For the toughest cleaning assignments (very caked on grease, rust, BBQ grills, very dirty grout), we recommend that you use the stainless steel (27) brushes.
When using the lance with or without the brushes, you will need a cloth to wipe off the moisture and dirt that has been lifted through cleaning.
Always respect the surface that you are cleaning, adhere to the surface cleaning instructions and do a colour test on a hidden section before you begin cleaning.
ORDER MORE ON DUPRAY.COM
STEAM SCRAPPER (28)
The steam scrapper (28) is used for removing stickers, wallpapers and adhesives. Attach it to the lance (23).
PLUNGER TOOL (29)
The plunger tool (29) is used to unclog drains. Attach the plunger tool to the lance (23), place the tool firmly on the drain and blow the steam inside the drain for a few seconds. Steam will melt away residue and remove odors.
MAINTENANCE
MAINTENANCE OF THE BOILER
To maintain your steam cleaner in good condition and to ensure constant performance, we recommend that you periodically clean the boiler after every 20 hours of use or less depending on the water hardness. The ADI™ will display DESCALE BOILER when the boiler needs to be maintained.
CLEANING INSTRUCTIONS
Before cleaning the boiler, please make sure that the boiler is at room temperature, that it has not been used for at least 8 hours, and that the steam cleaner is disconnected from the power source.
DO NOT USE DECALCIFYING SOLUTION OR VINEGAR INSIDE THE STEAM CLEANER AS IT MAY DAMAGE THE PUMP.
- Place the steam cleaner above a sink or a bucket. Unscrew and remove the boiler drain cap (8) (use the provided Allen key).
Empty all the remaining water from the boiler. Refill the water tank with water (for a maximum of 0.8 gal / 3L of water). Reconnect the steam cleaner to a power outlet and turn the steam cleaner ON (press the buttons 2A and 2). Doing so will rinse the boiler with water. Do NOT press the boiler activation button (3). Keep flushing the boiler until the water tank is empty. - Turn the steam cleanerOFF, (press the buttons 2A and 2). Replace the boiler drain cap.
- To reset the DESCALE BOILER display, turn on the appliance by activating the switch (2A) and the power button (2), then press again the power button (2) and keep it pressed for approximately 10 seconds, the DESCALE BOILER indicator will disappear from the display and will only appear at the next maintenance interval.
It is not recommended that you use any other chemical to clean this product. Doing so will automatically void the warranty.
ATTACHMENT COUPLINGS
If the attachment connections dry up after intensive use, put a small amount of petroleum jelly (Vaseline) around the O-rings on the male attachment.
TECHNICAL SPECIFICATIONS
To verify the technical data of your model, always consult the plate under the machine.
| POWER | 1600 W, 15 AMPS, 120V |
| BOILER STEAM TEMPERATURE | 345°F / 175°C |
| STEAM PRESSURE | 121 PSI / 8 BAR |
| BOILER VOLUME | 0.4 gal / 1.5 L |
| HEAT UP TIME | APPROX. 7 MINUTES |
| OPERATING TIME | UNLIMITED |
| WEIGHT | 28 Lbs / 13 Kg |
REPLACEMENT PARTS
ORDER AT DUPRAY.COM
#120716PKG: Small nylon brushes (10)
#120717PKG: Small brass brushes (10)
#120709PKG: Small stainless steel brushes (10)
#63071000PKG: Microfiber cloths (10)
#7000055PKG: Microfiber pads (5)
#120718PKG: Large nylon brushes (5)
#BONTRIPKG: Triangular bonnets (5)
#BONRECPKG: Rectangular bonnets (5)
TROUBLESHOOTING
Do not operate the steam cleaner with a damaged cord, plug or if the steam cleaner has been dropped or damaged. To avoid risk of electric shock, do not disassemble or attempt to repair the unit on your own. Return the unit to Dupray for examination, repair or replacement. All service is to be performed by authorized professionals of Dupray service centers.
| PROBLEM | POSSIBLE CAUSE | REMEDY |
The machine does not produce steam |
|
|
The red low water indicator (4) lights up |
|
|
Water leaks from the connections |
|
|
Steam does not come out |
|
|
| On the display appears the writing FAIL. Switches and buttons are blocked (do not react to the command). |
|
|
Noise inside the boiler |
|
|
Steam pressure is dropping when in use |
|
|
Detergent doesn't come out |
|
|
IMPORTANT SAFETY INSTRUCTIONS
When using your steam cleaner, basic safety precautions should be followed. Please read the following instructions carefully as they provide important information concerning how to install, use and care for your steam cleaner.
- Use the steam cleaner only for its intended use.
- To protect against a risk of electric shock, do not immerse the steam cleaner in water or any other liquids.
- The steam cleaner should always be turned off before plugging it into or unplugging it from a wall outlet. Never pull the power cord to disconnect from the outlet; instead grasp the plug and pull to disconnect.
- Do not let the power cord touch hot surfaces.
- Wrap the power cord around the cord wrap bar when not in use.
![]()
Do not operate the steam cleaner with a damaged cord, plug, safety device, hose, trigger gun or if the steam cleaner has been dropped or damaged. This will void any and all warranties. Please contact Dupray at 1-800-881-8482 for repair procedure, or visit dupray.com.- Keep away from children.
- Do not leave the steam cleanerON while unattended.
- Do not use this unit in the presence of explosive and/or flammable fumes.
- Keep ventilation slots free from dust.
- Never drop or insert any object into ventilation slots.
- To prevent overheating, unravel the electrical cord completely.
- Do not operate where aerosol (spray) products are being used or where oxygen is being administered.
- To disconnect, turn off the main power button (2A), then remove the plug from the main power.
- Never put away your steam cleaner while it is still hot. There is no need for emptying the tank unless you intend to leave it unused for a long period of time.
- Never pull the machine by the steam hose. Move the machine instead.
- Handle might get hot during use.
- When using the steam cleaner on an uneven surface ensure the machine is blocked in place.
- Sound pressure levels do not exceed Lpa<99db (A).
- Do not freeze.
- This is machine is intended for commercial use only.
- The electric supply connection shall be made by a qualified electrician and comply with IEC 60364-1.
- This machine is equipped with a pressure switch able to check and to maintain the pressure under certain preset limits (ref. «Rated pressure» on the technical label underneath the machine). In case there would be a steam leakage under the machine, it means that the functioning of this device has been compromised and the safety valve has been involved as to limit the boiler's internal pressure.It is recommended not to use the machine, immediately unplug the machine and call the service center.
Do not use this machine in the presence of flammable liquids, or dusts that are hazardous to health. WARNING: Operators shall be adequately instructed on the use of this steam cleaner.
This machine is not suitable for picking up hazardous dust.
If liquid escapes from the machine, switch OFF immediatly.
High pressure jets can be dangerous if subject to misuse. The jet must not be directed at persons, live electrical equipment or the machine itself.
Do not use the machine within range of persons unless they wear protective clothing.
Do not direct the jet against yourself or others in order to clean clothes or footwear.
Risk of explosion - Do not spray flammable liquids.
High pressure cleaners shall not be used by children or untrained personnel.
To ensure machine safety, use only original spare parts from the manufacturer of approved by the manufacturer.
High pressure hoses, fittings and couplings are important for the safety of the machine. Use only hoses, fittings and couplings recommended by the manufacturer.
The hand -arm vibrations data, referred to this device, are not metioned as they are bellow 2.5 m/s2
This machine is built with a safety valve to protect the steam cleaner in case of a primary failure. It is recommended to have an authorised service center verify the integrity of this safety valve and replace it if needed every 2 years.
Do not disassemble the accessories while the machine is supplying steam.
This machine is for indoor use only.
This machine shall be stored indoor only.
RISK OF BURNS
- This appliance produces steam at a very high temperature.
- The steam cleaner and its accessories can get very hot always use appropriate precautions.
- Avoid direct skin contact.
IMPORTANT WARNING
Steam is a powerful tool. Like any other tool, it should be used with caution. Certain surfaces, fabrics, materials and finishes are water and heat sensitive and can be damaged or discolored by steam. ALWAYS check with the manufacturer of the surface or product being cleaned before using steam. TEST a small, hidden surface to make sure the surface can be steamed.
DO NOT leave steam in one spot on any surface for any period of time with a wet cleaning cloth/pad attached as this will damage your floors.
DO NOT use on unsealed wood, on wood or tile floors that are highly worn, unfinished or have a wax or oil finish. Surfaces that have been treated with wax or no-wax floors may be damaged by heat.
DO NOT use on leather, synthetic fabrics, velvet or other delicate, steam-sensitive materials.
DO NOT use the steam cleaner for any other purpose than what is described in the instructions manual.
In no event is Dupray liable for incidental or consequential damages to anyone, of any nature whatsoever. Some states/provinces do not permit the exclusion or limitation of incidental or consequential damages, so the above may not apply to you.
ELECTRICAL INSTRUCTIONS
To avoid a circuit overload, do not operate another high-wattage appliance on the same circuit simultaneously with the steam cleaner. If an extension cord is necessary, a 15-amp rated cord with a 3-prong grounded plug should be used. Cords rated for less may overheat and cause damage.
EXTENSION CORD
3-PRONG GROUNDED PLUG
This system features a 3-prong grounded plug. As a safety feature, this plug will fit into a grounded outlet only one way.
If the plug does not fit fully into the power outlet, contact a qualified electrician. Do not attempt to defeat this safety feature.
Inadequate extension cords can be dangerous. If an extension cord is used, it shall be suitable for outdoor use, and the connection has to be kept dry and off the ground. It is recommended that this is accomplished by means of a cord reel which keeps the socket at least 60mm above the ground.
WATER INSTRUCTIONS
Your steam cleaner has been designed to use with normal tap water. In order to extend the life of this product, if you are living where the level of water hardness is very high, we recommend using 50% normal water with 50% distilled water.
Never put anything else other than clean water in the boiler.
Documents / Resources
References
Download manual
Here you can download full pdf version of manual, it may contain additional safety instructions, warranty information, FCC rules, etc.
Advertisement


Need help?
Do you have a question about the Hill Injection and is the answer not in the manual?
Questions and answers