Hikmicro LYNX PRO-LH25, LYNX PRO-LH19, OWL-OH25, OWL-OQ35 Manual
- User manual (31 pages)
Advertisement
- 1 Overview
- 2 Preparation
- 3 Image Settings
- 4 Measure the Distance
- 5 Highest Temperature Tracking
- 6 Picture and Video
- 7 Client Software Connection
- 8 CVBS Output
- 9 Maintenance
- 10 Frequently Asked Questions
- 11 Device Command
- 12 Device Communication Matrix
- 13 Symbol Conventions
- 14 Safety Instruction
- 15 Documents / Resources
Overview
Brief Description
The handheld thermal monocular camera is a handheld device with functions of observation, highest temperature target tracking, distance measurement, Wi-Fi hot spot, and so on. The highsensitivity built-in thermal detector provides you with clear view even in total darkness. The device is mainly applied to outdoor scenarios such as patrolling, law enforcement, searching and rescuing, drug enforcement, anti-smuggling, criminal seizing, hiking, travel, and hunting, etc.
Function
Distance Measurement
The device can detect the distance between the target and the observation position.
Highest Temperature Tracking
The device can detect the highest temperature in the scene and mark the spot. This function varies according to different camera models.
Image Correction
The device supports DPC (Defective Pixel Correction) and FFC (Flat Field Correction) which can optimize the image quality.
Client Software Connection
The device can capture snapshots, record videos, and set parameters by T-Vision APP after being connected to your phone via hot spot.
Storage
The built-in memory module supports video recording and snapshot capturing.
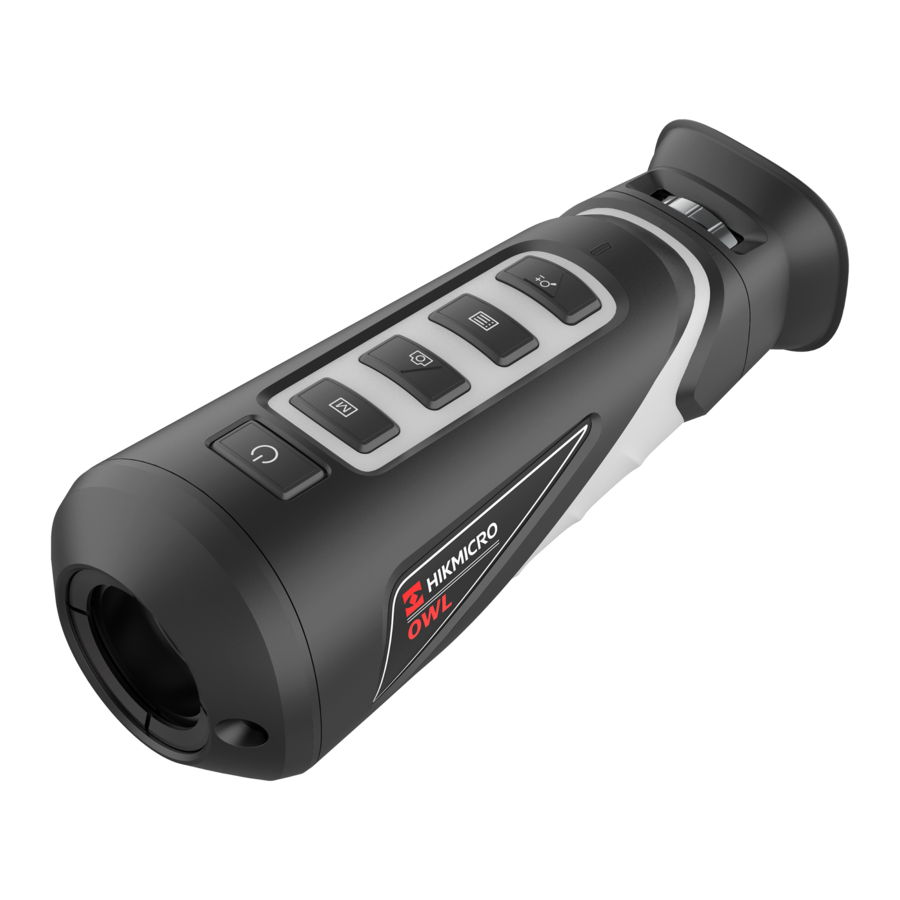
Appearance
Button
Figure 1-1 Buttons on The Device

Table 1-1 Function of Button
| Icon | Button | Function | |
 | Power | Hold: power on/off | |
 | Mode | Press: palettes Hold: FFC | |
 | Capture | Press: capture Hold: start/stop recording | |
 | Menu | Press: standby mode on/off Hold: display menu or not | |
 | Zoom | Press: start digital zoom | |
Interface
Figure 1-2 Overview of Interfaces

- Lens Cover: protect the lens from dust or scratch.
- Diopter Adjustment Knob: adjust the view according to your degree of myopia.
- Cable Interface: charge the device or export files with the supplied cable.
- Tripod Screw: connected to tripod.
Preparation
Charge Device
After the device starts up, the OSD (on-screen display) shows the battery status. When the battery is low, charge the device and ensure it works properly.
Before You Start
- The charging temperature should be from 0°C to 45°C (32°F to 113°F).
- Charge the device with the delivered cable.
- Lift the cable interface cover.
- Plug in the cable and charge the device.
Figure 2-1 Cable Interface


- Flashing Red & Green: error occurred.
- Solid Red: battery is properly charged.
- Solid Green: battery is fully charged.
- OFF: battery is not charged.
Power On/Off
Power On
When the device is connected to cable or the battery is enough, press ![]() for 2 seconds to power on the device.
for 2 seconds to power on the device.
Power Off
When the device is turned on, hold ![]() for 2 seconds to power off the device.
for 2 seconds to power off the device.
Menu Description
When the device powers on, hold  to display the menu.
Figure 2-2 Menu Description

- Press
![]() to move the cursor up.
to move the cursor up. - Press
![]() to move the cursor down.
to move the cursor down. - Press
![]() to confirm and hold it to exit the menu.
to confirm and hold it to exit the menu.
Image Settings
You can set palettes, brightness, scenes, FFC (flat field corrrection), and DPC (defective pixel correction) to display the best image effect.
Adjust Diopter
Make sure the eyepiece covers your eye and aims at the target. Adjust the diopter adjustment knob until the OSD text or image is clear.
 Note
Note
When adjusting diopter, DO NOT touch the surface of lens to avoid smearing the lens.
Figure 3-1 View the Target

Figure 3-2 Adjust Diopter

Focus Lens
Slightly rotate the focus wheel to focus the objective lens.
Figure 3-3 Adjust Objective Lens

Note
DO NOT touch the lens directly with your finger, or place any sharp objects near them.
Adjust Brightness
In the menu mode, select ![]() and press
and press ![]() to adjust brightness. In white hot mode, the higher the value of brightness is, the brighter the image is. The image effect in white hot mode is showed as picture below and effect in black hot mode is opposite.
to adjust brightness. In white hot mode, the higher the value of brightness is, the brighter the image is. The image effect in white hot mode is showed as picture below and effect in black hot mode is opposite.
Figure 3-4 Adjust Brightness in White Hot Mode

Adjust Contrast
In the menu mode, select ![]() and press
and press ![]() to adjust image contrast.
to adjust image contrast.
Select Scene
You can select proper scene according to actual using scene to improve the display effect.
- Hold
![]() to go to the menu.
to go to the menu. - Select
![]() and press
and press ![]() to switch scene.
to switch scene. ![]() refers to recognition mode and is recommended in normal scene.
refers to recognition mode and is recommended in normal scene.![]() refers to jungle mode and is recommended in hunting environment.
refers to jungle mode and is recommended in hunting environment.
- Hold
![]() to save settings and exit.
to save settings and exit.
 and press
  refers to jungle mode and is recommended in hunting environment.
Set Palettes
You can select different palettes to display the same scene in different effects. Press ![]() to switch palettes.
to switch palettes.
White Hot
The hot part is light-colored in view. The higher the temperature is, the lighter the color is.

Black Hot
The hot part is black-colored in view. The higher the temperature is, the more black the color is.

Red Hot
The hot part is red-colored in view. The higher the temperature is, the redder the color is.

Fusion
From high temperature to low temperature, the image is colored in from white, yellow, red, pink to purple.

Adjust Digital Zoom
You can zoom the image by using this function.
Press  in the view mode, the live view switches between 1 ×, 2 ×, 4 ×, and 8 ×.
Note
This function varies according to different camera models.
Flat Field Correction
This function can correct non-uniformity of display.
- Hold
![]() to go to the menu.
to go to the menu. - Select
![]() and press
and press ![]() to switch FFC mode.
to switch FFC mode. - Manual: Hold
![]() in live view to correct the non-uniformity of display.
in live view to correct the non-uniformity of display. - Auto: The device performs FFC automatically according to the set schedule when switching on the camera.
- External: Cover the lens cover, then hold
![]() in live view to correct the non-uniformity of display.
in live view to correct the non-uniformity of display.
- Manual: Hold
- Hold
![]() to save the settings and exit.
to save the settings and exit.
 and press
 Correct Defective Pixel
The device can correct the defective pixels on the screen which are not performed as expected.
- Hold
![]() to show the menu.
to show the menu. - Select
![]() .
. - press
![]() to select the offset. The offset refers to the moving length of cursor.
to select the offset. The offset refers to the moving length of cursor. - Press
![]() or
or ![]() to select the moving direction.
to select the moving direction. - Press
![]() to move the cursor to the position of dead pixel. Hold
to move the cursor to the position of dead pixel. Hold ![]() to correct the dead pixel.
to correct the dead pixel.
 .
.Note
If the menu blocks the dead pixel, hold  to perform mirror display.
Set OSD
In the menu interface, press ![]() to display or hide the OSD information.
to display or hide the OSD information.
Measure the Distance
The device can detect the distance between the target and the observation position.
Before You Start
When measuring the distance, keep the hand and the position steady. Otherwise, the accuracy may be affected.
- Hold
![]() to show the menu.
to show the menu. - Select
![]() and press
and press ![]() to go to the setting interface.
to go to the setting interface. - Press
![]() or
or ![]() to select the target from Deer, Wolf, Bear, and Custom.
to select the target from Deer, Wolf, Bear, and Custom. - Set the target height.
![information]() Note
Note
The available height ranges from 0.1 m to 9.9 m. - Press
![]() to confirm.
to confirm.
- Press
 and press
 - Align the center of top mark with the edge of target top. Press
![]() .
.
The cursor blinks on the top edge of the target.
Figure 4-1 Set the Edge of Target Top

- Align the center of bottom mark with the edge of target bottom. Press
![]() .
.
Figure 4-2 Set the Edge of Target Bottom


Result
The left top of the image displays the distance measurement result and the height of the target.
Figure 4-3 Measurement Result

Note
Go to distance measurement interface, and press  to view the result of the previous measuring target.
Highest Temperature Tracking
The device can detect the highest temperature spot in the scene and mark it on display.
In the menu, select ![]() and press to mark the spot of highest temperature.
and press to mark the spot of highest temperature.
When the function is enabled,  displays in the spot of highest temperature. When the scene changes, the
 ![]() moves.
moves.
Picture and Video
You can manually record video or capture picture when displaying live view.
Capture Picture
On the main live view page, press  to capture picture.
Note
- When capturing succeeds, the image freezes for 1 second and a prompt shows on the display. For exporting captured pictures, refer to Export Files.
Record Video
- In the main live view, hold
![]() and start recording.
and start recording.
The left top of image displays the information of recording time.
Figure 6-1 Start Recording


- Hold
![]() again to stop recording.
again to stop recording.
What to do next
For exporting recording files, refer to Export Files.
Export Files
This function is used to export recorded videos and captured pictures.
Before You Start
Turn off hot spot function.
- Connect the device and PC with cable.
![information]() Note
Note
Make sure the device is turned off when connecting the cable. - Open computer disk and select the disk of device. Go to DICM → 100EZVIZ.
- Select and copy the files to PC.
- Disconnect the device from your PC.
Note
- The device displays images when you connect it to PC. But functions such as recording, capturing and hot spot are disabled.
- When you connect the device to PC for the first time, it installs the drive program automatically.
Client Software Connection
Connect the device to the T-Vision APP via hot spot, then you can capture picture, record video, or configure parameters on your phone.
- Hold
![]() to show the menu of device.
to show the menu of device. - Press
![]() to enable hot spot function.
to enable hot spot function. - Turn on the WLAN of your phone and connect to the hot spot.
- Hot Spot Name: HIK-IPTS Serial No.
- Hot Spot Password: the last 9 digits of serial No.
- Scan the QR code to download and install the app.
Android System
![]()
![play.google.com]()
iOS System
![]()
![itunes.apple.com]()
- Open the APP and connect your phone with the device. You can view the interface of device on your phone.
![information]() Note
Note
The hot spot function will be turned off automatically when power is less than 15%.
 to enable hot spot function.


CVBS Output
You can view the image on the display unit for details with this function.
Before You Start
Purchase the CVBS cable from the manufacturer separately or prepare it by yourself.
Connect the device and the display unit via USB to CVBS cable. Make sure the device is turned off when connecting the cable.
- Hold
![]() to show the menu of device.
to show the menu of device. - SelectCVBS, and press
![]() to turn on CVBS output. The display unit show the device image.
to turn on CVBS output. The display unit show the device image.
Maintenance
This part introduces the operation of checking device information, upgrading device, and restoring to defaults, etc.
View Device Information
- Hold
![]() to show the menu of device.
to show the menu of device. - Select
![]() and press
and press ![]() . You can view the device information such as version, and serial No.
. You can view the device information such as version, and serial No.
 and press
 Upgrade Device
Before You Start
Please get the upgrade package first.
- Connect the device to your PC with cable.
- Open the detected disk, copy the upgrade file and paste it to the root directory of the device.
- Disconnect the device from your PC.
- Reboot the device.
Result
The device upgrades automatically. The upgrading process will be displayed in the main interface.
Restore Device
- Hold
![]() to show the menu of device.
to show the menu of device. - Select
![]() and press
and press ![]() to restore the device to defaults according to the prompt.
to restore the device to defaults according to the prompt.
 and press
 Frequently Asked Questions
Why is the monitor off?
Check whether the device is off-battery. Check the monitor after charging the device for 5 minutes.
What should I do if I forget the login password?
Reset the password after initializing the device.
The image is not clear, how to adjust it?
Adjust the diopter adjustment knob until the image is clear. Refer to section Adjust Diopter.
Capturing or recording fails. What's the problem?
Check the following items.
- Whether the device is connected to your PC. Capturing or recording is disabled in this status.
- Whether the storage space is full.
- Whether the device is low-battery.
Why the PC cannot identify the device?
Check the following items.
- Whether the device is connected to your PC with supplied USB cable.
- If you use other USB cables, make sure the cable length is no longer than 1 m.
- Whether the hot spot function is turned on. If so, go to device menu and turn off hot spot.
Device Command
Scan the following QR code to get device common serial port commands.
Note that the command list contains the commonly used serial port commands for Hikvision thermal cameras.

Device Communication Matrix
Scan the following QR code to get device communication matrix.
Note that the matrix contains all communication ports of Hikvision thermal cameras.

Symbol Conventions
The symbols that may be found in this document are defined as follows.
| Symbol | Description |
 | Indicates a hazardous situation which, if not avoided, will or could result in death or serious injury. |
 | Indicates a potentially hazardous situation which, if not avoided, could result in equipment damage, data loss, performance degradation, or unexpected results. |
| Note | Provides additional information to emphasize or supplement important points of the main text. |
Safety Instruction
These instructions are intended to ensure that user can use the product correctly to avoid danger or property loss.
Laws and Regulations
- Use of the product must be in strict compliance with the local electrical safety regulations.
Transportation
- Keep the device in original or similar packaging while transporting it.
- Keep all wrappers after unpacking them for future use. In case of any failure occurred, you need to return the device to the factory with the original wrapper. Transportation without the original wrapper may result in damage on the device and the company shall not take any responsibilities.
- Do not drop the product or subject it to physical shock. Keep the device away from magnetic interference.
Power Supply
- Please purchase the charger by yourself. Input voltage should meet the Limited Power Source (5 VDC, 2A) according to the IEC61010-1 standard. Please refer to technical specifications for detailed information.
- Make sure the plug is properly connected to the power socket.
- DO NOT connect multiple devices to one power adapter, to avoid over-heating or fire hazards caused by overload.
Battery
- The built-in battery cannot be dismantled. Please contact the manufacture for repair if necessary.
- For long-term storage of the battery, make sure it is fully charged every half year to ensure the battery quality. Otherwise, damage may occur.
Maintenance
- If the product does not work properly, please contact your dealer or the nearest service center. We shall not assume any responsibility for problems caused by unauthorized repair or maintenance.
- A few device components (e.g., electrolytic capacitor) require regular replacement. The average lifespan varies, so periodic checking is recommended. Contact your dealer for details.
- Wipe the device gently with a clean cloth and a small quantity of ethanol, if necessary.
- If the equipment is used in a manner not specified by the manufacturer, the protection provided by the device may be impaired.
Using Environment
- Make sure the running environment meets the requirement of the device. The operating temperature shall be -30°C to 55°C (-22°F to 131°F), and the operating humidity shall be 95% or less.
- DO NOT expose the device to high electromagnetic radiation or dusty environments.
- DO NOT aim the lens at the sun or any other bright light.
Emergency
- If smoke, odor, or noise arises from the device, immediately turn off the power, unplug the power cable, and contact the service center.
Documents / Resources
References
Download manual
Here you can download full pdf version of manual, it may contain additional safety instructions, warranty information, FCC rules, etc.
Download Hikmicro LYNX PRO-LH25, LYNX PRO-LH19, OWL-OH25, OWL-OQ35 Manual
Advertisement


Need help?
Do you have a question about the LYNX PRO-LH25 and is the answer not in the manual?
Questions and answers