RiverRidge 06-040 Assembly Instructions Manual
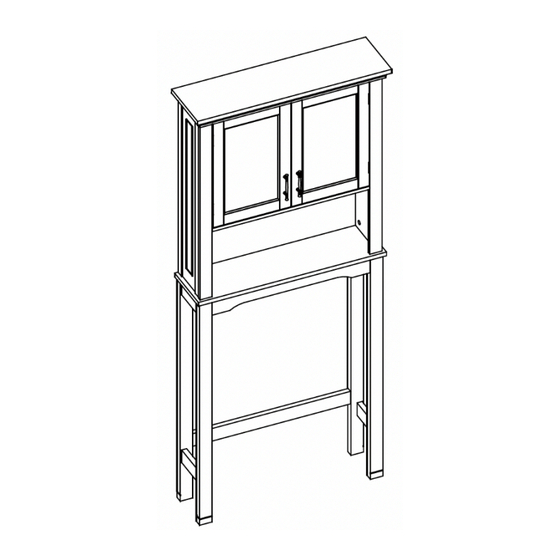
Somerset spacesaver
Hide thumbs
Also See for 06-040:
- Aassembly instructions (13 pages) ,
- Assembly instructions manual (12 pages) ,
- Assembly instructions manual (25 pages)
Advertisement
INSTRUCCIONES DE ENSAMBLAJE
®
RiverRidge
®
RiverRidge
es una marca comercial registrada de Sourcing Solutions, Inc., Hudson, WI 54016, USA
®
RiverRidge
®
RiverRidge
ist ein eingetragenes Warenzeichen der Sourcing Solutions, Inc. mit Sitz in Hudson, WI 54016, USA
ASSEMBLY INSTRUCTIONS
INSTRUCTIONS D'ASSEMBLAGE
MONTAGEANLEITUNGEN
RiverRidge
Gabinete ahorra espacio Somerset RiverRidge
Gagne-place Somerset RiverRidge
RiverRidge
06-040 - White, Blanco, Blanc, Weiß
06-079 - Gray, Gris, Gris, Grau
is a registered trademark of Sourcing Solutions, Inc., Hudson, WI 54016, USA
est une marque déposée de Sourcing Solutions, Inc., Hudson, WI 54016, USA
®
Somerset Spacesaver
®
Somerset – Raumwunder
®
®
Advertisement
Table of Contents

Related Manuals for RiverRidge 06-040


Summary of Contents for RiverRidge 06-040
- Page 1 Gabinete ahorra espacio Somerset RiverRidge ® ® Gagne-place Somerset RiverRidge ® RiverRidge Somerset – Raumwunder 06-040 - White, Blanco, Blanc, Weiß 06-079 - Gray, Gris, Gris, Grau ® RiverRidge is a registered trademark of Sourcing Solutions, Inc., Hudson, WI 54016, USA ® RiverRidge es una marca comercial registrada de Sourcing Solutions, Inc., Hudson, WI 54016, USA...
- Page 2 WARNING ADULT ASSEMBLY REQUIRED: This product requires assembly by an adult because of small parts. Care should be taken in unpacking and assembling this item to keep small parts away from children. During assembly children should be kept away from the product due to possible risk of injury. SERIOUS OR FATAL INJURIES CAN OCCUR FROM FURNITURE TIP-OVER.
- Page 3 ADVERTENCIA REQUIERE QUE UN ADULTO REALICE EL ENSAMBLAJE: Este producto requiere que un adulto lleve a cabo el ensamblaje debido a las piezas pequeñas. Debe tener cuidado al desempacar y ensamblar este artículo para mantener las piezas pequeñas alejadas de los niños. Los niños deben mantenerse alejados del producto durante el ensamblaje debido al posible riesgo de lesiones.
- Page 4 AVERTISSEMENT L’ASSEMBLAGE DOIT ÊTRE EFFECTUÉ PAR UN ADULTE : Ce produit doit être assemblé par un adulte à cause de la présence de petites pièces. Lorsque vous déballez et assemblez cet article, veillez à tenir les petites pièces hors de portée des enfants.
- Page 5 WARNUNG MONTAGE DURCH ERWACHSENE ERFORDERLICH: Dieses Produkt muss wegen der kleinen Teile von einem Erwachsenen zusammengebaut werden. Beim Auspacken und Zusammenbau dieses Artikels ist darauf zu achten, dass Kleinteile von Kindern ferngehalten werden. Während der Montage sollten Kinder wegen möglicher Verletzungsgefahr vom Produkt ferngehalten werden.
-
Page 6: Parts List
PARTS LIST DESCRIPTION Left Door Right Door Upper Right Side Panel Upper Left Side Panel Shelf Top Board Middle Connection Board Upper Back Board Middle Back Board Lower Back Board Adjustable Shelf Right Support Board Left Support Board 2PCS Lower Section Top Cross Bar Rear Lower Cross Bar Lower Left Side Panel Lower Right Side Panel... - Page 7 If you purchased your item in the United States, you can order replacement parts at no cost to you on www.riverridgehome.com. If purchased outside of the United States, please contact retailer where purchased. For any questions regarding your RiverRidge® product, please feel free to contact us at www.riverridgehome.com/pages/contact-us.
- Page 8 STEP 1 Attach 1 magnet plate (F) to left door (1) by inserting 1 screw (D) through hole on magnet plate (F), then tighten to left door (1). Attach 1 handle (K) to left door (1) by inserting 2 machine screws (J) through holes on left door (1), then tighten to handle (K).
- Page 9 STEP 3 Attach right support board (13) to upper right side panel (3) by inserting wood dowels (A) into dowel holes and inserting cam bolts (B) into cam lock holes on upper right side panel (3). Insert 3 cam locks (C) into cam lock holes on upper right side panel (3), then rotate clockwise to secure cam bolts (B) in place.
- Page 10 STEP 5 Attach magnet (H) to bottom of top board (7) by inserting 2 screws through holes on magnet (H), then tighten to top board (7). Insert 2 screws (Q) through sliding bracket (P) into holes on top board (7) Screw 4 cam bolts (B) into cam bolt holes on top board (7).
- Page 11 STEP 7 Screw 2 cam bolts (B) into cam bolt holes on middle connection board (8). Insert 8 wooden dowels (A) into holes on lower left side panel (17), lower right side panel (18) and lower section top cross bars (15). Turn over middle connection board (8) and attach to pre-assembled lower left side panel (17), lower right side panel (18) and lower section top cross bars (15) by inserting wood dowels (A) into dowel holes and inserting cam bolts (B) into cam lock holes on the lower...
- Page 12 STEP 8 Screw 4 cam bolts (B) into cam bolt holes on middle connection board (8). STEP 9 Attach upper assembled section to lower assembled section by inserting 4 cam bolts (B) into cam lock holes on upper left side panel (4) and upper right side panel (3). Insert 4 cam locks (C) into cam lock holes on upper left side panel (4) and upper right side panel (3), then rotate clockwise to secure cam bolts (B) in place.
- Page 13 STEP 10 Attach upper back board (9) and middle back board (10) together by sliding into plastic connection strip (N). Attach upper back board (9) and middle back board (10) to cabinet by inserting 8 screws (G) through holes on upper back board (9), and 4 screws (G) through holes on middle back board (10), then tighten to cabinet.
- Page 14 STEP 12 Option #1: Securing to Drywall Position spacesaver against wall in desired location. Using a pencil, make 2 small marks on wall through holes on brackets (P). Move cabinet away from wall and screw 2 plastic anchors (L) into wall on pencil marks. Place cabinet against wall, insert 2 screws (M) through holes on brackets (P), then tighten to plastic anchors (L).
-
Page 15: Care Instructions
CARE INSTRUCTIONS: Wipe clean with a water dampened cloth. Wipe dry with clean cloth. IMPORTANT: Keep assembly instructions for future reference. LET’S GET SOCIAL! Follow us and tag @riverridgehome in your photos and videos of your RiverRidge products! ®... - Page 16 LISTA DE PIEZAS N.° DESCRIPCIÓN CANT. Puerta izquierda Puerta derecha Panel superior derecho Panel superior izquierdo Repisa Tablero superior Tablero de conexión media Tablero trasero superior Tablero medio trasero Tablero trasero inferior Repisa regulable Tablero de soporte derecho Tablero de soporte izquierdo Barra transversal superior de la sección inferior Barra transversal trasera inferior Panel izquierdo inferior...
- Page 17 Si lo compró fuera de los Estados Unidos, comuníquese con el distribuidor donde lo adquirió. Si tiene preguntas con relación a este producto RiverRidge®, no dude en comunicarse con nosotros a través de www.riverridgehome.com/pages/contact-us. PASO 1 Fije 1 placa magnética (F) a la puerta izquierda (1) insertando 1 tornillo (D) a través del agujero...
- Page 18 Fije el tablero superior (7) al panel superior izquierdo (4) y al panel superior derecho (3) insertando pernos de anclaje (B) en los agujeros de los cierres de anclaje del panel superior izquierdo (4) y el panel superior derecho (3). Inserte 4 cierres de anclaje (C) en los agujeros correspondientes del panel superior izquierdo (4) y el panel superior derecho (3) y, luego, gírelos en el sentido de las agujas del reloj para ajustar los pernos de anclaje.
- Page 19 INSTRUCCIONES DE CUIDADO: Limpiar con un paño humedecido en agua. Secar con un paño limpio. IMPORTANTE: Guarde las instrucciones de ensamblaje para futuras referencias. ¡SOCIALICEMOS! ¡Síganos y etiquete a @riverridgehome en las fotos y videos de sus productos RiverRidge ®...
- Page 20 LISTE DES PIÈCES Nº DESCRIPTION QTÉ Porte gauche Porte droite Panneau latéral droit supérieur Panneau latéral gauche supérieur Étagère Plaque supérieure Plaque de raccordement intermédiaire Plaque arrière supérieure Plaque arrière intermédiaire Plaque arrière inférieure Étagère réglable Plaque de support droite Plaque de support gauche Barre transversale supérieure de la section inférieure...
- Page 21 Si vous avez acheté votre article aux États-Unis, vous pouvez commander des pièces de rechange sans frais pour vous sur www.riverridgehome.com. Si l’achat est effectué en dehors des États-Unis,veuillez contacter le détaillant où vous avez acheté. Pour toute question concernant votre contrat RiverRidge® n’hésitez pas à nous contacter à l’adresse www.riverridgehome.com/pages/contact-us. ÉTAPE 1 Fixez 1 plaque magnétique (F) sur la porte gauche (1) en insérant 1 vis (D) dans le trou de la...
- Page 22 Vissez 4 boulons à came (B) dans les trous de boulons à came de la plaque supérieure (7). Fixez la plaque supérieure (7) au panneau latéral supérieur gauche (4) et au panneau latéral supérieur droit (3) en insérant des boulons à came (B) dans les trous de verrou à cames du panneau latéral supérieur gauche (4) et du panneau latéral supérieur droit (3).
-
Page 23: Instructions D'entretien
INSTRUCTIONS D’ENTRETIEN : Nettoyez avec un chiffon humide. Séchez avec un chiffon propre. IMPORTANT : Conservez les instructions d’assemblage pour toute référence ultérieure SOCIALISONS-NOUS! Suivez-nous et marquez @riverridgehome dans vos photos et vidéos de vos produits RiverRidge ®... - Page 24 TEILELISTE BESCHREIBUNG ANZ. Linke Tür Rechte Tür Obere rechte Seitenteil Oberes linkes Seitenteil Regal Oberstes Brett Mittleres Verbindungsbrett Obere Rückwand Mittlere Rückwand Untere Rückwand Verstellbarer Regalboden Rechtes Stützbrett Linkes Stützbrett Unterer Abschnitt, obere Querleiste Untere hintere Querleiste Linkes unteres Seitenteil Rechtes unteres Seitenteil Holzdübel Korpusverbinder-Bolzen...
- Page 25 Wenn Sie Ihren Artikel in den Vereinigten Staaten gekauft haben, können Sie Ersatzteile versandkostenfrei auf www.riverridgehome.com bestellen. Bei Kauf außerhalb der Vereinigten Staaten, wenden Sie sich bitte an den Händler, bei dem Sie das Produkt erstanden haben. Für alle Fragen zu Ihrem RiverRidge® Produkt kontaktieren Sie uns bitte unter www.riverridgehome.com/pages/contact-us. SCHRITT 1 Bringen Sie 1 Magnetplatte (F) an der linken Tür (1) an, indem Sie 1 Schraube (D) durch das...
- Page 26 SCHRITT 5 Befestigen Sie den Magneten (H) an der Unterseite des obersten Bretts (7), indem Sie 2 Schrauben durch die Öffnungen des Magneten (H) stecken und am obersten Brett (7) festschrauben. Stecken Sie 2 Schrauben (Q) durch die verschiebbare Halterung (P) in die Bohrungen des obersten Bretts (7).
- Page 27 SCHRITT 8 Schrauben Sie 4 Korpusverbinder-Bolzen (B) in die Korpusverbinder-Bolzenbohrungen des mittleren Verbindungsbretts (8). SCHRITT 9 Befestigen Sie den oberen zusammengebauten Abschnitt am unteren zusammengebauten Abschnitt, indem Sie die 4 Korpusverbinder-Bolzen (B) in die Korpusverbinder- Exzentergehäusebohrungen des oberen linken Seitenteils (4) und des oberen rechten Seitenteils (3) einsetzen.
- Page 28 PFLEGEHINWEISE: Mit einem mit Wasser angefeuchteten Tuch abwischen. Mit einem sauberen Tuch trockenwischen. WICHTIG: Bewahren Sie die Montageanleitung zum späteren Nachschlagen auf. Lasst uns sozial werden! Folgen Sie uns und markieren Sie @riverridgehome in den Fotos und Videos Ihrer RiverRidge®-Produkte!
Need help?
Do you have a question about the 06-040 and is the answer not in the manual?
Questions and answers