Table of Contents
Advertisement
Quick Links
Advertisement
Table of Contents

Related Manuals for Avery Weigh-Tronix WI-125


Summary of Contents for Avery Weigh-Tronix WI-125
- Page 1 WI-125 for Lift Trucks User’s Manual...
- Page 2 CAUTION Risk of electrical shock. Do not remove cover. No user service- able parts inside. Refer servicing to qualified service personnel. Weigh-Tronix reserves the right to change specifications at any time. 06/15/01 125LT_U.P65 PN 29554-0017G e1 Printed in USA...
-
Page 3: Table Of Contents
Table of Contents Introduction ......................5 Operations Mode ....................5 Keyboard ....................... 5 Key Functions ....................6 Entering Numbers with Arrow Keys ..............7 Indicator Operation ....................8 Powering Up ....................8 Annunciators ....................8 Operations Menu ....................9 Gross/Tare/Net Weighing Operations ............10 Gross Weighing .................. - Page 4 WI-125 Specifications Dimensions: 9.37" W x 6.75" H x 3.75" D (23.8 cm x 17.1 cm x 9.5 cm) Power: 10 to 90 VCD, 300 mA maximum Display: 8 digits, 7-segment LCD, 0.6 inch high with annunciators and backlighting. Display Rate:...
-
Page 5: Introduction
Introduction The WI-125 is a weight indicator which may be used with Lift Truck Sys- tems. The indicator is powered by a DC power source of 10 to 90 volts. This set of instructions is divided into the following sections: •... -
Page 6: Key Functions
Enters a pushbutton tare in gross/net operation. This Key Functions key's factory default is OFF and it must be enabled for use. Accesses the gross weighing mode from any other function and activates the net weighing mode if a tare is active. -
Page 7: Entering Numbers With Arrow Keys
The arrow keys are used to enter numbers. Refer to this section when you Entering Numbers with need to enter a number or numbers. Arrow Keys Example: To key in the number 603 Press the key repeatedly until the 6 appears on the display. If at any time you enter an Press the ¬... -
Page 8: Indicator Operation
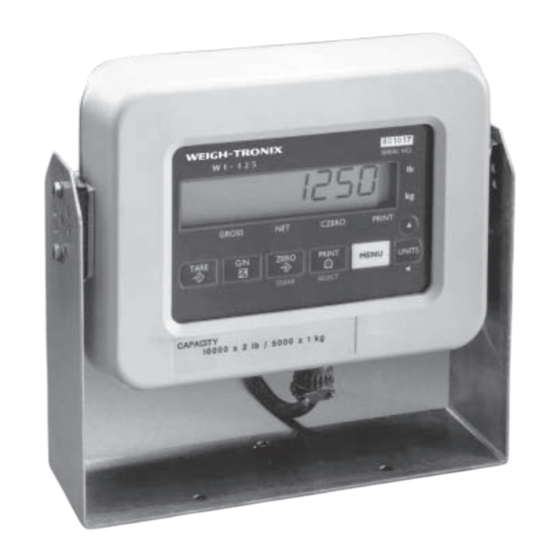
Indicator Operation The unit will power up in gross or net weighing mode, depending on what Powering Up mode the unit was in when last turned off. The indicator display (see Figure 2) tells you the status of the indicator through the illumination of annunciators. -
Page 9: Operations Menu
Operations Menu Your unit is configured to display some or all of the following functions: pushbutton tare, ID, time, date, accumulator, count, and backlight. These can be viewed and changed if allowed by the security code. This manual assumes the unit is configured to allow full access to all functions. You can disable unneeded options. -
Page 10: Gross/Tare/Net Weighing Operations
Gross Weighing Gross/Tare/Net Weighing Operations To perform gross/net weighing operations, follow these steps: 1. Power up the indicator. Indicator powers up in gross or net mode. 2. If the unit is not in gross mode, press the G/N key once to get to gross mode. -
Page 11: Entering A Scroll Tare
Entering a Scroll Tare 1. From gross/net weighing mode, press the MENU key. tArE is displayed. 2. Briefly press the SELECT key. no tArE or the current tare value is displayed. You can toggle between no tArE and the current tare value by pressing the MENU key. -
Page 12: Id Number Entry
You may enter an ID number of up to 8 digits in length. The ID number may ID Number Entry include any combination of the numbers 0 through 9, a dash and a decimal point. Reference the Operations 1. From gross weighing mode, Menu section for menu details. -
Page 13: Viewing And Setting Date (Option)
1. From gross/net weighing mode, Viewing and Setting the press MENU repeatedly until. . . dAY is displayed. Date (OPTION) 2. Press SELECT. . . Depending on the configuration of your indicator, you will see the date displayed in one of three ways: •... -
Page 14: Viewing Accumulated Weight And Count
1. With weight displayed, press Viewing Accumulated MENU until. . . ACC is displayed. Weight and Count 2. Press PRINT/SELECT. . . Total weight of all loads is displayed. 3. Press PRINT/SELECT to toggle back to ACC. . . ACC is displayed. GROSS may be pressed at any time during viewing to 4. -
Page 15: Transmitting Data
Figure 5 Possible Print Configuration An enquire code can be sent to the WI-125. This will prompt the indicator to send a standard printout. The default enquire code number is an ASCII decimal 005. This number can be changed in configuration. See your Service Manual. -
Page 16: Indicator Diagnostics
Indicator Diagnostics The test mode is used to test various functions of the WI-125. The test menu is shown in Figure 6. Instructions for using the test menu are found below. Figure 6 Test Menu 1. Enter the test mode from gross/net operation by pressing and holding the MENU key until tESt is displayed. - Page 17 Below are the specific directions and explanations for the items you see in the test menu. VERSION — Under version are the Weigh-Tronix part number and revision number for the software found in your machine. Weigh-Tronix part numbers are divided into two parts: the prefix and the dash number.
-
Page 18: Daily Inspection Checklist For Lift Truck Scale Users
Daily Inspection Checklist For Lift Truck Scale Users Check scale carriage for loose, worn, bent, or broken components. Inspect forks for damage. Check locking pins on forks for proper function. Inspect cables from the junction box to Weigh Bars for wear. Inspect retractable cable for pinched, rubbed, stretched, or damaged areas. - Page 20 Weigh-Tronix 1000 Armstrong Dr. Fairmont, MN 56031 USA Telephone: 507-238-4461 Facsimile: 507-238-4195 e-mail: industrial@weigh-tronix.com www.wtxweb.com Weigh-Tronix Canada, ULC 217 Brunswick Blvd. Pointe Claire, QC H9R 4R7 Canada Telephone: 514-695-0380 Facsimile: 514-695-6820 Weighing Products & Systems Weigh Bar is a registered trademark of Weigh-Tronix Inc. ®...
Need help?
Do you have a question about the WI-125 and is the answer not in the manual?
Questions and answers