Advertisement
Quick Links
Thank you for purchasing this product. Before starting assembly we suggest you spend a short time reading
through this leaftlet, then follow the simple step by step guide.Two people are needed to assemble this product.
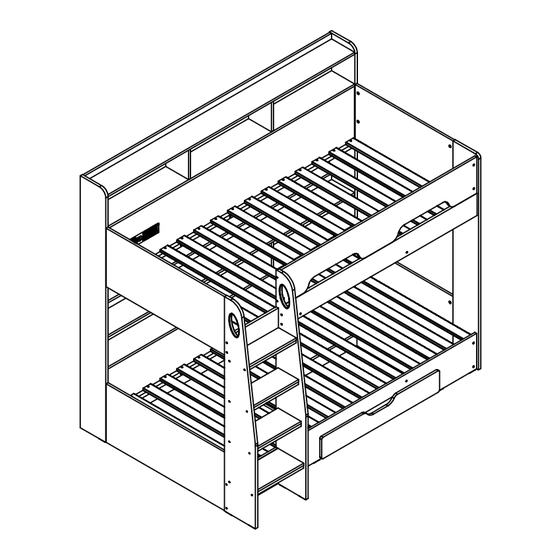
1370mm
[53.94"]
ASSEMBLY INSTRUCTIONS
1966mm
[77.40"]
1708mm
[67.24"]
IQCASSBDW
Read these instructions and follow steps carefully to ensure you assemble
the product correctly and avoid damages. Check that all parts and
hardware have been provided before assembling the product. Place all
contents on a clean, soft-flat surface to avoid scratching the product.
Caution:
Only tighten bolts to 80% at first. Once all parts have been assembled fully tighten all hardware.
To prevent damage to threads, do not use a power tool and do not overtighten bolts.
Use two people to lift and turn the product when assembling.
Do not attempt with only one person and do not roll onto legs.
Keep all hardware and small parts away from children.
2 PERSON RECOMMENCED
Page : 1 of 21
Advertisement

Related Manuals for TEMPLE & WEBSTER IQCASSBDW


Summary of Contents for TEMPLE & WEBSTER IQCASSBDW
- Page 1 ASSEMBLY INSTRUCTIONS IQCASSBDW Thank you for purchasing this product. Before starting assembly we suggest you spend a short time reading through this leaftlet, then follow the simple step by step guide.Two people are needed to assemble this product. Read these instructions and follow steps carefully to ensure you assemble the product correctly and avoid damages.
- Page 2 ASSEMBLY INSTRUCTIONS IQCASSBDW TOP TIPS BEFORE YOU START ! IMPORTANT- READ CAREFULLY- RETAIN FOR FUTURE REFERENCE Please check that all parts & hardware are present before you start the assembly of your furniture. For ease and speed of assembly, we recommend that before you commence each step of the assembly, Please identify all the parts required for that step.
-
Page 3: Tools Required For Assembly
ASSEMBLY INSTRUCTIONS IQCASSBDW Tools Required For Assembly DO NOT USE POWER TOOLS TO ASSEMBLE THIS PRODUCT. USE OF POWER TOOLS WILL INVALIDATE ANY CLAIM AND MAY DAMAGE THIS PRODUCT MAKING IT UNSAFE. Phillips Screw Driver ¸ Approximately 2 hour 30 min €... -
Page 4: Part List
ASSEMBLY INSTRUCTIONS IQCASSBDW Carton 1 of 4 Carton 3 of 4 Part List Part List Letf End Panel (Back) Back Side Panel (Upper) Right End Panel (Back) Center Panel (Shelf) 1st Ladder Step Front Side Panel (Bottom) 2nd Ladder Step... - Page 5 ASSEMBLY INSTRUCTIONS IQCASSBDW LVL x30 Page : 5 of 21...
- Page 6 ASSEMBLY INSTRUCTIONS IQCASSBDW Carton 1 of 4 Caution There are many small components Fitting List used in the construction of this unit.These loose items should be Part Name kept away from young children Cam Stud (small) whilst assembling your unit. As...
- Page 7 ASSEMBLY INSTRUCTIONS IQCASSBDW WHEN FITTING CAMS ENSURE STARTING POSITION IS CORRECT A x 10 BEFORE YOU INSERT CONNECTING BOLT TURN CLOCKWISE UNTIL SECURE û ü B x 30 WRONG CORRECT C x 60 Page : 7 of 21...
- Page 8 ASSEMBLY INSTRUCTIONS IQCASSBDW Do This Step 2 Times E x 8 Do This Step 2 Times E x 20 Do This Step 2 Times Page : 8 of 21...
- Page 9 ASSEMBLY INSTRUCTIONS IQCASSBDW Page : 9 of 21...
- Page 10 ASSEMBLY INSTRUCTIONS IQCASSBDW WHEN FITTING CAMS ENSURE STARTING POSITION IS CORRECT A x 12 BEFORE YOU INSERT CONNECTING BOLT TURN CLOCKWISE UNTIL SECURE û ü B x 8 WRONG CORRECT C x 16 K x 4 Page : 10 of 21...
- Page 11 ASSEMBLY INSTRUCTIONS IQCASSBDW V x 4 Page : 11 of 21...
- Page 12 ASSEMBLY INSTRUCTIONS IQCASSBDW N x 8 N x 8 A x 24 V x 6 Page : 12 of 21...
- Page 13 ASSEMBLY INSTRUCTIONS IQCASSBDW x 16 G x 32 H x 8 15.1 USE PRE - DRILLED HOLES IN PART 01,25 15.2 Page : 13 of 21...
- Page 14 ASSEMBLY INSTRUCTIONS IQCASSBDW A x 8 N x 10 R x 6 Page : 14 of 21...
- Page 15 ASSEMBLY INSTRUCTIONS IQCASSBDW B x 16 C x 24 U x 6 Page : 15 of 21...
- Page 16 ASSEMBLY INSTRUCTIONS IQCASSBDW U x 6 D x 9 K x 4 Page : 16 of 21...
- Page 17 ASSEMBLY INSTRUCTIONS IQCASSBDW Q x 4 S x 1 V x 4 Page : 17 of 21...
- Page 18 ASSEMBLY INSTRUCTIONS IQCASSBDW L x 4 M x 8 M x 2 Page : 18 of 21...
- Page 19 ASSEMBLY INSTRUCTIONS IQCASSBDW L x 4 M x 6 N x 10 R x 4 Page : 19 of 21...
- Page 20 ASSEMBLY INSTRUCTIONS IQCASSBDW P x 60 WHEN FITTING CAMS A x 9 ENSURE STARTING POSITION IS CORRECT BEFORE YOU INSERT CONNECTING BOLT TURN CLOCKWISE UNTIL SECURE B x 9 û ü C x 12 WRONG CORRECT Turn Over Turn Over...
- Page 21 ASSEMBLY INSTRUCTIONS IQCASSBDW F x 3 J x 4 F x 4 G x 8 Page : 21 of 21...
Need help?
Do you have a question about the IQCASSBDW and is the answer not in the manual?
Questions and answers