Advertisement
Quick Links
TEMPLE
WEBSTER
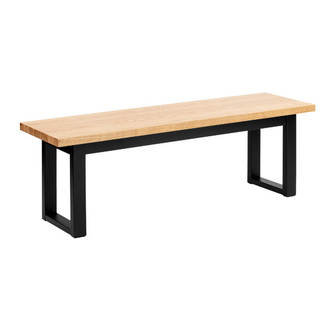
Ski Leg Oak Dining Bench - 140cm - Natural/Black
Ski Leg Oak Dining Bench - 140cm - Natural/Natural
Ski Leg Oak Dining Bench - 180cm - Natural/Black
Ski Leg Oak Dining Bench - 180cm - Natural/Natural
Two people required
2021/11/18
ASSEMBLY INSTRUCTIONS
www.templeandwebster.com.au
SBSKBTNB
SBSKBTNN
SBSLBTNB
SBSLBTNN
Advertisement

Related Manuals for TEMPLE & WEBSTER SBSKBTNB


Summary of Contents for TEMPLE & WEBSTER SBSKBTNB
- Page 1 SBSKBTNB TEMPLE SBSKBTNN WEBSTER SBSLBTNB SBSLBTNN ASSEMBLY INSTRUCTIONS Ski Leg Oak Dining Bench - 140cm - Natural/Black Ski Leg Oak Dining Bench - 140cm - Natural/Natural Ski Leg Oak Dining Bench - 180cm - Natural/Black Ski Leg Oak Dining Bench - 180cm - Natural/Natural Two people required www.templeandwebster.com.au...
- Page 2 Keep these instructions for future reference Assemble the furniture on a soft level surface to avoid damaging the furniture or your floor. Parts of the assembly will be easier with 2 people. We recommend furniture be assembled near where they will be placed, to avoid moving the product unnecessarily once assembled.
- Page 3 Tools Required Time Required DO NOT USE Mallet Flat Head Screwdriver 30 min Parts List People Required Bench Top (P1); Leg Post (P2) x 2; Leg Post (P3) x 2; Stretcher (P4) x 2. (P1) (P3) (P2) (P2) (P3) (P4) (P4)
- Page 4 Hardware/Fittings Wood Dowel x 8 Long Threaded Rod x 8 Flat Washer x 12 Spring Washer x 12 Short Threaded Rod x 4 Half Moon Washers x 4 Nut x 12 Spanner x 1 Felt Foot x 4 Barrel Nut x 4...
- Page 5 10 x2 2 x4 5 x2 P2 x2 Insert 1 x Barrel Nut 10 into Leg Post (P2). If necessary, use a flat head screwdriver to rotate the Barrel Nut. Screw 2 x Long Threaded Rod 2 into Barrel Nut 10 . Screw 1 x Short Threaded Rod 5 into Leg Post (P2).
- Page 6 1 x8 P4x2 Insert 4 x Wood Dowel 1 into Stretcher (P4). If necessary, gently tap the wood dowels with a mallet. Repeat with the remaining Stretcher (P4). 3 x4 4 x4 7 x4 Place the Bench Top (P1) with its underside facing up on a soft covered surface. Position 1 x Leg Post (P3) onto the corner of Bench Top (P1) as shown.
- Page 7 7 x4 3 x4 4 x4 Fit Stretcher (P4) onto Leg Post (P3) as shown. Position Leg Post (P2) onto the other end of Stretcher (P4) and the corner of Bench Top (P1) as shown. Loosely attach Leg Post (P2) to Bench (P1) with 2 x Flat Washers 3 , 2 x Spring Washers 4 and 2 x Nuts 7 .
- Page 8 6 x4 7 x4 3 x4 4 x4 8 x1 Attach Stretcher (P4) onto Leg Posts (P2) (P3) with 2 x half moon washers 6 , 2 x Flat Washers 3 , 2 x Spring Washers 4 and 2 x Nuts 7 on each leg frame. Fasten with Spanner 8 .
- Page 9 9 x4 8 x1 100% Fasten all Nuts 7 with Spanner 8 . Paste 2 x Felt Feet 9 onto each Stretcher (P4) as shown. Please dispose of all packing thoughtfully. With help, carefully turn the table over. Assembly is complete.
Need help?
Do you have a question about the SBSKBTNB and is the answer not in the manual?
Questions and answers