
Subscribe to Our Youtube Channel
Related Manuals for TEMPLE & WEBSTER SBVIBTNB


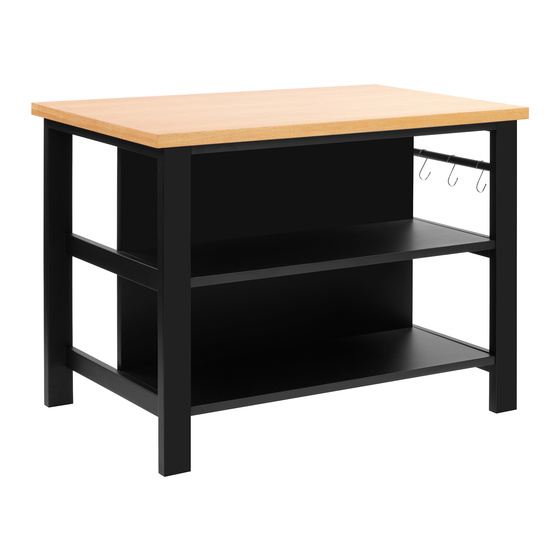
Summary of Contents for TEMPLE & WEBSTER SBVIBTNB
- Page 1 SBVIBTNB TEMPLE SBVIBTNW WEBSTER ASSEMBLY INSTRUCTIONS Vonn Oak Veneer Kitchen Island Bench - White Oak Top w/ Black Body Vonn Oak Veneer Kitchen Island Bench - White Two people required www.templeandwebster.com.au...
- Page 2 Keep these instructions for future reference Assemble the furniture on a soft level surface to avoid damaging the furniture or your floor. Parts of the assembly will be easier with 2 people. We recommend furniture be assembled near where they will be placed, to avoid moving the product unnecessarily once assembled.
- Page 3 Tools Required Time Required DO NOT USE Mallet Flat head Screwdriver Cross Screwdriver 60 min Parts List People Required Top Panel (P1); Left Side (P2); Right Side (P3); Back Panel (P4); Shelf (P5)x2. (P1) (P2) (P4) (P3) (P5) (P5)
- Page 4 Hardware/Fittings 8x30mm 6x44mm 15x10mm 4mm Allen Key x 1 Wood Dowel x 18 Connecting Bolt x 23 Locking Nut x23 70x30mm M6x45mm Bolt x 8 Spring Washer x 8 16mm Washer x 8 Felt Pad x 4 Hook x 4...
- Page 5 1 x6 (P4) Insert 6 x Wood Dowels into Back Panel (P4). 2 x6 (P4) Screw 6 x Connecting Bolts into Back Panel (P4).
- Page 6 1 x12 (P5) x2 Insert 12 x Wood Dowels into into 2 x Shelf (P5). 3 x6 (P5) (P5) (P4) Position 1 x Shelf (P5) onto Back Panel (P4) as shown. Insert 3 x Locking Nuts into Shelf (P5). Turn the Locking Nuts clockwise to lock using a flat head screwdriver.
- Page 7 2 x7 8 x2 (P3) Screw 7 x Connecting Bolts into Right Side (P3). Paste 2 x Felt Pads to the Right Side (P3) as shown. 3 x7 (P4) (P5) Position the shelf and back panel assembly onto Right Side (P3) as shown. Insert 7 x Locking Nuts into Shelf (P5) and Back Panel (P4).
- Page 8 2 x7 8 x2 (P2) Screw 7 x Connecting Bolts into Left Side (P2). Paste 2 x Felt Pads to the Left Side (P2) as shown. 3 x7 (P2) Position Left Side (P2) onto the assembled unit as shown. Insert 7 x Locking Nuts into Shelf (P5) and Back Panel (P4).
- Page 9 2 x3 (P1) Screw 3 x Connecting Bolts into Top Panel (P1). 3 x3 (P1) (P4) Position Top Panel (P1) onto the assembled unit as shown. Insert 3 x Locking Nuts into Back Panel (P4). Turn the Locking Nuts clockwise to lock using a flat head screwdriver.
- Page 10 5 x8 6 x8 7 x8 4 x1 (P1) (P1) (P2 ) (P3) (P3) (P2) Attach Top Panel (P1) to Left Side (P2), Right Side (P3) with 8 x Bolts , 8 x Spring Washers and 8 x Washers Tighten the bolts with Allen Key 9 x4 (P3) Hang 4 x Hooks...
Need help?
Do you have a question about the SBVIBTNB and is the answer not in the manual?
Questions and answers