Table of Contents
Advertisement
Available languages
Available languages
Quick Links
Technical Support and E-Warranty Certificate www.vevor.com/support
PIPES HYDROPONICS GROWING SYSTEM
USER MANUAL
We continue to be committed to provide you tools with competitive price.
"Save Half", "Half Price" or any other similar expressions used by us only represents an
estimate of savings you might benefit from buying certain tools with us compared to the major
top brands and doses not necessarily mean to cover all categories of tools offered by us. You
are kindly reminded to verify carefully when you are placing an order with us if you are
actually saving half in comparison with the top major brands.
Advertisement
Table of Contents

Related Manuals for VEVOR VVGrey4-36


Summary of Contents for VEVOR VVGrey4-36
- Page 1 Technical Support and E-Warranty Certificate www.vevor.com/support PIPES HYDROPONICS GROWING SYSTEM USER MANUAL We continue to be committed to provide you tools with competitive price. "Save Half", "Half Price" or any other similar expressions used by us only represents an estimate of savings you might benefit from buying certain tools with us compared to the major top brands and doses not necessarily mean to cover all categories of tools offered by us.
- Page 3 This is the original instruction, please read all manual instructions carefully before operating. VEVOR reserves a clear interpretation of our user manual. The appearance of the product shall be subject to the product you received. Please forgive us that we won't inform you again if...
-
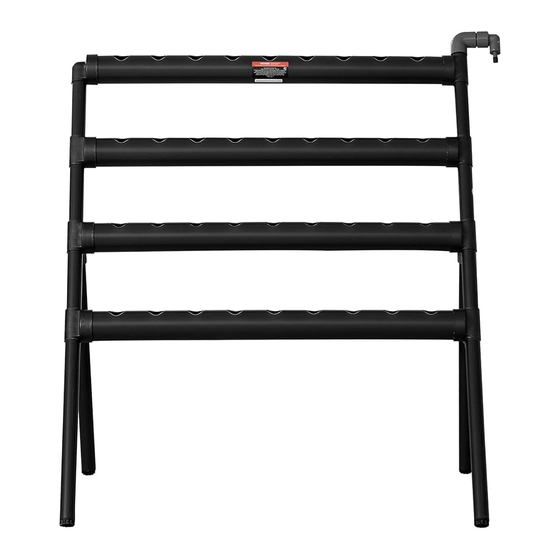
Page 4: Specifications
SPECIFICATIONS VVGrey4-36 Model 870*560*990mm Product Size North America: 120V 60Hz European Union: 220~240V 50Hz Input Voltage Australia: 220~240V 50Hz Before using the product, please read the instructions carefully and keep them properly. Note: Please ensure that children are always supervised by an adult when using this product. -
Page 5: Parts List
Parts list Foot tube ×2 Water pump ×1 (400mm) With water plug and footpad Foot tube ×2 Water outlet (520mm) hose 1.5m ×1 With water plug and footpad Water outlet Water outlet composite hose 1m ×1 tube ×1 Connector Planting basket composite ×36 tube ×1... -
Page 6: Installation
Installation Figure 1: Connect a set of connector Figure 2: Connect two 400mm foot composite tubes, a set of water outlet tubes, a 1m hose and an outlet tap composite tubes, and four planting with the assembly of Figure 1 pipelines together according to the according to the diagram. - Page 7 Figure 3: Connect two 520mm foot Figure 4: Connect an adapter, a tubes, a 1.5m hose, and an inlet tap with controller, and a water pump the assembly of Figure 2 according to together according to the diagram. the diagram. Figure 5: Firstly, prepare a water tank Figure 6: Put 36 planting baskets into and fill it with water.
- Page 8 Vegetable planting method: 1. Put the sponge into the water, press it with your hands, and suck in enough water. 2. Place the seeds at the opening of the sponge, and pay attention not to place them too deep. 3. Pour water into a basin about 2 centimeters deep. 4.
- Page 9 Manufacturer: Shanghaimuxinmuyeyouxiangongsi Address:Baoshanqu Shuangchenglu 803long 11hao 1602A-1609shi Shanghai Imported to AUS: SIHAO PTY LTD, 1 ROKEVA STREETEASTWOOD NSW 2122 Australia Imported to USA: Sanven Technology Ltd., Suite 250, 9166 Anaheim Place, Rancho Cucamonga, CA 91730 Made In China...
- Page 12 Technical Support and E-Warranty Certificate www.vevor.com/support...
- Page 13 Técnico Soporte y certificado de garantía electrónica www.vevor.com/support SISTEMA DE CULTIVO HIDROPÓNICO DE TUBERÍAS MANUAL DE USUARIO We continue to be committed to provide you tools with competitive price. "Save Half", "Half Price" or any other similar expressions used by us only represents an estimate of savings you might benefit from buying certain tools with us compared to the major top brands and doses not necessarily mean to cover all categories of tools offered by us.
- Page 15 This is the original instruction, please read all manual instructions carefully before operating. VEVOR reserves a clear interpretation of our user manual. The appearance of the product shall be subject to the product you received. Please forgive us that we won't inform you again if...
-
Page 16: Especificaciones
ESPECIFICACIONES VVGris4-36 Modelo 870*560*990mm Tamaño del producto América del Norte: 120 V 60 Hz Unión Europea: 220~240V 50Hz Voltaje de entrada Australia: 220~240V 50Hz Antes de utilizar el producto, lea atentamente las instrucciones y consérvelas correctamente. Nota: Asegúrese de que los niños estén siempre supervisados por un adulto cuando utilicen este producto. -
Page 17: Lista De Partes
Lista de partes Tubo de pie × Bomba de agua 2 (400 mm) × 1 Con tapón de agua y reposapiés. Tubo de pie × Manguera de 2 (520 mm) salida de agua 1,5 m × 1 Con tapón de agua y reposapiés. Tubo Manguera de compuesto de... -
Page 18: Instalación
Se utiliza para sellar tuberías no plantadas para evitar la entrada de rayos UV e insectos voladores. Controlador × Martillo de goma × 1 Adaptador × 1 Instalación... - Page 19 Figura 1: Conecte un conjunto de tubos Figura 2: Conecte dos tubos de pie compuestos conectores , un conjunto de 400 mm, una manguera de 1 m y de tubos compuestos de salida de agua un grifo de salida con el conjunto de y cuatro tuberías de plantación entre sí...
- Page 20 Figura 5: En primer lugar, prepare un Figura 6: Coloque 36 cestas de tanque de agua y llénelo con agua. (Se siembra en las tuberías de siembra e recomienda utilizar un tanque de agua inserte el adaptador en la fuente de que tenga una capacidad superior a 20 alimentación.
- Page 21 6. Conecte la bomba a la fuente de alimentación y enciéndala. El agua en el tanque de agua disminuirá. Apague la bomba dentro de 10 minutos. Cuando el agua regrese al tanque de agua, llénelo con agua para llenarlo. Atención: no inyecte agua en el tanque de agua después de arrancar la bomba, de lo contrario, cuando la bomba deje de funcionar, el agua se desbordará...
- Page 24 Técnico Certificado de soporte y garantía electrónica www.vevor.com/support...
- Page 25 Tecnico Supporto e certificato di garanzia elettronica www.vevor.com/support SISTEMA DI COLTIVAZIONE IDROPONICA DI TUBI MANUALE D'USO We continue to be committed to provide you tools with competitive price. "Save Half", "Half Price" or any other similar expressions used by us only represents an estimate of savings you might benefit from buying certain tools with us compared to the major top brands and doses not necessarily mean to cover all categories of tools offered by us.
- Page 27 This is the original instruction, please read all manual instructions carefully before operating. VEVOR reserves a clear interpretation of our user manual. The appearance of the product shall be subject to the product you received. Please forgive us that we won't inform you again if...
- Page 28 SPECIFICHE VVGrey4-36 Modello 870*560*990 millimetri Taglia del prodotto Nord America: 120 V 60 Hz Unione Europea: 220~240 V 50 Hz Tensione di ingresso Australia: 220~240 V 50 Hz Prima di utilizzare il prodotto, leggere attentamente le istruzioni e conservarle correttamente.
-
Page 29: Elenco Delle Parti
Elenco delle parti Tubo del Pompa piede × 2 (400 dell'acqua × 1 Con presa acqua e poggiapiedi Tubo del Tubo di uscita piede × 2 (520 dell'acqua 1,5 m × 1 Con presa acqua e poggiapiedi Tubo Tubo di uscita composito di dell'acqua 1m ×... -
Page 30: Installazione
Controllore × Martello di gomma × 1 Adattatore × 1 Installazione... - Page 31 Figura 1: Collegare insieme un set di Figura 2: Collegare due tubi da 400 tubi compositi di collegamento , un set mm, un tubo da 1 me un rubinetto di di tubi compositi per l'uscita dell'acqua e uscita con il gruppo della Figura 1 quattro tubazioni per la semina insieme secondo lo schema.
- Page 32 Figura 5: Innanzitutto, preparare un Figura 6: Metti 36 cestini per piantare serbatoio dell'acqua e riempirlo d'acqua. nelle tubazioni per piantare e (Si consiglia di utilizzare un serbatoio inserisci l'adattatore dell'acqua con capacità superiore a 20 nell'alimentatore. Quando la pompa litri, che non include 20 litri).
- Page 33 10. Collegare la pompa all'alimentazione e avviare la pompa. L'acqua nel serbatoio diminuirà. Spegnere la pompa entro 10 minuti. Quando l'acqua ritorna nel serbatoio, riempire il serbatoio con acqua per renderlo pieno. Attenzione: non iniettare acqua nel serbatoio dell'acqua dopo l'avvio della pompa, altrimenti quando la pompa smette di funzionare, l'acqua traboccherà...
- Page 36 Tecnico Supporto e certificato di garanzia elettronica www.vevor.com/support...
- Page 37 Techniczny Certyfikat wsparcia i e-gwarancji www.vevor.com/support SYSTEM UPRAWY HYDROPONICZNEJ RUR INSTRUKCJA OBSŁUGI We continue to be committed to provide you tools with competitive price. "Save Half", "Half Price" or any other similar expressions used by us only represents an estimate of savings you might benefit from buying certain tools with us compared to the major top brands and doses not necessarily mean to cover all categories of tools offered by us.
- Page 39 This is the original instruction, please read all manual instructions carefully before operating. VEVOR reserves a clear interpretation of our user manual. The appearance of the product shall be subject to the product you received. Please forgive us that we won't inform you again if...
- Page 40 SPECYFIKACJE VVSzary4-36 Model 870*560*990mm Rozmiar produktu Ameryka Północna: 120 V 60 Hz Unia Europejska: 220 ~ 240 V 50 Hz Napięcie wejściowe Australia: 220 ~ 240 V 50 Hz Przed użyciem produktu prosimy o dokładne zapoznanie się z instrukcją i odpowiednie jej przechowywanie.
-
Page 41: Lista Części
Lista części Rura Pompa wodna × podnóżka × 2 (400 mm) Z korkiem wodnym i podnóżkiem Rura Wąż podnóżka × 2 odprowadzający (520 mm) wodę 1,5 m × 1 Z korkiem wodnym i podnóżkiem Rura Wąż kompozytowa odprowadzający wylotu wody × wodę... - Page 42 Kontroler × 1 Młotek gumowy × 1 Adapter × 1 Instalacja...
- Page 43 Rysunek 1: Połącz zestaw Rysunek 2: Połącz dwie stopy 400 kompozytowych rur łączących , zestaw mm, wąż o długości 1 m i kran rur kompozytowych wylotu wody i cztery wylotowy z zespołem z rysunku 1 rurociągi do sadzenia razem zgodnie ze zgodnie ze schematem.
- Page 44 Rysunek 5: Najpierw przygotuj zbiornik Rysunek 6: Umieść 36 koszy do na wodę i napełnij go wodą. (Zaleca się sadzenia w rurociągach do sadzenia stosowanie zbiornika na wodę o i podłącz adapter do źródła zasilania. pojemności większej niż 20L, co nie Gdy pompa wodna zacznie działać, obejmuje 20L).
- Page 45 woda będzie się przelewać, gdy wróci do zbiornika na wodę. 15. Sugeruje się, aby użytkownicy zakupili własny zbiornik na wodę o pojemności 20L lub większej. 16. Kupuj nasiona i pożywki według własnych potrzeb. Producent: Shanghaimuxinmuyeyouxiangongsi Adres: Baoshanqu Shuangchenglu 803long 11hao 1602A-1609shi Szanghaj Import do AUS: SIHAO PTY LTD, 1 ROKEVA STREETEASTWOOD NSW 2122 Australia...
- Page 48 Techniczny Certyfikat wsparcia i e-gwarancji www.vevor.com/support...
- Page 49 Technisch Support- und E-Garantie-Zertifikat www.vevor.com/support ROHRE HYDROKULTUR-ANBAUSYSTEM BENUTZERHANDBUCH We continue to be committed to provide you tools with competitive price. "Save Half", "Half Price" or any other similar expressions used by us only represents an estimate of savings you might benefit from buying certain tools with us compared to the major top brands and doses not necessarily mean to cover all categories of tools offered by us.
- Page 51 This is the original instruction, please read all manual instructions carefully before operating. VEVOR reserves a clear interpretation of our user manual. The appearance of the product shall be subject to the product you received. Please forgive us that we won't inform you again if...
-
Page 52: Spezifikationen
SPEZIFIKATIONEN VVGrau4-36 Modell 870*560*990mm Produktgröße Nordamerika: 120 V 60 Hz Europäische Union: 220~240V 50Hz Eingangsspannung Australien: 220~240V 50Hz Bevor Sie das Produkt verwenden, lesen Sie bitte die Gebrauchsanweisung sorgfältig durch und bewahren Sie sie ordnungsgemäß auf. Notiz: Bitte stellen Sie sicher, dass Kinder bei der Verwendung dieses Produkts immer von einem Erwachsenen beaufsichtigt werden. -
Page 53: Liste Der Einzelteile
Liste der Einzelteile Fußrohr × 2 Wasserpumpe × (400 mm) Mit Wasseranschluss und Fußpolster Fußrohr × 2 Wasserauslasss (520 mm) chlauch 1,5 m × Mit Wasseranschluss und Fußpolster Wasserauslas Wasserauslasss s-Verbundrohr chlauch 1 m × 1 × 1 Verbindungsst Pflanzkorb × 36 ück-Verbundr ohr ×... -
Page 54: Installation
Controller × 1 Gummihammer × 1 Adapter × 1 Installation... - Page 55 Abbildung 1: Verbinden Sie einen Satz Abbildung 2: Verbinden Sie zwei Verbindungs-Verbundrohre , einen Satz 400-mm-Fußrohre, einen 1 m langen Wasserauslass-Verbundrohre und vier Schlauch und einen Auslasshahn mit Pflanzrohre gemäß der Abbildung der Baugruppe aus Abbildung 1 miteinander, wobei die Pflanzrohre nach gemäß...
- Page 56 Abbildung 5: Bereiten Sie zunächst Abbildung 6: Setzen Sie 36 einen Wassertank vor und füllen Sie ihn Pflanzkörbe in die Pflanzleitungen mit Wasser. (Es wird empfohlen, einen ein und stecken Sie den Adapter in Wassertank mit einem die Stromversorgung. Wenn die Fassungsvermögen von mehr als 20 l Wasserpumpe arbeitet, bildet sie zu verwenden, wobei 20 l nicht...
- Page 57 17. Die Sämlinge können nach dem Erwachsenwerden in ein Regal umgepflanzt werden. Nach dem Vereinzeln können sie zusammen mit dem Schwamm in den Pflanzkorb gefüllt werden. Bitte beachten Sie, dass der Schwamm am Boden des Korbs gefüllt sein und die Nährlösung berühren sollte. 18.
- Page 58 In China hergestellt...
- Page 61 Technisch Support- und E-Garantiezertifikat www.vevor.com/support...
- Page 62 Technique Assistance et certificat de garantie électronique www.vevor.com/support SYSTÈME DE CULTURE HYDROPONIQUE AVEC TUYAUX MANUEL DE L'UTILISATEUR...
- Page 63 We continue to be committed to provide you tools with competitive price. "Save Half", "Half Price" or any other similar expressions used by us only represents an estimate of savings you might benefit from buying certain tools with us compared to the major top brands and doses not necessarily mean to cover all categories of tools offered by us.
- Page 65 This is the original instruction, please read all manual instructions carefully before operating. VEVOR reserves a clear interpretation of our user manual. The appearance of the product shall be subject to the product you received. Please forgive us that we won't inform you again if...
-
Page 66: Caractéristiques
CARACTÉRISTIQUES VVGris4-36 Modèle 870*560*990mm Taille du produit Amérique du Nord : 120 V 60 Hz Union européenne : 220 ~ 240 V 50 Hz Tension d'entrée Australie : 220~240 V 50 Hz Avant d'utiliser le produit, veuillez lire attentivement les instructions et les conserver correctement. -
Page 67: Liste Des Pieces
Liste des pieces Tube de pied Pompe à eau × × 2 (400 mm) Avec bouchon d'eau et repose-pieds Tube de pied Tuyau de sortie × 2 (520 mm) d'eau 1,5 m × 1 Avec bouchon d'eau et repose-pieds Tube Tuyau de sortie composite de d'eau 1m ×... -
Page 68: Installation
UV et les insectes volants d'entrer Contrôleur × 1 Marteau en caoutchouc × 1 Adaptateur × Installation... - Page 69 Figure 1 : Connectez un ensemble de Figure 2 : Connectez deux tubes de tubes composites de connecteur , un pied de 400 mm, un tuyau de 1 m et ensemble de tubes composites de sortie un robinet de sortie avec d'eau et quatre canalisations de l'assemblage de la figure 1 selon le plantation ensemble selon le schéma,...
- Page 70 Figure 5 : Tout d’abord, préparez un Figure 6 : placez 36 paniers de réservoir d’eau et remplissez-le d’eau. plantation dans les pipelines de (Il est recommandé d'utiliser un plantation et insérez l'adaptateur réservoir d'eau d'une capacité dans l'alimentation électrique. supérieure à...
- Page 71 22. Connectez la pompe à l'alimentation électrique et démarrez la pompe. L'eau dans le réservoir d'eau diminuera. Éteignez la pompe dans les 10 minutes. Lorsque l'eau retourne dans le réservoir d'eau, remplissez le réservoir d'eau pour le remplir. Attention : n'injectez pas d'eau dans le réservoir d'eau après le démarrage de la pompe, sinon lorsque la pompe s'arrête de fonctionner, l'eau débordera lorsqu'elle retournera dans le réservoir d'eau.
- Page 74 Technique Assistance et certificat de garantie électronique www.vevor.com/support...
- Page 75 Technisch Ondersteuning en e-garantiecertificaat www.vevor.com/support PIJPEN HYDROCULTUUR GROEISYSTEEM HANDLEIDING We continue to be committed to provide you tools with competitive price. "Save Half", "Half Price" or any other similar expressions used by us only represents an estimate of savings you might benefit from buying certain tools with us compared to the major top brands and doses not necessarily mean to cover all categories of tools offered by us.
- Page 77 This is the original instruction, please read all manual instructions carefully before operating. VEVOR reserves a clear interpretation of our user manual. The appearance of the product shall be subject to the product you received. Please forgive us that we won't inform you again if...
- Page 78 SPECIFICATIES VVGrijs4-36 Model 870*560*990mm Product grootte Noord-Amerika: 120V 60Hz Europese Unie: 220~240V 50Hz Ingangsspanning Australië: 220~240V 50Hz Voordat u het product gebruikt, dient u de instructies aandachtig te lezen en deze goed te bewaren. Opmerking: Zorg ervoor dat kinderen altijd onder toezicht staan van een volwassene wanneer ze dit product gebruiken.
- Page 79 Onderdelen lijst Voetbuis × 2 Waterpomp × 1 (400 mm) Met waterplug en voetpad Voetbuis × 2 Waterafvoerslan (520 mm) g 1,5 m × 1 Met waterplug en voetpad Samengestel Waterafvoerslan de buis voor g 1m × 1 wateruitlaat × Connector Plantmand ×...
- Page 80 Regelaar × 1 Rubberen hamer × 1 Adapter × 1 Installatie...
- Page 81 Figuur 1: Sluit een set samengestelde Figuur 2: Sluit twee voetbuizen van connectorbuizen , een set 400 mm, een slang van 1 meter en samengestelde waterafvoerbuizen en een uitlaatkraan aan met de vier plantpijpleidingen met elkaar aan montage van Figuur 1 volgens het volgens het diagram, met de diagram.
- Page 82 Figuur 5: Maak eerst een watertank Figuur 6: Plaats 36 plantmanden in klaar en vul deze met water. (Het wordt de plantleidingen en steek de aanbevolen om een watertank te adapter in de voeding. Wanneer de gebruiken met een capaciteit van meer waterpomp werkt, vormt deze een dan 20 liter, exclusief 20 liter).
- Page 83 en de voedingsoplossing moet kunnen aanraken. 26. Sluit de pomp aan op de voeding en start de pomp. Het water in het waterreservoir zal afnemen. Schakel de pomp binnen 10 minuten uit. Wanneer het water terugkeert naar het waterreservoir, vult u het reservoir met water om het vol te maken.
- Page 86 Technisch Ondersteuning en e-garantiecertificaat www.vevor.com/support...
- Page 87 Teknisk Support och e-garanticertifikat www.vevor.com/support PIPES HYDROPONICS ODLINGSSYSTEM ANVÄNDARMANUAL We continue to be committed to provide you tools with competitive price. "Save Half", "Half Price" or any other similar expressions used by us only represents an estimate of savings you might benefit from buying certain tools with us compared to the major top brands and doses not necessarily mean to cover all categories of tools offered by us.
- Page 89 This is the original instruction, please read all manual instructions carefully before operating. VEVOR reserves a clear interpretation of our user manual. The appearance of the product shall be subject to the product you received. Please forgive us that we won't inform you again if...
- Page 90 SPECIFIKATIONER VVGrå4-36 Modell 870*560*990mm Produktstorlek Nordamerika: 120V 60Hz Europeiska unionen: 220~240V 50Hz Inspänning Australien: 220~240V 50Hz Innan du använder produkten, läs instruktionerna noggrant och förvara dem ordentligt. Notera: Se till att barn alltid övervakas av en vuxen när de använder denna produkt. Efter att ha tillsatt vatten, se till att dina händer är torra innan du ansluter adaptern till en strömkälla.
-
Page 91: Lista Över Delar
Lista över delar Fotrör × 2 Vattenpump × 1 (400 mm) Med vattenplugg och fotplatta Fotrör × 2 Vattenutloppssla (520 mm) ng 1,5m × 1 Med vattenplugg och fotplatta Vattenutlopp Vattenutloppssla kompositrör × ng 1m × 1 Anslutningsko Planteringskorg mpositrör × 1 ×... - Page 92 Adapter × 1 Installation Figur 1: Anslut en uppsättning Figur 2: Anslut två 400 mm fotrör, en kompositrör för kopplingar , en 1 m slang och en utloppskran med uppsättning kompositrör för enheten i figur 1 enligt diagrammet. vattenutlopp och fyra (Förstärk de två...
- Page 93 planteringsrörledningarna vända uppåt. Förstärk dem med en gummihammare (slå på varje anslutning med gummihammaren tills de sitter tätt) Figur 3: Anslut två 520 mm fotrör, en 1,5 Bild 4: Anslut en adapter, en m slang och en inloppskran med styrenhet och en vattenpump enheten i figur 2 enligt diagrammet.
- Page 94 vattenpumpen i botten av vattentanken. näringslösning genom varje rör. Placera även den andra änden av 1 m slangen i vattentanken. Vattennivån måste sänka vattenpumpen, annars skadar den pumpen eller slutar fungera. Metod för att plantera grönsaker: 36. Lägg svampen i vattnet, tryck på den med händerna och sug i tillräckligt med vatten.
- Page 95 Tillverkare: Shanghaimuxinmuyeyouxiangongsi Adress: Baoshanqu Shuangchenglu 803long 11hao 1602A-1609shi Shanghai Importerad till AUS: SIHAO PTY LTD, 1 ROKEVA STREETEASTWOOD NSW 2122 Australien Importerad till USA: Sanven Technology Ltd., Suite 250, 9166 Anaheim Place, Rancho Cucamonga, CA 91730 Tillverkad i Kina...
- Page 98 Teknisk Support och e-garanticertifikat www.vevor.com/support...
Need help?
Do you have a question about the VVGrey4-36 and is the answer not in the manual?
Questions and answers