Table of Contents
Advertisement
Available languages
Available languages
Quick Links
Technical Support and E-Warranty Certificate www.vevor.com/support
SUBSURFACE POND AERATION SYSTEM
USER MANUAL
We continue to be committed to provide you tools with competitive price.
"Save Half", "Half Price" or any other similar expressions used by us only represents an
estimate of savings you might benefit from buying certain tools with us compared to the major
top brands and does not necessarily mean to cover all categories of tools offered by us. You
are kindly reminded to verify carefully when you are placing an order with us if you are
actually saving half in comparison with the top major brands.
Advertisement
Table of Contents

Related Manuals for VEVOR OLF400D


Summary of Contents for VEVOR OLF400D
- Page 1 Technical Support and E-Warranty Certificate www.vevor.com/support SUBSURFACE POND AERATION SYSTEM USER MANUAL We continue to be committed to provide you tools with competitive price. "Save Half", "Half Price" or any other similar expressions used by us only represents an estimate of savings you might benefit from buying certain tools with us compared to the major top brands and does not necessarily mean to cover all categories of tools offered by us.
- Page 3 This is the original instruction, please read all manual instructions carefully before operating. VEVOR reserves a clear interpretation of our user manual. The appearance of the product shall be subject to the product you received. Please forgive us that we won't inform you again if...
-
Page 4: Electrical Safety
Thank you very much for choosing this product. Please read all of the instructions before using it.The information will help you achieve the best possible results. Warning-To reduce the risk of injury, user must read instructions manual carefully. This product is subject to the provision of European Directive 2012/19/EC. -
Page 5: Personal Safety
Do not expose the air compressor to rain or humidity,water entering the air compressor will increase the risk of electric shock Do not abuse the power cord,keep the power cord away from heat,oil,sharp edges,or moving parts.damaged or tangled wires will increase the risk of electric shock Please ensure that the socket has an effective grounding,which can avoid the ... -
Page 6: Product Parameter
WARNING: The diffuser can not be directly thrown into the pond or water to prevent the hose from falling off or the diffuser from overturning.It is recommended to put it into the water gently. PRODUCT PARAMETER 2.1 Product Specification Model OLF400D-B OLF400D-C OLF400D-A SPEC. Voltage (V/Hz) 220~240V/50Hz... - Page 7 Model OLF400D-A OLF400D-B OLF400D-C Parts Air compressor × Airline × Airflow diffuser Hose clamp Air Filter Timer Pressure relief valve Check valve Solenoid valve Joints distributor Air flow valve × Stainless Base Users’Manual...
-
Page 8: System Components
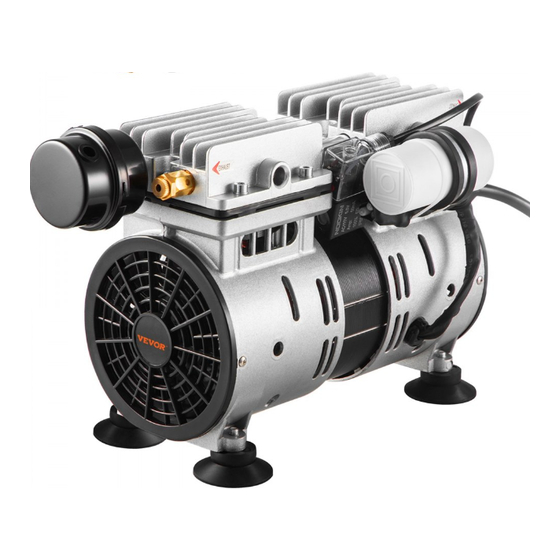
2.2 System components 1)Oil-free air compressor High efficiency,silent,oil-free, continuous-duty rocking piston compressor. Rubber compressor mounts reduce noise and vibration for silent operation. 3x1.0mm2x1.5m plug power cord. The solenoid valve can better protect the motor from starting with a load. Single/double diffuser airflow valve The check valve can avoid the risk of water vapor backflow. -
Page 9: Installation
EPDM non-stick 8"membrane difuser sticks provide the synergy of air stones while being virtually maintenance-free. Stainless steel connector for the airline and the diffuser plate. L13.6xW11.6*square stainless steel base for the diffuser’s stability 3) Airline The 3/8"100 ft lead-free airline is made of durable PVC materials.Fish hook is resistant and kink-free. - Page 10 Step2: Screw the air filter into the compressor right near the pressure-relief valve.(Use Teflon tape if needed.) Step3: Use your shovel to dig a trench from the shelter to the pond.The minimum depth of the trench should not be less than 8 inches to protect the air pipe.We recommend marking utility lines before starting excavation.
- Page 11 Step5:Connect the two ends of the air pipe with the airflow valve on the air compressor and the pagoda connector on the aeration disk,and lock and fix them with a hose clamp.
- Page 12 Step6:Screw and fix the aeration disk on the stainless steel base. 8"EPDM Diffuser plate...
-
Page 13: Operation
2.4 Operation Please check the following items at least once a day during operation. 1) ls there any abnormal sound; 2) Whether the pump is abnormally hot; 3) Whether the exhaust is normal; 4) Is the muffler clogged? The machine can work after the power is turned on.The aeration system is equipped with timers for users to set the opening and closing mode of the machine according to the actual climate. -
Page 14: Button Instructions
weather environment.For example,in the rainy season,if the pond is oxygen deficient the aeration system will be turned on for 2 hours and turned off for half an hour to help the pond oxygenate. Min.setting time is 1 sec/min.It can set 8/20 programs of on and off every day The function mode is divided into normal open state and timing state. -
Page 15: Maintenance
3) Press "SET UP(PROG)to set the timer for "OFF" time and day for "1OFF". 4) Press "HOUR""MIN"and "WEEK" to program the correct day and time. 5) If needed,press "SET UP(PROG)to advance the second on/offsetting. ON/OFF switch to turn on or turn off mode: 1) Press "ON/AUTO/OFF"there is an indicator in the display show "ON"... -
Page 16: Troubleshooting
Always unplug system and refer servicing to a qualified electrician when cord is damaged or frayed,compressor,power control,compressor fan,or other electrical components are producing unusual noises or odors. WARNING: Compressors are equipped with a thermal overload switch If temperature becomes high enough to trip the overload,the compressor will shut down.It will then automatically start up when temperature decreases as long as power is applied. - Page 17 1.No power supply 1.Check the plug and 2.The fuse is blown switch 2.Replace the fuse The motor does not rotate 3.Overload protector is 3.The motor will restart and there is no sound in a protection state after cooling 4 The motor stator 4.Replace the stator winding is burnt 1.The voltage is too low...
- Page 18 1.The drain valve is open 1.Tighten the drain valve 2.Cold blockage of air filter 2.Clean or replace the filter 3.The pipeline leaks The air supply of the air compressor is slow or element 4.The valve plate has a poor cannot reach the function or foreign matters 3.Check and eliminate specified pressure.
- Page 20 Technical Support and E-Warranty Certificate www.vevor.com/support...
- Page 21 Machine Translated by Google Technischer Support und E-Garantie-Zertifikat www.vevor.com/support UNTERFLÄCHEN-TEICHBELÜFTUNGSSYSTEM BENUTZERHANDBUCH Wir sind weiterhin bestrebt, Ihnen Werkzeuge zu wettbewerbsfähigen Preisen anzubieten. „Sparen Sie die Hälfte“, „Halber Preis“ oder andere ähnliche Ausdrücke, die wir verwenden, stellen nur eine Schätzung der Ersparnis dar, die Sie beim Kauf bestimmter Werkzeuge bei uns im Vergleich zu den großen Topmarken erzielen können, und decken nicht unbedingt alle von uns angebotenen Werkzeugkategorien ab.
- Page 22 Machine Translated by Google...
- Page 23 Dies ist die Originalanleitung. Bitte lesen Sie alle Anweisungen sorgfältig durch, bevor Sie das Gerät in Betrieb nehmen. VEVOR behält sich eine klare Auslegung unserer Bedienungsanleitung vor. Das Erscheinungsbild des Produkts richtet sich nach dem Produkt, das Sie erhalten haben.
- Page 24 Machine Translated by Google Vielen Dank, dass Sie sich für dieses Produkt entschieden haben. Bitte lesen Sie alle Lesen Sie sich die Gebrauchsanweisung vor der Anwendung durch. Die Informationen helfen Ihnen, die bestmöglichen Ergebnisse zu erzielen. Warnung: Um das Verletzungsrisiko zu verringern, muss der Benutzer die Bedienungsanleitung sorgfältig lesen.
- Page 25 Machine Translated by Google ÿ Setzen Sie den Luftkompressor nicht Regen oder Feuchtigkeit aus, da sonst Wasser in die Luft eindringen kann. Kompressor erhöht das Risiko eines Stromschlags ÿ Missbrauchen Sie das Netzkabel nicht, halten Sie das Netzkabel fern von Hitze, Öl, scharfen Kanten oder bewegliche Teile.
- Page 26 ACHTUNG: Der Diffusor darf nicht direkt in den Teich oder ins Wasser geworfen werden. Verhindern Sie, dass der Schlauch herunterfällt oder der Diffusor umkippt. Es wird empfohlen um es vorsichtig ins Wasser zu legen. PRODUKTPARAMETER 2.1 Produktspezifikation Modell OLF400D-A OLF400D-B OLF400D-C SPEZ. 220~240 V/50 Hz Spannung (V/Hz)
- Page 27 Machine Translated by Google Modell OLF400D-A OLF400D-B OLF400D-C Ersatzteile Luftkompressor × Fluggesellschaft × Luftstromdiffusor Schlauchschelle Luftfilter Timer Überdruckventil Rückschlagventil Magnetventil Gelenkverteiler Luftstromventil × Edelstahlsockel Benutzerhandbuch...
- Page 28 Machine Translated by Google 2.2 Systemkomponenten 1) Ölfreier Luftkompressor 1 Hocheffizienter, geräuscharmer, ölfreier Pendelkolbenkompressor für den Dauerbetrieb. 2 Gummilager des Kompressors reduzieren Lärm und Vibrationen für einen geräuschlosen Betrieb. 3 Netzkabel mit Stecker 3 x 1,0 mm2 x 1,5 m. 4 Das Magnetventil kann den Motor besser vor dem Anlaufen unter Last schützen.
- Page 29 Machine Translated by Google 10 EPDM-Antihaft-Diffusorstäbe mit 8 Zoll Membran sorgen für die Synergie von Luftsteinen und ist dabei praktisch wartungsfrei. 11 Edelstahlanschlussstück für die Luftleitung und die Diffusorplatte. 12 L13,6xB11,6*quadratischer Edelstahlsockel für die Stabilität des Diffusors 3) Fluggesellschaft Die 3/8"100 ft bleifreie Luftleitung besteht aus langlebige PVC-Materialien.
- Page 30 Machine Translated by Google Schritt 2: Schrauben Sie den Luftfilter direkt neben dem Überdruckventil in den Kompressor. (Verwenden Sie bei Bedarf Teflonband.) Schritt 3: Graben Sie mit Ihrer Schaufel einen Graben vom Unterstand zum Teich. Die Mindesttiefe des Grabens sollte nicht weniger als 20 cm betragen, um die Luftleitung zu schützen.
- Page 31 Machine Translated by Google Schritt 5: Verbinden Sie die beiden Enden des Luftrohrs mit dem Luftstromventil am Luftkompressor und dem Pagodenanschluss an der Belüftungsscheibe und verriegeln und fixieren Sie sie mit einer Schlauchschelle.
- Page 32 Machine Translated by Google Schritt 6: Schrauben Sie die Belüftungsscheibe an die Edelstahlbasis und befestigen Sie sie. 8"EPDM-Diffusorplatte...
- Page 33 Machine Translated by Google 2.4 Betrieb Bitte überprüfen Sie während des Betriebs mindestens einmal täglich die folgenden Punkte: 1) Sind ungewöhnliche Geräusche zu hören? 2) Wird die Pumpe ungewöhnlich heiß? 3) Ist der Auspuff normal? 4) Ist der Schalldämpfer verstopft? Die Maschine kann nach dem Einschalten arbeiten.
- Page 34 Machine Translated by Google Wetterumgebung. Zum Beispiel in der Regenzeit, wenn der Teich Sauerstoff ist Bei einem Mangel wird das Belüftungssystem für 2 Stunden eingeschaltet und für eine halbe Stunde ausgeschaltet. Stunde, um den Teich mit Sauerstoff anzureichern. Die Mindesteinstellzeit beträgt 1 Sek./Min. Es können 8/20 Programme für das tägliche Ein- und Ausschalten eingestellt werden. Der Funktionsmodus ist in den normalen Öffnungszustand und den Zeitgebungszustand unterteilt.
-
Page 35: Wartung
Machine Translated by Google 3) Drücken Sie „SET UP (PROG), um den Timer auf die „OFF“-Zeit und den Tag auf „1OFF“ einzustellen. 4) Drücken Sie „HOUR“, „MIN“ und „WEEK“, um den richtigen Tag und die richtige Uhrzeit zu programmieren. 5) Drücken Sie bei Bedarf „SET UP (PROG), um die zweite Ein-/Ausschaltzeit zu verkürzen. EIN/AUS-Schalter zum Ein- bzw. - Page 36 Machine Translated by Google ÿ Ziehen Sie immer den Netzstecker und überlassen Sie die Wartung einem qualifizierten Elektriker, wenn das Kabel beschädigt oder ausgefranst ist, Kompressor, Leistungsregler, Kompressorlüfter oder andere elektrische Komponenten erzeugen ungewöhnliche Geräusche oder Gerüche. ACHTUNG: Kompressoren sind mit einem thermischen Überlastschalter ausgestattet. Temperatur hoch genug wird, um die Überlastung auszulösen, schaltet der Kompressor ab Es wird dann automatisch gestartet, wenn die Temperatur sinkt, solange Strom wird...
- Page 37 Machine Translated by Google 1.Keine Stromversorgung 1.Überprüfen Sie den Stecker und 2.Die Sicherung ist durchgebrannt Schalter 2.Ersetzen Sie die Sicherung Der Motor dreht sich nicht 3.Überlastschutz ist 3.Der Motor wird neu gestartet und es ist kein Ton zu hören im Schutzzustand nach dem Abkühlen 4 Der Motorstator 4.Stator austauschen...
- Page 38 Machine Translated by Google 1.Das Ablassventil ist geöffnet 1.Das Ablassventil festziehen 2.Kalte Blockade des Luftfilters 2.Reinigen oder ersetzen Sie den Filter 3.Die Pipeline ist undicht Die Luftzufuhr des Luft Element Kompressor ist langsam oder 4.Die Ventilplatte hat eine schlechte kann nicht erreichen die 3.Überprüfen und beseitigen Funktion oder Fremdkörper angegebenen Druck.
- Page 39 Machine Translated by Google...
- Page 40 Machine Translated by Google Technischer Support und E-Garantie-Zertifikat www.vevor.com/support...
-
Page 41: Manuel D'utilisation
Machine Translated by Google Assistance t echnique e t c ertificat d e g arantie é lectronique w ww.vevor.com/support SYSTÈME D 'AÉRATION D 'ÉTANG S OUTERRAIN MANUEL D 'UTILISATION Nous c ontinuons à n ous e ngager à v ous f ournir d es o utils à d es p rix c ompétitifs. - Page 42 Machine Translated by Google...
- Page 43 Assistance t echnique e t c ertificat d e g arantie électronique w ww.vevor.com/support Il s 'agit d e l a n otice d 'utilisation d 'origine. V euillez l ire a ttentivement t outes l es i nstructions d u ...
- Page 44 Machine Translated by Google Merci b eaucoup d 'avoir c hoisi c e p roduit. V euillez l ire t outes l es instructions a vant d e l 'utiliser. L es i nformations v ous a ideront à o btenir l es m eilleurs résultats ...
- Page 45 Machine Translated by Google N 'exposez p as l e c ompresseur d 'air à l a p luie o u à l 'humidité, l 'eau n e p énétrant p as d ans l 'air le c ompresseur a ugmentera l e r isque d e c hoc é lectrique ...
- Page 46 'eau. PARAMÈTRE D U P RODUIT 2.1 S pécifications d u p roduit Modèle OLF400DB OLF400DC OLF400DA SPÉC. 220~240V/50Hz Tension ...
- Page 47 Machine Translated by Google Modèle OLF400DA OLF400DB OLF400DC Parties Compresseur d 'air × Compagnie a érienne × Diffuseur d e f lux d 'air Collier d e s errage Filtre à a ir Minuteur Soupape d e s urpression Clapet ...
- Page 48 Machine Translated by Google 2.2 C omposants d u s ystème 1) C ompresseur d 'air s ans h uile 1 C ompresseur à p iston b asculant à h aut r endement, s ilencieux, s ans h uile e t à f onctionnement c ontinu. 2 ...
- Page 49 Machine Translated by Google 10 b âtons d iffuseurs à m embrane a ntiadhésive E PDM d e 8 " o ffrent l a s ynergie d es p ierres à a ir tout e n é tant p ratiquement s ans e ntretien. 11 ...
- Page 50 Machine Translated by Google Étape 2 : V issez l e f iltre à a ir d ans l e c ompresseur j uste à c ôté d e l a s oupape d e s urpression. ( Utilisez d u ruban ...
- Page 51 Machine Translated by Google Étape 5 : C onnectez l es d eux e xtrémités d u t uyau d 'air a vec l a v anne d e d ébit d 'air s ur l e compresseur d 'air e t l e c onnecteur d e p agode s ur l e d isque d 'aération, p uis v errouillezles e t f ixezles avec ...
- Page 52 Machine Translated by Google Étape 6 : V issez e t f ixez l e d isque d 'aération s ur l a b ase e n a cier i noxydable. Plaque d e d iffusion E PDM 8 "...
- Page 53 Machine Translated by Google 2.4 F onctionnement Veuillez v érifier l es é léments s uivants a u m oins u ne f ois p ar j our p endant l e f onctionnement. 1 ) Y a til un ...
- Page 54 Machine Translated by Google environnement m étéorologique. P ar e xemple, p endant l a s aison d es p luies, s i l 'étang e st r iche e n o xygène déficient l e s ystème d 'aération s era a llumé p endant 2 h eures e t é teint p endant u ne d emiheure heure ...
-
Page 55: Entretien
Machine Translated by Google 3) A ppuyez s ur « SET U P ( PROG) » p our r égler l a m inuterie s ur l 'heure « OFF » e t l e j our s ur « 1OFF ». 4) A ppuyez s ur « HEURE », « MIN » e t « SEMAINE » p our p rogrammer l e j our e t l 'heure c orrects. 5) ... - Page 56 Machine Translated by Google D ébranchez t oujours l e s ystème e t c onfiez l 'entretien à u n é lectricien q ualifié l orsque l e c ordon est e ndommagé o u e ffiloché, c ompresseur, c ommande d e p uissance, v entilateur d e c ompresseur o u a utre é lément é lectrique les ...
- Page 57 Machine Translated by Google 1. P as d 'alimentation é lectrique 1.Vérifiez l a p rise e t 2. L e f usible e st g rillé interrupteur 2 .Remplacez l e f usible Le m oteur n e t ourne p as 3. ...
- Page 58 Machine Translated by Google 1. L e r obinet d e v idange e st o uvert 1. S errez l e r obinet d e v idange 2. B locage à f roid d u f iltre à a ir 2. ...
- Page 59 Machine Translated by Google...
- Page 60 Machine Translated by Google Assistance t echnique e t c ertificat d e g arantie électronique w ww.vevor.com/support...
- Page 61 Machine Translated by Google Technische ondersteuning en e-garantiecertificaat www.vevor.com/support ONDERGRONDSE VIJVERBELUCHTINGSSYSTEEM GEBRUIKERSHANDLEIDING Wij streven er voortdurend naar om u gereedschappen tegen concurrerende prijzen te leveren. "Save Half", "Half Price" of andere soortgelijke uitdrukkingen die wij gebruiken, geven alleen een schatting weer van de besparingen die u kunt behalen door bepaalde gereedschappen bij ons te kopen in vergelijking met de grote topmerken en betekent niet noodzakelijkerwijs dat alle categorieën gereedschappen die wij aanbieden, worden gedekt.
- Page 62 Machine Translated by Google...
- Page 63 Dit is de originele instructie, lees alle handleidingen zorgvuldig door voordat u het product gebruikt. VEVOR behoudt zich een duidelijke interpretatie van onze gebruikershandleiding voor. Het uiterlijk van het product is afhankelijk van het product dat u hebt ontvangen. Vergeef ons...
- Page 64 Machine Translated by Google Hartelijk dank voor het kiezen van dit product. Lees alle Lees de instructies aandachtig door voordat u het product gebruikt. Deze informatie helpt u de best mogelijke resultaten te behalen. Waarschuwing: om het risico op letsel te verkleinen, moet de gebruiker de gebruiksaanwijzing zorgvuldig lezen.
- Page 65 Machine Translated by Google ÿ Stel de luchtcompressor niet bloot aan regen of vochtigheid, of aan water dat in de lucht komt. compressor verhoogt het risico op een elektrische schok ÿ Misbruik het netsnoer niet, houd het netsnoer uit de buurt van hitte, olie, scherpe voorwerpen en andere voorwerpen. randen of bewegende delen.
- Page 66 WAARSCHUWING: De diffuser mag niet rechtstreeks in de vijver of het water worden gegooid. voorkom dat de slang eraf valt of dat de diffuser kantelt. Het wordt aanbevolen om het voorzichtig in het water te leggen. PRODUCTPARAMETER 2.1 Productspecificatie Model OLF400D-A OLF400D-B OLF400D-C SPECIFICATIES 220~240V/50Hz Spanning (V/Hz)
- Page 67 Machine Translated by Google Model OLF400D-A OLF400D-B OLF400D-C Onderdelen Luchtcompressor × Luchtvaartmaatschappij × Luchtstroomdiffuser Slangklem Luchtfilter Tijdklok Overdrukventiel Terugslagklep Solenoïdeklep Gewrichtenverdeler Luchtstroomklep × Roestvrijstalen basis Gebruikershandleiding...
- Page 68 Machine Translated by Google 2.2 Systeemcomponenten 1) Olievrije luchtcompressor 1 Zeer efficiënte, stille, olievrije, continu werkende schommelzuigercompressor. 2 Rubberen compressorbevestigingen verminderen geluid en trillingen voor een stille werking. 3 3x1.0mm2x1.5m stekker netsnoer. 4 Het magneetventiel kan de motor beter beschermen tegen starten met een belasting. 5 Enkele/dubbele diffusor luchtstroomklep 6 Het terugslagventiel kan het risico op terugstroming van waterdamp voorkomen.
- Page 69 Machine Translated by Google 10 EPDM antiaanbak 8" membraan diffusor sticks zorgen voor de synergie van luchtstenen terwijl ze vrijwel onderhoudsvrij zijn. 11 RVS connector voor de luchtleiding en de diffusorplaat. 12 L13,6xB11,6*vierkante roestvrijstalen basis voor de stabiliteit van de diffuser 3) Luchtvaartmaatschappij De 3/8"100 ft loodvrije luchtleiding is gemaakt van duurzame PVC-materialen.
- Page 70 Machine Translated by Google Stap 2: Schroef het luchtfilter vast in de compressor, vlakbij het overdrukventiel. (Gebruik indien nodig teflontape.) Stap 3: Graaf met uw schop een sleuf van de schuilplaats naar de vijver. De minimale diepte van de sleuf mag niet minder dan 20 cm zijn om de luchtbuis te beschermen.
- Page 71 Machine Translated by Google Stap 5: Verbind de twee uiteinden van de luchtbuis met de luchtstroomklep op de luchtcompressor en de pagodeconnector op de beluchtingsschijf en zet ze vast met een slangklem.
- Page 72 Machine Translated by Google Stap 6: Schroef de beluchtingsschijf vast aan de roestvrijstalen basis. 8"EPDM-diffusorplaat...
- Page 73 Machine Translated by Google 2.4 Bediening Controleer de volgende punten minstens één keer per dag tijdens het gebruik. 1) Is er sprake van abnormale geluiden? 2) Is de pomp abnormaal heet? 3) Is de uitlaat normaal? 4) Is de demper verstopt? De machine kan werken nadat de stroom is ingeschakeld.
- Page 74 Machine Translated by Google weersomstandigheden. Bijvoorbeeld, in het regenseizoen, als de vijver zuurstofrijk is bij een tekort wordt het beluchtingssysteem 2 uur lang aangezet en een half uur lang uitgezet uur om de vijver te helpen zuurstof te geven. De minimale insteltijd is 1 sec/min. Er kunnen 8/20 programma's per dag worden ingesteld om het apparaat aan en uit te zetten. De functiemodus is verdeeld in de normale open toestand en de timingtoestand.
- Page 75 Machine Translated by Google 3) Druk op "SET UP(PROG)" om de timer in te stellen voor de "OFF"-tijd en de dag voor "1OFF". 4) Druk op "HOUR", "MIN" en "WEEK" om de juiste dag en tijd te programmeren. 5) Druk indien nodig op "SET UP(PROG)" om de tweede aan/uit-instelling te vervroegen. AAN/UIT-schakelaar om de modus in of uit te schakelen: 1) Druk op "ON/AUTO/OFF".
- Page 76 Machine Translated by Google ÿ Haal altijd de stekker uit het stopcontact en laat het onderhoud over aan een gekwalificeerde elektricien als het snoer losraakt. is beschadigd of gerafeld, compressor, vermogensregeling, compressorventilator of andere elektrische componenten produceren ongewone geluiden of geuren. WAARSCHUWING: Compressoren zijn uitgerust met een thermische overbelastingsschakelaar.
- Page 77 Machine Translated by Google 1.Geen stroomvoorziening 1. Controleer de stekker en 2. De zekering is doorgebrand schakelaar 2. Vervang de zekering De motor draait niet 3.Overbelastingsbeveiliging is 3. De motor start opnieuw en er is geen geluid in een beschermingsstatus na afkoeling 4 De motorstator 4.
- Page 78 Machine Translated by Google 1. De afvoerklep staat open 1. Draai de aftapkraan vast 2. Koude blokkade van het luchtfilter 2. Reinig of vervang het filter 3. De pijpleiding lekt De luchttoevoer van de lucht element compressor is traag of 4.De klepplaat heeft een slechte kan de 3.Controleer en elimineer...
- Page 79 Machine Translated by Google...
- Page 80 Machine Translated by Google Technische ondersteuning en e- garantiecertificaat www.vevor.com/support...
- Page 81 Machine Translated by Google Teknisk support och e-garanticertifikat www.vevor.com/support LUFTNINGSSYSTEM FÖR UNDERLANDSDAMMAR ANVÄNDARMANUAL Vi fortsätter att vara engagerade i att ge dig verktyg till konkurrenskraftiga priser. "Spara hälften", "halva priset" eller andra liknande uttryck som används av oss representerar bara en uppskattning av besparingar du kan dra nytta av att köpa vissa verktyg hos oss jämfört med de stora toppmärkena och betyder inte nödvändigtvis att täcka alla kategorier av verktyg som erbjuds...
- Page 82 Machine Translated by Google...
- Page 83 Detta är den ursprungliga instruktionen, läs alla instruktioner noggrant innan du använder den. VEVOR reserverar sig för en tydlig tolkning av vår användarmanual. Utseendet på produkten är beroende av den produkt du fått. Ursäkta oss att vi inte kommer att...
- Page 84 Machine Translated by Google Tack så mycket för att du valde denna produkt. Vänligen läs alla instruktioner innan du använder den. Informationen hjälper dig att uppnå bästa möjliga resultat. Varning - För att minska risken för skada måste användaren läsa instruktionerna noggrant. Denna produkt omfattas av bestämmelserna i det europeiska direktivet 2012/19/EC.
- Page 85 Machine Translated by Google ÿ Utsätt inte luftkompressorn för regn eller fukt, eller vatten som kommer in i luften kompressor ökar risken för elektriska stötar ÿ Missbruk inte nätsladden, håll nätsladden borta från värme, olja, vassa kanter,eller rörliga delar.skadade eller trassliga ledningar ökar risken för elektriska chock ÿ...
- Page 86 VARNING: Spridaren kan inte kastas direkt i dammen eller vatten till förhindra att slangen faller av eller att diffusorn välter. Det rekommenderas för att försiktigt lägga den i vattnet. PRODUKTPARAMETER 2.1 Produktspecifikation Modell OLF400D-B OLF400D-C OLF400D-A SPEC. 220~240V/50Hz Spänning (V/Hz) 550W Märkeffekt...
- Page 87 Machine Translated by Google Modell OLF400D-A OLF400D-B OLF400D-C Delar Luftkompressor × Flygbolag × Luftflödesdiffusor Slangklämma Luftfilter Timer Övertrycksventil Backventil Magnetventil Ledfördelare Luftflödesventil × Rostfri bas Användarmanual...
- Page 88 Machine Translated by Google 2.2 Systemkomponenter 1) Oljefri luftkompressor 1 Högeffektiv, tyst, oljefri, kontinuerligt gungande kolvkompressor. 2 gummikompressorfästen minskar buller och vibrationer för tyst drift. 3 st 3x1,0mm2x1,5m nätsladd. 4 Magnetventilen kan bättre skydda motorn från att starta med en belastning. 5 Enkel/dubbel diffusor luftflödesventil 6 Backventilen kan undvika risken för återflöde av vattenånga.
- Page 89 Machine Translated by Google 10 EPDM non-stick 8" membranspridare ger synergien av luftstenar samtidigt som den är praktiskt taget underhållsfri. 11 Rostfritt stålkoppling för luftledningen och spridarplattan. 12 L13,6xB11,6*fyrkantig bas i rostfritt stål för diffusorns stabilitet 3) Flygbolag Det blyfria flygbolaget på 3/8"100 fot är tillverkat av hållbara PVC-material.
- Page 90 Machine Translated by Google Steg 2: Skruva in luftfiltret i kompressorn precis nära övertrycksventilen. (Använd teflontejp om det behövs.) Steg 3: Använd din spade för att gräva ett dike från skyddet till dammen. Det minsta djupet på diket bör inte vara mindre än 8 tum för att skydda luftröret.
- Page 91 Machine Translated by Google Steg 5: Anslut de två ändarna av luftröret med luftflödesventilen på luftkompressorn och pagodanslutningen på luftningsskivan, och lås och fixera dem med en slangklämma.
- Page 92 Machine Translated by Google Steg 6: Skruva och fixera luftningsskivan på basen av rostfritt stål. 8" EPDM diffusorplatta...
- Page 93 Machine Translated by Google 2.4 Drift Kontrollera följande punkter minst en gång om dagen under drift. 1) Finns det något onormalt ljud; 2) Om pumpen är onormalt varm; 3) Om avgaserna är normala; 4) Är ljuddämparen igensatt? Maskinen kan fungera efter att strömmen slagits på. Luftningssystemet är utrustat med timers för användare att ställa in maskinens öppnings- och stängningsläge efter det faktiska klimatet.
- Page 94 Machine Translated by Google vädermiljö.Till exempel under regnperioden,om dammen är syre bristfällig kommer luftningssystemet att slås på i 2 timmar och stängas av i en halv timme för att hjälpa dammen att syresättas. Min.inställningstid är 1 sek/min. Den kan ställa in 8/20 program på och av varje dag Funktionsläget är uppdelat i normalt öppet läge och tidsläge.
- Page 95 Machine Translated by Google 3) Tryck på "SET UP(PROG) för att ställa in timern för "OFF" tid och dag för "1OFF". 4) Tryck på "HOUR""MIN" och "WEEK" för att programmera in rätt dag och tid. 5) Om det behövs, tryck på "SET UP(PROG) för att flytta fram den andra på/förskjutningen. ON/OFF-knapp för att slå...
- Page 96 Machine Translated by Google ÿ Koppla alltid ur systemet och överlåt service till en kvalificerad elektriker när sladden är skadad eller sliten, kompressor, effektkontroll, kompressorfläkt eller annan elektrisk utrustning komponenter producerar ovanliga ljud eller lukter. VARNING: Kompressorer är utrustade med en termisk överbelastningsbrytare If temperaturen blir tillräckligt hög för att lösa ut överbelastningen, kommer kompressorn att stängas ner.Den startar sedan automatiskt när temperaturen sjunker så...
- Page 97 Machine Translated by Google 1.Ingen strömförsörjning 1.Kontrollera kontakten och 2. Säkringen har gått strömbrytare 2.Byt ut säkringen Motorn roterar inte 3. Överbelastningsskydd är 3. Motorn startar om och det finns inget ljud i skyddstillstånd efter kylning 4 Motorstatorn 4.Byt ut statorn lindningen är bränd 1.
- Page 98 Machine Translated by Google 1. Dräneringsventilen är öppen 1. Dra åt avtappningsventilen 2.Kallblockering av luftfiltret 2.Rengör eller byt ut filtret 3.Rörledningen läcker Lufttillförseln av luften element kompressorn är långsam eller 4. Ventilplattan har en dålig kan inte nå 3. Kontrollera och eliminera funktion eller främmande angelägenheter specificerat tryck.
- Page 99 Machine Translated by Google...
- Page 100 Machine Translated by Google Teknisk support och e-garanticertifikat www.vevor.com/support...
-
Page 101: Manual Del Usuario
Machine Translated by Google Soporte t écnico y c ertificado d e g arantía e lectrónica w ww.vevor.com/support SISTEMA D E A IREACIÓN D E E STANQUES S UBTERRÁNEOS MANUAL D EL U SUARIO Seguimos c omprometidos a b rindarle h erramientas a p recios c ompetitivos. - Page 102 Machine Translated by Google...
- Page 103 Soporte t écnico y c ertificado d e g arantía electrónica w ww.vevor.com/support Estas s on l as i nstrucciones o riginales, l ea a tentamente t odas l as i nstrucciones d el m anual ...
- Page 104 Machine Translated by Google Muchas g racias p or e legir e ste p roducto. L ea t odas l as i nstrucciones. instrucciones a ntes d e u sarlo.La i nformación l e a yudará a l ograr l os m ejores resultados ...
- Page 105 Machine Translated by Google N o e xponga e l c ompresor d e a ire a l a l luvia n i a l a h umedad, n i p ermita q ue e ntre a gua e n e l a ire. El ...
- Page 106 q ue e l d ifusor s e v uelque.Se r ecomienda Ponerlo e n e l a gua c on c uidado. PARÁMETRO D EL P RODUCTO 2.1 E specificaciones d el p roducto Modelo OLF400DB OLF400DC OLF400DA ESPECULACIÓN. 220 ~ 2 40 V /50 H z Voltaje ...
- Page 107 Machine Translated by Google Modelo OLF400DA OLF400DB OLF400DC Regiones Compresor d e a ire × Aerolínea × Difusor d e f lujo d e a ire Abrazadera d e m anguera Filtro d e a ire Minutero Válvula d e a livio d e p resión Controlador ...
- Page 108 Machine Translated by Google 2.2 C omponentes d el s istema 1)Compresor d e a ire s in a ceite 1 C ompresor d e p istón o scilante d e a lta e ficiencia, s ilencioso, s in a ceite y d e s ervicio c ontinuo. 2 ...
- Page 109 Machine Translated by Google 10 v arillas d ifusoras d e m embrana a ntiadherentes d e E PDM d e 8 " p roporcionan l a s inergia d e l as p iedras d ifusoras y p rácticamente n o r equiere m antenimiento. 11 ...
- Page 110 Machine Translated by Google Paso 2 : Atornille e l f iltro d e a ire e n e l c ompresor j usto c erca d e l a v álvula d e a livio d e p resión. ( Use c inta d e teflón ...
- Page 111 Machine Translated by Google Paso 5 : C onecte l os d os e xtremos d el t ubo d e a ire c on l a v álvula d e f lujo d e a ire e n e l compresor ...
- Page 112 Machine Translated by Google Paso 6 : A tornille y f ije e l d isco d e a ireación e n l a b ase d e a cero i noxidable. Placa d ifusora d e E PDM d e 8 "...
- Page 113 Machine Translated by Google 2.4 O peración Verifique l os s iguientes e lementos a l m enos u na v ez a l d ía d urante l a o peración. 1) ¿ Hay a lgún s onido a normal?; 2 ) S i la ...
- Page 114 Machine Translated by Google entorno c limático. P or e jemplo, e n l a t emporada d e l luvias, s i e l e stanque t iene o xígeno En c aso d e d eficiencia, e l s istema d e a ireación s e e ncenderá d urante 2 h oras y s e a pagará d urante m edia h ora. hora ...
-
Page 115: Mantenimiento
Machine Translated by Google 3) P resione " SET U P(PROG)" p ara c onfigurar e l t emporizador p ara l a h ora " OFF" y e l d ía p ara " 1OFF". 4) P resione “ HORA”, “ MIN” y “ SEMANA” p ara p rogramar e l d ía y l a h ora c orrectos. 5) ... - Page 116 Machine Translated by Google S iempre d esenchufe e l s istema y s olicite s ervicio a u n e lectricista c alificado c uando e l c able está d añado o d esgastado, c ompresor, c ontrol d e p otencia, v entilador d el c ompresor u o tro c omponente e léctrico. Los ...
- Page 117 Machine Translated by Google 1.No h ay f uente d e a limentación 1.Compruebe e l e nchufe y 2.El f usible e stá f undido interruptor 2 .Reemplace e l f usible El m otor n o g ira 3.El ...
- Page 118 Machine Translated by Google 1.La v álvula d e d renaje e stá a bierta. 1. A priete l a v álvula d e d renaje. 2. B loqueo d el f iltro d e a ire p or f río 2.Limpie ...
- Page 119 Machine Translated by Google...
- Page 120 Machine Translated by Google Soporte t écnico y c ertificado d e g arantía electrónica w ww.vevor.com/support...
- Page 121 Machine Translated by Google Supporto tecnico e certificato di garanzia elettronica www.vevor.com/support SISTEMA DI AERAZIONE PER STAGNI SOTTERRANEI MANUALE D'USO Continuiamo a impegnarci per fornirvi strumenti a prezzi competitivi. "Risparmia la metà", "Metà prezzo" o qualsiasi altra espressione simile da noi utilizzata rappresenta...
- Page 122 Machine Translated by Google...
- Page 123 Questa è l'istruzione originale, si prega di leggere attentamente tutte le istruzioni del manuale prima di utilizzare. VEVOR si riserva una chiara interpretazione del nostro manuale utente. L'aspetto del prodotto sarà soggetto al prodotto ricevuto. Vi preghiamo di perdonarci se non vi informeremo di nuovo se ci sono aggiornamenti tecnologici o software sul nostro prodotto.
- Page 124 Machine Translated by Google Grazie mille per aver scelto questo prodotto. Si prega di leggere tutte le istruzioni prima di utilizzarlo. Le informazioni ti aiuteranno a ottenere i migliori risultati possibili. Attenzione: per ridurre il rischio di lesioni, l'utente deve leggere attentamente il manuale di istruzioni.
- Page 125 Machine Translated by Google ÿ Non esporre il compressore d'aria alla pioggia o all'umidità, l'acqua penetra nell'aria il compressore aumenterà il rischio di scosse elettriche ÿ Non abusare del cavo di alimentazione, tenere il cavo di alimentazione lontano da calore, olio, oggetti taglienti bordi o parti mobili.
- Page 126 ATTENZIONE: il diffusore non può essere gettato direttamente nello stagno o nell'acqua per evitare che il tubo cada o che il diffusore si ribalti. Si consiglia per immergerlo delicatamente nell'acqua. PARAMETRO PRODOTTO 2.1 Specifiche del prodotto Modello Modello OLF400D-B Modello OLF400D-C Modello OLF400D-A SPECIFICHE 220~240V/50Hz Tensione (V/Hz)
- Page 127 Machine Translated by Google Modello Modello OLF400D-A Modello OLF400D-B Modello OLF400D-C Parti Compressore d'aria × Compagnia aerea × Diffusore del flusso d'aria Fascetta stringitubo Filtro dell'aria Timer Valvola di sicurezza Valvola di ritegno Elettrovalvola Distributore di giunti Valvola di flusso dell'aria ×...
- Page 128 Machine Translated by Google 2.2 Componenti del sistema 1)Compressore d'aria senza olio 1 Compressore a pistone oscillante a servizio continuo, silenzioso, senza olio e ad alta efficienza. 2 I supporti in gomma del compressore riducono il rumore e le vibrazioni, garantendo un funzionamento silenzioso. Cavo di alimentazione con spina 3x1,0mm2x1,5m.
- Page 129 Machine Translated by Google 10 bastoncini diffusori a membrana antiaderenti da 8" in EPDM forniscono la sinergia delle pietre d'aria pur non richiedendo praticamente alcuna manutenzione. 11 Connettore in acciaio inossidabile per la linea aerea e la piastra del diffusore. 12 L13.6xW11.6*base quadrata in acciaio inox per la stabilità...
- Page 130 Machine Translated by Google Fase 2: Avvitare il filtro dell'aria nel compressore proprio vicino alla valvola di sicurezza (se necessario, utilizzare del nastro in teflon). Fase 3: Utilizzare la pala per scavare una trincea dal rifugio allo stagno. La profondità minima della trincea non deve essere inferiore a 8 pollici per proteggere il tubo dell'aria.
- Page 131 Machine Translated by Google Fase 5: Collegare le due estremità del tubo dell'aria alla valvola del flusso d'aria sul compressore d'aria e al connettore pagoda sul disco di aerazione, quindi bloccarli e fissarli con una fascetta stringitubo.
- Page 132 Machine Translated by Google Fase 6: Avvitare e fissare il disco di aerazione sulla base in acciaio inossidabile. Piastra diffusore EPDM da 8"...
- Page 133 Machine Translated by Google Funzionamento Durante il funzionamento, controllare almeno una volta al giorno i seguenti elementi: 1) Si sente qualche rumore anomalo? 2) La pompa è eccessivamente calda? 3) Lo scarico è normale? 4) Il silenziatore è intasato? La macchina può funzionare dopo l'accensione. Il sistema di aerazione è dotato di timer che consentono agli utenti di impostare la modalità...
- Page 134 Machine Translated by Google ambiente meteorologico. Ad esempio, nella stagione delle piogge, se lo stagno è ossigeno carente il sistema di aerazione verrà acceso per 2 ore e spento per mezz'ora ora per aiutare l'ossigenazione dello stagno. Il tempo di impostazione minimo è di 1 sec/min. È possibile impostare 8/20 programmi di accensione e spegnimento ogni giorno La modalità...
-
Page 135: Manutenzione
Machine Translated by Google 3) Premere "SET UP(PROG)" per impostare il timer per l'ora di "OFF" e il giorno per "1OFF". 4) Premere "HOUR" "MIN" e "WEEK" per programmare il giorno e l'ora corretti. 5) Se necessario, premere "SET UP(PROG)" per avanzare al secondo on/offset. Interruttore ON/OFF per accendere o spegnere la modalità: 1) Premere "ON/AUTO/OFF";... - Page 136 Machine Translated by Google ÿ Scollegare sempre il sistema e rivolgersi a un elettricista qualificato per la manutenzione quando il cavo è danneggiato o sfilacciato, il compressore, il controllo di potenza, la ventola del compressore o altri componenti elettrici i componenti producono rumori o odori insoliti. ATTENZIONE: I compressori sono dotati di un interruttore termico di sovraccarico.
- Page 137 Machine Translated by Google 1.Nessuna alimentazione 1. Controllare la spina e 2. Il fusibile è bruciato interruttore 2.Sostituire il fusibile Il motore non gira 3. Il protettore di sovraccarico è 3.Il motore si riavvia e non c'è suono in uno stato di protezione dopo il raffreddamento 4 Lo statore del motore 4.Sostituire lo statore...
- Page 138 Machine Translated by Google 1. La valvola di scarico è aperta 1. Serrare la valvola di scarico 2. Blocco a freddo del filtro dell'aria 2. Pulire o sostituire il filtro 3. La conduttura perde L'alimentazione dell'aria elemento il compressore è lento o 4.La piastra della valvola ha una cattiva non può...
- Page 139 Machine Translated by Google...
- Page 140 Machine Translated by Google Supporto tecnico e certificato di garanzia elettronica www.vevor.com/support...
-
Page 141: Instrukcja Obsługi
Machine Translated by Google Wsparcie techniczne i certyfikat gwarancji elektronicznej www.vevor.com/support SYSTEM NAPOWIETRZANIA STAWU PODPOWIERZCHNIOWEGO INSTRUKCJA OBSŁUGI Nadal staramy się oferować Państwu narzędzia w konkurencyjnych cenach. „Oszczędź połowę”, „Połowa ceny” lub inne podobne wyrażenia używane przez nas stanowią jedynie szacunkowe oszczędności, jakie możesz uzyskać, kupując u nas określone narzędzia w porównaniu z głównymi markami i niekoniecznie oznaczają... - Page 142 Machine Translated by Google...
- Page 143 To jest oryginalna instrukcja, przed użyciem należy uważnie przeczytać wszystkie instrukcje. VEVOR zastrzega sobie jasną interpretację naszej instrukcji obsługi. Wygląd produktu będzie zależał od produktu, który otrzymałeś. Prosimy o wybaczenie, że nie poinformujemy Cię ponownie, jeśli w naszym produkcie pojawią się jakiekolwiek aktualizacje...
- Page 144 Machine Translated by Google Dziękujemy bardzo za wybranie tego produktu. Przeczytaj proszę wszystkie Przed użyciem należy zapoznać się z instrukcją. Informacje te pomogą w osiągnięciu najlepszych możliwych rezultatów. Ostrzeżenie: Aby zminimalizować ryzyko obrażeń, użytkownik powinien uważnie przeczytać instrukcję obsługi. Ten produkt podlega postanowieniom Dyrektywy Europejskiej 2012/19/WE.
- Page 145 Machine Translated by Google Nie wystawiaj sprężarki powietrza na działanie deszczu lub wilgoci, gdyż może to spowodować przedostanie się wody do powietrza. kompresor zwiększa ryzyko porażenia prądem Nie nadużywaj przewodu zasilającego, trzymaj przewód zasilający z dala od ciepła, oleju i ostrych przedmiotów. krawędzie lub ruchome części.
- Page 146 OSTRZEŻENIE: Dyfuzora nie wolno wrzucać bezpośrednio do stawu lub wody. zapobiega spadaniu węża lub przewróceniu się dyfuzora. Zaleca się delikatnie włożyć do wody. PARAMETR PRODUKTU 2.1 Specyfikacja produktu Model OLF400D-A OLF400D-B OLF400D-C SPECYFIKACJA 220~240V/50Hz Napięcie (V/Hz) 550 W Moc znamionowa Maksymalny przepływ...
- Page 147 Machine Translated by Google Model OLF400D-A OLF400D-B OLF400D-C Strony Kompresor powietrza × Linia lotnicza × Dyfuzor przepływu powietrza Zacisk węża Filtr powietrza Regulator czasowy Zawór bezpieczeństwa Zawór zwrotny Zawór elektromagnetyczny Dystrybutor stawów Zawór przepływu powietrza × Podstawa ze stali nierdzewnej...
- Page 148 Machine Translated by Google 2.2 Komponenty systemu 1) Kompresor powietrza bezolejowy 1 Wysokowydajna, cicha, bezolejowa sprężarka tłokowa do pracy ciągłej. 2 gumowe mocowania sprężarki redukują hałas i wibracje, zapewniając cichą pracę. 3. Przewód zasilający z wtyczką 3x1,0mm2x1,5m. 4 Zawór elektromagnetyczny może lepiej chronić silnik przed uruchomieniem pod obciążeniem. 5 Pojedynczy/podwójny zawór przepływu powietrza dyfuzora 6 Zawór zwrotny pozwala uniknąć...
- Page 149 Machine Translated by Google 10 nieprzywierających membranowych patyczków dyfuzyjnych EPDM o średnicy 8 cali zapewnia synergię kamieni napowietrzających przy czym urządzenie jest praktycznie bezobsługowe. 11 Złącze ze stali nierdzewnej do przewodu powietrznego i płyty dyfuzora. 12 Dł. 13,6 x szer. 11,6*kwadratowa podstawa ze stali nierdzewnej zapewniająca stabilność dyfuzora 3) Linie lotnicze Linia lotnicza bez ołowiu o średnicy 3/8"100 stóp wykonana jest z trwałe materiały PVC.
- Page 150 Machine Translated by Google Krok 2: Przykręć filtr powietrza do sprężarki tuż obok zaworu bezpieczeństwa. (W razie potrzeby użyj taśmy teflonowej.) Krok 3: Za pomocą łopaty wykop rów od schronienia do stawu. Minimalna głębokość wykopu nie powinna być mniejsza niż 8 cali, aby chronić...
- Page 151 Machine Translated by Google Krok 5: Podłącz dwa końce przewodu powietrza do zaworu przepływu powietrza w sprężarce powietrza i złącza pagoda na tarczy napowietrzającej, a następnie zablokuj je i zabezpiecz zaciskiem węża.
- Page 152 Machine Translated by Google Krok 6: Przykręć i zamocuj tarczę napowietrzającą do podstawy ze stali nierdzewnej. Płyta dyfuzyjna EPDM 8"...
- Page 153 Machine Translated by Google 2.4 Działanie Podczas pracy urządzenia należy przynajmniej raz dziennie sprawdzać następujące elementy. 1) Czy słychać jakieś nietypowe dźwięki; 2) Czy pompa nie jest nadmiernie gorąca; 3) Czy wydech działa prawidłowo; 4) Czy tłumik nie jest zatkany? Maszyna może pracować...
- Page 154 Machine Translated by Google warunki pogodowe. Na przykład, w porze deszczowej, jeśli staw jest natleniony w przypadku awarii system napowietrzania zostanie włączony na 2 godziny i wyłączony na pół godziny godzinę, aby pomóc natlenić staw. Minimalny czas ustawienia wynosi 1 sek./min. Można ustawić 8/20 programów włączania i wyłączania każdego dnia. Tryb działania dzieli się...
- Page 155 Machine Translated by Google 3) Naciśnij przycisk „SET UP(PROG), aby ustawić timer na czas „OFF” i dzień dla „1OFF”. 4) Naciśnij „HOUR”, „MIN” i „WEEK”, aby zaprogramować prawidłowy dzień i godzinę. 5) W razie potrzeby naciśnij przycisk „SET UP(PROG), aby przesunąć o sekundę pozycję on/offset. Przełącznik ON/OFF do włączania i wyłączania trybu: 1) Naciśnij przycisk „ON/AUTO/OFF”, na wyświetlaczu pojawi się...
- Page 156 Machine Translated by Google Zawsze odłączaj system od zasilania i zleć naprawę wykwalifikowanemu elektrykowi, gdy przewód jest uszkodzony. jest uszkodzony lub postrzępiony, sprężarka, sterowanie mocą, wentylator sprężarki lub inny element elektryczny komponenty wydają nietypowe dźwięki lub zapachy. OSTRZEŻENIE: Sprężarki wyposażone są w wyłącznik termiczny. temperatura stanie się...
- Page 157 Machine Translated by Google 1.Brak zasilania 1.Sprawdź wtyczkę i 2. Bezpiecznik jest przepalony przełącznik 2.Wymień bezpiecznik Silnik się nie obraca 3. Zabezpieczenie przeciwprzeciążeniowe jest 3. Silnik uruchomi się ponownie i nie ma dźwięku w stanie ochronnym po schłodzeniu 4 Stojan silnika 4.
- Page 158 Machine Translated by Google 1. Zawór spustowy jest otwarty 1. Dokręć zawór spustowy 2.Zimne zablokowanie filtra powietrza 2. Wyczyść lub wymień filtr 3. Rurociąg przecieka Dopływ powietrza do powietrza element kompresor jest wolny lub 4. Płyta zaworowa ma słabą nie można dotrzeć 3.Sprawdź...
- Page 159 Machine Translated by Google...
- Page 160 Machine Translated by Google Wsparcie techniczne i certyfikat gwarancji elektronicznej www.vevor.com/support...
Need help?
Do you have a question about the OLF400D and is the answer not in the manual?
Questions and answers