Advertisement
Quick Links
Technical Support and E-Warranty Certificate www.vevor.com/support
POOL COVER REEL
USER MANUAL
We continue to be committed to provide you tools with competitive price.
"Save Half", "Half Price" or any other similar expressions used by us only represents an
estimate of savings you might benefit from buying certain tools with us compared to the major
top brands and does not necessarily mean to cover all categories of tools offered by us. You
are kindly reminded to verify carefully when you are placing an order with us if you are
actually saving half in comparison with the top major brands.
Advertisement

Subscribe to Our Youtube Channel
Related Manuals for VEVOR PCR04


Summary of Contents for VEVOR PCR04
- Page 1 Technical Support and E-Warranty Certificate www.vevor.com/support POOL COVER REEL USER MANUAL We continue to be committed to provide you tools with competitive price. "Save Half", "Half Price" or any other similar expressions used by us only represents an estimate of savings you might benefit from buying certain tools with us compared to the major top brands and does not necessarily mean to cover all categories of tools offered by us.
- Page 3 This is the original instruction, please read all manual instructions carefully before operating. VEVOR reserves a clear interpretation of our user manual. The appearance of the product shall be subject to the product you received. Please forgive us that we won't inform you again if...
-
Page 4: Safety Instructions
SAFETY INSTRUCTIONS WARNING: Read this instructions carefully before using this product. Failure to do so can result in serious injury. Assembly precautions 1. Assemble only should be according to these instructions. Improper assembly can result in hazards. 2. Wear ANSI-approved safety goggles and heavy-duty work gloves during assembly. -
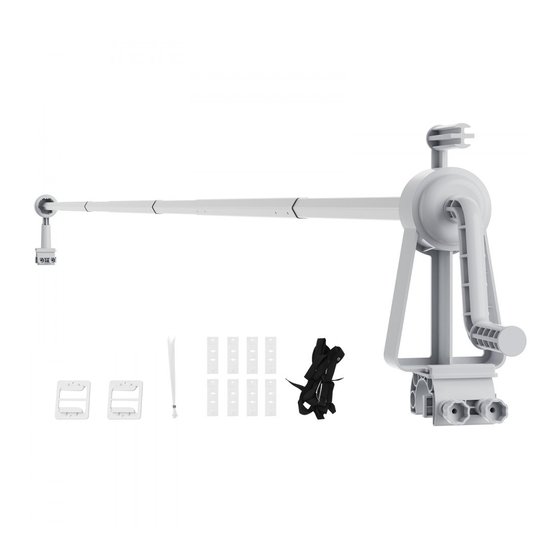
Page 5: Parts List
PARTS LIST Reel PCR04-F Reel Handle Lever Strap with female Velcro Male Velcro sticker Buckle Cover Clip Base plate Clamp Self tapping screw Self tapping screw Mertic screw with nut Metric screw Large octagonal tube Small octagonal tube Small octagonal adapter... - Page 6 1. According to the width of the pool, select the appropriate serial number of aluminum tubes for assembly, for details see the following figure. Attention: Minimum overlapping of 20cm for each tube.(PCR04-P) 2. The initial curing time of the threadlocker is 20 minutes, and the full curing time is 24 hours.Please wait until the thread glue is completely cured before using the...
-
Page 7: Assembly Step
ASSEMBLY STEP STEP1 Insert (#4) into (#1),Insert (#3) into (#2) STEP2 Insert (#11) into (#1) and tighten. Insert (#11) into (#2) and tighten. - Page 8 STEP3 Attach (#16)/(#17) onto (#1 )and (#2) and tighten with (#12) STEP4 Insert the smaller tubes into the larger tube. Ensure that the larger tube is centered. so that on both sides X is equal. The over lapping X should be a minimum of 20 cm.
- Page 9 STEP5 Insert (#14) into per-drilled holes of(#15) and tighten. (for PCR04-Paminimum overlapping of 20 cm is required) STEP6 For above ground pools with ledge Slide (#9) onto (#2) and (#1), position onto the ledge and tighten. For wood or plastic ledge, use self taping screw (#11) .
- Page 10 STEP7 For above ground pools with frame, Slide (#10) onto (#1) and (#2),position onto the frame and tighten the screws.
- Page 11 STEP8 Detach the eight male Velcro stickers (#6) from (#5) and peel off the protective layers. Glue them onto the tubes in a straight line at equal distance over the length X. After the strap is installed(13#), wrap it around the aluminum tube to prevent loosing.
- Page 12 STEP9 Assemble (#5) and (#7) and (#8) as shown in the picture. STEP10 For rectangular-shaped above-ground pools,open the cover over the pool and set into position. Attach (#8) on the cover, keeping the same regular intervals as the male Velcro stickers on the tubes. Ensure that the length of the straps allows the cover to lay flat on the pool, to prevent wind from getting under the cover.
- Page 13 STEP11 For round or oval-shaped above-ground pools Open the cover over the pool and pinch it as shown in the picture. Attach ( #8 )on the cover keeping the same regular intervals as the male Velcro stickers on the tubes. Ensure that the length of the straps allows the cover to lay flat on the pool, to prevent wind from getting under the cover.
-
Page 14: Product Parameter
PRODUCT PARAMETER Model PCR04 Package size(mm) 1065*185*200 Size(mm) 6510*170*360 N.W(kg) G.W(kg) 6.67 Colour Black and Silver Specification 20FT,For underground swimming pool Aluminum tube assembly 2.62~6.02 length range(m) Bearing(kg) Height of the axis(mm) Address: Baoshanqu Shuangchenglu 803long 11hao 1602A-1609shi Shanghai Imported to AUS: SIHAO PTY LTD. 1 ROKEVA STREETEASTWOOD NSW 2122 Australia Imported to USA: Sanven Technology Ltd. - Page 16 Technical Support and E-Warranty Certificate www.vevor.com/support...
Need help?
Do you have a question about the PCR04 and is the answer not in the manual?
Questions and answers