Table of Contents
Advertisement
Available languages
Available languages
Quick Links
Technical Support and E-Warranty Certificate www.vevor.com/support
RETRACTABLE RV AWNING
MODEL: B2E
We continue to be committed to provide you tools with competitive price.
"Save Half", "Half Price" or any other similar expressions used by us only
represents an estimate of savings you might benefit from buying certain tools
with us compared to the major top brands and does not necessarily mean to cover
all categories of tools offered by us. You are kindly reminded to verify carefully
when you are placing an order with us if you are actually Saving
Half in comparison with the top major brands.
Advertisement
Table of Contents

Related Manuals for VEVOR B2E


Summary of Contents for VEVOR B2E
- Page 1 Technical Support and E-Warranty Certificate www.vevor.com/support RETRACTABLE RV AWNING MODEL: B2E We continue to be committed to provide you tools with competitive price. "Save Half", "Half Price" or any other similar expressions used by us only represents an estimate of savings you might benefit from buying certain tools with us compared to the major top brands and does not necessarily mean to cover all categories of tools offered by us.
- Page 2 This is the original instruction, please read all manual instructions carefully before operating. VEVOR reserves a clear interpretation of our user manual. The appearance of the product shall be subject to the product you received. Please forgive us that we won't inform you again if there are any technology or software updates on our product.
-
Page 3: Important Safeguards
IMPORTANT SAFEGUARDS WARNING: Read and understand this entire manual before operating or servicing this product. Failure to follow these warnings and instructions can cause personal injury or damage to valuable property. It is best to complete the process of assembling the awning with an ... -
Page 4: Correct Disposal
CORRECT DISPOSAL This product is subject to the provision of European Directive 2012/19/EU. The symbol showing a wheelie bin crossed through indicates that the product requires separate refuse collection in the European Union. This applies to the product and all accessories marked with this symbol. Products marked as such may not be discarded with normal domestic waste, but must be taken to a collection point for recycling electrical and electronic devices. -
Page 5: Technical Parameter
Increase the distance between the product and receiver. Connect the product to an outlet on a circuit different from that to which the receiver is connected. Consult the dealer or an experienced radio/TV technician for assistance. Thank you very much for choosing this RV Awning. Please read all the instructions before using it. - Page 6 Roller Assembly (R) Extension Roller Connect pipe Motor side cover Non-motor side cover Fabric Fabric ploy-cord Spare crank handle Door Support - 5 -...
- Page 7 Center Cradle base Center Cradle support Platen Adjustment lever Screw A Screw B Screw C ASSEMBLY INSTRUCTIONS Introduction To better use the awning, please read the user manual carefully before use. Please keep the user manual properly for future reference. ※Attention: Please carefully read the user manual before installation and install and use it according to the required specifications, Otherwise, it may cause accidental injury or damage to the sunshade.
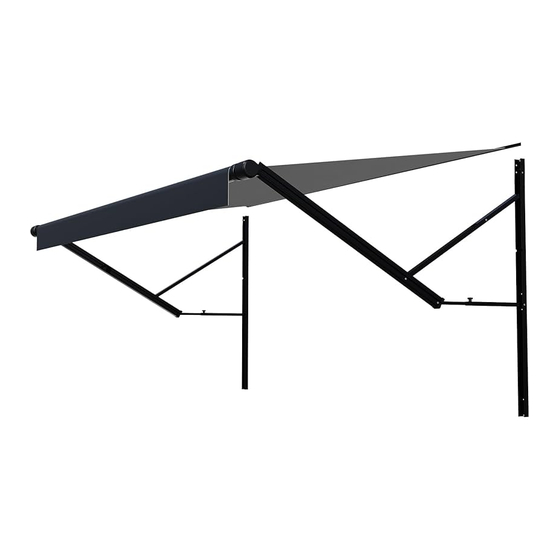
- Page 8 B2E awning structure diagram : Figure D1 Figure D1 The B2E awning is installed on the side of the vehicle and secured with air pressure folding arms (Figure D2). The instructions and installation methods are as follows: 1. The awning must be installed by 2 or more people.
- Page 9 3. Installation method: 3.1 Take out the fabric rail and fix it on the outside of the vehicle body with screws B (Figure D4). The fabric rail should be installed horizontally, and if not, it should be leveled (the cushion block should be provided) (Figure D5). If the vehicle body is pre-install-ed with a fabric insertion slot, this step can be omitted and the fabric rail not need to be used.
- Page 10 Figure D6 Figure D7 3.4 Pull out the connecting pipes at both ends of the middle coil to the red limit position, and assemble the left and right tube end. Fix the connection with Screw A. (Figure D8, Figure D9) Figure D8 Figure D9 3.5 Open the fabric, insert the fabric into the slot of the roll tube, then insert...
- Page 11 the other end of the fabric into the vehicle's fabric strip (Figure D13), and finally insert the roller assembly into the steel shaft at the top of the motor folding arm. Fix the screws to connect and fix the roller end cover to the steel shaft (Figure D14).
- Page 12 3.7.2 Remove the decorative cover on the top of the non-motor side folding arm, insert the non-motor side scroll and bracket into the top of the folding arm, fix it with Screws(all screws on the covers), and install the decorative cover.
- Page 13 ※Attention: There is a winding spring inside the non-motor side scroll, which may have been preset with an upward force. Please make sure to fully secure the sunshade roll before removing the safety pin, otherwise it may cause accidental injury! If the winding spring on the non-motor side is not tightened or released, you can grip the bracket and rotate it 10 times in the direction of the arrow to the preset torque.
- Page 14 4. Motor Wiring 4.1 Firstly, install the wire control switch in a suitable position inside the vehicle (Figure D20). After the canopy is installed, introduce the motor wire into the vehicle and connect it according to Figure D21. It is recommended to use a 2-core power cord with RVV2 * 1.5mm or more and a wire length of no more than 3m for the motor power cord (the wiring part inside the car needs to be prepared).
- Page 15 6. Manual power-off device 6.1 The B2E sunshade supports manual power-off. In case of power outage or malfunction, the manual crank can be inserted into the manual hole on the side cover of the scroll motor, and the crank can be rotated to retract or release the sunshade.
- Page 16 Figure D24 6.3 Insert fixing screw B (Figure D25) on both sides of the fabric insert to prevent the sunshade fabric from moving. Pay attention to tightening the sunshade fabric moderately when inserting the fixing screw to ensure flatness. 6.4 After the installation of the sunshade is completed, check the appearance and ensure that the screws in the above parts are securely installed.
- Page 17 0.4inch higher than the door Figure D26 Figure D27 8. Center cradle install Find the correct position fro the center cradle, put the center cradle under the roller, mark the position with marker. Fix the center cradle with Screw C, then inset the bolt to the center cradle.
- Page 18 Figure D30 SCAN THE OR CODE TO VIEW THE VIDEO - 17 -...
- Page 19 Instruction for Use 1. Press and hold the wire control switch to electrically open or close the sunshade, and release the switch to stop. When the sunshade is fully opened or closed, the motor will automatically stop. (Figure E1) 2. There is a manual joystick hole on the side end cover of the sunshade scroll motor.
-
Page 20: Troubleshooting
before retrieving it. Otherwise, there is a possibility of damaging the tarpaulin. ※Attention: Awning fabric can only be cleaned with weakly alkaline detergents. If damaged tarpaulin is found, please contact the seller for handling. TROUBLE SHOOTING Every awning undergoes strict debugging and testing before leaving the factory to achieve the best condition. -
Page 21: Product Structure Diagram
PRODUCT STRUCTURE DIAGRAM some products may have adjustments and will not be listed (Figure G1) B2E Retractable RV Awning - 20 -... - Page 22 PARAMETER Awning Awning color Size (mm) (mm) (mm) (mm) (mm) (support) 10’ 3066 2794 2438 3207 1680 Black 14’ 4285 4013 2438 4426 1680 Black 15’ 4590 4318 2438 4731 1680 Black 16’ 4895 4623 2438 5036 1680 Black 18’ 5504 5232 2438...
- Page 23 Manufacturer: Shanghaimuxinmuyeyouxiangongsi Address: Shuangchenglu 803nong11hao1602A-1609shi, baoshanqu, shanghai 200000 CN. Imported to AUS: SIHAO PTY LTD. 1 ROKEVA STREETEASTWOOD NSW 2122 Australia Imported to USA: Sanven Technology Ltd. Suite 250, 9166 Anaheim Place, Rancho Cucamonga, CA 91730 YH CONSULTING LIMITED. C/O YH Consulting Limited Office 147, Centurion House, London Road, Staines-upon-Thames, Surrey, TW18 4AX E-CrossStu GmbH...
- Page 24 Technical Support and E-Warranty Certificate www.vevor.com/support...
- Page 25 Machine Translated by Google Assistance t echnique e t c ertificat d e g arantie é lectronique w ww.vevor.com/support AUVENT R ÉTRACTABLE P OUR V R MODÈLE : B 2E Nous c ontinuons à n ous e ngager à v ous f ournir d es o utils à d es p rix c ompétitifs.
- Page 26 Assistance t echnique e t c ertificat d e g arantie é lectronique www.vevor.com/support Il s 'agit d e l a n otice d 'utilisation d 'origine. V euillez l ire a ttentivement t outes l es ...
- Page 27 Machine Translated by Google MESURES D E S ÉCURITÉ I MPORTANTES AVERTISSEMENT : L isez e t c omprenez l 'intégralité d e c e m anuel a vant d'utiliser o u d 'entretenir c e p roduit. L e n onrespect d e c es les ...
- Page 28 Machine Translated by Google ÉLIMINATION C ORRECTE Ce p roduit e st s oumis a ux d ispositions d e l a d irective e uropéenne 2 012/19/UE. Le s ymbole r eprésentant u ne p oubelle à r oulettes b arrée i ndique q ue Le ...
- Page 29 Machine Translated by Google A ugmentez l a d istance e ntre l e p roduit e t l e r écepteur. C onnectez l e produit à u ne p rise s ur u n c ircuit d ifférent d e c elui a uquel le ...
- Page 30 Machine Translated by Google Ensemble d e r ouleaux ( R) Rouleau d 'extension Raccorder l e t uyau Couvercle c ôté m oteur Côté n on m oteur couverture Tissu Cordon e n t issu Manivelle d e r echange Support ...
- Page 31 Machine Translated by Google Base d u b erceau c entral Berceau c entral soutien Platine Levier d e r églage Vis A Vis B Vis C INSTRUCTIONS D E M ONTAGE Introduction Pour u ne m eilleure u tilisation d u s tore, v euillez l ire a ttentivement l e m anuel d 'utilisation a vant u tilisation. Veuillez ...
- Page 32 Machine Translated by Google Schéma d e l a s tructure d u s tore B 2E : F igure D 1 Figure D 1 Le s tore B 2E e st i nstallé s ur l e c ôté d u v éhicule e t f ixé a vec d e l 'air bras ...
- Page 33 Machine Translated by Google 3. M éthode d 'installation : 3.1 R etirez l e r ail e n t issu e t f ixezle à l 'extérieur d e l a c arrosserie d u v éhicule a vec l es v is B ...
- Page 34 Machine Translated by Google Figure D 6 F igure D 7 3.4 R etirez l es t uyaux d e r accordement a ux d eux e xtrémités d e l a b obine c entrale j usqu'au r ouge position ...
- Page 35 Machine Translated by Google l'autre e xtrémité d u t issu d ans l a b ande d e t issu d u v éhicule ( Figure D 13), e t insérez e nfin l 'ensemble d u r ouleau d ans l 'arbre e n a cier e n h aut d u m oteur bras ...
- Page 36 Machine Translated by Google 3.7.2 R etirez l e c ouvercle d écoratif s ur l e d essus d u b ras p liant c ôté n on m oteur, i nsérez l a volute l atérale n on m oteur e t l e s upport d ans l e h aut d u b ras p liant, f ixezle a vec d es v is (toutes ...
- Page 37 Machine Translated by Google Attention : i l y a u n r essort d 'enroulement à l 'intérieur d u r ouleau l atéral n on motorisé, q ui p eut a voir é té p réréglé a vec u ne f orce v ers l e h aut. V euillez v ous assurer ...
- Page 38 Machine Translated by Google 4. C âblage d u m oteur 4.1 T out d 'abord, i nstallez l 'interrupteur d e c ommande d u f il d ans u ne p osition a ppropriée à l 'intérieur d u v éhicule ( Figure D 20). U ne f ois l e c apot i nstallé, i ntroduisez l e f il d u m oteur dans ...
- Page 39 Machine Translated by Google Figure D 22 Figure D 23 Attention : l e r églage d e l a c ourse, e n p articulier d ans l e s ens d e l a r écupération, d oit ê tre légèrement ...
- Page 40 Machine Translated by Google Figure D 24 6.3 I nsérez l a v is d e f ixation B ( Figure D 25) d es d eux c ôtés d e l 'insert e n t issu p our empêcher ...
- Page 41 Machine Translated by Google 0,4 p ouce p lus h aut q ue l a p orte Figure D 26 Figure D 27 8. I nstallation d u b erceau c entral Trouvez l a p osition c orrecte d u b erceau c entral, p lacez l e b erceau c entral s ous l e rouleau, ...
- Page 42 Machine Translated by Google Figure D 30 SCANNEZ L E C ODE O R P OUR V OIR L A V IDÉO 1 7 ...
- Page 43 Machine Translated by Google Mode d 'emploi 1. A ppuyez s ur l 'interrupteur d e c ommande d u f il e t m aintenezle e nfoncé p our o uvrir o u f ermer électriquement l e p aresoleil, p uis r elâchez l 'interrupteur p our a rrêter. L orsque l e p aresoleil est ...
-
Page 44: Dépannage
Machine Translated by Google avant d e l e r écupérer. S inon, i l y a u n r isque d 'endommager l e bâche. Attention : l e t issu d e l 'auvent n e p eut ê tre n ettoyé q u'avec u n d étergent f aiblement a lcalin détergents. ... - Page 45 Machine Translated by Google DIAGRAMME D E S TRUCTURE D U P RODUIT certains p roduits p euvent a voir d es a justements e t n e s eront p as r épertoriés ( Figure G 1) Auvent r étractable p our c ampingcar B 2E ...
- Page 46 Machine Translated by Google PARAMÈTRE Store Couleur d e l 'auvent Taille (mm) (mm) (mm) (mm) (mm) (soutien) 3066 2 794 2 438 3207 1680 Noir 4285 4 013 2 438 4 426 1680 Noir 4590 4 318 2 438 4 731 1680 Noir 4895 ...
- Page 47 Machine Translated by Google Fabricant : S hanghaimuxinmuyeyouxiangongsi Adresse : Shuangchenglu 8 03nong11hao1602A1609shi, b aoshanqu, s hanghai 200000 C N. Importé e n A ustralie : S IHAO P TY L TD. 1 R OKEVA S TREETEASTWOOD NSW 2 122 A ustralie Importé a ux É tatsUnis : S anven T echnology L td. S uite 2 50, 9 166 A naheim Lieu, ...
- Page 48 Machine Translated by Google Assistance t echnique e t c ertificat d e g arantie électronique w ww.vevor.com/support...
- Page 49 Machine Translated by Google Technischer Support und E-Garantie-Zertifikat www.vevor.com/support EINZIEHBARE MARKISE FÜR RV MODELL: B2E Wir sind weiterhin bestrebt, Ihnen Werkzeuge zu wettbewerbsfähigen Preisen anzubieten. "Sparen Sie die Hälfte", "Halber Preis" oder andere ähnliche Ausdrücke, die wir nur verwenden stellt eine Schätzung der Einsparungen dar, die Sie durch den Kauf bestimmter Werkzeuge erzielen können mit uns im Vergleich zu den großen Top-Marken und bedeutet nicht unbedingt, zu decken...
- Page 50 Dies ist die Originalanleitung. Bitte lesen Sie alle Anweisungen sorgfältig durch, bevor Sie das Gerät in Betrieb nehmen. VEVOR behält sich eine klare Auslegung unserer Bedienungsanleitung vor. Das Erscheinungsbild des Produkts richtet sich nach dem Produkt, das Sie erhalten haben. Bitte verzeihen Sie uns, dass wir Sie nicht erneut informieren, wenn es Technologie- oder Software-Updates für unser Produkt gibt.
-
Page 51: Wichtige Sicherheitshinweise
Machine Translated by Google WICHTIGE SICHERHEITSHINWEISE WARNUNG: Lesen Sie das gesamte Handbuch sorgfältig durch, bevor Sie Betrieb oder Wartung dieses Produkts. Die Nichtbeachtung dieser Warnungen und Anweisungen können zu Verletzungen oder Schäden führen zu wertvollem Eigentum. ÿ Am besten schließen Sie den Montagevorgang der Markise mit einem Assistent. - Page 52 Machine Translated by Google KORREKTE ENTSORGUNG Dieses Produkt unterliegt den Bestimmungen der europäischen Richtlinie 2012/19/EU. Das Symbol einer durchgestrichenen Mülltonne weist darauf hin, dass die Das Produkt muss in der Europäischen Union getrennt entsorgt werden. gilt für das Produkt und alle mit diesem Symbol gekennzeichneten Zubehörteile. Produkte, die als solche gekennzeichnet sind, dürfen nicht mit dem normalen Hausmüll entsorgt werden.
-
Page 53: Technische Parameter
Machine Translated by Google ÿ Vergrößern Sie den Abstand zwischen Produkt und Empfänger. ÿ Schließen Sie das Produkt an eine Steckdose an, die zu einem anderen Stromkreis gehört als der, an den das Produkt angeschlossen ist. der Receiver ist angeschlossen. ÿ... - Page 54 Machine Translated by Google Rolleneinheit (R) Verlängerungsrolle Rohr anschließen Motorseitige Abdeckung Nicht-Motorseite Abdeckung Stoff Stoff Ploy-Cord Ersatzkurbel Türunterstützung - 5 -...
- Page 55 Machine Translated by Google Mittelhalterungsbasis Mittelhalterung Unterstützung Walze Einstellhebel Schraube A Schraube B Schraube C MONTAGEANLEITUNG Einführung Um die Markise besser nutzen zu können, lesen Sie die Bedienungsanleitung vor der Verwendung bitte sorgfältig durch. Bitte bewahren Sie das Benutzerhandbuch für zukünftige Referenzzwecke sorgfältig auf.
- Page 56 Machine Translated by Google Aufbaudiagramm der B2E-Markise: Abbildung D1 Abbildung D1 Die B2E Markise wird seitlich am Fahrzeug montiert und mit Luft gesichert Druckfaltarme (Abbildung D2). Die Anweisungen und Installationsmethoden lauten wie folgt: 1. Die Markise muss von 2 oder mehr Personen montiert werden.
- Page 57 Machine Translated by Google 3. Installationsmethode: 3.1 Nehmen Sie die Stoffschiene heraus und befestigen Sie sie mit den Schrauben B an der Außenseite der Fahrzeugkarosserie (Abbildung D4). Die Stoffschiene sollte waagerecht installiert werden. Wenn dies nicht der Fall ist, sollte sie nivelliert werden (der Polsterblock sollte bereitgestellt werden) (Abbildung D5). Ist in der Fahrzeugkarosserie bereits ein Stoffeinführschlitz verbaut, kann dieser Arbeitsschritt entfallen und die Stoffschiene muss nicht verwendet werden.
- Page 58 Machine Translated by Google Abbildung D6 Abbildung D7 3.4 Ziehen Sie die Verbindungsrohre an beiden Enden der mittleren Spule bis zum roten Endlage und montieren Sie das linke und rechte Rohrende. Fixieren Sie die Verbindung mit Schraube A. (Abbildung D8, Abbildung D9) Abbildung D8 Abbildung D9 3.5 Öffnen Sie den Stoff, legen Sie ihn in den Schlitz des Rollenrohrs und stecken Sie ihn dann...
- Page 59 Machine Translated by Google das andere Ende des Stoffes in den Stoffstreifen des Fahrzeugs (Abbildung D13) und Setzen Sie abschließend die Rollenbaugruppe in die Stahlwelle oben am Motor ein Gelenkarm. Befestigen Sie die Schrauben, um die Rollenendabdeckung an der Stahlwelle (Abbildung D14). Abbildung D13 Abbildung D14 ÿ...
- Page 60 Machine Translated by Google 3.7.2 Entfernen Sie die dekorative Abdeckung oben am nicht motorseitigen Klapparm, setzen Sie die nicht motorseitige Spirale und Halterung oben am Klapparm ein, befestigen Sie sie mit Schrauben (alle Schrauben auf den Abdeckungen) und installieren Sie die dekorative Abdeckung.
- Page 61 Machine Translated by Google ÿAchtung: Im Inneren der nicht motorisierten Seitenrolle befindet sich eine Aufrollfeder, die möglicherweise mit einer Aufwärtskraft voreingestellt ist. Bitte achten Sie darauf, die Sonnenschirmrolle vollständig zu sichern, bevor Sie den Sicherheitsstift entfernen, da es sonst zu versehentlichen Verletzungen kommen kann! Wenn die Wickelfeder auf der Nicht-Motorseite nicht gespannt oder entspannt ist, können Sie die Halterung greifen und 10 Mal in Pfeilrichtung bis zum voreingestellten Drehmoment drehen.
- Page 62 Machine Translated by Google 4. Motorverdrahtung 4.1 Installieren Sie zunächst den Kabelsteuerschalter an einer geeigneten Stelle im Fahrzeug (Abbildung D20). Nachdem das Verdeck installiert ist, führen Sie das Motorkabel in das Fahrzeug ein und schließen Sie es gemäß Abbildung D21 an. Es wird empfohlen, für das Motorstromkabel ein 2-adriges Stromkabel mit 1,5 mm oder mehr und eine Drahtlänge RVV2 von nicht mehr als 3 m zu verwenden (der Verkabelungsteil im Fahrzeug muss vorbereitet...
- Page 63 Sonnenschutz während der Fahrt nur geschlossen zu halten. 6. Manuelle Abschaltvorrichtung 6.1 Der B2E-Sonnenschutz unterstützt die manuelle Abschaltung. Bei einem Stromausfall oder einer Störung kann die Handkurbel in das manuelle Loch an der Seitenabdeckung des Scrollmotors eingeführt und die Kurbel gedreht werden, um den Sonnenschutz einzuziehen oder freizugeben.
- Page 64 Machine Translated by Google Abbildung D24 6.3 Fixierschraube B (Bild D25) beidseitig in den Stoffeinsatz einsetzen, um ein Verschieben des Schirmstoffes zu verhindern. Achten Sie beim Einsetzen der Fixierschraube auf ein mäßiges Spannen des Schirmstoffes, um eine Planlage zu gewährleisten. 6.4 Überprüfen Sie nach Abschluss der Installation des Sonnenschutzes das Aussehen und stellen Sie sicher, dass die Schrauben in den oben genannten Teilen fest angebracht sind.
- Page 65 Machine Translated by Google 0,4 Zoll höher als die Tür Abbildung D26 Abbildung D27 8. Installation der Mittelhalterung Finden Sie die richtige Position für die Mittelhalterung, legen Sie die Mittelhalterung unter die Rolle und markieren Sie die Position mit einem Stift. Befestigen Sie die Mittelhalterung mit Schraube C und setzen Sie dann den Bolzen in die Mittelhalterung ein.
- Page 66 Machine Translated by Google Abbildung D30 SCANNEN SIE DEN ODER CODE, UM DAS VIDEO ANZUSEHEN - 17 -...
- Page 67 Machine Translated by Google Gebrauchsanweisung 1. Drücken und halten Sie den Kabelschalter, um den Sonnenschutz elektrisch zu öffnen oder zu schließen, und lassen Sie den Schalter los, um anzuhalten. Wenn der Sonnenschutz vollständig geöffnet oder geschlossen ist, stoppt der Motor automatisch. (Abbildung E1) 2.
-
Page 68: Fehlerbehebung
Machine Translated by Google bevor Sie es herausnehmen. Andernfalls besteht die Möglichkeit einer Beschädigung des Plane. ÿAchtung: Markisenstoff kann nur mit schwach alkalischen Reinigungsmitteln gereinigt werden. Reinigungsmittel. Wenn eine beschädigte Plane gefunden wird, kontaktieren Sie bitte den Verkäufer zur Handhabung. FEHLERBEHEBUNG Jede Markise wird einer strengen Prüfung und Kontrolle unterzogen, bevor sie das Werk verlässt. - Page 69 Machine Translated by Google PRODUKTSTRUKTURDIAGRAMM Bei manchen Produkten kann es zu Anpassungen kommen und sie werden deshalb nicht aufgeführt (Abbildung G1) B2E Einziehbare Wohnmobil-Markise - 20 -...
- Page 70 Machine Translated by Google PARAMETER Markise Markisenfarbe Größe (mm) (mm) (mm) (mm) (mm) (Unterstützung) 3066 2794 2438 3207 1680 Schwarz 4285 4013 2438 4426 1680 Schwarz 4590 4318 2438 4731 1680 Schwarz 4895 4623 2438 5036 1680 Schwarz 5645 1680 5504 5232 2438 Schwarz 5809 5537 2438...
- Page 71 Machine Translated by Google Hersteller: Shanghaimuxinmuyeyouxiangongsi Adresse: Shuangchenglu 803nong11hao1602A-1609shi, baoshanqu, Shanghai 200000 CN. Nach AUS importiert: SIHAO PTY LTD. 1 ROKEVA STREETEASTWOOD NSW 2122 Australien Importiert in die USA: Sanven Technology Ltd. Suite 250, 9166 Anaheim Ort, Rancho Cucamonga, CA 91730 YH CONSULTING LIMITED.
- Page 72 Machine Translated by Google Technischer Support und E-Garantie-Zertifikat www.vevor.com/support...
- Page 73 Machine Translated by Google Supporto tecnico e certificato di garanzia elettronica www.vevor.com/support TENDA DA SOLE RETRATTILE PER CAMPER MODELLO: B2E Continuiamo a impegnarci per fornirvi strumenti a prezzi competitivi. "Risparmia la metà", "Metà prezzo" o altre espressioni simili utilizzate solo da noi...
- Page 74 Questa è l'istruzione originale, si prega di leggere attentamente tutte le istruzioni del manuale prima di utilizzare. VEVOR si riserva una chiara interpretazione del nostro manuale utente. L'aspetto del prodotto sarà soggetto al prodotto ricevuto. Vi preghiamo di perdonarci se non vi informeremo di nuovo se ci sono aggiornamenti tecnologici o software sul nostro prodotto.
-
Page 75: Importanti Misure Di Sicurezza
Machine Translated by Google IMPORTANTI MISURE DI SICUREZZA ATTENZIONE: leggere e comprendere l'intero manuale prima funzionamento o la manutenzione di questo prodotto. La mancata osservanza di queste le avvertenze e le istruzioni possono causare lesioni personali o danni a beni di valore. ÿ È meglio completare il processo di montaggio della tenda da sole con un assistente. - Page 76 Machine Translated by Google SMALTIMENTO CORRETTO Questo prodotto è soggetto alle disposizioni della Direttiva Europea 2012/19/UE. Il simbolo raffigurante un bidone della spazzatura barrato indica che il prodotto richiede la raccolta differenziata dei rifiuti nell'Unione Europea. Questo si applica al prodotto e a tutti gli accessori contrassegnati con questo simbolo. I prodotti contrassegnati come tali non possono essere smaltiti con i normali rifiuti domestici.
- Page 77 Machine Translated by Google ÿ Aumentare la distanza tra il prodotto e il ricevitore. ÿ Collegare il prodotto a una presa su un circuito diverso da quello a cui è collegato. il ricevitore è connesso. ÿ Consultare il rivenditore o un tecnico radio/TV esperto per assistenza.
- Page 78 Machine Translated by Google Gruppo rulli (R) Rullo di estensione Collegare il tubo Copertura lato motore Lato non motore copertina Tessuto Corda di tessuto Manovella di ricambio Supporto porta - 5 -...
-
Page 79: Istruzioni Di Montaggio
Machine Translated by Google Base della culla centrale Culla centrale supporto Platina Leva di regolazione Vite A Vite B Vite C ISTRUZIONI DI MONTAGGIO Introduzione Per utilizzare al meglio la tenda da sole, leggere attentamente il manuale d'uso prima dell'uso. Si prega di conservare correttamente il manuale utente per riferimento futuro. - Page 80 Schema della struttura della tenda da sole B2E: Figura D1 Figura D1 La tenda da sole B2E viene installata sul lato del veicolo e fissata con aria bracci pieghevoli a pressione (Figura D2). Le istruzioni e i metodi di installazione sono i seguenti: 1.
- Page 81 Machine Translated by Google 3. Metodo di installazione: 3.1 Estrarre la guida in tessuto e fissarla all'esterno della carrozzeria del veicolo con le viti B (Figura D4). La guida in tessuto deve essere installata orizzontalmente e, in caso contrario, deve essere livellata (il blocco del cuscino deve essere fornito) (Figura D5).
- Page 82 Machine Translated by Google Figura D6 Figura D7 3.4 Estrarre i tubi di collegamento da entrambe le estremità della bobina centrale verso il rosso posizione limite e assemblare l'estremità sinistra e destra del tubo. Fissare la connessione con la vite A. (Figura D8, Figura D9) Figura D8 Figura D9 3.5 Aprire il tessuto, inserire il tessuto nella fessura del tubo avvolgitore, quindi inserire...
- Page 83 Machine Translated by Google l'altra estremità del tessuto nella striscia di tessuto del veicolo (Figura D13), e infine inserire il gruppo rulli nell'albero in acciaio nella parte superiore del motore braccio pieghevole. Fissare le viti per collegare e fissare il coperchio terminale del rullo al albero in acciaio (Figura D14).
- Page 84 Machine Translated by Google 3.7.2 Rimuovere la copertura decorativa sulla parte superiore del braccio pieghevole laterale non motore, inserire la pergamena laterale non motore e la staffa nella parte superiore del braccio pieghevole, fissarla con le viti (tutte le viti sulle coperture) e installare la copertura decorativa.
- Page 85 Machine Translated by Google ÿAttenzione: all'interno della pergamena laterale non motorizzata è presente una molla di avvolgimento, che potrebbe essere stata preimpostata con una forza verso l'alto. Assicurarsi di fissare completamente il rullo della tenda da sole prima di rimuovere il perno di sicurezza, altrimenti potrebbe causare lesioni accidentali Se la molla di avvolgimento sul lato non motore non è...
- Page 86 Machine Translated by Google 4. Cablaggio del motore 4.1 Innanzitutto, installare l'interruttore di controllo del filo in una posizione adatta all'interno del veicolo (Figura D20). Dopo aver installato la calotta, introdurre il filo del motore nel veicolo e collegarlo secondo la Figura D21. Si consiglia di utilizzare un cavo di alimentazione a 2 fili con RVV2 di non più...
- Page 87 Si consiglia di tenere il parasole appena chiuso durante il viaggio. 6. Dispositivo di spegnimento manuale 6.1 Il parasole B2E supporta lo spegnimento manuale. In caso di interruzione di corrente o malfunzionamento, la manovella manuale può essere inserita nel foro manuale sul coperchio laterale del motore di scorrimento e la manovella può...
- Page 88 Machine Translated by Google Figura D24 6.3 Inserire la vite di fissaggio B (Figura D25) su entrambi i lati dell'inserto in tessuto per evitare che il tessuto dell'ombrellone si muova. Prestare attenzione a stringere moderatamente il tessuto dell'ombrellone quando si inserisce la vite di fissaggio per garantirne la planarità. 6.4 Dopo aver completato l'installazione della tenda parasole, controllarne l'aspetto e assicurarsi che le viti nelle parti sopra indicate siano saldamente installate.
- Page 89 Machine Translated by Google 0,4 pollici più alto della porta Figura D26 Figura D27 8. Installazione della culla centrale Trova la posizione corretta per la culla centrale, metti la culla centrale sotto il rullo, segna la posizione con un pennarello. Fissa la culla centrale con la vite C, quindi inserisci il bullone nella culla centrale.
- Page 90 Machine Translated by Google Figura D30 SCANSIONA IL CODICE OR PER VISUALIZZARE IL VIDEO - 17 -...
- Page 91 Machine Translated by Google Istruzioni per l'uso 1. Premere e tenere premuto l'interruttore di controllo del filo per aprire o chiudere elettricamente la tenda parasole e rilasciare l'interruttore per fermarla. Quando la tenda parasole è completamente aperta o chiusa, il motore si fermerà automaticamente. (Figura E1) 2.
- Page 92 Machine Translated by Google prima di recuperarlo. Altrimenti, c'è la possibilità di danneggiare il telone. ÿAttenzione: il tessuto della tenda da sole può essere pulito solo con un detergente debolmente alcalin detersivi. Se si trova un telone danneggiato, contattare il venditore per la movimentazione.
- Page 93 Machine Translated by Google SCHEMA DELLA STRUTTURA DEL PRODOTTO alcuni prodotti potrebbero avere delle modifiche e non saranno elencati (Figura G1) Tendalino retrattile per camper B2E - 20 -...
- Page 94 Machine Translated by Google PARAMETRO Tenda da sole Colore della tenda da sole (mm) (mm) (mm) (mm) (mm) (supporto) Misurare 3207 1680 Nero Numero di telefono: 3066 2794 2438 Numero di telefono: 4285 4013 2438 4426 1680 Nero Numero di telefono: 4590 4318 2438 4731 1680 Nero 4895 4623 2438...
- Page 95 Machine Translated by Google Produttore: Shanghaimuxinmuyeyouxiangongsi Indirizzo: Shuangchenglu 803nong11hao1602A-1609shi, baoshanqu, shanghai 200000 CN. Importato in AUS: SIHAO PTY LTD. 1 ROKEVA STREETEASTWOOD Nuovo Galles del Sud 2122 Australia Importato negli USA: Sanven Technology Ltd. Suite 250, 9166 Anaheim Luogo, Rancho Cucamonga, CA 91730 CONSULENZA YH LIMITATA.
- Page 96 Machine Translated by Google Supporto tecnico e certificato di garanzia elettronica www.vevor.com/support...
- Page 97 Machine Translated by Google Soporte t écnico y c ertificado d e g arantía e lectrónica w ww.vevor.com/support TOLDO R ETRÁCTIL P ARA R V MODELO: B 2E Seguimos c omprometidos a b rindarle h erramientas a p recios c ompetitivos.
- Page 98 Soporte t écnico y c ertificado d e g arantía e lectrónica www.vevor.com/support Estas s on l as i nstrucciones o riginales, l ea a tentamente t odas l as instrucciones d el m anual a ntes d e u tilizar e l p roducto. V EVOR s e r eserva u na ...
- Page 99 Machine Translated by Google MEDIDAS D E S EGURIDAD I MPORTANTES ADVERTENCIA: L ea y c omprenda t odo e ste m anual a ntes d e operar o r eparar e ste p roducto. E l i ncumplimiento d e e stas Las ...
- Page 100 Machine Translated by Google ELIMINACIÓN C ORRECTA Este p roducto e stá s ujeto a l as d isposiciones d e l a D irectiva E uropea 2 012/19/UE. El s ímbolo q ue m uestra u n c ontenedor d e b asura t achado i ndica q ue e l Este ...
- Page 101 Machine Translated by Google A umente l a d istancia e ntre e l p roducto y e l r eceptor. C onecte e l p roducto a una t oma d e c orriente d e u n c ircuito d iferente a l q ue e stá c onectado. El ...
- Page 102 Machine Translated by Google Conjunto d e r odillos ( R) Rodillo d e e xtensión Conectar t ubería Tapa l ateral d el m otor Lado n o m otor cubrir Tela Cordón d e t ela p oliamida Manivela ...
- Page 103 Machine Translated by Google Base d e c una c entral Cuna c entral apoyo Platina Palanca d e a juste Tornillo A Tornillo B Tornillo C INSTRUCCIONES D E M ONTAJE Introducción Para u tilizar m ejor e l t oldo, l ea a tentamente e l m anual d el u suario a ntes d e u sarlo. Conserve ...
- Page 104 Machine Translated by Google Diagrama d e e structura d el t oldo B 2E: F igura D 1 Figura D 1 El t oldo B 2E s e i nstala e n e l l ateral d el v ehículo y s e a segura c on a ire. brazos ...
- Page 105 Machine Translated by Google 3. M étodo d e i nstalación: 3.1 S aque e l r iel d e t ela y f íjelo e n e l e xterior d e l a c arrocería d el v ehículo c on l os t ornillos B ( Figura D4). ...
- Page 106 Machine Translated by Google Figura D 6 F igura D 7 3.4 E xtraiga l os t ubos d e c onexión d e a mbos e xtremos d e l a b obina c entral h acia e l r ojo. Posición ...
- Page 107 Machine Translated by Google el o tro e xtremo d e l a t ela e n l a t ira d e t ela d el v ehículo ( Figura D 13), y Finalmente i nserte e l c onjunto d e r odillos e n e l e je d e a cero e n l a p arte s uperior d el m otor. Brazo ...
- Page 108 Machine Translated by Google 3.7.2 R etire l a c ubierta d ecorativa e n l a p arte s uperior d el b razo p legable d el l ado s in m otor, inserte e l s oporte y e l r ollo d el l ado s in m otor e n l a p arte s uperior d el b razo p legable, f íjelo con ...
- Page 109 Machine Translated by Google Atención: H ay u n r esorte e nrollable d entro d el r ollo l ateral s in m otor, q ue puede h aberse p reajustado c on u na f uerza h acia a rriba. ¡ Asegúrese d e a segurar completamente ...
- Page 110 Machine Translated by Google 4. C ableado d el m otor 4.1 E n p rimer l ugar, i nstale e l i nterruptor d e c ontrol d el c able e n u na p osición adecuada d entro d el v ehículo ( Figura D 20). U na v ez i nstalada l a c ubierta, i ntroduzca e l cable ...
- Page 111 Machine Translated by Google Figura D 22 Figura D 23 Atención: E l a juste d el r ecorrido, e specialmente e n l a d irección d e r ecuperación, debe a justarse l igeramente p ara e vitar q ue e l p arasol s e d añe d ebido a u n r ecorrido d e recuperación ...
- Page 112 Machine Translated by Google Figura D 24 6.3 I nserte e l t ornillo d e f ijación B ( Figura D 25) e n a mbos l ados d el i nserto d e t ela p ara evitar ...
- Page 113 Machine Translated by Google 0,4 p ulgadas m ás a lto q ue l a p uerta Figura D 26 Figura D 27 8. I nstalación d e l a c una c entral Encuentre l a p osición c orrecta d e l a b ase c entral, c oloque l a b ase c entral d ebajo del ...
- Page 114 Machine Translated by Google Figura D 30 ESCANEA E L C ÓDIGO O P ARA V ER E L V IDEO 1 7 ...
- Page 115 Machine Translated by Google Instrucciones d e u so 1. M antenga p resionado e l i nterruptor d e c ontrol c on c able p ara a brir o c errar e léctricamente el p arasol y s uelte e l i nterruptor p ara d etenerlo. C uando e l p arasol e sté c ompletamente abierto ...
- Page 116 Machine Translated by Google antes d e r ecuperarlo. D e l o c ontrario, e xiste l a p osibilidad d e d añar e l Lona. Atención: L a t ela d el t oldo s olo s e p uede l impiar c on u n d etergente l igeramente a lcalino. detergentes. ...
- Page 117 Machine Translated by Google DIAGRAMA D E E STRUCTURA D EL P RODUCTO Algunos p roductos p ueden t ener a justes y n o a parecerán e n e l l istado ( Figura G 1) Toldo r etráctil p ara v ehículos r ecreativos B 2E ...
- Page 118 Machine Translated by Google PARÁMETRO Toldo Color d el t oldo (mm) (mm) (mm) (mm) (mm) (apoyo) Tamaño 3066 2 794 2 438 3207 1680 Negro 4285 4 013 2 438 4 426 1680 Negro 4590 4 318 2 438 4 731 1680 Negro 4895 ...
- Page 119 Machine Translated by Google Fabricante: S hanghaimuxinmuyeyouxiangongsi Dirección: S huangchenglu 8 03nong11hao1602A1609shi, b aoshanqu, s hanghai 200000 C N. Importado a A ustralia: S IHAO P TY L TD. 1 R OKEVA S TREETEASTWOOD Nueva G ales d el S ur 2 122 A ustralia Importado ...
- Page 120 Machine Translated by Google Soporte t écnico y c ertificado d e g arantía electrónica w ww.vevor.com/support...
- Page 121 Machine Translated by Google Wsparcie techniczne i certyfikat gwarancji elektronicznej www.vevor.com/support Rozkładana markiza do kampera MODEL: B2E Nadal staramy się oferować Państwu narzędzia w konkurencyjnych cenach. „Oszczędź połowę”, „Połowa ceny” lub jakiekolwiek inne podobne wyrażenia używane wyłącznie przez nas przedstawia szacunkowe oszczędności, jakie możesz uzyskać kupując określone narzędzia z nami w porównaniu do głównych, najlepszych marek i niekoniecznie oznacza to pokrycie...
- Page 122 To jest oryginalna instrukcja, przed użyciem należy uważnie przeczytać wszystkie instrukcje. VEVOR zastrzega sobie jasną interpretację naszej instrukcji obsługi. Wygląd produktu będzie zależał od produktu, który otrzymałeś. Prosimy o wybaczenie, że nie poinformujemy Cię ponownie, jeśli w naszym produkcie pojawią się jakiekolwiek aktualizacje technologiczne lub oprogramowania.
- Page 123 Machine Translated by Google WAŻNE ZABEZPIECZENIA OSTRZEŻENIE: Przed przystąpieniem do użytkowania należy przeczytać i zrozumieć całą instrukcję. obsługi lub serwisowania tego produktu. Nieprzestrzeganie tych ostrzeżenia i instrukcje mogą spowodować obrażenia ciała lub szkody do cennego mienia. Najlepiej jest zakończyć proces montażu markizy za pomocą asystent.
- Page 124 Machine Translated by Google PRAWIDŁOWA UTYLIZACJA Niniejszy produkt podlega postanowieniom Dyrektywy Europejskiej 2012/19/UE. Symbol przedstawiający przekreślony pojemnik na śmieci na kółkach oznacza, że produkt wymaga oddzielnej zbiórki odpadów w Unii Europejskiej. dotyczy produktu oraz wszystkich akcesoriów oznaczonych tym symbolem. Produktów oznaczonych w ten sposób nie wolno wyrzucać razem ze zwykłymi odpadami domowymi. odpady, ale muszą...
-
Page 125: Parametry Techniczne
Machine Translated by Google Zwiększ odległość między produktem a odbiornikiem. Podłącz produkt do gniazdka w innym obwodzie niż ten, do którego jest podłączony. Odbiornik jest podłączony. W celu uzyskania informacji skontaktuj się ze sprzedawcą lub doświadczonym technikiem radiowo-telewizyjnym. pomoc. Dziękujemy bardzo za wybranie markizy RV. Przeczytaj wszystkie instrukcje przed użyciem. - Page 126 Machine Translated by Google Zespół rolek (R) Wałek przedłużający Podłącz rurę Osłona boczna silnika Strona bez silnika okładka Tkanina Sznurek z tkaniny Zapasowa korba Podpora drzwi - 5 -...
- Page 127 Machine Translated by Google Podstawa centralnej kołyski Kołyska środkowa wsparcie Płyta dociskowa Dźwignia regulacyjna Śruba A Śruba B Śruba C INSTRUKCJA MONTAŻU Wstęp Aby w pełni wykorzystać możliwości markizy, przed jej użyciem należy uważnie przeczytać instrukcję obsługi. Prosimy o zachowanie instrukcji obsługi w celu wykorzystania w przyszłości. ※Uwaga: Przed instalacją...
- Page 128 Machine Translated by Google Schemat konstrukcji markizy B2E: Rysunek D1 Rysunek D1 Markiza B2E montowana jest z boku pojazdu i zabezpieczana za pomocą wentyla ramiona składane pod naciskiem (rysunek D2). Instrukcje i metody instalacji są następujące: 1. Markizę muszą montować co najmniej 2 osoby.
- Page 129 Machine Translated by Google 3. Metoda instalacji: 3.1 Wyjmij szynę materiałową i przymocuj ją na zewnątrz nadwozia pojazdu za pomocą śrub B (rysunek D4). Szynę materiałową należy zamontować poziomo, a jeśli nie, należy ją wypoziomować (należy zapewnić blok amortyzujący) (rysunek D5). Jeśli nadwozie pojazdu jest fabrycznie wyposażone w szczelinę...
- Page 130 Machine Translated by Google Rysunek D6 Rysunek D7 3.4 Wyciągnij rury łączące z obu końców środkowej cewki do czerwonego położenie graniczne i zmontuj lewy i prawy koniec rury. Zamocuj połączenie ze śrubą A. (Rysunek D8, Rysunek D9) Rysunek D8 Rysunek D9 3.5 Otwórz tkaninę, włóż...
- Page 131 Machine Translated by Google drugi koniec materiału do pasa materiału pojazdu (rysunek D13) i na koniec włóż zespół rolek do stalowego wału na górze silnika składane ramię. Przymocuj śruby, aby połączyć i przymocować osłonę końcową rolki do wał stalowy (rysunek D14). Rysunek D13 Rysunek D14 ※...
- Page 132 Machine Translated by Google 3.7.2 Zdejmij osłonę dekoracyjną znajdującą się na górze składanego ramienia po stronie bez silnika, włóż zwój i wspornik po stronie bez silnika do górnej części składanego ramienia, przymocuj je śrubami (wszystkie śruby znajdują się na osłonach) i zainstaluj osłonę dekoracyjną. (Rysunek D17) Rysunek D17 3.7.3 Wyjmij sworzeń...
- Page 133 Machine Translated by Google ※Uwaga: Wewnątrz bocznego zwoju bez silnika znajduje się sprężyna naciągowa, która mogła zostać wstępnie ustawiona na siłę skierowaną do góry. Przed wyjęciem szpilki zabezpieczającej upewnij się, że rolka osłony przeciwsłonecznej jest całkowicie zabezpieczona, w przeciwnym razie może to spowodować przypadkowe obrażenia! Jeżeli sprężyna naciągowa po stronie bez silnika nie jest naciągnięta lub zwolniona, można chwycić...
- Page 134 Machine Translated by Google 4. Okablowanie silnika 4.1 Najpierw zainstaluj przełącznik sterowania przewodem w odpowiednim miejscu wewnątrz pojazdu (rysunek D20). Po zainstalowaniu osłony wprowadź przewód silnika do pojazdu i podłącz go zgodnie z rysunkiem D21. Zaleca się użycie 2-żyłowego przewodu zasilającego z RVV2 o długości nie 1,5 mm lub więcej i długość...
- Page 135 6. Urządzenie do ręcznego wyłączania zasilania 6.1 Osłona przeciwsłoneczna B2E obsługuje ręczne wyłączanie zasilania. W przypadku zaniku zasilania lub awarii, korbę ręczną można włożyć do otworu ręcznego na bocznej pokrywie silnika przewijania, a korbę można obrócić, aby schować...
- Page 136 Machine Translated by Google Rysunek D24 6.3 Włóż śrubę mocującą B (rysunek D25) po obu stronach wkładki z tkaniny, aby zapobiec przesuwaniu się tkaniny osłony przeciwsłonecznej. Zwróć uwagę na umiarkowane naciąganie tkaniny osłony przeciwsłonecznej podczas wkładania śruby mocującej, aby zapewnić płaskość.
- Page 137 Machine Translated by Google 0,4 cala wyżej niż drzwi Rysunek D26 Rysunek D27 8. Montaż kołyski środkowej Znajdź właściwą pozycję kołyski środkowej, umieść kołyskę środkową pod rolką, zaznacz pozycję markerem. Zamocuj kołyskę środkową za pomocą śruby C, a następnie włóż śrubę do kołyski środkowej.
- Page 138 Machine Translated by Google Rysunek D30 ZESKANUJ KOD LUB, ABY OBEJRZEĆ FILM - 17 -...
- Page 139 Machine Translated by Google Instrukcja użytkowania 1. Naciśnij i przytrzymaj przełącznik sterujący przewodem, aby elektrycznie otworzyć lub zamknąć osłonę przeciwsłoneczną, a następnie zwolnij przełącznik, aby zatrzymać. Gdy osłona przeciwsłoneczna zostanie całkowicie otwarta lub zamknięta, silnik zatrzyma się automatycznie. (Rysunek E1) 2.
- Page 140 Machine Translated by Google przed jego odzyskaniem. W przeciwnym razie istnieje możliwość uszkodzenia plandeka. ※Uwaga: Materiał markizy można czyścić wyłącznie środkami o słabym odczynie alkalicznym. detergenty. W przypadku stwierdzenia uszkodzenia plandeki prosimy o kontakt ze sprzedawcą do obsługi. ROZWIĄZYWANIE PROBLEMÓW Każda markiza przechodzi rygorystyczne testy i debugowanie przed opuszczeniem fabryki.
- Page 141 Machine Translated by Google SCHEMAT STRUKTURY PRODUKTU niektóre produkty mogą mieć modyfikacje i nie będą wymienione (rysunek G1) B2E Rozsuwana markiza do kampera - 20 -...
- Page 142 Machine Translated by Google PARAMETR Markiza Kolor markizy (mm) (mm) (mm) (mm) (mm) (wsparcie) Rozmiar 3066 2794 2438 3207 1680 Czarny 4285 4013 2438 4426 1680 Czarny 4590 4318 2438 4731 1680 Czarny 4895 4623 2438 5036 1680 Czarny 5504 5232 2438 5645 1680 Czarny...
- Page 143 Machine Translated by Google Producent: Shanghaimuxinmuyeyouxiangongsi Adres: Shuangchenglu 803nong11hao1602A-1609shi, baoshanqu, szanghaj 200000 CN. Importowane do AUS: SIHAO PTY LTD. 1 ROKEVA STREETEASTWOOD NSW 2122 Australia Importowane do USA: Sanven Technology Ltd. Suite 250, 9166 Anaheim Miejsce, Rancho Cucamonga, CA 91730 YH CONSULTING LIMITED.
- Page 144 Machine Translated by Google Wsparcie techniczne i certyfikat gwarancji elektronicznej www.vevor.com/support...
- Page 145 Machine Translated by Google Technische ondersteuning en e-garantiecertificaat www.vevor.com/support INTREKBARE CAMPERLUIFEL MODEL: B2E Wij streven er voortdurend naar om u gereedschappen tegen concurrerende prijzen te leveren. "Bespaar de helft", "halve prijs" of andere soortgelijke uitdrukkingen die alleen door ons worden gebruikt...
- Page 146 Dit is de originele instructie, lees alle handleidingen zorgvuldig door voordat u het product gebruikt. VEVOR behoudt zich een duidelijke interpretatie van onze gebruikershandleiding voor. Het uiterlijk van het product is afhankelijk van het product dat u hebt ontvangen. Vergeef ons dat we u niet opnieuw zullen informeren als er technologie- of software-updates voor ons product zijn.
-
Page 147: Belangrijke Veiligheidsmaatregelen
Machine Translated by Google BELANGRIJKE VEILIGHEIDSMAATREGELEN WAARSCHUWING: Lees en begrijp deze hele handleiding voordat u het bedienen of onderhouden van dit product. Het niet naleven van deze Waarschuwingen en instructies kunnen persoonlijk letsel of schade veroorzaken tot waardevolle eigendommen. ÿ Het is het beste om het proces van het monteren van de luifel te voltooien met een assistent. - Page 148 Machine Translated by Google CORRECTE VERWIJDERING Dit product valt onder de bepalingen van de Europese richtlijn 2012/19/EU. Het symbool met een doorgestreepte afvalbak geeft aan dat de product vereist aparte afvalinzameling in de Europese Unie. Dit geldt voor het product en alle accessoires die met dit symbool zijn gemarkeerd. Producten die als zodanig zijn gemarkeerd, mogen niet met het normale huishoudelijke afval worden weggegooid.
- Page 149 Machine Translated by Google ÿ Vergroot de afstand tussen het product en de ontvanger. ÿ Sluit het product aan op een stopcontact op een ander circuit dan dat waarop het product is aangesloten. De ontvanger is aangesloten. ÿ Raadpleeg de dealer of een ervaren radio-/tv-technicus voor bijstand.
- Page 150 Machine Translated by Google Rollenmontage (R) Verlengrol Buis aansluiten Motor zijdeksel Niet-motorzijde omslag Stof Stoffen koord Reserve krukas Deurondersteuning - 5 -...
-
Page 151: Montage-Instructies
Machine Translated by Google Centrale wieg basis Centrale wieg steun Platen Verstelhendel Schroef A Schroef B Schroef C MONTAGE-INSTRUCTIES Invoering Om optimaal gebruik te kunnen maken van de luifel, raden wij u aan de gebruiksaanwijzing zorgvuldig door te lezen voordat u de luifel in gebruik neemt. Bewaar de gebruikershandleiding goed voor toekomstig gebruik. - Page 152 Machine Translated by Google B2E luifelstructuurdiagram: Afbeelding D1 Figuur D1 De B2E-luifel wordt aan de zijkant van het voertuig gemonteerd en met lucht vastgezet. drukvouwarmen (Figuur D2). De instructies en installatiemethoden zijn als volgt: 1. De luifel moet door 2 of meer personen worden geïnstalleerd.
- Page 153 Machine Translated by Google 3. Installatiemethode: 3.1 Haal de stoffen rail eruit en bevestig deze aan de buitenkant van de carrosserie met schroeven B (Figuur D4). De stoffen rail moet horizontaal worden geïnstalleerd en indien dit niet het geval is, moet deze worden genivelleerd (het kussenblok moet worden meegeleverd) (Figuur D Als de carrosserie van het voertuig vooraf is uitgerust met een gleuf voor het aanbrengen van stoffen bekleding, kan deze stap worden overgeslagen en hoeft de stoffen bekleding niet te worden gebruikt.
- Page 154 Machine Translated by Google Figuur D6 Figuur D7 3.4 Trek de verbindingsbuizen aan beide uiteinden van de middelste spoel naar de rode limietpositie, en monteer het linker- en rechterbuisuiteinde. Bevestig de verbinding met Schroef A. (Figuur D8, Figuur D9) Figuur D8 Figuur D9 3.5 Open de stof, steek de stof in de gleuf van de rolbuis en steek vervolgens de stof in de gleuf.
- Page 155 Machine Translated by Google het andere uiteinde van de stof in de stoffen strook van het voertuig (Figuur D13), en Plaats ten slotte de rolconstructie in de stalen as aan de bovenkant van de motor vouwarm. Bevestig de schroeven om de roldeksel aan te sluiten en te bevestigen aan de stalen schacht (Figuur D14).
- Page 156 Machine Translated by Google 3.7.2 Verwijder de decoratieve afdekking aan de bovenkant van de niet-gemotoriseerde zijvouwarm, plaats de niet-gemotoriseerde zijrol en de beugel in de bovenkant van de vouwarm, bevestig deze met schroeven (alle schroeven zitten op de afdekkingen) en installeer de decoratieve afdekking.
- Page 157 Machine Translated by Google ÿLet op: Er zit een opwindveer in de niet-gemotoriseerde zijrol, die mogelijk is ingesteld met een opwaartse kracht. Zorg ervoor dat de rol van de parasol volledig is vastgezet voordat u de veiligheidspin verwijdert, anders kan dit onbedoeld letsel veroorzaken! Als de opwindveer aan de niet-motorzijde niet is vastgedraaid of losgedraaid, kunt u de beugel vastpakken en 10 keer in de richting van de pijl draaien tot het vooraf ingestelde koppel.
- Page 158 Machine Translated by Google 4. Motorbedrading 4.1 Installeer eerst de draadbedieningsschakelaar op een geschikte positie in het voertuig (Figuur D20). Nadat de kap is geïnstalleerd, voert u de motordraad in het voertuig in en sluit u deze aan volgens Figuur D21. Het wordt aanbevolen om een 2- aderige voedingskabel met RVV2 van 1,5 mm of meer en een draadlengte maximaal 3 m te gebruiken voor de motorvoedingskabel (het bedradingsgedeelte in de...
- Page 159 Het is raadzaam om de zonnekap tijdens de reis gewoon gesloten te houden. 6. Handmatig uitschakelapparaat 6.1 De B2E-zonnekap ondersteunt handmatige uitschakeling. In geval van stroomuitval of storing kan de handmatige kruk in het handmatige gat op de zijkap van de scrollmotor worden gestoken en kan de kruk worden gedraaid om de zonnekap in te trekken of los te maken.
- Page 160 Machine Translated by Google Figuur D24 6.3 Plaats bevestigingsschroef B (Figuur D25) aan beide zijden van het doekinzetstuk om te voorkomen dat het doek van de parasol beweegt. Let erop dat u het doek van de parasol matig aandraait bij het plaatsen van de bevestigingsschroef om vlakheid te garanderen. 6.4 Nadat de installatie van de zonnekap is voltooid, controleert u het uiterlijk en zorgt u ervoor dat de schroeven in de bovenstaande onderdelen stevig zijn geïnstalleerd.
- Page 161 Machine Translated by Google 0,4 inch hoger dan de deur Figuur D26 Figuur D27 8. Centrale wieg installeren Vind de juiste positie van de center cradle, plaats de center cradle onder de roller, markeer de positie met een markeerstift. Bevestig de center cradle met schroef C en plaats de bout vervolgens in de center cradle.
- Page 162 Machine Translated by Google Figuur D30 SCAN DE OF-CODE OM DE VIDEO TE BEKIJKEN - 17 -...
- Page 163 Machine Translated by Google Gebruiksaanwijzing 1. Houd de draadbedieningsschakelaar ingedrukt om de zonnekap elektrisch te openen of te sluiten en laat de schakelaar los om te stoppen. Wanneer de zonnekap volledig is geopend of gesloten, stopt de motor automatisch. (Afbeelding E1) 2.
- Page 164 Machine Translated by Google voordat u het ophaalt. Anders bestaat de kans dat het beschadigd raakt zeildoek. ÿLet op: Luifeldoek mag alleen worden gereinigd met zwak alkalische detergenten. Als er beschadigd zeildoek wordt aangetroffen, neem dan contact op met de verkoper voor behandeling.
- Page 165 Machine Translated by Google PRODUCTSTRUCTUURDIAGRAM Sommige producten kunnen aanpassingen hebben en worden niet vermeld (Figuur G1) B2E Intrekbare RV Luifel - 20 -...
- Page 166 Machine Translated by Google PARAMETER Luifel Luifelkleur Maat (mm) (mm) (mm) (mm) (mm) (steun) 3066 2794 2438 3207 1680 Zwart 4285 4013 2438 4426 1680 Zwart 4590 4318 2438 4731 1680 Zwart 4895 4623 2438 5036 1680 Zwart 5504 5232 2438 5645 1680 Zwart...
- Page 167 Machine Translated by Google Fabrikant: Shanghaimuxinmuyeyouxiangongsi Adres: Shuangchenglu 803nong11hao1602A-1609shi, baoshanqu, shanghai 200000 CN. Geïmporteerd naar AUS: SIHAO PTY LTD. 1 ROKEVA STREETEASTWOOD NSW 2122 Australië Geïmporteerd naar de VS: Sanven Technology Ltd. Suite 250, 9166 Anaheim Plaats, Rancho Cucamonga, CA 91730 YH CONSULTING LIMITED.
- Page 168 Machine Translated by Google Technische ondersteuning en e- garantiecertificaat www.vevor.com/support...
- Page 169 Machine Translated by Google Teknisk support och e-garanticertifikat www.vevor.com/support INDRÄCKBAR FÖRTÄLT för husbil MODELL: B2E Vi fortsätter att vara engagerade i att ge dig verktyg till konkurrenskraftiga priser. "Spara hälften", "Halva priset" eller andra liknande uttryck som endast används av oss representerar en uppskattning av besparingar du kan dra nytta av att köpa vissa verktyg...
- Page 170 Detta är den ursprungliga instruktionen, läs alla instruktioner noggrant innan du använder den. VEVOR reserverar sig för en tydlig tolkning av vår användarmanual. Utseendet på produkten är beroende av den produkt du fått. Ursäkta oss att vi inte kommer att informera dig igen om det finns någon teknik eller mjukvaruuppdateringar på...
-
Page 171: Viktiga Säkerhetsåtgärder
Machine Translated by Google VIKTIGA SÄKERHETSÅTGÄRDER VARNING: Läs och förstå hela denna manual innan drift eller service av denna produkt. Underlåtenhet att följa dessa varningar och instruktioner kan orsaka personskada eller skada till värdefull egendom. ÿ Det är bäst att slutföra processen med att montera markisen med en assistent. - Page 172 Machine Translated by Google KORREKT AVFALLSHANTERING Denna produkt omfattas av bestämmelserna i det europeiska direktivet 2012/19/EU. Symbolen som visar en soptunna på hjul anger att Produkten kräver separat sophämtning i EU. Detta gäller för produkten och alla tillbehör märkta med denna symbol. Produkter märkta som sådana får inte kasseras med normala inhemska avfall, men måste lämnas till en insamlingsplats för återvinning av el och elektroniska apparater.
- Page 173 Machine Translated by Google ÿ Öka avståndet mellan produkten och mottagaren. ÿ Anslut produkten till ett uttag på en annan krets än den till vilken mottagaren är ansluten. ÿ Rådfråga återförsäljaren eller en erfaren radio-/TV-tekniker för bistånd. Tack så mycket för att du valde denna RV-markis. Vänligen läs alla instruktioner innan du använder den.
- Page 174 Machine Translated by Google Rullenhet (R) Förlängningsrulle Anslut röret Motor sidokåpa Icke-motorisk sida täcka Tyg knep-sladd Extra vev Dörrstöd - 5 -...
- Page 175 Machine Translated by Google Center Cradle bas Centervagga stöd Platen Justeringsspak Skruv A Skruv B Skruv C MONTERINGSINSTRUKTIONER Introduktion För att bättre använda markisen, vänligen läs bruksanvisningen noggrant före användning. Förvara bruksanvisningen på rätt sätt för framtida referens. ÿObs: Läs noga igenom bruksanvisningen innan installation och installera och använda den enligt de erforderliga specifikationerna.
- Page 176 Machine Translated by Google B2E markis strukturdiagram : Figur D1 Figur D1 B2E-markisen monteras på sidan av fordonet och säkras med luft tryckvikbara armar (Figur D2). Instruktionerna och installationsmetoderna är som följer: 1. Markisen måste monteras av 2 eller fler personer.
- Page 177 Machine Translated by Google 3. Installationsmetod: 3.1 Ta ut tygskenan och fäst den på utsidan av fordonskarossen med skruvarna B (Figur D4). Tygskenan bör installeras horisontellt, och om inte, bör den jämnas (kuddblocket ska finnas) (Figur D5). Om fordonskarossen är förinstallerad med en tyginsättningsspår kan detta steg utelämnas och tygskenan behöver inte användas.
- Page 178 Machine Translated by Google Figur D6 Figur D7 3.4 Dra ut anslutningsrören i båda ändarna av mittspolen till det röda gränsläge och montera den vänstra och högra röränden. Fixa anslutningen med skruv A. (Figur D8, Figur D9) Bild D8 Bild D9 3.5 Öppna tyget, för in tyget i spåret på...
- Page 179 Machine Translated by Google den andra änden av tyget i fordonets tygremsa (Figur D13), och Sätt slutligen in rullenheten i stålaxeln på toppen av motorn vikarm. Fäst skruvarna för att ansluta och fixera rulländkåpan till stålaxel (Figur D14). Bild D13 Bild D14 ÿ...
- Page 180 Machine Translated by Google 3.7.2 Ta bort det dekorativa locket på toppen av den icke-motoriserade sidovikarmen, sätt in den icke-motoriserade sidorullen och fästet i toppen av den fällbara armen, fixera den med skruvar (alla skruvar på kåporna) och installera det dekorativa omslaget. (Figur D17) Figur D17 3.7.3 Ta bort säkerhetsnålen på...
- Page 181 Machine Translated by Google ÿObs: Det finns en lindningsfjäder inuti den icke-motoriska sidorullen, som kan ha förinställts med en uppåtriktad kraft. Se till att säkra solskyddsrullen helt innan du tar bort säkerhetsnålen, annars kan det orsaka oavsiktlig skada! Om lindningsfjädern på den icke-motoriska sidan inte är åtdragen eller släppt kan du greppa fästet och vrida det 10 gånger i pilens riktning till det förinställda vridmomentet.
- Page 182 Machine Translated by Google 4. Motorledningar 4.1 Installera först strömbrytaren för trådkontroll i ett lämpligt läge inuti fordonet (Figur D20). När kapellet har installerats, för in motorkabeln i fordonet och anslut den enligt figur D21. Det rekommenderas att använda en 2-kärnig nätsladd med RVV2 på...
- Page 183 Det är lämpligt att ha solskyddet precis stängt under resan. 6. Manuell avstängningsanordning 6.1 B2E-solskyddet stöder manuell avstängning. Vid strömavbrott eller felfunktion kan den manuella veven sättas in i det manuella hålet på sidokåpan på scrollmotorn, och veven kan roteras för att dra in eller frigöra solskyddet.
- Page 184 Machine Translated by Google Bild D24 6.3 Sätt i fästskruv B (Figur D25) på båda sidor av tyginlägget för att förhindra att solskyddstyget rör sig. Var uppmärksam på att dra åt solskyddstyget måttligt när du sätter i fästskruven för att säkerställa planhet. 6.4 Efter att installationen av solskyddet är slutfört, kontrollera utseendet och se till att skruvarna i ovanstående delar är ordentligt installerade.
- Page 185 Machine Translated by Google 0,4 tum högre än dörren Bild D26 Bild D27 8. Installation av mittvaggan Hitta rätt position från mittvaggan, lägg mittvaggan under rullen, markera positionen med markör. Fäst mittvaggan med skruv C och sätt sedan in bulten i mittvaggan.
- Page 186 Machine Translated by Google Bild D30 SKANNA ELLER-KODEN FÖR ATT SE VIDEON - 17 -...
- Page 187 Machine Translated by Google Bruksanvisning 1. Tryck och håll in trådkontrollomkopplaren för att elektriskt öppna eller stänga solskyddet och släpp omkopplaren för att stanna. När solskyddet är helt öppet eller stängt stannar motorn automatiskt. (Figur E1) 2. Det finns ett manuellt joystickhål på sidokåpan på solskyddsrullmotorn. I händelse av strömavbrott eller fel, öppna det dekorativa locket på...
- Page 188 Machine Translated by Google innan du hämtar den. Annars finns det en möjlighet att skada presenning. ÿObs: Markistyg kan endast rengöras med svagt alkaliskt tvättmedel. Om skadad presenning hittas, kontakta säljaren för hantering. FELSÖKNING Varje markis genomgår strikt felsökning och testning innan den lämnar fabrik för att uppnå...
- Page 189 Machine Translated by Google PRODUKTSTRUKTURDIAGRAM vissa produkter kan ha justeringar och kommer inte att listas (Figur G1) B2E infällbar markis för husbil - 20 -...
- Page 190 Machine Translated by Google PARAMETER Markis Markis färg (mm) (mm) (mm) (mm) (mm) (stöd) Storlek 3066 2794 2438 3207 1680 Svart 4285 4013 2438 4426 1680 Svart 4590 4318 2438 4731 1680 Svart 4895 4623 2438 5036 1680 Svart 5504 5232 2438 5645 1680 Svart...
- Page 191 Machine Translated by Google Tillverkare: Shanghaimuxinmuyeyouxiangongsi Adress: Shuangchenglu 803nong11hao1602A-1609shi, baoshanqu, shanghai 200000 CN. Importerad till AUS: SIHAO PTY LTD. 1 ROKEVA STREETEASTWOOD NSW 2122 Australien Importerad till USA: Sanven Technology Ltd. Suite 250, 9166 Anaheim Place, Rancho Cucamonga, CA 91730 YH CONSULTING LIMITED.
- Page 192 Machine Translated by Google Teknisk support och e-garanticertifikat www.vevor.com/support...
Need help?
Do you have a question about the B2E and is the answer not in the manual?
Questions and answers