
Related Manuals for Hanna Instruments HI 83218


Summary of Contents for Hanna Instruments HI 83218
- Page 1 Instruction Manual HI 83218 Multiparameter Bench Photometer for Laboratories w w w . h a n n a i n s t . c o m...
-
Page 2: Table Of Contents
Dear Customer, Thank you for choosing a Hanna product. Please read this instruction manual carefully before using the instrument. This manual will provide you with the necessary information for the correct use of the instrument. If you need additional technical information, do not hesitate to e-mail us at tech@hannainst.com. TABLE OF CONTENTS PRELIMINARY EXAMINATION .............................. -
Page 3: Preliminary Examination
The amount of reagent is precisely dosed to ensure maximum reproducibility. HI 83218 bench photometer can be connected to a PC via an USB cable. The optional HI 92000 Windows Compatible Software helps users manage all their results. -
Page 4: Specifications
SPECIFICATIONS Light Life Life of the instrument Light Detector Silicon Photocell Environment 0 to 50°C (32 to 122°F); max 90% RH non-condensing Power Supply external 12 Vdc power adapter built-in rechargeable battery Dimensions 235 x 200 x 110 mm (9.2 x 7.87 x 4.33") Weight 0.9 Kg For specifications related to each method (e.g. - Page 5 The optical system of HI 83218 is based on special subminiature tungsten lamps and narrow-band interference filters to guarantee both high performance and reliable results.
-
Page 6: Functional Description
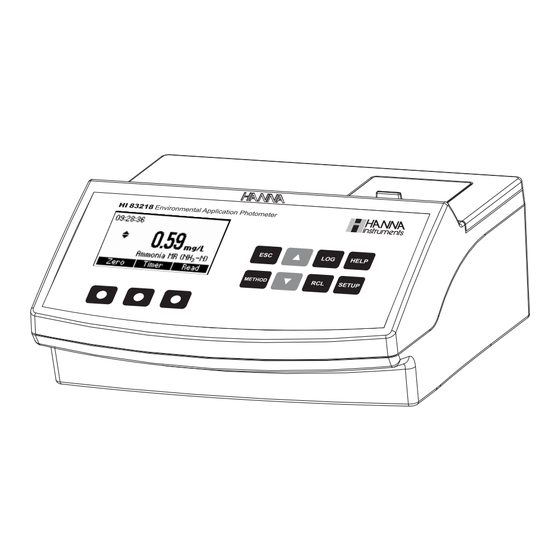
FUNCTIONAL DESCRIPTION INSTRUMENT DESCRIPTION 1) Open Cuvette Lid 2) Indexing mark 3) Cuvette point 4) Liquid Crystal Display (LCD) 5) Splash proof keypad 6) ON/OFF power switch 7) Power input connector 8) USB connector... -
Page 7: Tips For An Accurate Measurement
KEYPAD DESCRIPTION The keypad contains 8 direct keys and 3 functional keys with the following functions: Press to perform the function displayed above it on the LCD. Press to exit the current screen. Press to access the select method menu. Press to move up in a menu or a help screen, to increment a set value, to access second level functions. - Page 8 (c) take out the syringe and clean the outside of the syringe tip. Be sure that no drops are hanging on the tip of the syringe, if so eliminate them. Then, keeping the syringe in vertical position above the cuvette, push the plunger down into the syringe until the lower edge of the seal is exactly on the 0.5 mL mark.
- Page 9 USING CUVETTES • Proper mixing of the cuvette is done by shaking the cuvette, moving the cuvette up and down. The movement may be gentle or vigorous. This mixing method is indicated with “shake gently” or “shake vigorously”, and one of the following icons: shake gently shake vigorously •...
-
Page 10: Health & Safety
• Do not let the reacted sample stand too long after reagent is added. For best accuracy, respect the timings described in each specific method. • It is possible to take multiple readings in a row, but it is recommended to take a new zero reading for each sample and to use the same cuvette for zeroing and measurement when possible (for most precise results follow the measurement procedures carefully). -
Page 11: Operational Guide
OPERATIONAL GUIDE POWER CONNECTION AND BATTERY MANAGEMENT The meter can be powered from an AC/DC adapter (included) or from the built-in rechargeable battery. Note: Always turn the meter off before unplugging it to ensure no data is lost. When the meter switches ON, it verifies if the power supply adapter is connected. The battery icon on the LCD will indicate the battery status: - battery is charging from external adapter - battery fully charged (meter connected to AC/DC adapter) - Page 12 • After the desired method is selected, follow the measurement described in the related section. • Before performing a test you should read all the instructions carefully. DATA MANAGEMENT The instrument features a data log function to help you keep track of all your analysis. The data log can hold 200 individual measurements.
-
Page 13: Setup
S E T U P S E T U P S E T U P S E T U P S E T U P In the Setup mode the instrument’s parameters can be changed. Some parameters affect the measuring sequence and others are general parameters that change the behavior or appearance of the instrument. - Page 14 Date / Time This option is used to set the instrument’s date and time. Press the Modify key to change the date/time. Press the functional keys to highlight the value to be modified (year, month, day, hour, minute or second). Use the keys to change the value.
-
Page 15: Help Mode
H E L P M O D E HELP MODE HI 83218 offers an interactive contextual help mode that assists the user at any time. To access the help screens press HELP. The instrument will display additional information related to the current screen. -
Page 16: Ammonia Hr
AMMONIA HIGH RANGE SPECIFICATIONS Range 0.0 to 50.0 mg/L Resolution 0.1 mg/L Accuracy ±0.5 mg/L ±5% of reading at 25 °C Typical EMC ±0.1 mg/L Deviation Light Source Tungsten lamp with narrow band interference filter @ 420 nm Adaptation of the ASTM Manual of Water and Environmental Technology, D1426-92 , Method Nessler method. - Page 17 • Remove the cuvette. • Add 4 drops of HI 93733A-0 Nessler Reagent. Replace the cap and mix the solution. • Reinsert the cuvette into the instrument. • Press Timer and the display will show the countdown prior to the measurement or, alternatively, wait for 3 minutes and 30 seconds and press Read.
-
Page 18: Ammonia Mr
AMMONIA MEDIUM RANGE SPECIFICATIONS Range 0.00 to 10.00 mg/L Resolution 0.01 mg/L Accuracy ±0.05 mg/L ±5% of reading at 25 °C Typical EMC ±0.01 mg/L Deviation Light Source Tungsten lamp with narrow band interference filter @ 420 nm Adaptation of the ASTM Manual of Water and Environmental Technology, D1426-92 , Method Nessler method. - Page 19 • Remove the cuvette. • Add 4 drops of HI 93715A-0 First Reagent (6 drops for seawater analysis). Replace the cap and mix the solution. • Add 4 drops of HI 93715B-0 Second Reagent (10 drops for seawater analysis). Replace the cap and mix the solution. •...
-
Page 20: Chromium Vi Hr
CHROMIUM VI HIGH RANGE SPECIFICATIONS 0 to 1000 μg/L Range Resolution 1 μg/L Accuracy ±5 μg/L ±4% of reading at 25 °C Typical EMC ±1 μg/L Deviation Light Source Tungsten lamp with narrow band interference filter @ 525 nm Adaptation of the ASTM Manual of Water and Environmental Technology, D1687-92 , Method Diphenylcarbohydrazide method. - Page 21 • Remove the cuvette and add the content of one packet of HI 93723-0 reagent. Replace the cap and shake vigorously for about 10 seconds. • Reinsert the cuvette into the instrument. • Press Timer and the display will show the countdown prior to the measurement or, alternatively, wait for 6 minutes and press Read.
-
Page 22: Chromium Vi Low Range
CHROMIUM VI LOW RANGE SPECIFICATIONS Range 0 to 300 μg/L Resolution 1 μg/L Accuracy ±1 μg/L ±4% of reading at 25 °C Typical EMC ±1 μg/L Deviation Light Source Tungsten lamp with narrow band interference filter @ 525 nm Method Adaptation of the ASTM Manual of Water and Environmental Technology, D1687-92 , Diphenylcarbohydrazide method. - Page 23 • Remove the cuvette and add the content of one packet of HI 93749-0 reagent. Replace the cap and shake vigorously for about 10 seconds. • Reinsert the cuvette into the instrument. • Press Timer and the display will show the countdown prior to the measurement or, alternatively, wait for 6 minutes and press Read.
-
Page 24: Nitrate
NITRATE SPECIFICATIONS Range 0.0 to 30.0 mg/L Resolution 0.1 mg/L Accuracy ±0.5 mg/L ±10% of reading at 25 °C Typical EMC ±0.1 mg/L Deviation Light Source Tungsten lamp with narrow band interference filter @ 525 nm Method Adaptation of the cadmium reduction method. The reaction between nitrate and the reagent causes an amber tint in the sample. - Page 25 • Replace the cap and immediately shake vigorously up and down for exactly 10 seconds. Continue to mix by inverting the cuvette gently for 50 seconds, while taking care not to induce air bubbles. Powder will not completely dissolve. Time and way of shaking could sensitively affect the measurement.
-
Page 26: Nitrite Hr
NITRITE HIGH RANGE SPECIFICATIONS Range 0 to 150 mg/L Resolution 1 mg/L Accuracy ±4 mg/L ±4% of reading at 25 °C Typical EMC ±1 mg/L Deviation Light Source Tungsten lamp with narrow band interference filter @ 575 nm Method Adaptation of the Ferrous Sulfate method. The reaction between nitrite and the reagent causes a greenish-brown tint in the sample. - Page 27 • Add the content of one packet of HI 93708-0 reagent. Replace the cap and shake gently until completely dissolved. • Reinsert the cuvette into the instrument. • Press Timer and the display will show the countdown prior to the measurement or, alternatively, wait for 10 minutes and press Read.
-
Page 28: Nitrite Lr
NITRITE LOW RANGE SPECIFICATIONS Range 0.00 to 1.15 mg/L Resolution 0.01 mg/L Accuracy ±0.06 mg/L ±4% of reading at 25 °C Typical EMC ±0.01 mg/L Deviation Light Source Tungsten lamp with narrow band interference filter @ 525 nm Method Adaptation of the EPA Diazotization method 354.1 . The reaction between nitrite and the reagent causes a pink tint in the sample. - Page 29 • Add the content of one packet of HI 93707-0 reagent. Replace the cap and shake gently for about 15 seconds. • Reinsert the cuvette into the instrument. • Press Timer and the display will show the countdown prior to the measurement or, alternatively, wait for 6 minutes and press Read.
-
Page 30: Phosphorus
PHOSPHORUS SPECIFICATIONS Range 0.0 to 15.0 mg/L Resolution 0.1 mg/L Accuracy ±0.3 mg/L ±4% of reading at 25 °C Typical EMC Dev. ±0.2 mg/L Light Source Tungsten lamp with narrow band interference filter @ 525 nm Method Adaptation of the Standard Methods for the Examination of Water and Wastewater, edition, Amino Acid method. - Page 31 • Add the content of one packet of HI 93706B-0 Phosphorus Reagent B (Amino Acid) to the cuvette. Replace the cap and shake gently until completely dissolved. • Reinsert the cuvette into the instrument. • Press Timer and the display will show the countdown prior to the measurement or, alternatively, wait for 5 minutes and press Read.
-
Page 32: Errors And Warnings
ERRORS AND WARNINGS The instrument shows clear warning messages when erroneous conditions appear and when measured values are outside the expected range. These messages are described below. No Light: The light source is not functioning properly. Light Leak: There is an excess amount of ambient light reaching the detector. -
Page 33: Data Management
DATA MANAGEMENT The analyzed data can be managed using Hanna’s product HI92000, Windows Compatible Software. ® STANDARD METHODS Description Range Method Ammonia HR 0.0 to 50.0 mg/L Nessler Ammonia MR 0.00 to 10.00 mg/L Nessler Chromium VI HR 0 to 1000 μg/L Diphenylcarbohydrazide Chromium VI LR 0 to 300 μg/L... -
Page 34: Accessories
ACCESSORIES OTHER ACCESSORIES REAGENT SETS HI 731318 cloth for wiping cuvettes (4 pcs) HI 93706-01 100 phosphorus tests HI 731321 glass cuvettes (4 pcs) HI 93706-03 300 phosphorus tests HI 731325W new cap for cuvette (4 pcs) HI 93707-01 100 nitrite LR tests HI 740034 cap for 100 mL beaker (6 pcs) HI 93707-03 300 nitrite LR tests... -
Page 35: Warranty
If the repair is not covered by the warranty, you will be notified of the charges incurred. If the instrument is to be returned to Hanna Instruments, first obtain a Returned Goods Authorization Number from the Customer Service Department and then send it with shipment costs prepaid. When shipping any instrument, make sure it is properly packaged for complete protection. - Page 36 Hanna Instruments Inc. Highland Industrial Park 584 Park East Drive Woonsocket, RI 02895 USA Technical Support for Customers Tel. (800) 426 6287 Fax (401) 765 7575 E-mail tech@hannainst.com www.hannainst.com Local Sales and Customer Service Office Printed in EUROPE (ROMANIA) MAN83218 04/10...
Need help?
Do you have a question about the HI 83218 and is the answer not in the manual?
Questions and answers