
Subscribe to Our Youtube Channel
Related Manuals for Grandhall XB10ALP


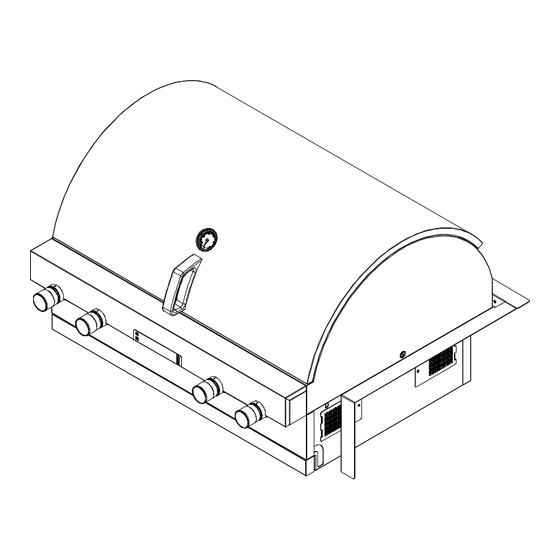
Summary of Contents for Grandhall XB10ALP
- Page 1 This Owner's Manual is provided and hosted by Appliance Factory Parts. Grand Hall XB10ALP Owner's Manual Shop genuine replacement parts for Grand Hall XB10ALP Find Your Grand Hall Grill Parts - Select From 203 Models -------- Manual continues below --------...
- Page 2 Replacement of Damaged or Missing parts before using your grill to ensure the grill is visit www.grandhall.com or call: properly assembled, installed and maintained. Ÿ Use your grill at least 3 feet away from any 1-877-934-7455 wall or surface.
- Page 3 Table of Contents WARNING Primary Safety Warnings ......1-3 Pre-Assembly Instructions ......3 Do not store or use gasoline or other Part Diagrams and Lists ......4-7 flammable liquids or vapors in the Assembly Instructions.......8-11 vicinity of this or any other appli- Use &...
- Page 4 Pre-Assembly Instructions For Your Safety PRE-ASSEMBLY Congratulations on your selection of one of the finest out- door kitchen appliances available. Your Grill is equipped Read and perform the following pre-assembly instruc- with the unique Crossray Infrared Cooking System® by Grand tions: Hall, which offers restaurant style grilling performance.
- Page 5 Hardware Pack Parts List for Models XB10ALP & XB10ANG PART # PART DESCRIPTION PURPOSE OF PART P06030027A Hardware Pack For use in assembly of XB10ALP/NG S182G03061 Pan Head Screw 3/16"x3/8" Install Battery Bracket S162G04041 Hex Head Screw 1/4"x1/4" Install Rear Trim Panel S182G04061 Pan Head Screw 1/4"x3/8"...
- Page 6 Parts Diagram for Models XB10ALP & XB10ANG 8b(Optional) 8b(Optional) 8a(Optional)
- Page 7 Parts List for Models XB10ALP & XB10ANG DESCRIPTION PART# Lid Assembly Outer P0014513A5 Protective Pad P05518018I Temperature Gauge P00601371A Lid Handle P00215034F Lid Handle Heat Insulating Spacer P06802011F Lid Assembly Inner P0014514EA Lid Hinge P05547004D Lid Bracket P033031165 Gas Fitting...
- Page 8 Temperature Probe P05385001B Connection Wire Set P02615177A Hardware Pack P06030027A Operator's Manual P80151110A Optional Parts to Purchase for Models XB10ALP & XB10ANG DESCRIPTION PART# Griddle (optional) P057050035 Griddle Handle (optional) P055151255 For the repair or replacement parts you need: Call 1-877-934-7455 M-F 8AM-4:30 PM CST To obtain the correct replacement parts for your gas grill, please refer to the part numbers in this parts list.
- Page 9 Assembly Instructions CAUTION : While it is possible for one person to assemble this grill, obtain assistance from another person when handling some of the larger, heavier pieces. Build your grill island before installing the LP Gas Tank and Partition Panel (Not included in this unit). Refer to the heights listed in Fig. 4 for constructing your grill island. Make sure a set of doors is installed in your Island so that the Control Box can be accessed.
- Page 10 Install Grill Head With the assistance of another person, place the Grill Head into the cutout of your grill island as shown in the Figure. NOTE: This grill head is designed to fit into an island of your own design. The island shown is for illustration purposes only and is not included with the purchase of this grill head.
- Page 11 Install LP Regulator and LP Gas Tank (For XB10ALP Model) Note: You will need to make 3 holes on your Island Bottom Panel before installing the Tank Tray Set. These 3 holes must be large enough to fit the hardware in the diagram below.
- Page 12 Install the Grease Tray Heat Shield and Spark Electrode Tip Grease Tray Spark Receiver Place the 4 pins on the Grease Tray Heat Shield into the 4 Holes in the Grill Bowl as Spark Gap 1/8" shown. Pull out the Grease Tray Bracket. Place the Grease Tray into the Grease Tray Bracket as shown.
- Page 13 Refer to this table when designing the island unit for the XB10ALP/NG. Side* and Rear* show the Always keep LP Gas tank in upright position. minimum amount of distance the unit must be from combustibles (ex.
- Page 14 USE AND CARE INSTRUCTIONS Secure a 20lb LP Gas Tank to Gas Grill NOTE about LP Gas Tank Exchange Programs Note: You can only use 20lb LP Gas Tank in this Gas Many retailers that sell grills offer you the option of replac- Grill.
- Page 15 USE AND CARE INSTRUCTIONS LP Gas Model only: Check all connections for LP Gas Leaks Connect Regulator with Hose to your LP Gas Tank Never test for leaks with an open flame. Prior to first use, at the beginning of each season, or every time Turn all Burner Valves to the OFF position.
- Page 16 Natural Gas Connection Fig.1 Natural Gas Model only: Vertical fitting Connecting Natural Gas To Your Grill Connect the Swivel nut of the 12' Natural Gas Hose to the vertical fitting of NG Regulator as shown in Fig.1. Connect the other hose end (male Swivel plug) to the gas supply line from your home.
- Page 17 USE AND CARE INSTRUCTIONS - LCD LCD Functions: 1. Cooking Timer (shows cooking time remaining) 2. Grill Temperature Display (indicates temperature of grill) 3. Flame Level Detector (indicates flame level) 4. Battery Power Display (indicates how much battery power is remaining) LCD Symbols: Timer Celsius or Fahrenheit...
- Page 18 USE AND CARE INSTRUCTIONS - LCD Using the Temperature Probe Insert the plug of the Temperature Probe into the Temperature Control Outlet of the LCD Panel. When appears, select whether you want the temperature displayed in Celsius or Fahrenheit. Note: Do not measure the temperature of the burners by using this probe. Do not expose this probe to open flame.
- Page 19 USE AND CARE INSTRUCTIONS Grill Lighting Instructions If ignition does not occur in 5 seconds, turn gas off at Before each use, check all hoses for cracks, nicks, cuts, burns, or abrasions. If a hose is damaged in any way, source and turn Control Knobs OFF.
- Page 20 USE AND CARE INSTRUCTIONS Troubleshooting To purge air from your gas line and/or reset the regulator excess gas flow device: If the grill fails to light : Turn Control Knobs to the OFF position. Turn gas off at source and turn Control Knobs to OFF. Wait at least 5 minutes for gas to clear, then retry.
- Page 21 CLEANING AND MAINTENANCE Cleaning Exterior Stainless Steel Surfaces: Routine care and maintenance is required to preserve Proper care and maintenance will keep your grill in top the appearance and corrosion resistance of stainless operating condition and prolong its life. Follow these clean- steel.
- Page 22 Infrared Grill Cooking Instructions Burn-Off Indirect Cooking Before cooking on your gas grill for the first time, you should To cook indirectly, the food should be placed on the left "burn off" the grill to eliminate any odor or foreign matter. or right side of your grill (or Secondary Rack) with the Ignite the burners, lower the Lid, and operate grill on Burners lit on the opposite side.
- Page 23 Guide to Infrared Grilling using the Direct Cooking Method Grilling Steak and Ribs Cut of Meat Approx. Total Cooking Times Turn the grill Burners on , close the Lid and preheat your T-bone steak Rare: 4-6 minutes grill 3 to 5 minutes. Open Lid and place food on the mid Sirloin steak Medium: 6-8 minutes section of a Cooking Grid.
- Page 24 Guide to Roasting & Baking using the Indirect Cooking Method An Important Note About Infrared Heat Settings Food preparation The suggested heat settings and cooking times shown are Trim meat of excess fat. Truss meat and poultry with cooking approximate. Unlike the controlled environment inside your string to retain shape if desired.
- Page 25 Guide to Smoking Preparing to Smoke Smoking gives food a distinctive, delicious flavor. You will find a variety of wood chips available for use in smoking grilled foods. Pre-soaking of wood chips may be required so read and follow the manufacturer's instructions for preparing smoking chips prior to use.
- Page 26 Guide to Stir-Frying and Deep-Frying STIR-FRYING TECHNIQUES DEEP-FRYING TECHNIQUES This method of cooking is popular around the world and can A wide variety of foods can be deep-fried outdoors on your be easily accomplished outdoors on your gas grill. It's a quick grill, from potatoes, to seafood and chicken.
- Page 27 Question: Question: Sometimes I hear a humming sound coming from my Can I convert my grill from one fuel type to another in regulator. What causes this? And - My grill has a low other words from LPG to NG or vice versa? flame and sometimes will not light.
- Page 28 Question: After every use (after your grill has cooled down), wipe The Regulator and Hose supplied with my gas grill stainless surfaces with a soft, soapy cloth or sponge does not fit the older LP Gas tank I’ve used for years. then rinse with water.
- Page 29 All Other Grill Parts - 5 Year Limited Warranty Grand Hall will require reasonable proof of your date of purchase. Therefore, you should send in the owner registration card or register online at www.grandhall.com. Save your receipt in case it is required as proof of purchase.
Need help?
Do you have a question about the XB10ALP and is the answer not in the manual?
Questions and answers