Nilfisk SC351 Li-Ion Manual
- Quick start manual (294 pages) ,
- Instructions for use manual (88 pages) ,
- User manual (84 pages)
Advertisement
- 1 INTRODUCTION
- 2 TECHNICAL DATA
- 3 MACHINE DESCRIPTION
- 4 USE
- 5 MAINTENANCE
- 6 SAFETY
- 7 Documents / Resources
INTRODUCTION
For general information or other detail not included in this Guide, see the User Manual on the supplied CD-ROM.
NOTE
The numbers in brackets refer to the components shown in Machine Description chapter.
CONTENT OF THE CD-ROM
The supplied CD-ROM contains "Start Doc" – User Manual – Spare Parts List – Reading Software (Adobe® Reader®).
SYSTEM REQUIREMENTS
Windows® - Intel® Pentium® III processor or equivalent, Microsoft® Windows® Vista; Windows XP Professional, Home Edition or Tablet PC Edition with Service Pack 2; Microsoft Windows 2000 with Service Pack 4; Windows 2003 Server, 128 MB RAM (256 MB recommended for complex modules or heavy documents), Microsoft Internet Explorer 6.0 or 7.0, Firefox® 1.5 or 2.0, Mozilla® 1.7, AOL 9.
Macintosh® - PowerPC® G3, G4, G5 or Intel® processor - Mac OS X version 10.4.3 to version 10.4.9 - 128 MB RAM (256 MB recommended for complex modules or heavy documents) - 170 MB available disk space - Safari 2.0.2.
IDENTIFICATION DATA
The machine serial number and model name are marked on the plate (1).
Product code and year of production are marked on the same plate (Date code: A16, means January 2016).
The machine model year is written also in the declaration of conformity.
This information is useful when requiring machine spare parts.
OPERATION CAPABILITIES
This scrubber-dryer is used to clean (scrubbing and drying) smooth and solid floors, in civil or industrial environment, under safe operation conditions by a qualified operator.
The scrubber-dryer cannot be used for fitted carpet and carpet cleaning.
CONVENTIONS
Forward, backward, front, rear, left or right are intended with reference to the operator's position, that is to say in driving position with the hands on the handlebar (2).
TECHNICAL DATA
| Description | SC351 Li-ion |
| Maximum gradient when working | 2% |
| Sound pressure level at workstation (ISO 11201, ISO 4871, EN 60335-2-72) (LpA) | 65 ± 3 dB(A) |
| Machine sound pressure level (ISO 3744, ISO 4871, EN 60335-2-72) (LwA) | 84 dB(A) |
| Vibration level at the operator's arms (ISO 5349-1, EN 60335-2-72) | < 2.5 m/s2 |
| IP protection class | X4 |
| Protection class (electric) | III |
| Standard battery | 439 Wh |
| Battery charger | 100-240 VAC/50/60 Hz |
| Rated power | 500 W |
| Net weight | 45 kg |
| Gross vehicle weight (GVW) | 56 kg |
| Shipping weight | 63 kg |
Machine material composition and recyclability
| Type | Recyclable percentage | SC351 Li-ion weight percentage |
| Aluminium | 100% | 18% |
| Electric motors - various | 29% | 9% |
| Ferrous materials | 100% | 20% |
| Wiring harness | 80% | 9% |
| Liquids | 100% | 0% |
| Plastic - non-recyclable material | 0% | 11% |
| Plastic - recyclable material | 100% | 18% |
| Polyethylene | 92% | 9% |
| Rubber | 20% | 7% |
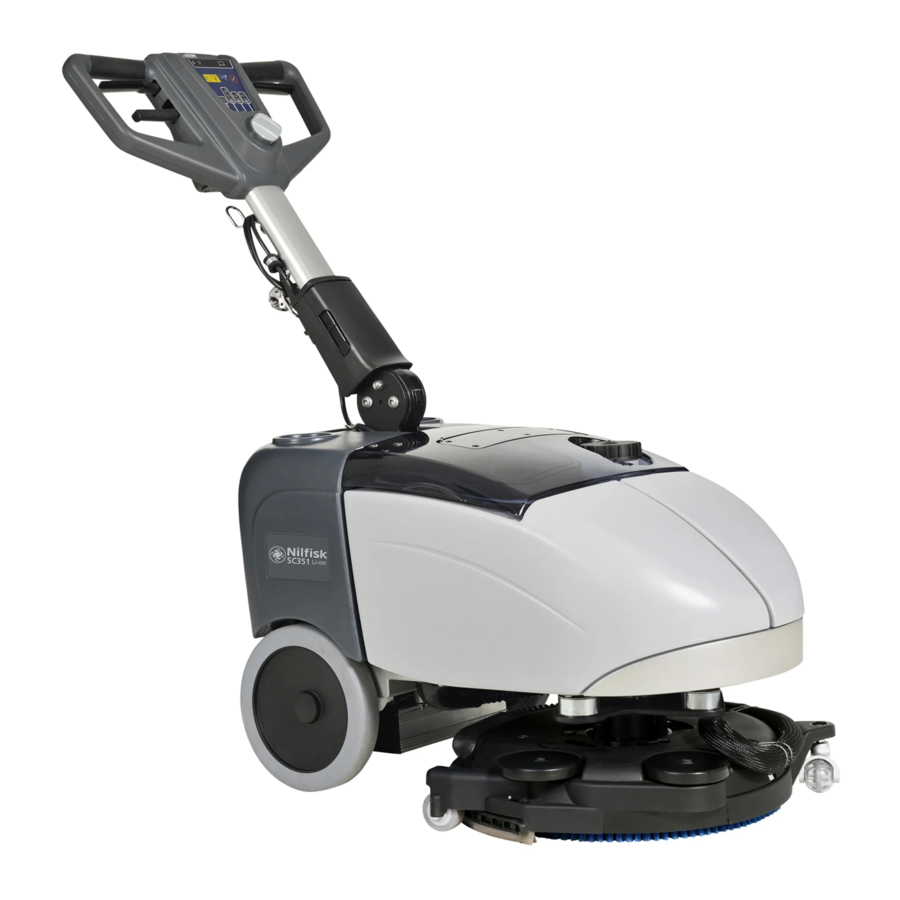
MACHINE DESCRIPTION
MACHINE STRUCTURE

- Serial number plate/technical data/conformity certification
- Handlebar with control panel (see the following paragraph)
- Accessory and battery compartment cover (closed)
- Accessory and battery compartment cover (open)
- Cover latch
- Can holder
- TC1
- Li-Ion battery box and controller assembly
- Battery charger
- Battery charger cable
- Battery charger cable holder
- Brush/pad-holder deck
- Brush deck gearmotor
- Squeegee vacuum hose
- Brush rotation direction
- Deck bumper wheels
- Brush deck wheels
- Squeegee
- Squeegee blades assembly
- Squeegee fasteners
- Solution tank filler plug
- Solution tank
- Recovery tank
- Transparent cover with vacuum grid
- Vacuum grid with automatic shut-off float
- Vacuum system motor
- Rear wheels on fixed axle
HANDLEBAR WITH CONTROL PANEL

- Function selection knob
- Scrubbing and drying program: brush - vacuum system -solution flow activation
- Scrubbing program: brush - solution flow activation
- Drying program: brush - vacuum system activation
- Machine switching off "0"
- Solution flow switch
- One drop - "ECO" solution flow
- Two drops - Maximum solution flow
- Battery charge LED indicators
- Green warning light - 10% < battery capacity ≤ 100%
- Yellow warning light - 5% ≤ battery capacity ≤ 10%
- Red warning light - battery capacity < 5%
- Machine start-up enabling push-button
- Brush levers
- Handlebar inclination adjusting lever
USE

On some points of the machine there are some adhesive plates indicating:
- DANGER
- WARNING
- CAUTION
- CONSULTATION
While reading this Manual, the operator must pay particular attention to the symbols shown on the plates (see Visible Symbols On The Machine paragraph).
Do not cover these plates for any reason and immediately replace them if damaged.
BATTERY CHECK/SETTING ON A NEW MACHINE
The electric components of the machine can be seriously damaged if the battery is either improperly installed or connected. The battery must be installed by qualified personnel only. Check the battery for damage before installation.
Turn off the machine with the function selection knob (31) turned to "0" at first.
Handle the battery with great care.
Install the battery terminal protection caps supplied with the machine.
The machine requires one 24V battery.
The machine can be supplied in one of the following modes:
Li-ion battery already installed on the machine
- Turn the function selection knob (31) on one of the programs to turn on the machine. If the green/yellow warning light (37) turns on, the batteries are ready to be used.
- If the red warning light turns on, the battery must be charged (see the procedure in Maintenance chapter).
Replace battery
- Buy appropriate battery (see the Technical Data paragraph).
For battery choice and installation, apply to qualified battery Retailers. - Replace the battery (see the following paragraph).
- Charge the battery (see the procedure in Maintenance chapter).
BATTERY REPLACEMENT

This machine requires sealed exclusive use Li-ion battery.

- First of all, turn the function selection knob (31) to "0" to turn off the machine.
- Open the cover (4) and take down the transparent cover (24), solution tank (22) and recovery tank (23). (Fig.1 left).
- Loosen the screws to take down the cover in the order of rear cover (8-1), side cover (8-2) and front cover (8-3). (Fig.1 right).
- Operator must disconnect the positive terminal first, second the control cable and then disconnect negative terminal on the battery (8-4) and lift the battery up a little then can pull it out in the left or right side.
- Replace the new battery to the machine and reconnect the terminals and control cable to the battery.
![]()
Pay special attention when connecting the battery pins. The black cable must be connected to the negative pin (-) of the battery first, then the control cable and then the red cable must be connected to the positive pin (+). A wrong connection or sequence can damage the battery. - Close the three box covers and re-lock the screws which are loosened before and then close the cover (4).
- Charge the battery (see the procedure in Maintenance chapter).
BEFORE MACHINE START-UP
Brush/pad-holder installation/removal
NOTE
Install either the brush (A, Fig. 2) or the pad-holder (B and C) according to the type of floor to be cleaned.

- Slightly lift the machine brush deck and place the brush under the deck.
- Turn the function selection knob (31) to program (32).
- Press the enabling push-button (38) together with the brush levers (39) to engage the brush/pad-holder.
Remove the brush/pad-holder deck by performing the following procedure:
- Check that the function selection knob (31) is turned to "0".
- Slightly lift the machine brush deck, then manually release the brush/pad-holder from the hub, by turning it abruptly in its normal rotation direction (D).
Available brushes and their relevant application guides (suggestions only)
| Models | MIDLITE GRIT 180 | MIDGRIT 240 | PROLITE | UNION MIX | |
| General cleaning | Concrete | ||||
| Terrazzo floor | |||||
| Ceramic tiles/quarrystones | |||||
| Marble | |||||
| Vinyl tiles | |||||
| Rubber tiles | |||||
| Polishing | Rubber tiles | ||||
| Marble | |||||
| Vinyl tiles |
Solution tank filling
- Open the plug (21) and fill the tank (22) with a solution suitable for the work to be performed. Do not fill the solution tank completely, leave few centimetres from the edge. Always follow the dilution instructions on the label of the chemical product used to prepare the solution. The solution temperature must not exceed 40°C.
![]()
Use only low-foam and non-flammable detergents, intended for automatic scrubber applications.
![]()
When using floor cleaning detergents, follow the instructions on the labels of the detergent bottles. To handle floor cleaning detergents, wear suitable gloves and protections.
Adjustments
- Press the lever (40) and adjust the handlebar (2) to reach a comfortable position.
MACHINE START AND STOP
Starting the machine
- Prepare the machine as shown in the previous paragraph.
- Turn the function selection knob (31) to turn on the machine and select one of the programs according to the following table:
Position Symbol Program (32) ![]()
Scrubbing and drying.
Brush - vacuum system - solution flow activation(33) ![]()
Scrubbing.
Brush - solution flow activation(34) ![]()
Drying.
Brush - vacuum system activation - Turn the solution flow control switch (36) to one of the following positions, according to the type of cleaning to be performed
- One drop: to scrub/clean floors which are not very dirty; in this condition the machine can work with an autonomy of 50minutes (0.25 litres/min. average).
- Two drops: to scrub/clean floors which are quite or very dirty; in this condition the machine can work with an autonomy of 25 minutes (0.5 litres/min. average).
- While keeping the hands on the handlebar (2), start the machine by pressing the enabling push-button (38) together with the brush levers (39).
NOTE
If the green/yellow warning light (37) turns on, the machine is ready to be used. If the red warning light turns on, the battery must be charged (see the procedure in Maintenance chapter).


Stopping the machine
- Release the brush levers (39) and the enabling push-button (38).
- Turn the function selection knob (31) to "0" to turn off the machine.
![]()
In case of immediate necessity and to stop all machine functions, turn off the machine with the function selection knob (31) turned to "0" at first. Reset the machine functions by switch the function selection knob (31).
MACHINE OPERATION (SCRUBBING/DRYING)
- Start the machine as shown in the previous paragraph.
- While keeping both hands on the handlebar (2), move the machine and start scrubbing/drying the floor.
- If necessary, adjust the solution quantity by using the switch (36).
- When necessary, to use the squeegee in the opposite direction, pry on the handlebar (2) and slightly lift the deck while the brush is turning. When the deck is turned by 180° start to scrub/dry by drawing the machine.
To resume working in the normal forward direction, push the machine forward until the brush deck (12) returns to the original position.
![]()
Pay attention when lifting the deck with the brush turning: The deck will suddenly turn by 180°. Pay attention to the moving part, do not hit and/or damage things, walls or people.
![]()
To avoid damaging the floor surface, do not use the brush without the solution and, when the machine is not operating, stop the brush/pad-holder by releasing the levers (39).
![]()
Before lifting the brush/pad, turn it off by releasing the levers (39).
NOTE
For correct scrubbing/drying of floors at the sides of the walls, Nilfisk suggests to go near the walls with the right side the machine as shown in figure 3.


Machine speed adjustment
- The machine speed varies according to the type of floor to be cleaned and the choice of using the brush or the pad. If necessary, it is possible to adjust the machine speed, according to the procedure shown in Maintenance chapter.
Battery discharge during operation
- Until the green/yellow warning light (37) stays on, the batteries allow the machine to work normally. When the green/yellow warning light turns off and the red warning lights turn on, it is necessary to charge the battery as the machine residual autonomy is at the minimum level.
![]()
Do not use the machine with discharged battery, to avoid damaging the battery and reducing the battery life.
MACHINE TRANSPORT/PARKING
To transport/park the machine, proceed as follows.
- Check that the function selection knob (31) is turned to "0".
- Grab the handlebar (2) and slightly lift the machine brush deck. While holding the machine in this position, drive it to the transport/parking area.
- When finishing working, it is advisable to remove the brush/pad in order not to drag it on the floor and leave wet marks.
TANK EMPTYING
An automatic float shut-off system (25) turns off the vacuum system when the recovery tank (23) is full.
The vacuum system shut-down is signalled by an increase in the vacuum system motor noise, moreover the floor is not dried.

If the vacuum system turns off accidentally (for example, when the float is activated because of a sudden machine movement), to resume the operation: turn off the machine with the function selection knob (31) turned to "0", check that the float inside the grid (25) has gone down to the water level. Then turn on the vacuum system by pressing the function selection knob (31).
When the recovery tank (23) is full, empty it as shown.

Recovery tank emptying
- Check that the function selection knob (31) is turned to "0".
- Drive the machine to the appointed disposal area.
- Remove the transparent cover (24).
- Grab the handle (A, Fig. 4) and lift the recovery tank (B).
- Drain the recovery tank. Then, rinse the tank with clean water.
- Place the tank back again on its housing in the frame and install the transparent cover.
Solution tank emptying
- Perform steps 1 to 3.
- Grab the handle (C, Fig. 4) and lift the solution tank (D).
- Open the plug (E) and drain the solution tank. Then, rinse the tank with clean water.
- Place the tank back again on its housing in the frame and install the transparent cover.
AFTER USING THE MACHINE
After working, before leaving the machine:
- Empty the tanks (23 and 22) as shown in the previous paragraph.
- Perform the daily maintenance procedures (see the Maintenance chapter).
- Store the machine in a clean and dry place, with the brush/ pad-holder and the squeegee blades lifted or removed.
MACHINE LONG INACTIVITY
If the machine is not going to be used for more than 30 days, proceed as follows:
- Perform the procedures described in the previous paragraph.
- Store the machine in a clean and dry place.
- To safeguard the brush or squeegee blades, bend the handlebar (2) forward and park the machine as shown in figure 5.
![]()

MAINTENANCE
The lifespan of the machine and its maximum operating safety are ensured by correct and regular maintenance. The following chart provides the scheduled maintenance. The intervals shown may vary according to particular working conditions, which are to be defined by the person in charge of the maintenance.
Maintenance procedures must be performed with the machine switched off and the battery/battery charger cable disconnected.
Moreover, carefully read the instructions in the Safety chapter.
All scheduled or extraordinary maintenance procedures must be performed by qualified personnel, or by an authorised Service Center. This Manual describes only the easier and most common maintenance procedures.
NOTE
For other maintenance procedures shown in the Scheduled Maintenance Table, refer to the Service Manual that can be consulted at any Service Center.
SCHEDULED MAINTENANCE TABLE
| Procedure | Daily, after using the machine | Weekly | Every six months | Yearly |
| Battery charging | ||||
| Squeegee Cleaning | ||||
| Brush Cleaning | ||||
| Tank and Vacuum Grid Cleaning | ||||
| Squeegee blade check and/or replacement | ||||
| Solution valve check and cleaning | (1) | |||
| Brush deck rotation clutch check and/or replacement | (1) |
- For the relevant procedure, refer to the Service Manual.
SAFETY
The following symbols indicate potentially dangerous situations. Always read this information carefully and take all necessary precautions to safeguard people and property.
The operator's cooperation is essential in order to prevent injury. No accident prevention program is effective without the total cooperation of the person responsible for the machine operation. Most of the accidents that may occur in a factory, while working or moving around, are caused by failure to comply with the simplest rules for exercising prudence. A careful and prudent operator is the best guarantee against accidents and is essential for successful completion of any prevention program.
SYMBOLS
VISIBLE SYMBOLS ON THE MACHINE

Carefully read all the instructions before performing any operation on the machine.

Do not wash the machine with direct or pressurized water jets.

Do not use the machine on slopes with a gradient exceeding the specifications.
SYMBOLS THAT APPEAR ON THIS MANUAL
It indicates a dangerous situation with risk of death for the operator.
It indicates a potential risk of injury for people or damage to objects.
It indicates a caution or a remark related to important or useful functions. Pay careful attention to the paragraphs marked by this symbol.
NOTE
It indicates a remark related to important or useful functions.
CONSULTATION
It indicates the necessity to refer to the Instructions for use Manual before performing any procedure.
GENERAL INSTRUCTIONS
Specific warnings and cautions to inform about potential damages to people and machine are shown below.
- Before performing any cleaning, maintenance, repair or replacement procedure, turn the function selection knob to "0".
- This machine must be used by properly trained operators only.
- Do not operate the machine near toxic, dangerous, flammable and/or explosive powders, liquids or vapours: This machine is not suitable for collecting dangerous powders.
- Read all safety warnings and all instructions. Failure to follow the warnings and instructions may result in electrical shock, fire and/or serious injury.
- Keep the battery away from sparks, flames and incandescent material. During the normal operation explosive.
- Always protect the machine against the sun, rain and bad weather, both under operation and inactivity condition. Store the machine indoors, in a dry place: This machine must be used in dry conditions, it must not be used or kept outdoors in wet conditions.
- Pay attention to the machine moving parts. When using the machine, the deck can abruptly turn by 180°.
- Do not use the machine on incline.
- Before using the machine, close all doors and/or covers as shown in the User Manual.
- Check the machine carefully before each use, always check that all the components have been assembled before use. If the machine is not perfectly assembled it can cause damages to people and properties.
- This machine is not intended for use by persons (including children) with reduced physical, sensory or mental capabilities, or lack of experience and knowledge, unless they have been given supervision or instruction concerning use of the machine by a person responsible for they safety. Children should be supervised to ensure that they do not play with the machine.
- Close attention is necessary when used near children.
- When using floor cleaning detergents, follow the instructions on the labels of the detergent bottles.
- To handle floor cleaning detergents, wear suitable gloves and protections.
- Use brushes and pads supplied with the machine or those specified in the User Manual. Using the brushes or pads could reduce safety.
- In case of machine malfunctions, ensure that these are not due to lack of maintenance. If necessary, request assistance from the authorised personnel or from an authorised Service Center.
Documents / ResourcesDownload manual
Here you can download full pdf version of manual, it may contain additional safety instructions, warranty information, FCC rules, etc.
Advertisement


Need help?
Do you have a question about the SC351 Li-Ion and is the answer not in the manual?
Questions and answers