Lightware UCX Series Manual
- User manual (109 pages) ,
- Installation manual (18 pages)
Advertisement
Introduction
This document was created to help integrators during the installation and configuration process of the Voice Tracking Solution.
The system's main components are:
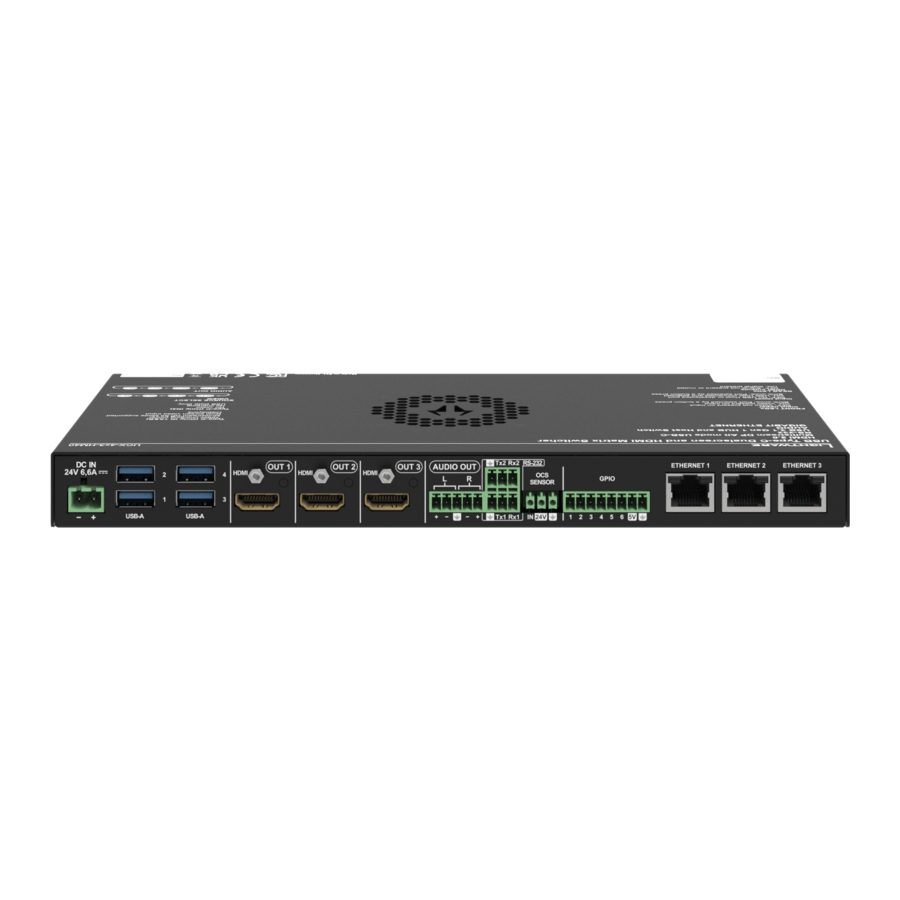
Lightware UCX series Universal Matrix Switcher,
Sennheiser TCC2 ceiling microphone,
PTZ camera, that can be controlled via Visca protocol.
Camera for overview shot of the room.
INOGENI CAM230 USB and HDMI multi-camera switcher
The room automation is done by Lightware Advanced Room Automation (LARA). It is a modular system which includes drivers for the equipment applied in the system. In our case TCC2 driver, a Visca protocol driver and two user-panels that make setup easier.
![]()
Solution overview
Voice Tracking PTZ Control solution provides automatic camera control based on vector information provided by Sennheiser TCC2 ceiling microphone array.
Screenshot from Sennheiser Cockpit Zones:

The basic principle of operation is querying the direction information of the sound source from the TCC2 microphone. According to the vector information coming from the microphone the algorithm of the LARA configuration tries to choose a camera preset from the previously stored ones which fits the best. If any of the stored vector information matches the current vector the corresponding preset is recalled from the camera, aiming it to the person speaking.
The Sennheiser TCC2 unit includes 28 omnidirectional microphone capsules. This enables the microphone to determine the currently speaking person's position in the meeting room at any time. It is indicated on the vector panel of the LARA configuration, helping integrators in the configuration process.

Setting up the camera preset can be done using the PTZ Camera Control panel of the LARA configuration:

Installation and Configuration
Installation
Minimum equipment requirement for the solution:
- Lightware UCX series Universal Matrix Switcher (FW: v2.9.0b6)
- Sennheiser TCC2 ceiling microphone array (FW: 1.8.0)
- PTZ camera controllable via VISCA protocol
- Camera for overview shot
- INOGENI CAM230 USB and HDMI multi-camera switcher (FW: 2.2)
- Ethernet network switch
- Cables
After the units are connected it is necessary to setup the Sennheiser TCC2 microphone's audio properties. Tuning the system may depend on the client's needs, however Sennheiser recommends to threat the room to achieve higher accuracy.
Before you start configuring Voice Tracking Solution, please setup the microphone.
Further information can be found here: https://en-us.sennheiser.com/tcc2
Please check the latest information on seamless video switcher here: https://inogeni.com/product/cam230/
Before uploading and configuring Voice Tracking Solution please download the latest Firmware from https://lightware.com/. Upgrade your UCX series Universal Matrix Switcher and activate LARA.
Configuration
Starting LARA, Uploading Configuration
Start a new browser window and start LARA. e.g.: https://192.168.1.88/lara
The IP address is: UCX series matrix device IP.
Choose: UPLOAD CONFIGURATION

Status bar information
After uploading and starting the configuration the status board displays the actual state of the configuration:

After uploading the configuration, you may see orange X markings in every instance field. This means that LARA is not running yet. Before running the configuration, the instance parameters must be set.
The parameter setting can be done with opening each instance's parameter section with this icon: ![]()
Setting parameters of TCC2 instance

First set the IP address of the TCC2 microphone.
TRACKING PARAMETER section:
Minimum level:
It is possible to determine the minimum sound pressure level to be considered. The vector, that contains lower sound pressure level value than the threshold, will be ignored. Setting this parameter low, results in a more sensitive system, to ignore room noise, set a higher threshold.
No sound detected period:
There is built-in silence detection. If there is no valid vector coming from the microphone until given time period e.g.: 10 sec, the system selects the fixed overview camera input of the seamless video switcher.
Silence detection enabled:
This enables the Silence Detection function, which activate room total shot in case of silence in the room.
Setting parameters of PTZ_CAM instance

It is possible to choose Ethernet (UDP) or RS232 control options.
In case of Ethernet set the IP address of the camera.
After choosing RS232 option set the baud-rate matching the camera settings and the RS232 port number of UCX series matrix connected to the PTZ camera.

The PTZ movement speed can be adjusted in the PAN TILT SETTINGS. Speed settings are used during the manual camera adjustments via PTZ camera panel.
Console output settings enables the LARA console log messages. It helps following the operation, and helps debugging.
Setting parameters of CAM230 instance

INOGENI CAM230 device is controlled via ethernet. IP address must be set for the device. If there is no authentication used, please leave those settings blank.
Please refer to User Manual of the CAM230 device.
Setting parameters of TCC2_logic instance
Various numbers of parameters give the integrator the maximum flexibility to customize the application as it is required from the customer.

The section above emphasizes that the instance names must be set, to make communication possible between LARA modules.

Polling interval:
Polling interval sets the rate of querying the vector from TCC2. Lower rate (longer time period) slows down the operation, higher rate (shorter time period) fastens.
Maximum preset number:
By factory default there are 63 memory slots prepared for vector information in the system.
Depending on the application, it is possible to determine how many camera settings will be needed for seamless operation. Increasing number of camera presets/vector memory allows us to cover the whole room area more accurately. A large number of camera presets/vector memory helps accuracy but can slow down the system depending on the other parameters below.
AZI parameter tolerance:
This parameter defines the azimuth (horizontal) accuracy measured in degrees.
 Hint: The default 20 degrees tolerance may provide the appropriate accuracy in cases when people are sitting in their chairs during the meeting.
ELEV parameter tolerance:
This parameter defines the elevation (vertical) accuracy measured in degrees.
Hint: The default 20 degrees tolerance may provide the appropriate accuracy in cases when people are sitting in their chairs during the meeting.
Multiple Sound sources period:
This parameter defines time period. If several vectors arrive from different directions within this period (different source of sound/speech is detected), situation is evaluated as crowd talking which indicates calling the room total view camera preset (preset 0).
Single sound source period:
If the vector information continuously indicates that there is no other sound source during this period, the algorithm will evaluate that as one person is speaking so it will aim the PTZ camera to the speaker.
The parameter determines this time period length.
PTZ movement suspend time:
According to this parameter value the system suspends every PTZ camera movement to improve smooth, seamless operation. Fast PTZ camera movements can cause discomfort for participants in the room, as well as online.
It is recommended to stay on a particular shot with the camera for a while before changing camera preset. This value is responsible for this period.

Video switcher in the system
If the system contains seamless video switcher set this to true, if not set this to false. If it false connect the USB camera to one of the UCX/MMX2 martix's USB input.
Video switcher input number where the PTZ Cam is connected:
The input number of the seamless video switcher where the PTZ camera is connected.
Video switcher Fixed Cam:
The input number of the seamless video switcher where the PTZ camera is connected.
Console output:
This setting enables the LARA console log messages. It helps following the operation, and helps when debugging.
Hint:
It may be an iteration to find the necessary and sufficient number of presets in order to keep the quick reaction of the algorithm and covering the room with enough camera shots, meanwhile avoiding the unwanted interruption of operation which can cause uncontrolled PTZ camera operation.
Finalizing the parameter settings
After setting all the necessary parameters, please press start:

If the configuration runs, and the IP address settings are properly done all the status sign should be green on the left side of each instance's status section:

Now the system is ready to start configuring the algorithm of Voice Tracking.
Operation
Setting up Voice Tracking
Vector Memory settings
Vector memories can be stored/recalled/deleted with the Vector Panel.
Please be silent in the room during the setup period.
One way to set up the vectors is the following:
- take a tablet/laptop with the opened Vector Information and PTZ control panel: /The tablet/laptop must be connected to the same LAN where the devices are connected.

- Disable automatic PTZ camera movement on the PTZ panel.
![]()
- Disable silence detection in the TCC2 instance:

- Aim you PTZ camera to the place of the sound source with the help of PTZ panel's buttons. (e.g.: find yourself in the camera's monitor)
![]()
- Clear the vector panel by refreshing the browser's page.
- Select preset number on the Vector panel with button +/-

- Speak loudly until the vectors appear in the panel.

- If a sound source (the vector on the panel, your place in the room) and the camera image matches your requirements in other words the vectors show the same direction then Press Store Memory only or Store Memory & CAM Preset. This will store the vector or the vector and camera preset respectively to the selected memory slot and PTZ preset.
The location vector is stored in the UCX series matrix's memory, the camera preset is saved in the camera's memory.


PTZ Preset settings
Store a shot by entering a number e.g. "1", and push STORE button. Check it by pressing "1" Recall.
Compose shots and make camera presets for all the places where speakers may be present during the usage of the room.

Check the individual presets with the help of the numpad on the PTZ panel. The "Selected Vector Memory" number and the PTZ preset numbers must be paired.
Video matrix manual control
It is possible to check the seamless switcher with the help of PTZ control panel. These buttons control the input matrix of the switcher.

PTZ movement must be disabled in order to make these buttons operate.
Starting the operation
Enable the PTZ movement on the PTZ panel:

Check the individual presets with the help of numpad on the PTZ panel or with the Recall PTZ preset button of the Vector Information Panel.
As a final test please take the places after one by one, talk loudly and observe the picture of the camera. If something went wrong repeat the steps above. It is possible to correct any memory settings with storing it again until they will be perfect.
Summary of Operation Principle
The basic principle of the operation is querying the information of the sound source from TCC2. According to the vector information coming from the microphone, the algorithm of the LARA configuration finds a camera preset from the previously stored ones which fits the best. If any of the stored vector information matches the current vector the corresponding preset is recalled from the camera, aiming it to the person talking.
Documents / Resources
References

Download manual
Here you can download full pdf version of manual, it may contain additional safety instructions, warranty information, FCC rules, etc.
Advertisement


Need help?
Do you have a question about the UCX Series and is the answer not in the manual?
Questions and answers