Ricoh Aficio SP C320DN Hardware Manual
Ricoh aficio sp c320dn: hardware guide
Hide thumbs
Also See for Aficio SP C320DN:
- Brochure & specs (4 pages) ,
- Operating instructions manual (44 pages) ,
- Software manual (248 pages)
Table of Contents
Advertisement
Read this manual carefully before you use this machine and keep it handy for future reference. For safe and correct use, be sure to read "Safety
Information" before using the machine.
1
Guide to the Printer
2
Setting Up the Printer
3
Installing Options
4
Connecting the Printer
5
Configuration
6
Loading Paper
7
Maintaining the Printer
8
Adjusting the Printer
9
Troubleshooting
10
Removing Misfed Paper
11
Appendix
Operating Instructions
Hardware Guide
Advertisement
Table of Contents
Troubleshooting

Subscribe to Our Youtube Channel
Related Manuals for Ricoh Aficio SP C320DN


Summary of Contents for Ricoh Aficio SP C320DN
-
Page 1: Operating Instructions
Operating Instructions Hardware Guide Guide to the Printer Setting Up the Printer Installing Options Connecting the Printer Configuration Loading Paper Maintaining the Printer Adjusting the Printer Troubleshooting Removing Misfed Paper Appendix Read this manual carefully before you use this machine and keep it handy for future reference. For safe and correct use, be sure to read "Safety Information"... - Page 2 Introduction This manual contains detailed instructions and notes on the operation and use of this machine. For your safety and benefit, read this manual carefully before using the machine. Keep this manual in a handy place for quick reference. Do not copy or print any item for which reproduction is prohibited by law. Copying or printing the following items is generally prohibited by local law: bank notes, revenue stamps, bonds, stock certificates, bank drafts, checks, passports, driver's licenses.
-
Page 3: Table Of Contents
TABLE OF CONTENTS How to Read This Manual..........................6 Symbols................................6 Model-Specific Information..........................7 Positions of WARNING and CAUTION Labels....................8 Power Switch Symbols...........................9 Manuals for This Printer...........................10 List of Options..............................11 Operating Instructions............................12 Reading the HTML Manuals on the CD-ROMs..................12 Reading the HTML Manuals That You Install on the Computer...............12 1. - Page 4 Installing the Interface Units..........................57 Installing the Gigabit Ethernet Board......................57 Installing the Wireless LAN Interface Board....................60 Installing the IEEE 1284 Interface Board....................62 Installing the SD Memory Card Options......................65 4. Connecting the Printer Ethernet Cable Connection..........................69 Reading the LED Lamps..........................72 USB Cable Connection............................73 Digital Camera Connection........................74 Parallel Cable Connection..........................77 5.
- Page 5 Standard Paper Feed Tray........................105 Optional Paper Feed Tray........................106 Bypass Tray..............................107 Supported Paper Types..........................108 Plain Paper..............................108 Middle Thick..............................108 Thick Paper..............................108 Thin Paper..............................109 Letterhead..............................110 Label Paper..............................110 Coated Paper (Glossy)..........................110 Coated Paper (Glossy: Thick)........................110 Coated Paper (Matted)..........................111 Coated Paper (Matted: Thick)........................111 Special Paper............................112 Preprinted Paper............................112 Color Paper..............................112 Recycled Paper............................113...
- Page 6 Printing Using Registered Paper Types....................146 7. Maintaining the Printer Replacing the Print Cartridge........................147 Replacing the Waste Toner Bottle........................154 Replacing the Intermediate Transfer Unit.....................161 Replacing the Maintenance Kit........................172 Cautions When Cleaning..........................179 Cleaning the Toner Density Sensor......................180 Cleaning the Friction Pad and the Paper Feed Roller.................182 Cleaning the Registration Roller and the Paper Tray..................185 8.
- Page 7 Misfeed Tray 1............................227 Misfeed Bypass Tray..........................229 Paper Misfeed Message (B).........................231 Paper Misfeed Message (Y).........................234 Paper Misfeed Message (Z).........................235 11. Appendix Moving and Transporting the Printer......................237 Moving the Printer in a Short Distance....................238 Consumables..............................239 Print Cartridge............................239 Waste Toner Bottle............................240 Intermediate Transfer Unit.........................240 Maintenance Kit............................241 Specifications..............................242 Mainframe..............................242...
-
Page 8: How To Read This Manual
How to Read This Manual Symbols This manual uses the following symbols: Indicates points to pay attention to when using the machine, and explanations of likely causes of paper misfeeds, damage to originals, or loss of data. Be sure to read these explanations. Indicates supplementary explanations of the machine's functions, and instructions on resolving user errors. -
Page 9: Model-Specific Information
Model-Specific Information This section explains how you can identify the region your machine belongs to. There is a label on the rear of the machine, located in the position shown below. The label contains details that identify the region your machine belongs to. Read the label. CBK001 The following information is region-specific. -
Page 10: Positions Of Warning And Caution Labels
Positions of WARNING and CAUTION Labels This machine has labels for WARNING and CAUTION at the positions shown below. For safety, please follow the instructions and handle the machine as indicated. CBK002 CBK003 Do not incinerate spilled toner or used toner. Toner dust is flammable and might ignite when exposed to an open flame. -
Page 11: Power Switch Symbols
CBK008 Be careful not to trap your fingers when opening or closing the top cover. CBK009 Do not incinerate spilled toner or used toner. Toner dust is flammable and might ignite when exposed to an open flame. Disposal should take place at an authorized dealer or an appropriate collection site. If you dispose of the used toner containers yourself, dispose of them according to local regulations. -
Page 12: Manuals For This Printer
Manuals for This Printer Read this manual carefully before you use this printer. Refer to the manuals that are relevant to what you want to do with the printer. • Media differ according to manual. • The printed and electronic versions of a manual have the same contents. •... -
Page 13: List Of Options
List of Options This section provides a list of options for this printer, and how they are referred to as in this manual. Option List Referred to as Paper Feed Unit TK1010 Paper feed unit Hard Disk Drive Option Type C320 Hard disk Memory Unit Type G 256 MB SDRAM module... -
Page 14: Operating Instructions
Operating Instructions This section explains how to use HTML format manuals. Reading the HTML Manuals on the CD-ROMs This section describes how to read the HTML manuals on the supplied manual CD-ROMs. Insert the CD-ROM into the CD-ROM drive of your computer. Select a language and a product, and then click [OK]. - Page 15 Install the HTML manuals following the on-screen instructions. When the installation is complete, click [Finish]. Click [Exit]. Open the HTML manuals that you installed. When opening the manuals from an icon, double-click the manual icon on the desktop. When opening the manuals from the [Start] menu, point to [All Programs] (Windows 2000: [Programs]), and then [Product Name].
-
Page 17: Guide To The Printer
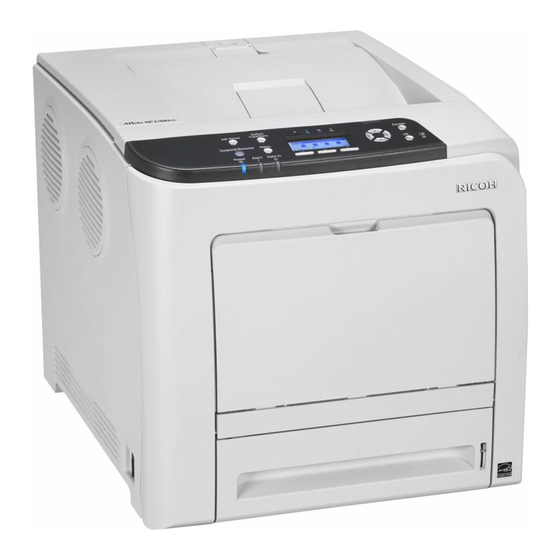
1. Guide to the Printer This chapter explains the names and functions of the printer's components. Exterior: Front View This section introduces the names and functions of the parts on the front and left sides of the printer. CBK012 1. Standard Tray Output is stacked here with the print side down. - Page 18 1. Guide to the Printer 7. Bypass Tray Up to 100 sheets of plain paper can be loaded. 8. Power Switch Use this switch to turn the power on and off. 9. Top Cover Open this cover to replace the print cartridge. 10.
-
Page 19: Exterior: Rear View
Exterior: Rear View Exterior: Rear View This section introduces the names and functions of the parts on the rear and right sides of the printer. CBK013 1. Memory Cover Remove this cover to install the additional SDRAM module and hard disk (optional). 2. - Page 20 1. Guide to the Printer • For details about the messages which appear on the screen to prompt you to replace the units, see "Error and Status Messages Appear on the Control Panel". • p.201 "Error and Status Messages Appear on the Control Panel"...
-
Page 21: Interior
Interior Interior This section introduces the names and functions of the parts inside of the printer. CBK014 1. Print Cartridge Loads from the printer rear, in the order of cyan (C), magenta (M), yellow (Y), and black (K). If the following message appears on the control panel, replace the print cartridge: •... - Page 22 1. Guide to the Printer • "Replacemnt Requird:IntTrans" • For details about the messages which appear on the screen to prompt you to replace the units, see "Error and Status Messages Appears on the Control Panel". • p.201 "Error and Status Messages Appear on the Control Panel"...
-
Page 23: Control Panel
Control Panel Control Panel This section explains names and usage of the parts of the control panel. 10 9 CBK015 1. [Job Reset] Key When the printer is online, press this key to cancel an ongoing print job. 2. [Switch Functions] Key Press this key to switch between the operation screen of the printer function and the function screens of the extended features currently in use. -
Page 24: Menu Key
1. Guide to the Printer Example: When this manual instructs you to press [Option], press the selection key on the left below the initial screen. 9. [Menu] Key Press this key to configure and check the current printer settings. 10. Data In Indicator Flashes when the printer is receiving data from a computer. -
Page 25: Display Panel
Display Panel Display Panel This section explains configuration using the initial screen of the display panel. The items are highlighted when selected. • Do not touch the display panel. The following screen appears when you turn on the printer. CBK016 1. - Page 26 1. Guide to the Printer...
-
Page 27: Setting Up The Printer
2. Setting Up the Printer This chapter explains how to set up and configure the printer for operation. Printer Setup Procedure Use the following procedure to set up the printer. Select a suitable location for your printer. For details, see p.26 "Place to Install" Take the printer out of its box, and then remove the protective materials and adhesive tape. -
Page 28: Place To Install
2. Setting Up the Printer Place to Install The printer's location should be carefully chosen because environmental conditions greatly affect its performance. • Do not use any frequencies other than those that match the specifications shown. Doing so could result in fire or electric shock. •... - Page 29 Place to Install • If the power cord is damaged and its inner wires are exposed or broken, contact your service representative for a replacement. Use of damaged power cords could result in fire or electric shock. • Be sure to locate the machine as close as possible to a wall outlet. This will allow easy disconnection of the power cord in the event of an emergency.
- Page 30 2. Setting Up the Printer CBK018 Optimum Environmental Conditions Permissible and recommended temperature and humidity ranges are as follows: CBK019 • White area: Permissible Range • Blue area: Recommended Range • The printer must be level within 3 mm, 0.2" from both front to rear and left to right. •...
- Page 31 Place to Install • Dusty areas • Areas with corrosive gases • Areas that are excessively cold, hot, or humid • Areas directly exposed to currents of hot, cold, or room-temperature air from air conditioners • Areas directly exposed to radiant heat from heaters •...
-
Page 32: Unpacking
2. Setting Up the Printer Unpacking To protect it from shock and vibration during transit, this printer comes packaged in cushioning foam and secured with tape. Remove these protective materials after bringing the machine to where it will be installed. •... - Page 33 Unpacking • When lifting the machine, use the inset grips on both sides. The printer could break or cause an injury if dropped. • Removed tape is dirty. Be careful not to let it touch your hands or clothes. • Do not grip on the tray area when lifting the printer. •...
- Page 34 2. Setting Up the Printer Pull up top cover open lever to open the top cover. CBK200 Remove the adhesive tape. CBK029 CBK238 Take each print cartridge out. Gripping its center, carefully pull the print cartridge upward and out.
- Page 35 Unpacking CBK204 When taking out the black print cartridge, be sure to place it on at a flat surface, and then remove the protection sheet also. CBK031 Do not touch the print cartridge's photo conductor unit. CBK026 Do not touch a metal part.
- Page 36 2. Setting Up the Printer CBK250 Hold the print cartridge and shake it from side to side five or six times. CBK032 Check the toner color and location correspond, and then carefully insert the print cartridge vertically. CBK033...
- Page 37 Unpacking Close the top cover with both hands carefully. Be careful not to trap your fingers. CBK034...
-
Page 38: Turning The Printer's Power On And Off
2. Setting Up the Printer Turning the Printer's Power On and Off This section explains the procedures for turning the printer's power on and off. • It is dangerous to handle the power cord plug with wet hands. Doing so could result in electric shock. - Page 39 Turning the Printer's Power On and Off Plug in the power cable. CBK046 Insert the plug of the power cord into the wall socket securely. CBK047 Turn the power switch to " On". The power indicator on the control panel lights up. CBK048 •...
-
Page 40: Turning Off The Power
2. Setting Up the Printer Turning off the Power Use this procedure to turn off the printer's power. Press the [Menu] key. CBK049 Press the [ ] or [ ] key to select [Shutdown], and then press the [OK] key. Press [Yes]. - Page 41 Turning the Printer's Power On and Off • Even if you follow the shutdown procedure, the printer might not shutdown in the following cases: • If it is communicating with external devices. • If the hard disk is active. • If the printer's cover is opened. Setting the ECO Night Sensor This printer can detect the brightness of ambient light and automatically power down if the level it detects is below a specified minimum.
- Page 42 2. Setting Up the Printer Press the [ ] or [ ] key to select [ECO Night Sensor], and then press the [OK] key. Press the [ ] or [ ] key to select [Auto Power Off Setting], and then press the [OK] key. Press the [ ] or [ ] key to select [Active], and then press the [OK] key.
- Page 43 Turning the Printer's Power On and Off • Turn on the main power switch to restart the printer whose main power has been turned off by ECO Night Sensor function.
-
Page 44: Selecting The Display Language
2. Setting Up the Printer Selecting the Display Language Select a language using the procedure described here. The message in the selected language will appear on the display. Press the [Menu] key. CBK049 Press the [ ] or [ ] key to select [Language], and then press the [OK] key. Press the [ ] or [ ] key to select the preferred language, and then press the [OK] key. -
Page 45: Test Printing
Test Printing Test Printing Print a test print in order to verify that the printer is working normally. Test printing checks printer performance only; it does not test the connection to the computer. Press the [Menu] key. CBK049 Press the [ ] or [ ] key to select [List/Test Print], and then press the [OK] key. Press the [ ] or [ ] key to select [Config. - Page 46 2. Setting Up the Printer...
-
Page 47: Installing Options
3. Installing Options This chapter explains how to install various options for this printer. Available Options By installing options, you can improve printer performance and expand the available features. • Before installing or removing options, always disconnect the power cord plugs from the wall outlet and allow time for the main unit to fully cool. - Page 48 3. Installing Options Loads up to 500 sheets of paper. Up to one paper feed unit can be installed on the printer. Installed tray unit is identified as "Tray 2". For details about attaching the paper feed unit, see "Attaching the Paper Feed Unit". Internal options CBK052 1.
- Page 49 Available Options • p.65 "Installing the SD Memory Card Options" • p.242 "Specifications"...
-
Page 50: Attaching The Paper Feed Unit
3. Installing Options Attaching the Paper Feed Unit • If the machine topples, or if a cover or other part gets broken, you must turn the power switch to off and disconnect the power cord plug from the wall outlet. Then contact your service representative and report the problem. - Page 51 Attaching the Paper Feed Unit Check the package contains the following: Paper Feed Unit (including a paper tray) CBK054 Turn off the printer's power switch, and then unplug the printer's power cord from the wall outlet. Remove the adhesive tape from the optional paper feed unit. CBK055 Lift the printer using the inset grips on both sides of the printer.
- Page 52 3. Installing Options There are three upright pins on the optional paper feed unit. Align them with the holes on the underside of the printer, and then carefully lower the printer. CBK056 After installing the option, print the configuration page to confirm the installation. •...
-
Page 53: Installing The Memory Expansion Units
Installing the Memory Expansion Units Installing the Memory Expansion Units • Do not touch the inside of the controller board compartment. It may cause a machine malfunction or a burn. Installing the SDRAM Module • Before installing the memory unit, turn off the printer's power switch and unplug the power cable. After installing the memory unit, be sure to close the memory cover, and then turn the printer back on. - Page 54 3. Installing Options Loosen the screw securing the inner cover by using a coin. CBK058 Push the levers on both ends of the slot outward ( ), and then remove the default module ( ). CBK243 Install a new SDRAM module. Be sure to install the memory unit as shown.
- Page 55 Installing the Memory Expansion Units To install the recommended memory, align the notch of the recommended memory with the protruding part of the vacant slot, and then carefully insert the module at an angle. CBK060 Keeping the module at an angle, press it down until it clicks into place. CBK061 To install the optional hard disk, use the "Install the Hard Disk"...
-
Page 56: Installing The Hard Disk
3. Installing Options • After finishing the installation, you can check the memory unit is properly installed: Print the configuration page from the [List/Test Print] menu. If it is installed properly, the memory capacity will appear under "Total Memory" on the configuration page. •... - Page 57 Installing the Memory Expansion Units Remove the memory cover. CBK057 Loosen the screw securing the inner cover by using a coin. CBK058 Be sure to install the hard disk as shown. CBK247 Align the connector of the hard disk ( ) with the connector on the board of the printer ( ), and then carefully push in the hard disk until it can go no further.
- Page 58 3. Installing Options CBK201 Be sure to set the hard disk parallel with the printer. • After finishing installation, you can check the hard disk is properly installed: Print the configuration page from the [List/Test Print] menu. If it is installed properly, you will see "Hard Disk" for "Device Connection"...
-
Page 59: Installing The Interface Units
Installing the Interface Units Installing the Interface Units Installing the Gigabit Ethernet Board • The printer's Ethernet and USB ports are not available when the Gigabit Ethernet board is installed in to the printer. Use the Ethernet and USB ports on the Gigabit Ethernet board. •... - Page 60 3. Installing Options Remove the cable cover. CBK233 Disconnect the cables from the Ethernet port and the USB port of the printer, and cover each port with its protective cap. CBK072 Remove the two screws and remove the cover of the slot in which the Gigabit Ethernet board is installed.
- Page 61 Installing the Interface Units Fully insert the Gigabit Ethernet board. CBK074 Tighten the two screws to secure the Gigabit Ethernet board. Check the Gigabit Ethernet board is connected firmly to the interface board slot. CBK075 Connect the cable to the Gigabit Ethernet board. For details see "Ethernet Cable Connection". •...
-
Page 62: Installing The Wireless Lan Interface Board
3. Installing Options Installing the Wireless LAN Interface Board • Before beginning work, ground yourself by touching something metal to discharge any static electricity. Static electricity can damage the unit. • Do not subject the unit to physical shocks. Check the contents of the package. BFL301S Turn off the power, and then unplug the power cord. - Page 63 Installing the Interface Units CBK255 Fully insert the Wireless LAN interface board. CBK078 Tighten the two screws to secure the interface board. Check the Wireless LAN interface board is connected firmly to the interface board slot. CBK079...
-
Page 64: Installing The Ieee 1284 Interface Board
3. Installing Options Attach the cable cover. CBK235 • Confirm that the interface board was correctly installed by printing the configuration page. If it is correctly installed, "Wireless LAN" will appear for "Device Connection" on the configuration page. • If the board was not installed properly, repeat the procedure from step 4. If it cannot be installed correctly even after reattempting installation, contact your sales or service representative. - Page 65 Installing the Interface Units Check the contents of the package. BFL302S Turn off the power, and then unplug the power cord. Remove the cable cover. CBK233 Remove the two screws and remove the cover of the slot in which the 1284 interface board is installed.
- Page 66 3. Installing Options Fully insert the IEEE 1284 interface board. CBK082 Tighten the two screws to secure the interface board. Check the IEEE 1284 interface board is connected firmly to the interface board slot. CBK083 • Confirm that the IEEE 1284 interface board was correctly installed by printing the configuration page. If it is correctly installed, "Parallel Interface"...
-
Page 67: Installing The Sd Memory Card Options
Installing the SD Memory Card Options Installing the SD Memory Card Options This section explains how to install the following SD memory cards: the camera direct print card, data overwrite security unit, HDD encryption unit, NetWare card, and VM card. •... - Page 68 3. Installing Options Remove the one screw, and then carefully remove the cover of the SD card slot. CBK084 Carefully push in the SD card (notched corner upward and leading), until it clicks into place. CBK085 Insert the SD card in the appropriate slot as follows: •...
- Page 69 Installing the SD Memory Card Options Attach the cable cover. CBK235 • Do not touch the card while the printer is in use. It may come loose, even if pushed only slightly. The slot cover must be reattached. • You can confirm that the SD card was installed correctly by checking the control panel menu. Depending on the SD card, certain menu items appear on the display.
- Page 70 3. Installing Options...
-
Page 71: Connecting The Printer
4. Connecting the Printer This chapter explains how to connect network and USB cables. Ethernet Cable Connection Prepare a hub and other network devices, and connect the Ethernet cable to the printer. Connect 10BASE-T or 100BASE-TX cable to the printer's Ethernet port. For 1000BASE-T, the optional Gigabit Ethernet board is required. - Page 72 4. Connecting the Printer Connecting to the standard Ethernet port Remove the cable cover. CBK233 Connect the Ethernet cable to the Ethernet port. CBK088 Connect the other end of the cable to the network, for example using a hub. Attach the cable cover. CBK234 Connecting to the Ethernet port of the Gigabit Ethernet board Attach the ferrite core to the Ethernet cable.
- Page 73 Ethernet Cable Connection CBK089 Remove the cable cover. CBK233 Connect the Ethernet cable to the Ethernet port of the Gigabit Ethernet board. CBK076 Connect the other end of the cable to the network, for example using a hub. • For details about configuring the network environment, see "Ethernet Configuration". •...
-
Page 74: Reading The Led Lamps
4. Connecting the Printer Reading the LED Lamps Standard Ethernet port CBK090 1. Yellow indicator If the printer is connected to a 100BASE-TX Ethernet, the yellow indicator will be lit. This indicator will be unlit if the printer is connected to a 10BASE-T Ethernet. 2. -
Page 75: Usb Cable Connection
USB Cable Connection USB Cable Connection • For users outside the United States of America: properly shielded and grounded cables and connectors must be used for connections to a host computer (and/or peripheral) in order to meet emission limits. • For users in the United States of America: properly shielded and grounded cables and connectors must be used for connections to a host computer (and/or peripheral) in order to meet FCC emission limits. -
Page 76: Digital Camera Connection
4. Connecting the Printer CBK095 • Connecting the USB cable to the Gigabit Ethernet board USB port Connect the smaller connector of the USB cable to the USB port of the Gigabit Ethernet board. CBK093 Connect the opposite end's flat connector to the desired device such as your computer's USB interface, or a USB hub. - Page 77 USB Cable Connection CBK094 • This function requires the camera direct print card. • Use the USB cable bundled with your digital camera. • Make sure your digital camera supports PictBridge. Confirm that the printer is turned on. Remove the cable cover. CBK233 Connect the USB cable to the standard USB port A on the printer and to your digital camera.
- Page 78 4. Connecting the Printer Attach the cable cover. CBK237 • For details about the printing method, see "PictBridge Printing", Software Guide. • For details about installing the camera direct print card, see "Installing the SD Memory Card Options". • p.65 "Installing the SD Memory Card Options"...
-
Page 79: Parallel Cable Connection
Parallel Cable Connection Parallel Cable Connection The type of cable required varies depending on the computer you are using. Make sure to use the interface cable compliant with your computer. • For users outside the United States of America: properly shielded and grounded cables and connectors must be used for connections to a host computer (and/or peripheral) in order to meet emission limits. - Page 80 4. Connecting the Printer Connect the interface cable to the IEEE 1284 interface board. CBK096 Connect the other end of the interface cable to your computer, and then secure the cable. The printer is now connected to the computer. Install the printer driver. For details, see "Installing the Printer Driver Using Parallel Cable", Driver Installation Guide.
-
Page 81: Configuration
5. Configuration This chapter explains supported network connections, and settings for the IP addresses and the Wireless LAN security. Ethernet Configuration Configure the following network settings according to the network interface you are using. • Configure the printer for the network using the control panel. •... -
Page 82: Specifying An Ip Address (No Dhcp)
5. Configuration • If DHCP is in use on your network, the IP address, subnet mask, and gateway address are all set automatically. • If the printer is already placed on a TCP/IP-capable environment, you can also use a Web browser to configure the IP address-related settings. - Page 83 Ethernet Configuration Press the [ ] or [ ] key to select [Effective Protocol], and then press the [OK] key. Press the [ ] or [ ] key to select the appropriate network protocol, and then press the [OK] key. Press the [ ] or [ ] key to select [Active] or [Inactive], and then press the [OK] key.
-
Page 84: Receiving An Ip Address Automatically (Dhcp)
5. Configuration Enter the address, and then press the [OK] key. Change the IP address from "11.22.33.44" to an IP address supported by your network. Use the same method to assign the subnet mask and gateway address. Press the [ ] or [ ] key to select [Specify], and then press the [OK] key. If you do not select [Specify] in this step, the address you set will not be saved. - Page 85 Ethernet Configuration Press the [Menu] key. CBK049 Press the [ ] or [ ] key to select [Host Interface], and then press the [OK] key. Press the [ ] or [ ] key to select [Network], and then press the [OK] key. Press the [ ] or [ ] key to select [Machine IPv4 Address], and then press the [OK] key.
-
Page 86: Configuring Network Settings When Using Netware
5. Configuration • [Gateway]: Default Gateway Press the [Menu] key to return to the initial screen. Print a configuration page to confirm the settings. • For details about printing the configuration page, see "Test Printing". • p.43 "Test Printing" Configuring Network Settings When Using NetWare To use NetWare, select the appropriate NetWare frame type from the following. -
Page 87: Setting The Ethernet Speed
Ethernet Configuration Press the [ ] or [ ] key to select [Host Interface], and then press the [OK] key. Press the [ ] or [ ] key to select [Network], and then press the [OK] key. Press the [ ] or [ ] key to select [NW Frame Type], and then press the [OK] key. Press the [ ] or [ ] key to select the frame type to use, and then press the [OK] key. - Page 88 5. Configuration Printer Router/HUB [10Mbps Half [10Mbps Full [100Mbps [100Mbps Full [Auto Select] Duplex] Duplex] Half Duplex] Duplex] 10 Mbps half duplex 10 Mbps full duplex 100 Mbps half duplex 100 Mbps full duplex auto- negotiation (auto selection) • Connection cannot be established if the selected Ethernet speed does not match your network's transmission speed.
- Page 89 Ethernet Configuration Press the [ ] or [ ] key to select [Host Interface], and then press the [OK] key. Press the [ ] or [ ] key to select [Network], and then press the [OK] key. Press the [ ] or [ ] key to select [Ethernet Speed], and then press the [OK] key. Press the [ ] or [ ] key to select the Ethernet speed, and then press the [OK] key.
-
Page 90: Wireless Lan Configuration
5. Configuration Wireless LAN Configuration Configure the following Wireless LAN settings according to the network environment using the control panel. • Ethernet and Wireless LAN cannot be used at the same time. • To use Wireless LAN, set as follows using the control panel: press the [Menu] key, select [Host Interface], [Network], [LAN Type], and then select [Wireless LAN]. - Page 91 Wireless LAN Configuration Press the [ ] or [ ] key to select [Host Interface], and then press the [OK] key. Press the [ ] or [ ] key to select [Wireless LAN], and then press the [OK] key. Press the [ ] or [ ] key to select [Communication Mode], and then press the [OK] key. Press the [ ] or [ ] key to select the transmission mode of Wireless LAN, and then press the [OK] key.
-
Page 92: Setting The Ssid
5. Configuration Press the scroll keys to select the Ad-hoc channel, and then press the [OK] key. Select an Ad-hoc channel according to the IEEE 802.11 standard you are using. • When using IEEE 802.11 b/g: • (mainly Europe and Asia) Channels 1 to 13 •... -
Page 93: Confirming Wireless Network Connectivity
Wireless LAN Configuration Press [SSID], and then press [Enter]. Enter the characters, and then press [Accept]. You can switch among lower /upper cases and numeric characters by pressing [ABC/123]. The characters that can be used are ASCII 0 × 20-0 × 7e (32 bytes). Press the [Menu] key to return to the initial screen. -
Page 94: Cautions When Using A Wireless Lan
5. Configuration 1. If the Wireless LAN unit is receiving power, the upper indicator will be lit green. 2. If the printer is connected to an operational network and is communicating normally, the lower indicator will be lit orange. Cautions When Using a Wireless LAN A Wireless LAN uses radio waves instead of cables to send and receive data. -
Page 95: Setting Security Method Of Wireless Lan
Setting Security Method of Wireless LAN Setting Security Method of Wireless LAN Setting a WEP Key If the wireless network uses WEP to encrypt transmitted data, the corresponding WEP key must be set to the printer to allow communications with other network devices. Ask your network administrator for the WEP key to use. -
Page 96: Setting Wpa
5. Configuration Press the [ ] or [ ] key to select [WEP], and then press [Details]. When activating the WEP setting, you will need to enter the WEP key. If you have not entered the key, be sure to enter it. Press [Enter]. - Page 97 Setting Security Method of Wireless LAN • For setting WPA, installing the optional Hard disk is required. Press the [Menu] key. CBK049 Press the [ ] or [ ] key to select [Host Interface], and then press the [OK] key. Press the [ ] or [ ] key to select [Wireless LAN], and then press the [OK] key.
- Page 98 5. Configuration Press the [ ] or [ ] key to select [Encryption Method], and then press the [OK] key. Press the [ ] or [ ] key to select encryption method, and then press the [OK] key. Consult your network administrator for information about making encryption settings. Encryption settings are as follows: •...
- Page 99 Setting Security Method of Wireless LAN WPA uses CA certificates and a RADIUS server to provide secure wireless communication. • [WPA2-PSK] As with WPA-PSK, authenticate using the encryption key (a Pre-Shared Key) shared by the access point and client. Enter Pre-Shared Key using between 8 and 63 ASCII characters. •...
-
Page 100: Configuring Ieee 802.1X
5. Configuration Configuring IEEE 802.1X IEEE 802.1X can be configured using Web Image Monitor's administrator mode. You can select four types of EAP authentication method: EAP-TLS, LEAP, EAP-TTLS and PEAP. Note that each EAP authentication method has different configuration settings and authentication procedures. Types and requirements of certificates are as follows: EAP Types Requiring a "Site Certificate"... -
Page 101: Enabling Ssl
Configuring IEEE 802.1X Enter appropriate "Common Name" and "Country Code" on "Certificate Information" page, and then click [OK]. "Updating..." appears. Wait for about 2 minutes, and then click [OK]. Click [Details], shown in the "Device Certificate" window as the memo pad icon for "Requesting". -
Page 102: Setting Items Of Ieee 802.1X For Ethernet
5. Configuration Log in to Web Image Monitor as an administrator. In the menu area, click [Configuration]. Under "Security", click [SSL/TLS]. Click [Active] for the protocol version used in "SSL/TLS". Select the encryption communication mode for "Permit SSL/TLS Communication". Click [OK]. The SSL setting is enabled. - Page 103 Configuring IEEE 802.1X Certain methods might not be available, depending on the RADIUS server you want to use. • Make the following settings according to the operating system you are using: • Select [On] or [Off] in "Authenticate Server Certificate". •...
-
Page 104: Setting Items Of Ieee 802.1X For Wireless Lan
5. Configuration Setting Items of IEEE 802.1X for Wireless LAN Log in to Web Image Monitor as an administrator. In the menu area, click [Configuration]. Under "Security", click [IEEE 802.1X]. In "User Name", enter the user name set in the RADIUS server. Enter the domain name in "Domain Name". - Page 105 Configuring IEEE 802.1X • Select [On] or [Off] in "Authenticate Server Certificate". • Select [On] or [Off] in "Trust Intermediate Certificate Authority". • Enter the host name of the RADIUS server on "Server ID". • Select [On] or [Off] in "Permit Sub-domain". Click [OK].
- Page 106 5. Configuration...
-
Page 107: Loading Paper
6. Loading Paper This chapter explains the paper sizes and types supported by this printer, and how to load paper into the paper trays. Supported Paper for Each Tray The tables in this section provide details of the sizes, types, feed directions, and maximum number of sheets of paper that can be loaded in each of the printer's trays. -
Page 108: Optional Paper Feed Tray
6. Loading Paper Paper weight 60 to 163 g/m (16 to 43 lb.) 500 sheets (80 g/m , 20 lb.) Paper capacity Do not load the paper so that the top of the stack exceeds the limit mark inside the tray. •... -
Page 109: Bypass Tray
Supported Paper for Each Tray Bypass Tray Plain Paper, Middle Thick, Thick Paper 1, Thick Paper 2, Thick Paper 3, Thin Paper, Letterhead, Label Paper, Coated Paper (Glossy), Coated Paper(Glossy:Thick), Coated Paper (Matted), Coated Paper Paper types (Matted:Thick), Cardstock, Special Paper 1, Special Paper 2, Special Paper 3, Bond Paper, Preprinted Paper, Color Paper, Recycled Paper, Envelope The following sizes are supported, but they must be selected using the... -
Page 110: Supported Paper Types
6. Loading Paper Supported Paper Types The tables in this section provide details of the paper types supported by this printer. Use these tables when specifying a tray's paper settings and take note of the information under "Notes". Plain Paper Paper weight 66 to 74 g/m (18 to 20 lb.) -
Page 111: Thin Paper
Supported Paper Types • The [Menu] key > [Paper Input] > [Paper Type: (tray name)] > [Thick Paper 1] > the [OK] key • The [Menu] key > [Paper Input] > [Paper Type: Tray 1] or [Paper Type: Bypass Tray] > [Thick Paper 2] > the [OK] key Paper type setting using the •... -
Page 112: Letterhead
6. Loading Paper Letterhead Paper type setting using the The [Menu] key > [Paper Input] > [Paper Type: (tray name)] > control panel [Letterhead] > the [OK] key Paper type setting using the [Letterhead] printer driver Supported input tray Any input tray can be used. Duplex printing Not supported Label Paper... -
Page 113: Coated Paper (Matted)
Supported Paper Types Paper type setting using the [Coated (Glossy: Thick Paper)] printer driver Supported input tray This paper type can be printed only from the bypass tray. Duplex printing Not supported Note Printing is slightly slower than when using plain paper. Coated Paper (Matted) Paper type setting using the The [Menu] key >... -
Page 114: Special Paper
6. Loading Paper Special Paper • The [Menu] key > [Paper Input] > [Paper Type: Tray 1] or [Paper Type: Bypass Tray] > [Special Paper 1] or [Special Paper 2] > Paper type setting using the the [OK] key control panel •... -
Page 115: Recycled Paper
Supported Paper Types Duplex printing Supported Recycled Paper Paper type setting using the The [Menu] key > [Paper Input] > [Paper Type: (tray name)] > control panel [Recycled Paper] > the [OK] key Paper type setting using the [Recycled] or [Plain & Recycled] printer driver Supported input tray Any input tray can be used. -
Page 116: Envelopes
6. Loading Paper Envelopes Paper type setting using the The [Menu] key > [Paper Input] > [Paper Type: Bypass Tray] > control panel [Envelope] > the [OK] key Paper type setting using the [Envelope] printer driver Supported input tray This paper type can be printed only from the bypass tray. Duplex printing Not supported •... -
Page 117: Storing Paper
Supported Paper Types CBK099 • To correctly specify the length of an envelope whose flap opens along its short edge, be sure to include the open flap when measuring. ASH125S Storing Paper Take care when storing paper. Improperly stored paper might result in poor print quality, paper misfeeds, or printer damage. -
Page 118: Non-Recommended Paper Types
6. Loading Paper Non-Recommended Paper Types • Do not use the following types of paper: • Ink-jet printer paper • GelJet special paper • Bent, folded, or creased paper • Curled or twisted paper • Wet paper • Paper that is dry enough to emit static electricity •... -
Page 119: Print Area
Print Area Print Area This section describes the area of a page that is available for printing. Be sure to set the print margins correctly by the application. The following diagram shows the print area for this printer. Paper CBK100 Print area Feed direction Approx. - Page 120 6. Loading Paper Envelope CBK101 Print area Feed direction Approx. 10 mm (0.4 inches) Approx. 15 mm (0.6 inches) • The print area may vary depending on the paper size, printer language and printer driver settings.
-
Page 121: Loading Paper In Trays
Loading Paper in Trays Loading Paper in Trays This section describes how to load paper into the paper feed tray or onto the bypass tray. Loading Paper into a Standard or Optional Paper Feed Tray The following explains loading procedure for the standard paper feed tray. •... - Page 122 6. Loading Paper Lift and pull Tray 1 carefully, and then pull it out with both hands. CBK035 Place the tray on a flat surface. Push the metal plate down until it clicks into place to lock. CBK036 Pinch the clip on the side paper guide and slide it to match the standard size. CBK207 When loading custom size paper, position the paper guide slightly wider than the actual paper size.
- Page 123 Loading Paper in Trays Pinch the front end paper guide and slide it inward to match the standard size. CBK208 When loading custom size paper, position the paper guide slightly wider than the actual paper size. Fan the paper before loading paper in the tray. CBK254 Load the new paper stack print side up.
- Page 124 6. Loading Paper Hold the tray with both hands, slide it along the rails of the printer body, and then push it straight in. CBK045 To avoid paper jams, make sure the tray is securely inserted. Loading paper in the optional paper feed tray The following example explains the loading procedure for the optional paper feed tray.
- Page 125 Loading Paper in Trays Press down on the bottom plate until it clicks. CBK227 Pinch the clips on the side paper guide, and then adjust the guide to the paper size. CBK228 Pinch the clip on the end paper guide and align the arrow with the paper size. CBK229...
- Page 126 6. Loading Paper Fan the paper before loading paper in the tray. CBK254 Load the new paper stack print side up. CBK230 Lift and slide the tray, then push it all the way in. Push the tray firmly to avoid a paper jam. CBK231 Loading legal size paper This section describes how to load Legal size paper into the printer.
- Page 127 Loading Paper in Trays • Do not move the end paper guide forcefully. Doing so can damage the tray. • When inserting the tray, make sure it is not slanted. Inserting it at a slant can damage the printer. Remove the rear cover using a coin. CBK102 Pull Tray 1 carefully, then hold it with both hands and pull it out.
- Page 128 6. Loading Paper Pinch the extender in the "PUSH" direction, and then pull out the extender until it stops (you will hear a click). CBK103 After extension, make sure the arrows on the extender and tray are aligned. CBK104 Pinch the clip on the side paper guide, and then slide it to match the legal paper size. CBK105...
- Page 129 Loading Paper in Trays Pinch the front end paper guide and slide it inward to match the legal paper size. CBK107 Fan the paper before loading paper in the tray. CBK254 Load the new paper stack print side up. CBK109 Make sure paper is not stacked higher than the upper limit (upper line) marked inside the tray.
- Page 130 6. Loading Paper Carefully push Tray 1 straight into the printer. CBK045 To avoid paper jams, make sure the tray is securely inserted. • To reinsert the extender, you might have to push it with moderate force. • For details about paper types supported by the printer, see "Supported Paper Types". •...
- Page 131 Loading Paper in Trays Press the [ ] or [ ] key to select [Paper Size: (tray name)], and then press the [OK] key. In the illustration below, [Paper Size: Tray 1] is selected for Tray 1. Select the paper size you want to set using the scroll keys, and then press the [OK] key. Press the [Menu] key to return to the initial screen.
- Page 132 6. Loading Paper Press the [ ] or [ ] key to select [Paper Input], and then press the [OK] key. Press the [ ] or [ ] key to select [Paper Size: (tray name)], and then press the [OK] key. In the illustration below, [Paper Size: Tray 1] is selected for Tray 1.
- Page 133 Loading Paper in Trays (mainly North America) Press the [Menu] key to return to the initial screen. Specifying a paper type for standard or optional paper feed tray This section describes how to specify a paper type. You can improve printer performance by selecting the optimum paper type for the tray.
-
Page 134: Loading Paper Onto Bypass Tray
6. Loading Paper Press the [ ] or [ ] key to select the paper type that is loaded, and then press the [OK] key. About two seconds later, the display returns to the Paper Input screen. Press the [Menu] key to return to the initial screen. •... - Page 135 Loading Paper in Trays Hold the middle part of the bypass tray and pull it toward you. CBK112 If you load legal or longer size paper, pull out the bypass tray extension. CBK114 Slide the paper guide both sides outward, and then load paper print side down, until it stops. CBK115...
- Page 136 6. Loading Paper Adjust the paper guide both sides to fit the paper width. CBK116 • When loading paper on the bypass tray, make sure the stack does not exceed the limit mark on the inner side of the paper guides. For details about the thicknesses of different paper types, see "Supported Paper Types".
- Page 137 Loading Paper in Trays Press the [ ] or [ ] key to select [Paper Size:Bypass Tray], and then press the [OK] key. Select the paper size you want to set using the scroll keys, and then press the [OK] key. Press the [Menu] key to return to the initial screen.
- Page 138 6. Loading Paper Press the [Menu] key. CBK049 Press the [ ] or [ ] key to select [Paper Input], and then press the [OK] key. Press the [ ] or [ ] key to select [Paper Size:Bypass Tray], and then press the [OK] key. Select [Custom Size] using the scroll keys, and then press the [OK] key.
- Page 139 Loading Paper in Trays Enter the vertical value, and then press the [OK] key. (mainly Europe and Asia) (mainly North America) Press the [Menu] key to return to the initial screen. • After specifying the paper size, specify a paper type using the control panel and printer driver. For details on specifying a paper type using the control panel, see "Specifying a paper type for the bypass tray".
- Page 140 6. Loading Paper Press the [Menu] key. CBK049 Press the [ ] or [ ] key to select [Paper Input], and then press the [OK] key. Press the [ ] or [ ] key to select [Paper Type:Bypass Tray] and then press the [OK] key. Press the [ ] or [ ] key to select the paper type you want to use, and then press the [OK] key.
-
Page 141: Loading Envelopes
Loading Envelopes Loading Envelopes Make sure to check if the envelopes to be used are supported by this printer. • Check there is no air in the envelopes before loading. • Load only one size and type of envelope at a time. •... - Page 142 6. Loading Paper When fanning envelopes, make sure the envelope flaps are not stuck together. If they are stuck together, separate them. Before loading envelopes, flatten them out so that their curl does not exceed that shown in the illustration below. CBK240 If the curl is severe, flatten out the envelopes using your fingers, as shown in the illustration below.
- Page 143 Loading Envelopes Adjust the paper guide both sides to fit the envelope width. CBK118 Specifying envelope size for the bypass tray This section describes how to specify envelope size for the bypass tray using the control panel. Press the [Menu] key. CBK049 Press the [ ] or [ ] key to select [Paper Input], and then press the [OK] key.
- Page 144 6. Loading Paper Select the envelope type using the scroll keys, and then press the [OK] key. Press the [Menu] key. The display returns to the initial screen. • Confirm that the top of the stack is not higher than the limit mark on the side guides. •...
-
Page 145: Printing On Fixed-Orientation Paper
Printing on Fixed-Orientation Paper Printing on Fixed-Orientation Paper This section explains how to print on paper whose orientation and printing side are unchangeable (letterhead paper, for example). When loading paper with a fixed orientation, such as letterhead or letter paper, misprints may occur. The following table shows the printout result according to the combination of paper feed direction and letterhead settings in the control panel and PCL printer driver. - Page 146 6. Loading Paper Press the [ ] or [ ] key to select [Machine Modes], and then press the [OK] key. Press the [ ] or [ ] key to select [Letterhead Setting], and then press the [OK] key. Select one of the following settings, and then press the [OK] key. On (Always) The printer always prints on paper that has a fixed orientation The printer will print on paper that has a fixed orientation only when [Letterhead] is Auto Detect...
-
Page 147: Registering Unique Names To Paper Types
Registering Unique Names to Paper Types Registering Unique Names to Paper Types You can register a unique name to a paper type using Web Image Monitor. The name you register should reflect the paper's type or usage, as this will make recognizing the paper type easier. •... -
Page 148: Printing Using Registered Paper Types
6. Loading Paper Log in to Web Image Monitor as an administrator. Click [Configuration]. Click [Paper] in the [Device Settings] area. Set the paper tray you want to use as a user paper type, and then select the registered paper type. -
Page 149: Maintaining The Printer
7. Maintaining the Printer This chapter explains how to replace consumables, and clean the printer. Replacing the Print Cartridge • Do not incinerate toner (new or used) or toner containers. Doing so risks burns. Toner will ignite on contact with naked flame. •... - Page 150 7. Maintaining the Printer • When removing jammed paper or replacing toner, avoid getting toner (new or used) on your skin. If toner comes into contact with your skin, wash the affected area thoroughly with soap and water. • Be careful not to trap your fingers when opening or closing the top cover. •...
- Page 151 Replacing the Print Cartridge When the following message appears on the display, the print cartridge should be replaced soon. Prepare a new print cartridge. "Repl Soon:Prt.Cart. :(color)" Repl Soon:Prt.Cart. :K,C,M,Y Pull up top cover open lever to open the top cover. CBK028 From the rear, the print cartridges are installed in the order of cyan (C), magenta (M), yellow (Y), and black (K).
- Page 152 7. Maintaining the Printer CBK121 Take the new print cartridge out of the box, and then take it out of the plastic bag. CBK123 Hold the print cartridge and shake it from side to side five or six times. CBK251 Even distribution of toner within the bottle improves print quality.
- Page 153 Replacing the Print Cartridge Remove the cover from the print cartridge. CBK124 Do not touch the print cartridge's photo conductor unit. CBK026 Do not touch a metal part. CBK250...
- Page 154 7. Maintaining the Printer Check the toner color and location correspond, and carefully insert the print cartridge vertically. CBK033 Close the top cover with both hands carefully. Be careful not to trap your fingers. CBK034 Wait while the toner loads. To avoid malfunction, do not turn off the power while "Please wait."...
- Page 155 Replacing the Print Cartridge • Comply with the print cartridge Recycling Program, whereby used print cartridges are collected for processing. For details, ask your sales or service representative.
-
Page 156: Replacing The Waste Toner Bottle
7. Maintaining the Printer Replacing the Waste Toner Bottle • Do not incinerate toner (new or used) or toner containers. Doing so risks burns. Toner will ignite on contact with naked flame. • Keep the polythene materials (bags, gloves, etc.) supplied with this machine away from babies and small children at all times. - Page 157 Replacing the Waste Toner Bottle Waste Toner Bottle full When the following message appears on the display, the waste toner bottle should be replaced soon. Prepare a new Waste Toner Bottle. " Waste Toner almost full" Waste Toner almost full Pull front cover open lever, and then open the front cover with both hands carefully.
- Page 158 7. Maintaining the Printer Hold both ends of the paper transfer unit, and then lift it up. CBK132 Hold the center of the waste toner bottle, and then carefully pull it out horizontally. CBK133 Pull the waste toner bottle halfway out, grab the bottle, and then pull it straight out. CBK134...
- Page 159 Replacing the Waste Toner Bottle CBK135 To prevent the waste toner bottle touching the intermediate transfer unit, do not lift the bottle while pulling it out. CBK136 Close the bottle cap. CBK160...
- Page 160 7. Maintaining the Printer CBK161 Hold the center of the new waste toner bottle, and then carefully insert it halfway into the printer body. Leave the cap open. CBK150 To prevent the waste toner bottle touching the intermediate transfer unit, do not lift the bottle while inserting it.
- Page 161 Replacing the Waste Toner Bottle CBK152 Place the paper transfer unit on the front cover by aligning the mark on the paper transfer unit with the mark on the front cover. CBK153 CBK154 Then, push on the green PUSH marks until the paper transfer unit clicks into place.
- Page 162 7. Maintaining the Printer CBK155 Close the front cover with both hands carefully. CBK156...
-
Page 163: Replacing The Intermediate Transfer Unit
Replacing the Intermediate Transfer Unit Replacing the Intermediate Transfer Unit • Wait for 30 minutes or more after disconnecting the power plug before removing the paper transfer unit. • The inside of the machine could be very hot. Do not touch the parts with a label indicating the “hot surface”. - Page 164 7. Maintaining the Printer Pull the right side lever to open the front cover. CBK130 Slide the lever on the front cover outwards. CBK131 Hold both ends of the paper transfer unit and lift it up. CBK132...
- Page 165 Replacing the Intermediate Transfer Unit Hold the center of the waste toner bottle, and then carefully pull it out horizontally. CBK133 Pull the waste toner bottle halfway out, grab the bottle, and then pull it straight out. CBK134 CBK135 To prevent the waste toner bottle touching the intermediate transfer unit, do not lift the bottle while pulling it out.
- Page 166 7. Maintaining the Printer CBK136 Loosen the finger screws on both ends of the intermediate transfer unit. CBK137 Hold the finger screws of sliders, and then pull the intermediate transfer unit until it stops. CBK138...
- Page 167 Replacing the Intermediate Transfer Unit Hold the green parts at both ends of the intermediate transfer unit. CBK139 CBK140 Holding the levers on both side, carefully pull out the intermediate transfer unit. CBK141...
- Page 168 7. Maintaining the Printer Open the box containing the new intermediate transfer unit and remove the top cover. CBK143 Remove the covering sheet. Then, while taking care not to touch the belt area, lift the new intermediate transfer unit from its box using the grips on both sides. CBK144 While holding the frame of the intermediate transfer unit steady with one hand, use your other hand to pull the side tab outwards and then upwards to remove the attachment.
- Page 169 Replacing the Intermediate Transfer Unit CBK146 Do not touch the transfer belt. CBK129 Hold the intermediate transfer unit by the green parts at both ends, and then push the unit straight into the printer body until it can go no further. CBK252...
- Page 170 7. Maintaining the Printer CBK147 Tighten the finger screws on both ends of the intermediate transfer unit. CBK148 Remove the transfer belt cover. CBK149...
- Page 171 Replacing the Intermediate Transfer Unit Hold the center of the waste toner bottle, and then carefully insert into the printer body. CBK150 To prevent the waste toner bottle touching the intermediate transfer unit, do not lift the bottle while inserting it. CBK151 Push in the waste toner bottle until it clicks into place.
- Page 172 7. Maintaining the Printer Place the paper transfer unit on the front cover by aligning the mark on the paper transfer unit with the mark on the front cover. CBK153 CBK154 Then, push on the green PUSH marks until the paper transfer unit clicks into place. CBK155...
- Page 173 Replacing the Intermediate Transfer Unit Close the front cover with both hands carefully. CBK156...
-
Page 174: Replacing The Maintenance Kit
7. Maintaining the Printer Replacing the Maintenance Kit • When replacing the maintenance kit, turn the main power switch off and wait at least 30 minutes before proceeding with the replacement. • The inside of the machine could be very hot. Do not touch the parts with a label indicating the "hot surface". - Page 175 Replacing the Maintenance Kit Hold the levers on both sides of the fusing unit and carefully pull it out. CBK168 Place the old fusing unit on a flat surface. Prepare a new fusing unit. CBK169 While supporting both ends of the new fusing unit with your forefingers and pressing down the levers with your thumbs, carefully push the unit fully in.
- Page 176 7. Maintaining the Printer Make sure that the markings on the fusing unit are aligned with the markings on the levers. CBK171 If the markings are misaligned, align them by lowering the levers and once again pushing the fusing unit fully in. Slide the levers on the front cover outwards.
- Page 177 Replacing the Maintenance Kit Push in the depressions on both sides of the paper transfer unit. CBK172 Lift the transcription roller to take it out. CBK173 CBK174...
- Page 178 7. Maintaining the Printer Hold the new transcription roller, and match it with the paper transfer unit. CBK175 Lift the transcription roller to install it. CBK178 CBK179...
- Page 179 Replacing the Maintenance Kit Place the paper transfer unit on the front cover by aligning the mark on the paper transfer unit with the mark on the front cover. CBK153 CBK154 Then, push on the green PUSH marks until the paper transfer unit clicks into place. CBK155...
- Page 180 7. Maintaining the Printer Close the front cover with both hands carefully. CBK156...
-
Page 181: Cautions When Cleaning
Cautions When Cleaning Cautions When Cleaning • Do not remove any covers or screws other than those explicitly mentioned in this manual. Inside this machine are high voltage components that are an electric shock hazard and laser components that could cause blindness. Contact your sales or service representative if any of the machine's internal components require maintenance, adjustment, or repair. -
Page 182: Cleaning The Toner Density Sensor
7. Maintaining the Printer Cleaning the Toner Density Sensor Clean the toner density sensor when the following message appears on the control panel. "Sensor cleaning required." • Be careful not to trap your fingers when opening or closing the top cover. Pull up top cover open lever to open the top cover. - Page 183 Cleaning the Toner Density Sensor Slide the toner density sensor lever once to the left. CBK180 Slide the lever only once. To reattach the cyan print cartridge removed in step 2. Push it all the way in carefully. CBK246 Close the top cover with both hands carefully. Be careful not to trap your fingers. CBK034...
-
Page 184: Cleaning The Friction Pad And The Paper Feed Roller
7. Maintaining the Printer Cleaning the Friction Pad and the Paper Feed Roller If the friction pad or paper feed roller is dirty, a multi-feed or misfeed might occur. In this case, clean the friction pad and paper feed roller as follows: •... - Page 185 Cleaning the Friction Pad and the Paper Feed Roller Lift and pull Tray 1 carefully, and then pull it out with both hands. CBK035 Place the tray on a flat surface. When there is paper in the tray, remove paper. Wipe the friction pad with a damp cloth.
- Page 186 7. Maintaining the Printer Push the metal plate down until it clicks into place to lock. CBK036 Slide Tray 1 along the rails, and push it carefully all the way into the printer. CBK045 Do not slide the paper tray in with force. If you do, the front and side guides might move. Insert the plug of the power cord into the wall socket securely.
-
Page 187: Cleaning The Registration Roller And The Paper Tray
Cleaning the Registration Roller and the Paper Tray Cleaning the Registration Roller and the Paper Tray The surrounding registration roller or paper tray might get dirty with paper dust when using paper other than standard paper. If white spots appear on the printout due to paper dust, wipe the paper tray and registration roller. •... - Page 188 7. Maintaining the Printer Wipe the inside of the paper tray with a cloth. CBK184 Push the metal plate down until it clicks into place to lock. CBK036 Slide Tray 1 along the rails, and push it carefully all the way into the printer. CBK045...
- Page 189 Cleaning the Registration Roller and the Paper Tray Pull Front Cover Open Lever, and then open the front cover with both hands carefully. CBK130 The registration roller is set in the position shown by the illustration. CBK185 Do not touch the transfer roller. CBK183...
- Page 190 7. Maintaining the Printer Using a cloth, wipe the metal registration roller. CBK232 Clean the registration roller if printed paper becomes smeared after clearing a paper jam. Close the front cover with both hands carefully. CBK156 Insert the plug of the power cord into the wall socket securely. Connect all the interface cables that were removed.
-
Page 191: Adjusting The Printer
8. Adjusting the Printer This chapter explains how to adjust the color gradations, color alignment, and print position. Adjusting the Color Registration This section describes automatic color adjustment. After moving the printer, printing on thick paper, or printing repeatedly for some time, color degradation may occur. - Page 192 8. Adjusting the Printer Select [Auto Adjust], and then Press the [OK] key. Press [OK]. Automatic color adjustment begins. Automatic color adjustment takes about 30 seconds. A confirmation message appears when the adjustment is complete. Press [Exit]. Press the [Menu] key to return to the initial screen.
-
Page 193: Correcting The Color Gradation
Correcting the Color Gradation Correcting the Color Gradation This section describes correcting the color gradation. Color gradation during color printing can change slightly, depending on a number of factors. If you print the same file repeatedly or print cartridge was recently replaced, changes may occur in color tones. In such cases, you can obtain optimal print results by correcting the color gradation. - Page 194 8. Adjusting the Printer Press the [Menu] key. CBK049 Press the [ ] or [ ] key to select [Maintenance], and then press the [OK] key. Press the [ ] or [ ] key to select [Quality Maintenance], and then press the [OK] key. Press the [ ] or [ ] key to select [Color Calibration], and then press the [OK] key.
- Page 195 Correcting the Color Gradation In the Color Calibration menu, press the [ ] or [ ] key to select [Print Test Pattern 1] or [Print Test Pattern 2], and then press the [OK] key. A confirmation message appears. Press [Print]. To cancel printing, press [Cancel].
-
Page 196: Viewing The Gradation Correction Sheet
8. Adjusting the Printer Select [Print Test Pattern 2] to print gradation correction sheet 2. Adjust the midtones on gradation correction sheet 2 by repeating the procedure you used to adjust the color values on gradation correction sheet 1. After completing all settings, press the [Menu] key to return to the initial screen. •... -
Page 197: Resetting The Gradation Correction Value To The Initial Value
Correcting the Color Gradation 4. Setting value The value displayed is the one currently set when the gradation correction sheet is printed. This value corresponds to the value set on the control panel. Resetting the Gradation Correction Value to the Initial Value Reset the correction value default. - Page 198 8. Adjusting the Printer Press the [ ] or [ ] key to select [Reset Setting], and then press the [OK] key. A confirmation message appears. Press [Yes]. When resetting is completed, press [Exit]. Press [Menu] key to return to the initial screen.
-
Page 199: Adjusting Printing Position
Adjusting Printing Position Adjusting Printing Position You can adjust the printing position for each tray. Only the horizontal printing position can be adjusted. "Horizontal" means perpendicular to the feed direction. Normally you do not need to update the printing position. However, updating is useful in some cases when the optional paper feed unit is installed. Press the [Menu] key. - Page 200 8. Adjusting the Printer Press the [ ] or [ ] key to select [Print Test Sheet], and then press the [OK] key. Press the [ ] or [ ] key to select the tray you want to adjust, and then press the [OK] key. Confirm the position of the image on the test sheet, and then adjust the registration value.
- Page 201 Adjusting Printing Position Enter the value (mm), and then press the [OK] key. Increase the value to shift the print area in the direction indicated by the " " symbol in the diagram below. Decrease the value to shift the print area in the direction indicated by the " " symbol. CBK242 : Print Area : Paper Feed Direction...
- Page 202 8. Adjusting the Printer...
-
Page 203: Troubleshooting
9. Troubleshooting This chapter provides solutions to common problems and it also explains how to correct unwanted print results. Error and Status Messages Appear on the Control Panel This section explains what the messages that appear on the control panel mean and what to do when a particular message appears. -
Page 204: Alert Messages (In Alphabetical Order)
9. Troubleshooting Ready This is the default ready message. The printer is ready for use. No action is required. Resetting Job... The printer is resetting the print job. Wait a while. Setting change... The printer is applying the changes made to its settings. Wait a while. Waiting for print data... - Page 205 Error and Status Messages Appear on the Control Panel Cannot connect with DHCP server.(101/201) Cannot obtain IP address from DHCP server. Consult your network administrator. Cannot connect with NetWare print server. (107/207) Connection with NetWare print server is unavailable. Cannot connect with NetWare server.(106/206) Connection with NetWare server is unavailable.
- Page 206 9. Troubleshooting Failed to connect to server for Remote Diagnostics. The printer cannot communicate with Remote Communication Gate. Check the connection to the Remote Server Gate. IPv6 Address already exists Link-local Address(109/209) The same IPv6 address already exists. Consult your network administrator. IPv6 Address already exists Stateless Address(109/209) The same IPv6 address already exists.
- Page 207 Error and Status Messages Appear on the Control Panel For details about installing the unit, see p.57 "Installing the Interface Units". Problem:Wireless card Please call service. The printer cannot detect a Wireless LAN board. It may be incorrectly installed. Check if it is installed properly or contact your sales or service representative. For details about installing the unit, see p.57 "Installing the Interface Units".
- Page 208 9. Troubleshooting Set paper in the Bypass Tray, then press OK. There is no paper in the bypass tray. Load paper onto the bypass tray, and then press the [OK] key. Set the Fusing Unit correctly. The fusing unit may not be installed correctly. Turn the printer off and re-install the fusing unit. If the message is still displayed after re-installation, contact your sales or service representative.
- Page 209 Error and Status Messages Appear on the Control Panel USB has a problem./ Please call service. The printer has detected a USB board failure. Turn the power off, and then on again. If the problem persists, contact your sales or service representative. Values set for IPv6/Gateway addresses are invalid.(110/210) The IPv6 address or gateway address is invalid.
-
Page 210: Panel Tones
9. Troubleshooting Panel Tones The following table explains the meaning of the various tone patterns that the printer emits to alerts users about its condition. Tone pattern Meaning Cause After cooling or being switched Two long beeps. Printer ready. on, the printer has fully warmed up and is ready for use. -
Page 211: Printer Does Not Print
Printer Does Not Print Printer Does Not Print Is the power on? Confirm that the cable is securely plugged into both the power outlet and the printer. Turn on the power. Does the Alert indicator stay red? If so, check the error message on the display and take the required action. For details, see p.201 "Error and Status Messages Appear on the Control Panel". -
Page 212: Checking The Port Connection
9. Troubleshooting • Infrastructure Mode Check the signal status in the [Wireless LAN] menu on the control panel. If the signal is poor, either move to a location where it is good, or remove obstructions. Checking the Port Connection When the Data in indicator does not flash or light up, check the port connection as shown below to confirm the setting. - Page 213 Printer Does Not Print Windows Vista or Windows Server 2008 Click the [Start] button, and then click [Control Panel]. Click [Printer]. Click the icon of the printer. On the [File] menu, click [Properties]. Click the [Ports] tab. In the [Print to the following port(s)] list, confirm the correct port is selected. Windows 7 or Windows Server 2008 R2 Click the [Start] button, and then click [Devices and Printers].
-
Page 214: Other Printing Problems
9. Troubleshooting Other Printing Problems When You Cannot Print Properly Toner smears appear on the print side of the page. • The paper setting may not be correct. For example, you are using thick paper but the setting for thick paper might not be set. - Page 215 Other Printing Problems Color shift occurs. • If the colors are not as you require them, perform [Color Registration]. For details, see p.189 "Adjusting the Color Registration". Speckling occurs in areas of solid black print. • Select [CMY + K] for [Gray Reproduction (Text/Line Art):] in the printer driver's dialog box. For details, see the printer driver Help.
- Page 216 9. Troubleshooting Images are printed at an angle. CBK259 • Adjust the front end paper guide and both side paper guides to match the paper size. See p.119 "Loading Paper in Trays". White lines appear. CBK260 • The intermediate transfer belt is dirty. Follow the procedure below to clean the belt: Open the top cover while the power is on.
-
Page 217: Paper Misfeeds Occur Frequently
Other Printing Problems • If document size is larger than paper size, e.g. A4 document on B5 paper, the back of the next printed sheet may be dirtied. If rubbed with your finger, it smears out. • The setting of the paper may not be correct. For example, although thick paper is used, the setting for thick paper may not be set. - Page 218 9. Troubleshooting • Paper is damp. Use paper that has been stored properly. For details, see p.108 "Supported Paper Types". • When loading paper, separate paper from each other. • The friction pad or paper feed roller or registration roller may be dirty. Clean the pertinent section as necessary.
-
Page 219: The Printed Image Is Different From The Image On The Computer
Other Printing Problems For details, see p.105 "Supported Paper for Each Tray". • The fusing unit is deteriorated or damaged. Replace the unit. For details, see p.172 "Replacing the Maintenance Kit". The printed image is different from the image on the computer A printed image is different from the image on the computer's display. - Page 220 9. Troubleshooting The paper size appears on the control panel and printing is not performed with PDF Direct Print. • When using PDF Direct Print, printout requires paper set within the PDF file. When a message indicating a paper size appears, either place the indicated size in the paper tray, or perform Form Feed. Also, if [Sub Paper Size] in the [System] Menu is set to [Auto], printing is performed assuming letter size and A4 size to be the same size.
-
Page 221: When Printer Is Not Functioning Properly
Other Printing Problems Black gradation is not natural. • Select [CMY + K] for [Gray Reproduction (Text/Line Art):] in the printer driver's dialog box. For details, see the printer driver Help. A color is missing or partially blurred. • Paper is damp. Use paper that has been stored properly. For details, see p.119 "Loading Paper in Trays". - Page 222 9. Troubleshooting It takes too much time to turn on the printer. • If the printer is turned off while it is still accessing the hard disk (for example: during file deletion), the printer will require more time to power-up the next time it is turned on. To avoid this time delay, do not turn the power off while it is in operation.
- Page 223 Other Printing Problems Some complex images do not print out on large custom size paper, such as paper with a length of 1260 mm. • If the image prints out when a lower resolution is set, the printer does not have enough memory to process the image.
-
Page 224: Additional Troubleshooting
9. Troubleshooting Additional Troubleshooting Strange noise is heard. • If a supply was recently replaced or an option attached in the area the strange noise is coming from, check the supply or option is properly attached. If the strange noise persists, contact your sales or service representative. - Page 225 Additional Troubleshooting Alert Occurrence and Alert Resolving are set for sending e-mail, but while no Alert Occurrence mail is received, Alert-resolved e-mail is received. • Alert-notification e-mail is not sent if the problem is resolved before sending. However, an Alert- resolved e-mail is sent.
- Page 226 9. Troubleshooting...
-
Page 227: 10. Removing Misfed Paper
10. Removing Misfed Paper This chapter explains how to remove misfed paper. When Paper is Jammed An error message appears if a paper misfeed occurs. The error message gives the location of the misfeed. Check the location and remove the paper. •... - Page 228 10. Removing Misfed Paper • Paper jams can cause pages to be lost. Check your print job for missing pages and reprint any pages that did not print out. • Remove the paper from the bypass tray before opening the front cover. •...
-
Page 229: Paper Misfeed Message (A)
Paper Misfeed Message (A) Paper Misfeed Message (A) The " (A) Remove paper from Trays. Opn & cls Frt. Cov." error message appears when a paper misfeed occurs in the standard paper feed tray. Misfeed Tray 1 Pull Front Cover Open Lever, and then open the front cover with both hands carefully. CBK130 Carefully pull the jammed paper upward and out. - Page 230 10. Removing Misfed Paper CBK195 Close the front cover with both hands carefully. CBK156 • Do not pull out the paper tray (Tray 1). • If paper is jammed in Tray 2, but it is difficult to locate, pull out Tray 2 to remove it. After removing the paper, carefully push Tray 2 all the way back inside the printer.
-
Page 231: Misfeed Bypass Tray
Paper Misfeed Message (A) Misfeed Bypass Tray Remove paper loaded in the bypass tray, and then close the bypass tray with both hands. CBK197 Pull Front Cover Open Lever, and then open the front cover with both hands carefully. CBK130 Pull out the jammed paper carefully. - Page 232 10. Removing Misfed Paper Close the front cover with both hands carefully. CBK156 • Be sure the Tray 1 is inserted before you open the front cover. • When closing the front cover, push the upper side of the cover firmly. After closing the cover, check that the error is cleared.
-
Page 233: Paper Misfeed Message (B)
Paper Misfeed Message (B) Paper Misfeed Message (B) The " (B) Open Front Cover and remove the paper." error message appears when a paper misfeed occurs in the internal paper feed path. • The inside of the machine could be very hot. Do not touch the parts with a label indicating the "hot surface". - Page 234 10. Removing Misfed Paper CBK192 Pull the paper downward to remove it. Do not pull it upward. If the jammed paper is visible in the output tray, lower the blue fusing unit levers, and then pull the jammed paper out of the tray. If you cannot find the jammed paper, open the guide by lowering the guide's blue levers.
- Page 235 Paper Misfeed Message (B) Close the front cover with both hands carefully. CBK156 • When closing the front cover, push the upper side of the cover firmly. After closing the cover, check that the error has cleared.
-
Page 236: Paper Misfeed Message (Y)
10. Removing Misfed Paper Paper Misfeed Message (Y) " (Y) Remove misfeed in Trays. Opn & cls Frt. Cov." appears when a paper jam has occurred in Tray 2. Open the front cover and remove the paper following the same procedure as for Tray 1. •... -
Page 237: Paper Misfeed Message (Z)
Paper Misfeed Message (Z) Paper Misfeed Message (Z) The " (Z) Open Front Cover and remove the paper." error message appears when a paper misfeed occurs inside the paper transfer unit. • Some of this machine's internal components get very hot. For this reason, take care when removing misfed paper. - Page 238 10. Removing Misfed Paper Close the front cover with both hands carefully. CBK156 • When closing the front cover, push the upper side of the cover firmly. After closing the cover, check that the error has cleared.
-
Page 239: 11. Appendix
11. Appendix This section explains maintenance and operation procedures for this printer. It also describes the specifications of the printer and its options. Moving and Transporting the Printer • If the machine topples, or if a cover or other part gets broken, you must turn the power switch to off and disconnect the power cord plug from the wall outlet. -
Page 240: Moving The Printer In A Short Distance
11. Appendix • The printer weighs approximately 29 kg (64.0 lb.). Moving the Printer in a Short Distance Be sure to check the following points: • The power switch is turned off. • The power cord is unplugged from the wall outlet. •... -
Page 241: Consumables
Consumables Consumables • Our products are engineered to meet the highest standards of quality and functionality. When purchasing expendable supplies, we recommend using only those specified by an authorized dealer. Print Cartridge Print cartridge Average number of pages printable per cartridge Black 2,500 pages Black (High yield) -
Page 242: Waste Toner Bottle
11. Appendix • Print cartridges may need to be changed sooner than indicated above due to deterioration over the period of use. • Print cartridges (consumables) are not covered by warranty. However, if there is a problem, contact the store where they were purchased. •... -
Page 243: Maintenance Kit
Consumables • If the intermediate transfer unit are not changed when necessary, printing will become impossible. We recommend keeping a stock of bottles or purchasing them soon. Maintenance Kit Name Average printable number of pages Maintenance Kit SP C320 (includes a fusing unit 90,000 pages and transcription roller) *1 A4/letter 5% test chart, 3 pages / job, printing in 50% monochrome/color. -
Page 244: Specifications
11. Appendix Specifications • The supplied power cord is for use with this machine only. Do not use it with other appliances. Doing so could result in fire, electric shock, or injury. Mainframe Configuration: Desktop Print Process: Laser beam scanning & Electrophotographic printing 4 drums tandem method First Print Speed: Monochrome: 13.5 sec or less (A4 or 8... - Page 245 Specifications Paper Weight: For details, see p.105 "Supported Paper for Each Tray". Media Type: For details, see p.108 "Supported Paper Types". Paper Output Capacity: Standard 150 sheets (80 g/m , 20 lb.) Paper Input Capacity Tray Paper capacity Standard Paper Tray 500 sheets Bypass Tray 100 sheets...
- Page 246 11. Appendix Noise Emission: • Sound Power Level • Main unit only Stand-by Less than 39 dB (A) B&W : Less than 61 dB (A) Printing Color: Less than 62 dB (A) • Complete system Stand-by Less than 39 dB (A) Printing Less than 65 dB (A) •...
-
Page 247: Options
Specifications • Gigabit Ethernet (1000BASE-T) Printer Language: PCL5c/PCL6, PS3/PDF/ PictBridge (optional) Fonts: PCL 5c/PCL 6: 45 fonts, 13 International fonts PostScript 3, PDF: 80 fonts Network: Topology: The physical or logical layout of the nodes (devices) in a network. (10BASE-T/100BASE- TX/1000BASE-T) Protocol: TCP/IP, IPX/SPX, AppleTalk Options... - Page 248 11. Appendix • Spooling Sample Print/Locked Print/Hold Print/Stored Print data • Storing log data Memory Unit Type G 256 MB Module Type: DIMM (Dual-in-line Memory Module) Memory Type: DDR-SDRAM (Double Data Rate Synchronous Dynamic RAM) Number of Pins: 200 pins Memory Unit Type I 512 MB Module Type: DIMM (Dual-in-line Memory Module)
- Page 249 Specifications IEEE 802.11a/g Interface Unit Type M (mainly Europe and Asia) Transmission Specification: Based on IEEE 802.11a/b/g (Wireless LAN) Data Transfer Speed: Auto select from the following speed: 1 Mbps, 2 Mbps, 5.5 Mbps, 6 Mbps, 9 Mbps, 11 Mbps, 12 Mbps, 18 Mbps, 24 Mbps, 36 Mbps, 48 Mbps, 54 Mbps Frequency Range: 2412 to 2472 Mhz (1 to 13 Channels)
- Page 250 11. Appendix Required Cable: Standard IEEE 1284-compliant Micro Centronics 36-pin cable...
-
Page 251: Trademarks
Trademarks Trademarks Adobe, Acrobat, Acrobat Reader, PostScript, and Reader are either registered trademarks or trademarks of Adobe Systems Incorporated in the United States and/or other countries. Apple, Macintosh, Mac OS, and Safari are trademarks of Apple Inc., registered in the U.S. and other countries. - Page 252 11. Appendix ® ® Microsoft Windows 7 Ultimate ® ® Microsoft Windows 7 Enterprise • The product names of Windows Server 2003 are as follows: ® ® Microsoft Windows Server 2003 Standard Edition ® ® Microsoft Windows Server 2003 Enterprise Edition •...
-
Page 253: Index
INDEX Escape key............. Ethernet..............Adding toner............Ethernet cable connection........Additional troubleshooting......... Ethernet configuration........... Adjusting the color registration......Ethernet port............Alert indicator............Ethernet speed............Alert messages............ Exterior..............Available options..........Friction pad............Bond paper............Front cover............. Bypass tray..16, 107, 119, 132, 134, 135, 137 Front cover open lever.......... - Page 254 LED lamps............... Paper misfeed message (B)........ Legal size paper..........Paper misfeed message (Y)........ Letterhead............Paper misfeed message (Z)........ Light sensor............. Paper size............List of options............Paper transfer unit..........Loading envelopes..........Paper type............Loading paper............. Parallel cable connection........Place to install............Plain paper............
- Page 255 Specifications............Specifying a paper type........WARNING label............. SSID................ Waste toner bottle....... 19, 154, 240 Standard paper feed tray....15, 105, 119 WEP key..............Standard tray............Wireless LAN........88, 91, 92, 93 Standard tray extension........Wireless LAN configuration......... Status message............ Wireless LAN connectivity........Stop fence..............
- Page 256 MEMO...
- Page 257 MEMO...
- Page 258 MEMO M0758627...
- Page 259 © 2010...
- Page 260 M075-8627...
Need help?
Do you have a question about the Aficio SP C320DN and is the answer not in the manual?
Questions and answers