Advertisement
- 1 Features & Application area
- 2 Specification
- 3 Appearance
- 4 Communication Interface
- 5 The installation of the paper roll
- 6 Operating Manual for Android iOS
- 7 Operating Manual for iOS APP
- 8 The Bluetooth configuration
- 9 How to use the port of USB
- 10 Serial (COM) port configuration
- 11 Cleaning of printer head
- 12 General Troubleshooting
- 13 Safety
- 14 Documents / Resources
Features & Application area
Features
- It can print 58mm width thermal paper
- Paper dimensions 50mm
- High-speed, Clear printing
- Super power lithium electricity, standby time can reach 5-6 days
- Auto sleep, auto awake, save electricity
- Small size light weight reliable performance, simple to connect easy to use
Application area
Compared to the traditional thermal receipt printer, Mini printer has smaller body, more reliable capability, more steady printing and portable advantages. The Mini printer can work on a lot of locations, such as the TAXI bill printing, administrative fees receipt printing, post receipt printing, restaurant ordering information printing, online payment information printing, etc. With the rapid popularity of smart-mobile, Mini printer will be more widely used in the near future.
Specification
Printing Method: Direct Thermal
Speed: 90mm/sec
Reliability TPH Life: 100km
Resolution: 203DPl (8dot/mm)
Printing Width: 48mm (384dot)
Paper Width: 58±01 mm
Roll Diameter: ∮≤50mm
Paper Type: Thermal Paper
Power: rechargeable lithium battery/Nl-MH battery
Battery: 7.4VDC, 1500mAh
Charging mode: DC 9V/1.5A
Print parameters: support to download the Logo trademark, support bar-code print.
Support bar-code types: UPC-A/ UPC-E / JAN 13 (EAN13) / JAN8 (EAN8) / CODE39 / ITF / CODABAR / CODE93 / CODE128; Two-dimensional code: QR CODE
Character size: 384 dots/line
FontA: 12*24dots, 1.5 (W)*3.0(H)mm
FontB: 9* 17 dots, 1.1 (W)*2.1(H)mm
Simplified/ Traditional: 24*24dots, 3.0(W)*3.0(H)mm
Printing Chinese character: Chinese: simplified Chinese 24x24 point. support 18030 font library, support Taiwan and HK traditional(complex font) ANK: ANK characters
Language: support for multiple languages (Support Traditional, Korean, Japanese, etc. must be instructed before purchased)
Extended character table: OEM437/Katakana/OEM850/OEM860/OEM863/OEM865/West Europe/Greek/Hebrew/EastEurope/lran/WPC1252/OEM866/OEM852/OEM858/Iran11/Latvian/Arabic/PT1511251/OEM747/WPC1257/Vietnam/OEM864/Hebrew/ WPC1255/Thai
Emulation: ESC/POS/STAR command
Interface: standard RS232/USB, Bluetooth 2.0&4.0(option)/SPP agreement or infrared/lRCOMM agreement (optional)/Android up to 4.0 operation system.
Driver: Win2003/Win2000/Win7/WinXP/VlSTA/Win8/Win10/1.1 NUX
Working Temperature: -10~50ºC;
Humidity: 10~90%
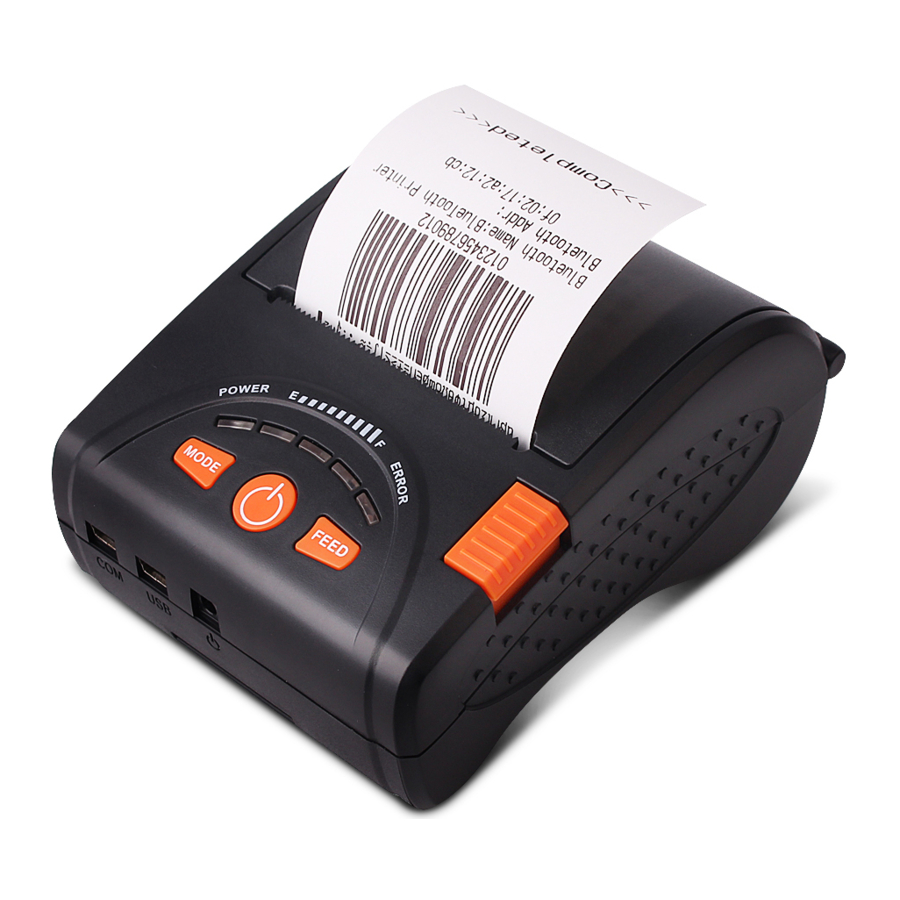
Appearance
Model: lMP001
Size: 114*90*52mm
Weight: 164g (Without Battery)

Communication Interface
- RS232(COM): standard RS232 Communications Protocol
- IMP001B Bluetooth 4.0: standard Bluetooth 4.0 support Android and iOS Devices
IMP001C Multimode Bluetooth: support 7 Android Devices and 1 iOS Device - USB: standard USB Communications Protocol
RS-232 Serial (COM) Interface
RS-232 is developed according to the ElA standard asynchronous transmission, the specifications are as following:
Data transmission: serial interface
Synchronization: asynchronous
Signal Level: RS-232 level, logic 1:-5.4v, logic 0: +5.4 v
Hardware Flow Control: None
Baud rate: 2400pbs to 115200pbs is optional
Data word length: 8 bits
Stop bit: 1 bit
Parity: None
Users can get the current baud rate from the printer self-testing page. Serial cable: We have made the cable specially using mini port like Mini USB port which connects the printer. The following picture shows the signal definition of the RS-232 Serial interface:
The connection between the printer and host follows the following rules:
| Printer | Host |
| TXD | RXD |
| RXD | TXD |
| GND | GND |
However, the printer usually works only on receiving data, it doesn't have to respond anything back to the host, then TXD signal can be ignored and then the connection can be sampled as following:
| Printer | Host |
| RXD | TXD |
| GND | GND |
Bluetooth Connection
Bluetooth is a proprietary open wireless technology standard for exchanging data over short distances (using short-wavelength radio transmissions in the ISM band from 2400—2480 MHz) from fixed and mobile devices, creating personal area networks (PANs) with high levels of security.
Bluetooth specification
Using blueCore4-Ext chipset, fully compatible with Bluetooth 2.0;
High-sensitivity receive signal, small size, lower consumption
Supporting 1200bps~1382400bps variety of baud rate;
Supporting SPP agreement, the maximum transfer speed is up to 3Mbit / s;
Use "AT" command to modify Bluetooth Module's parameters
 Notice: The following changes can't be done by user, these should be done in factory by Manufacturer. So if user wants to change these parameters, please inform our sales person before ordering our printers.
Modify name---Send character string "AT+NAMEXXXX, feedback "Okname";
For example, if you want change name to "Bluetooth Printer", please send string "AT+NAME Bluetooth Printer". Modify PIN code--- Send character string "AT+PINXXXX, feedback "Oksetpin";
For example, if you want change PIN code to "8888", please send string" AT +PlN8888".
Note: Default PIN code is "1234", you only can reset PIN code with four figures.
Clear Bluetooth address--- Send character string "AT+CLROO", feedback "Okclear";
Modify baud rate--- Send character string "AT+BAUDX, feedback "Ok+ current baud rate"; X represents the baud rate code, as following:
| 1 | 1200 | 7 | 57600 |
| 2 | 2400 | 8 | 115200 |
| 3 | 4800 | 9 | 230400 |
| 4 | 9600 | A | 460800 |
| 5 | 19200 | B | 921600 |
| 6 | 38400 | C | 1382400 |
For example, if you want to change baud rate to 115200bps, please send string "AT+BAUD8".
Build connection.
- Turn on the printer;
- Search for the Bluetooth device with host device;
- If there are other Bluetooth devices, please select "LY58"(for example) printer;
- Enter default pairing code "1234"
- Pairing succeed.
USB Interface
The printer is connected by standard Mini USB cable(included in accessories) for communication. The USB type belongs to slave device type.
The installation of the paper roll
The printer use 58MM thermal paper, and adopt to easy paper loading. So the paper is very convenient install.
Paper diameter Max 50mm.
Thermal paper installation method is as follows:
- Open the printer top cover
- Thermal Paper as follow Graph to put into paper storehouse

- Put out a little of the paper outside printer, then close the top cover.
- Use paper sawtooth tear off redundant paper

Button Operating Instructions
| POWER (Blue Light) | FEED (Red Light) | Printer Status |
| OFF | OFF | Printer Close |
| ON (Always) | OFF | Printer open and have paper |
| ON(Always) | Flash | Printer Open, without paper |
| ON (Always) | ON (Always) | Printer have paper |
| Under the normal working status, the paper feeding begins when press [FEED] button, and stop when loosen [FEED] button. | The printer paper feed | |
| Power off the printer, then hold down the [FEED] button and press the power button at the same time. Wait 2 seconds, then loosen the [FEED] button, the current setting will be printed out. | The printer Self test | |
| Power off the printer, then hold down the [FEED] button and press the power button at the same time. Wait until the power indicator & [ERROR] led are both on, and then [ERROR] led goes off, then loosen the [FEED] button, the language setting status will be printed out. | Transformation in both English and Chinese | |
| Power off the printer, then hold down the [FEED] button and press the power button at the same time. Wait until the power indicator & (ERROR) led are both on, and then [ERROR] led goes out, after, [ERROR] led goes on again, then loosen the [FEED] button, the density setting status will be printed out. (It has three levels setting for printing density, it is a circle Low level → Middle level → High level → low level... , Please switch the density status by repeating operation presented above.) | Set printing density | |
| Power off the printer, hold down the [MODE] button and press the power button at the same time. Wait until the power indicator & [ERROR] led are both on, and then [ERROR] led goes | Hexadecimal printing | |
Operating Manual for Android iOS
This manual applies to all of our android OS compatible printers (both 58mm & 80mm width printer)
Currently, the common communication ports we used for android OS are ( Ethernet Bluetooth and WiFi )
If you want to use Android Device connected with our printer, first of all make sure that printers can be supported Android Operate System, proceed as follows ( Bluetooth as example):
Step 1:
- Insert the CD driver disc into the CD-ROM, connect your cell phone with your computer;
Step 2:
- Find the File Named " SDK" from the CD driver, Then follow the path "BLUETOOTHDEMO ----bin----PrintDemo. APK ", install it in your Android phone. (Default pairing password for Bluetooth connection is " 1234" )
Step 3:
- Connect your cell phone with our printer once installation done.
Step 4:
- Find this icon
![]() and open it. (Ethernet interface need to enter the IP, you can get it from the self-test page, WIFI need to enter your IP of own setting), click on the "Connect Printer" after the connection successfully, click on the "Print Test Page", the printer will work.
and open it. (Ethernet interface need to enter the IP, you can get it from the self-test page, WIFI need to enter your IP of own setting), click on the "Connect Printer" after the connection successfully, click on the "Print Test Page", the printer will work.
 and open it. (Ethernet interface need to enter the IP, you can get it from the self-test page, WIFI need to enter your IP of own setting), click on the "Connect Printer" after the connection successfully, click on the "Print Test Page", the printer will work.
If you use the "Ethernet interface", "USB", "WIFI" communication, set " BluetoothDEMO" from "Step 2" into the corresponding "NET DEMO", "USBDEMO"and "WIFIDEMO".
Customer can get all the original code from below path if you need to develop your own APK (Path is:
 )
)
Operating Manual for iOS APP
- Download the Test Tools "POS-Printer" from App Store, as below:

(Image 1)

- Turn on the Apple mobile Bluetooth then click "POS-Printer":
![]()
(Image 2)
- In"POS-Printer" APP, search and select the "Blue Tooth Printer"

(Image 3)
- Connect successful, put content into Edit Box to test printing.
Test: Text(font size can be modify), ID/2D Barcode, Image etc.

(Image 4)


The Bluetooth configuration
Step 1: Make sure your device (like PC, Note Book) has Bluetooth function, then once the Bluetooth for your device is activated, you will see the Bluetooth sign  showed in the right bottom side of your device(like PC) screen.

Step 2: Power on the Bluetooth printer.
Step 3: To add the Bluetooth printer, please left-click the  → click "Add a Bluetooth Device",then you will enter wizard screen, please choose "My device is set up according and ready to be found"click "Next"(showed as below).

Step 4: if you can see screen as below, then the device is searching the bluetooth printer, please wait.

Step 5: Once the Bluetooth printer is found. You can see it listed on the screen, click "Next"

Step 6: Choose "Let me choose my own passkey", then enter "1234" (this is factory default passkey, if you want to change it, you have to inform us to set the new passkey for you in our factory before shipping), then click "Next".

Step 7: if you can see the screen as below, that means the Bluetooth printer is already connected. Please notice the assigned COM ports, then Click"Finish".

Note: The Bluetooth device will automatically assign a COM port.)
Step 8: Now if you want to test if the printer is 0K to print, you could use a com tool, and send printed data to Outgoing COM port( just as above image shown: COM5).
(Com tool setting is 9600, N, 8, 1.)
How to use the port of USB
- Insert the CD-ROM, click on the file (POS Printer Driver Setup) to star installation, select the language appears as you need to install the driver, as shown below:

- Then select the language click "0K",as shown below, click"Continue"to next step.

- Please read the following License Agreement, accept and continue the installation, as shown below:

- Click: Next"after the operation in the below figure(Customer can also modify the path of the driver can choose the default installation path)


- Then click"Next"after the operation as shown below, choose "install", if you computer has antivirus software, appears to block the installation of the windows allow this operation.

- Wait for the installation interface appear as follows after the completion choose your computer's operating system, then select the printer model (POS58 series printer),if you use a USB interface to communicate, click "USB Port Check"automatically recognize the computer USB port, click Next to continue, as shown below:

- Click Begin Setup, as shown below appears, select "install"or ' install this driver software anyway"


- Completing the driver installation, as shown below:


If the printer prints a normal page, then it shows that the work was successful.
Note: If the printer prompts "Print Error", please return to the "port" option from the "USB001 " started trying to choose
Serial (COM) port configuration
- Open the Printer Properties screen, and then select the "Port" item, as shown below:
 port configuration - Step 1")
- Select the list of ports "COM1" → "Configure Port", the printer factory default settings as shown below:
 port configuration - Step 2")
You can see the setting parameters of serial port from self-test page, Click "Apply", then click "OK"
![warning]() Note: (This setting must consistent with the setting parameters of serial port from the printer self-test page, otherwise it will be garbled case) appears as shown below:
Note: (This setting must consistent with the setting parameters of serial port from the printer self-test page, otherwise it will be garbled case) appears as shown below:
 port configuration - Step 3")
Click "Apply" again. - Return to the "General" tab, click "Print Test Page" as shown below:
 port configuration - Step 4")
If the printer prints a normal page, then it shows that the work was successful. If you feel the print speed is slow, please click on the "Device Settings" → "Print Mode" → Choose "soft font" button as shown below:
 port configuration - Step 5")
 port configuration - Step 1")
 port configuration - Step 2")
 port configuration - Step 3")
 port configuration - Step 4")
 port configuration - Step 5")
Cleaning of printer head
Cleaning of printer
When the printer has the following conditions, you should clean the printer head:
- The printer does not print clearly and the thermal paper is Ok.
- The printer Print pages lengthways is not clear
- It's getting too noisy while feeding paper or printing.
Printer head cleaning steps are as follows:
- Power off the printer and open the paper room cover. Remove the thermal paper roll.
- If the printer just finished printing, please wait for the print head to cool down.
- With a soft cotton cloth dipped in ethanol (please make sure there is no dripping), wipe the thermal printer head gently and remove any dust or stains.
- Wait for the complete evaporation of any ethanol, then place the thermal paper roll back in the printer and close the paper room cover, then print a test page.
Notes:
- When the printer maintenance must ensure that the power is shut down
- Hands or other metal tools away from the surface of the printer head, do not use tweezers to scratch the surface of the printer head and other sensitive parts.
- Do not use gasoline, acetone and other organic solvents for printer head cleaning.
General Troubleshooting
Why serial port printer printing messy code?
A: Ensure the baud rate setting in the PC is same as the printer baud rate. ( we can see printer baud rate from self test page)
Self printing test is ok, but printer does not work after driver installation.
A: Recheck the installation according to above installation wizard and see if we selected the right port or ask service center for advice if needed.
Malfunction of paper feeding?
A: Use soft brush to clean the paper sensor and try again or send it to the service center for repair.
Malfunction of the indicator light
A: Check the cable connecting way / adapter / power cord / switch on or off? Or contact the service center for repair.
Messy code printing except Arabic numeral printing.
A: Language switching incorrectly, please turn on the SW-4 switch on the DIP switches.
Red indicator keep flashing during the printing.
A: Usually it is due to the high temperature of the print head. If printing stopped, please contact the service center for repair.
Printing speed is very slow for serial printer
A: follow this path and change the set accordingly: Driver -- Properties -- Device Settings -- Print Mode -- Print as soft font.
Water or other liquid spills into the printer
A: Cut off the power, we can dry the main board or printer head with a hair dryer, careful of the temperature ( average 50 degree is Ok )
The printer can't open
A: The battery maybe without electricity, please use power adapter to charge. Then you try to open the printer, if the printer has same problem, please send to service center for repair.
Do not search to Bluetooth
A: Please check the main equipment "Bluetooth" whether opened, the communication whether normal, then plug the printer "Bluetooth Module" again. the printer re-connect, if there are problems, please send the specified location repair.
Safety
Notes on safety
This section presents important information intended to ensure safety and effective use of the printer. Please read carefully.
- Be sure to use the specified battery and power source provided by our company. Connection to an improper power source may cause fire, explosion or damage to the printer.
- Don't put the battery into the fire or water, don't disassemble or modify the battery, don't be short circuit, otherwise may result in injury or fire even explosion.
- If the printer would not be used fora long time, be sure to take off the battery, otherwise the battery may leak the corrosive liquid out, if improper operation causes battery leak, and the liquid is spattered on the skin or clothes, please wash it with water immediately, if spattered in the eyes, please rinse them with water thoroughly and see a doctor.
- Please don't open the paper room cover when it is printing or just when printing is over, do not touch the print head with hand or body, overheat may cause scald.
Notes on using
- Do not store the printer in hot and humid conditions.
- The lithium battery have a character that if it is not used for several months, it possibly can't be charged ever.
- The printer's power adapter is to be connected to a stable power 110—220 Volts, please do not use other devices on the same power socket, to avoid voltage fluctuations.
- Avoid water or conductive material (for example: metal). If water is present on the surface please turn off the power immediately.
- Please ensure that a thermal paper roll is always inserted in the printer to avoid damaging the printing roller and the printer head.
- Please ensure that your printer is serviced and repaired by a qualified technician. No responsibility is taken for misuse and/or non-qualified servicing.
- The power adapter that comes with this printer is specifically designed to be only used with the printer, please do not use an alternative power adapter.or use 9V-2A The standard power adapter.
- In order to ensure print quality and longevity of your printer, please ensure that only good quality thermal paper rolls are used.
- Please keep this manual in a safe place, where it can be accessed easily and used for your reference.
Documents / ResourcesDownload manual
Here you can download full pdf version of manual, it may contain additional safety instructions, warranty information, FCC rules, etc.
Advertisement


Need help?
Do you have a question about the IMP001 and is the answer not in the manual?
Questions and answers