BlackVue DR900X-2CH - Dash Camera Manual
- Manual (107 pages) ,
- Quick start manual (60 pages) ,
- Quick start manual (64 pages)
Advertisement
- 1 In the box
- 2 At a glance
- 3 STEP 1: Power Up
- 4 STEP 2: Playback
- 5 STEP 3: Changing dashcam's time zone, Wi-Fi password and other settings
- 6 STEP 4: Connect to BLACKVUE CLOUD (optional)
- 7 Tips for optimal performance
- 8 Customer Support
- 9 Product specifications
- 10 Important safety information
- 11 Documents / Resources
In the box
Check the box for each of the following items before installing the BlackVue dashcam.

Need help?
Download the manual (including FAQs) and the latest firmware from www.blackvue.com
Or contact a Customer Support expert at cs@pittasoft.com
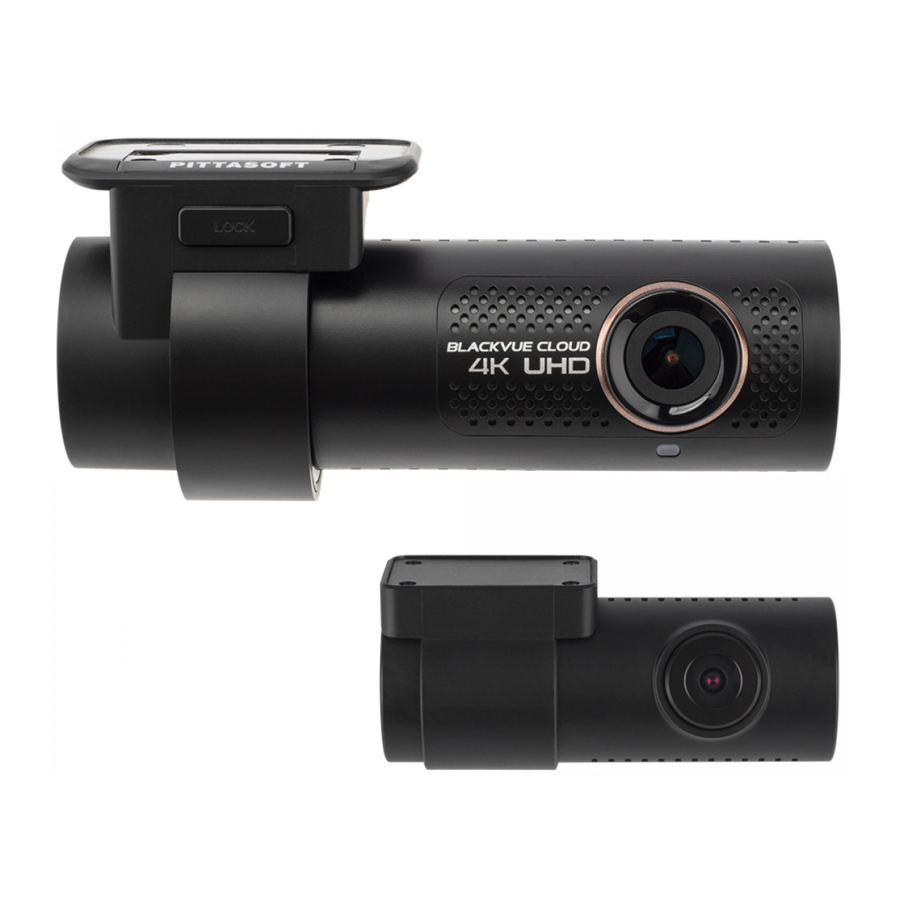
At a glance
The following diagrams explain each part of the BlackVue dashcam.
Front camera

Front security LED
 : Lights on during (i) normal mode, (ii) an event is being recorded (impact detected), (iii) manual recording has started, or (iv) motion is detected in parking mode.
![]() : Blinks slowly during parking mode motion detection standby.
: Blinks slowly during parking mode motion detection standby.


Rear camera

STEP 1: Power Up
Install the front camera behind the rear view mirror. Install the rear camera at the top of the back windshield. Remove any foreign matter and clean and dry the windshield before installation.
To meet the FCC's MPE regulation regarding '20cm minimum separation distance between transmitter and human body parts'; Please follow the install guide and suggested mounting location below.


Do not install the product in a location where it can obstruct the driver's field of vision.
![]() Turn off the engine. Open the cover of the microSD card slot, gently push the card into the slot until it locks into place and close the cover.
Turn off the engine. Open the cover of the microSD card slot, gently push the card into the slot until it locks into place and close the cover.

![]() Peel off the protective film from the double-sided tape and attach the front camera to the windshield behind the rear-view mirror.
Peel off the protective film from the double-sided tape and attach the front camera to the windshield behind the rear-view mirror.

![]() Adjust the angle of the lens by rotating the body of the front camera. We recommend pointing the lens slightly downwards (≈10° below horizontal), so as to record video with a 6:4 road to background ratio.
Adjust the angle of the lens by rotating the body of the front camera. We recommend pointing the lens slightly downwards (≈10° below horizontal), so as to record video with a 6:4 road to background ratio.

![]() Peel off the protective film from the double-sided tape and attach the rear camera to the rear windshield. Adjust the angle of the lens by rotating the body of the rear camera.
Peel off the protective film from the double-sided tape and attach the rear camera to the rear windshield. Adjust the angle of the lens by rotating the body of the rear camera.

![]() Connect the front camera ('Rear' port) and the rear camera ('V out') using the rear camera connection cable.
Connect the front camera ('Rear' port) and the rear camera ('V out') using the rear camera connection cable.

![]() Use the pry tool to lift the edges of the rubber window sealing and molding and tuck in the rear camera connection cable.
Use the pry tool to lift the edges of the rubber window sealing and molding and tuck in the rear camera connection cable.

![]() Connectivity Module (Optional): Connect the connectivity module to the front camera and attach it to the edge of the window. Use the pry tool to tuck in the cable.
Connectivity Module (Optional): Connect the connectivity module to the front camera and attach it to the edge of the window. Use the pry tool to tuck in the cable.
![]() Plug the cigarette lighter power cable into the cigarette lighter socket and the front camera. Skip to
Plug the cigarette lighter power cable into the cigarette lighter socket and the front camera. Skip to ![]() for Hardwiring Power Cable setup.
for Hardwiring Power Cable setup.
![]() Use the pry tool to lift the edges of the windshield trim/molding and tuck in the power cord.
Use the pry tool to lift the edges of the windshield trim/molding and tuck in the power cord.

![]() Turn on the engine. The BlackVue dashcam will power up and start recording. Video files are stored on the microSD card.
Turn on the engine. The BlackVue dashcam will power up and start recording. Video files are stored on the microSD card.
![]() Turn off the engine. The dashcam will automatically stop recording and power down. To record in parking mode while the engine is off please connect the Hardwiring Power Cable (included in the box) or install a Power Magic Battery Pack (sold separately). A Hardwiring Power Cable uses the automotive battery to power your dashcam when the engine is off. A low voltage power cut-off function and a parking mode timer to protect the automotive battery from discharge is installed in the device. Settings can be changed in the BlackVue App or Viewer.
Turn off the engine. The dashcam will automatically stop recording and power down. To record in parking mode while the engine is off please connect the Hardwiring Power Cable (included in the box) or install a Power Magic Battery Pack (sold separately). A Hardwiring Power Cable uses the automotive battery to power your dashcam when the engine is off. A low voltage power cut-off function and a parking mode timer to protect the automotive battery from discharge is installed in the device. Settings can be changed in the BlackVue App or Viewer.
 Locate the fuse box to connect the hardwiring power cable.
 Note
Note
Location of the fuse box differ by manufacturer or model. For details, refer to the vehicle owner's manual.
 After removing fuse panel cover, find a fuse that powers on when engine is turned on(ex.cigarette lighter socket, audio, etc) and another fuse that remains powered on after the engine is turned off (ex.hazard light, interior light). Connect the ACC+ cable to a fuse that powers on after engine start, and BATT+ cable to a fuse that remains powered on after engine is turned off.

Note
To use battery saver feature, connect the BATT+ cable to the hazard light fuse. Functions of fuse differ by manufacturer or model. For details refer to the vehicle owner's manual.
 Connect the GND cable to metal ground bolt.

 Connect the power cable to the DC in terminal of the front camera. BlackVue will power up and start recording. Video files are stored on the microSD card.
Note
When you run the dashcam for the first time the firmware is automatically loaded onto the microSD card. After the firmware has been loaded onto the microSD card you can customize settings using BlackVue Viewer on a computer.
STEP 2: Playback
Playing video files on your smartphone (Android/iOS)
![]() Search for the BlackVue app in the Google Play Store or Apple App Store and install it on your smartphone.
Search for the BlackVue app in the Google Play Store or Apple App Store and install it on your smartphone.
![]() "Pair" your smartphone with the BlackVue dashcam via direct Wi-Fi:
"Pair" your smartphone with the BlackVue dashcam via direct Wi-Fi:
- Go to your smartphone's Settings then select Wi-Fi, and make sure Wi-Fi is turned on.

- Choose your BlackVue dashcam from the network list. The dashcam's default SSID begins with its model number (e.g. BlackVue900X-******).
- Enter the password and tap join.
* To find the default Wi-Fi password, unplug the cables and remove the front camera from its mount. The default Wi-Fi SSID, password and cloud code are printed on the dashcam's connectivity details label. - Open the BlackVue app and select WI-FI.


 Select the video file you want to play from the video list.
Note
- The playback of 4K UHD resolution, 'Highest' image quality and/or H.265 coded videos depends on your device's hardware and software. Older devices may not support 4K UHD, 'Highest' image quality or H.265 video playback. If you encounter issues please check your device's video playback capabilities.
- Direct Wi-Fi lets you connect your smartphone to your dashcam via Wi-Fi within a range of 10m.
- For quick playback and download of the recordings, you can select the "Quick play file" option from App settings.
- All image shown are for illustration purposes only. Actual App may differ from images shown.
Playing video files on your computer (Windows/macOS)
![]() Remove the microSD card from the dashcam.
Remove the microSD card from the dashcam.
 - Step 1")
![]() Insert the card into the microSD card reader and connect it to a computer.
Insert the card into the microSD card reader and connect it to a computer.
 - Step 2")
![]() Download BlackVue Viewer program from www.blackvue.com > Support > Downloads and install it on your computer.
Download BlackVue Viewer program from www.blackvue.com > Support > Downloads and install it on your computer.
 Run BlackVue Viewer. To play, select a video and click on the play button or double click the selected video.
 - Step 3")
Windows/macOS Viewer
Note
- The playback of 4K UHD resolution and/or H.265 coded videos depends on your computer's hardware and software. Older computers may not support 4K UHD or H.265 video playback. If you encounter issues please check your computer's video playback capabilities.
- All images shown are for illustration purpose only. Actual program may differ from images shown.
STEP 3: Changing dashcam's time zone, Wi-Fi password and other settings
The dashcam's time zone is initially set to (GMT-11). To display the correct time please select your time zone.
Using your smartphone (Android/iOS)
 "Pair" your smartphone with the BlackVue dashcam via direct Wi-Fi (for details see STEP 2 'Playing video files on your smartphone').
 Open the BlackVue app and select WI-FI.
 Tap the
  button to access the Firmware settings menu.
 - Step 1")

- Select Firmware settings > Basic > Time.
- Select your time zone to auto-sync with GPS time or you can set the time and date manually after enabling Manual time setting.
![]() Go back to the Firmware settings menu and configure other desired settings. Settings that can be changed include Wi-Fi SSID & password, image quality, sensitivity settings, voice recording on/off, speed unit (km/h, MPH, off), LEDs on/ off, voice guidance volume, Cloud settings etc.
Go back to the Firmware settings menu and configure other desired settings. Settings that can be changed include Wi-Fi SSID & password, image quality, sensitivity settings, voice recording on/off, speed unit (km/h, MPH, off), LEDs on/ off, voice guidance volume, Cloud settings etc.
Once settings are configured, tap  and tap Save.
 - Step 2")
Changing the dashcam's time zone and other firmware settings on your computer (Windows/macOS)
Run BlackVue Viewer program after connecting dashcam's microSD card to your computer. Click on the ![]() button to open the BlackVue settings panel.
button to open the BlackVue settings panel.

Settings that can be changed include Wi-Fi SSID & password, image quality, sensitivity settings, voice recording on/off, speed unit (km/h, MPH, off), LEDs on/off, voice guidance volume, Cloud settings etc.
For more information about changing the settings in BlackVue Viewer, please download the manual from www.blackvue.com > Support > Downloads.
STEP 4: Connect to BLACKVUE CLOUD (optional)
If you don't have a mobile Wi-Fi hotspot, Blackvue connectivity module or if you don't want to use the BLACKVUE CLOUD service, you can skip this step.
If you have a mobile Wi-Fi hotspot (also known as a portable Wi-Fi router), BlackVue connectivity module (CM100LTE), a car-embedded wireless internet network or a Wi-Fi network near your car, you can use the BlackVue app to connect to BLACKVUE CLOUD and see in real-time where your car is and the dashcam's live video feed.
For more information about using the BlackVue app, please download the Cloud Manual from www.blackvue.com > Support > Downloads.
![]() Create an account
Create an account
- Open the BlackVue app.
- Tap the
![]() button in the top-left corner and select Create account.
button in the top-left corner and select Create account. - Enter your name, e-mail address and choose a password. Re-enter your password and press Sign up.
- You will receive an e-mail. Click the link in the email to finish creating your account.
![]() Register your dashcam with your account
Register your dashcam with your account
- In the BlackVue app select CLOUD and login to your account.
- Tap Yes to enable push notifications (this setting can be adjusted at any time later).
- Select Register new camera.
- Register your camera using one of the following methods:
QR Code: Press Scan QR Code and line up the QR Code on your smartphone's screen.

or
Manual registration: Enter your camera's Serial number and Cloud code and press Register.
![]() Connect your BlackVue dashcam to a Wi-Fi hotspot for Cloud connectivity
Connect your BlackVue dashcam to a Wi-Fi hotspot for Cloud connectivity
- Make sure your BlackVue dashcam and mobile Wi-Fi hotspot are on.
- "Pair" your smartphone with the BlackVue dashcam via direct Wi-Fi (for details see STEP 2 'Playing video files on your smartphone')
- Open the BlackVue app. Select WI-FI >
![]() > Firmware settings > CLOUD.
> Firmware settings > CLOUD.

- Ensure Enable Cloud service is on. Select Cloud service hotspot settings.
- Choose your Wi-Fi hotspot from the list. Enter the password and tap OK.

![warning]() Note
Note
Up to 3 Wi-Fi hotspot SSIDs can be saved (e.g. home, portable hotspot and work). - Go back to the Firmware settings menu, tap
![]() and tap Save.
and tap Save.


After rebooting, your dashcam will automatically establish internet connection. If internet connection was not established, please ensure Wi-Fi information was inserted correctly.
Select CLOUD from the main screen to access all of the Cloud features.
Note
If LTE and Wi-Fi hotspot is available for internet connection, Wi-Fi hotspot will be in priority. If LTE connection is preferred at all times, please remove Wi-Fi hotspot information.
![]() Connect your BlackVue dashcam to Cloud connectivity (Using CM100LTE)
Connect your BlackVue dashcam to Cloud connectivity (Using CM100LTE)
Make sure your BlackVue dashcam and connectivity module is connected. Then, follow the below steps for SIM registration.
- Locate the SIM card slot. Unscrew the bolt from SIM slot cover. Then, unmount the SIM slot by using a SIM eject tool. Insert SIM in the SIM slot. Mount the SIM slot back in the connectivity module, then, screw the bolt to hold SIM slot cover.
- "Pair" your smartphone with the BlackVue dashcam via direct Wi-Fi.
- Open the BlackVue app and select WI-FI >
![]() .
.

- Configure the APN settings to activate the SIM card. For detailed information, please check "SIM activation guide" in the packaging box or visit BlackVue Help Center: www.helpcenter.blackvue.com -> LTE connectivity guide.
- Once your dashcam is connected to the internet, you can go to the CLOUD menu to use BlackVue Cloud features.

Note
- For full details, refer to the "SIM activation guide" that is included in the CM100LTE package.
- To use the BlackVue Cloud Service, SIM card must be properly activated for Internet access via LTE network.
- When the dashcam is connected to internet, you can use BlackVue Cloud features such as remote Live View and Video playback, Real-time location, push notification, Auto-upload, remote Firmware update etc. on BlackVue app and PC Viewer.
- Some Cloud features may not work when surrounding temperature is high or/ and LTE speed is slow.
- For more information about using the BlackVue app, please download the Cloud Manual from www.blackvue.com > Support > Downloads.
Tips for optimal performance
![]() For stable operation of the dashcam, it is recommended to format the microSD card once a month.
For stable operation of the dashcam, it is recommended to format the microSD card once a month.
Format using BlackVue Viewer (Windows)
Download BlackVue Windows Viewer from www.blackvue.com > Support > Downloads and install it on your computer. Insert the microSD card into the microSD card reader and connect the reader to your computer. Launch the copy of BlackVue Viewer that is installed on your computer. Click the Format ![]() button, select the card drive and click OK.
button, select the card drive and click OK.
Format using BlackVue Viewer (macOS)
Download BlackVue Mac Viewer from www.blackvue.com > Support > Downloads and install it on your computer. Insert the microSD card into the microSD card reader and connect the reader to your computer. Launch the copy of BlackVue Viewer that is installed on your computer. Click the Format ![]() button and select the microSD card from the list of drives in the left frame. After selecting your microSD card select the Erase tab in the main window. Select "MS-DOS (FAT)" from the Volume Format drop-down menu and click Erase.
button and select the microSD card from the list of drives in the left frame. After selecting your microSD card select the Erase tab in the main window. Select "MS-DOS (FAT)" from the Volume Format drop-down menu and click Erase.
![]() Only use official BlackVue microSD cards. Other cards may have compatibility issues.
Only use official BlackVue microSD cards. Other cards may have compatibility issues.
![]() Regularly upgrade the firmware for performance improvements and updated features. Firmware updates will be made available for download at www.blackvue.com > Support > Downloads.
Regularly upgrade the firmware for performance improvements and updated features. Firmware updates will be made available for download at www.blackvue.com > Support > Downloads.
Customer Support
For customer support, manuals and firmware updates please visit www.blackvue.com
You can also email a Customer Support expert at cs@pittasoft.com
Product specifications
| Model Name | DR900X-2CH |
| Color/Size/Weight | Front: Black / Width 118.5 mm x Height 36 mm / 106 g Rear: Black / Width 67.4 mm x Height 25 mm / 25 g |
| Memory | microSD Card (32 GB / 64 GB / 128 GB / 256 GB) |
| Recording Modes | Normal recording, Event recording (when impact is detected in normal and parking mode), Manual recording and Parking recording (when motion is detected) * When using Hardwiring Power Cable, ACC+ will trigger parking mode. When using other methods, G-sensor will trigger parking mode. |
| Camera | Front: 8-Megapixel CMOS Sensor Rear: STARVIS™ CMOS Sensor (Approx. 2.1 M Pixel) |
| Viewing Angle | Front: Diagonal 162°, Horizontal 136°, Vertical 77° Rear: Diagonal 139°, Horizontal 116°, Vertical 61° |
| Resolution/ Frame Rate | <Front - Rear> 4K UHD (3840x2140) @30fps - Full HD (1920x1080) @30fps * Frame rate may vary during Wi-Fi streaming. |
| Video Codec | H.265 (HEVC), H.264 (AVC) |
| Image Quality | Highest (Extreme), Highest, High, Normal |
| Video Compression Mode | MP4 |
| Wi-Fi | Built-in (802.11 a.b.g.n.ac) |
| GNSS | Built-in (Dual Band: GPS, GLONASS) |
| Bluetooth | Built-in (V2.1+EDR/4.2) |
| LTE | External |
| Microphone | Built-in |
| Speaker (Voice Guidance) | Built-in |
| LED Indicators | Front: Recording LED, GPS/BT LED, LTE/Wi-Fi LED, Front Security LED, Proximity Sensing indicator LED Rear: Rear Security LED |
| Button | Wi-Fi button: Proximity sensor: |
| Sensor | 3-Axis Acceleration Sensor |
| Backup Battery | Built-in super capacitor |
| Input Power | DC 12V-24V (DC Plug (Ø3.5 x Ø1.1)) to Wires (Black: GND / Yellow: B+ / Red: ACC) |
| Power Consumption | Normal Mode (WiFi On / GPS On / 2CH): 450mA / hour * Actual power consumption may vary depending on use conditions and environment. |
| Operation Temperature | -20°C − 70°C (-4°F − 158°F) |
| Storage Temperature | -20°C − 90°C (-4°F − 194°F ) |
| High Temperature Cut-Off | Approx. 75°C (167°F) |
| Certifications | Front: FCC, CE, RoHS, Telec, WEEE, IC Rear: FCC, CE, RoHS, WEEE |
| Software | BlackVue Viewer * Windows 7 or higher and Mac Yosemite OS X (10.10) or higher |
| Application | BlackVue Application (Android 5.0 or higher, iOS 9.0 or higher) |
| Others | Adaptive Format Free File Management System |
Important safety information
For user safety and to avoid property damage, read through this manual and follow these safety instructions to use the product correctly.
- Do not disassemble, repair, or modify the product yourself.
Doing so may cause fire, electric shock, or malfunction. For internal inspection and repair, contact the service center. - Do not adjust the product while driving.
Doing so may cause an accident. Stop or park your car in a safe place before installing and setting up the product. - Do not operate the product with wet hands.
Doing so may cause electric shock. - If any foreign matter gets inside the product, detach the power cord immediately.
Contact the service center for repair. - Do not cover the product with any material.
Doing so may cause external deformation of the product or fire. Use the product and peripherals in a well-ventilated location. - If the product is used outside the optimal temperature range (-20°C - 70°C / -4°F - 158°F), performance can decline or malfunctions may occur.
- When entering or exiting a tunnel, when directly facing into bright sunlight, or when recording at night without lighting the quality of recorded video may deteriorate.
- If the product is damaged or the power supply is cut due to an accident, video may not be recorded.
- Do not remove the microSD card while the microSD card is saving or reading data.
- The data can be damaged or malfunctions may occur.

There is a risk of explosion if the battery is replaced by an incorrect type. Dispose of used batteries according to the instructions.
It is desirable that it be installed and operated with at least 20cm or more between the radiator and a person's body (excluding extremities: hand, wrists, feet, and ankles).
Documents / ResourcesDownload manual
Here you can download full pdf version of manual, it may contain additional safety instructions, warranty information, FCC rules, etc.
Advertisement


Need help?
Do you have a question about the DR900X-2CH and is the answer not in the manual?
Questions and answers