
Related Manuals for BlackVue DR770X Box Series


Summary of Contents for BlackVue DR770X Box Series
- Page 1 BlackVue 7 Box Series DR770X Box Series Quick Start Guide ENGLISH/NEDERLANDS www.blackvue.com Detailed Manual...
- Page 2 BLACKVUE DR770X Box Series For manuals, customer support and FAQs go to www.blackvue.com Voor handleidingen, Customer Support en Veelgestelde Vragen, ga naar www.blackvue.com...
-
Page 3: Important Safety Information
The data can be damaged or malfunctions may occur. y It is desirable that the device be installed and operated with a distance of at least 20cm or more between the radiator and a person’s body (excluding extremities: hand, wrists, feet, and ankles) DR770X Box Series... - Page 4 This device complies with Part 15 of the FCC Rules. Operation is subject to the following two conditions: (1) This device may not cause harmful interference, and (2) This device must accept any interference received, including interference that may cause undesired operation of this device. FCC ID: YCK-DR770XBox BLACKVUE...
- Page 5 Changes and modifications not expressly approved by the party responsible for compliance could void the user’s authority to operate the equipment. y It is desirable that it be installed and operated with at least 20cm or more between the radiator and a person’s body (excluding extremities: hand, wrists, feet, and ankles). DR770X Box Series...
- Page 6 Contact local authorities to learn about disposal and recycling options available in your area. 2. The correct disposal of your BlackVue dashcam will help prevent potential negative consequences for the environment and human health.
-
Page 7: Declaration Of Conformity
The full text of the EU declaration of conformity can be found at the following internet address: https://blackvue-nederland.nl/declaration-of-conformity/ Importer Company: TJM Supplies B.V. Address: Zompstraat 8 8102 HX Raalte The Netherlands Email: info@tjmsupplies.nl Phone number: +31 85-0402973 Business license number: 72016981 VAT number: NL858946439B01 DR770X Box Series... -
Page 8: Verklaring Van Overeenstemming
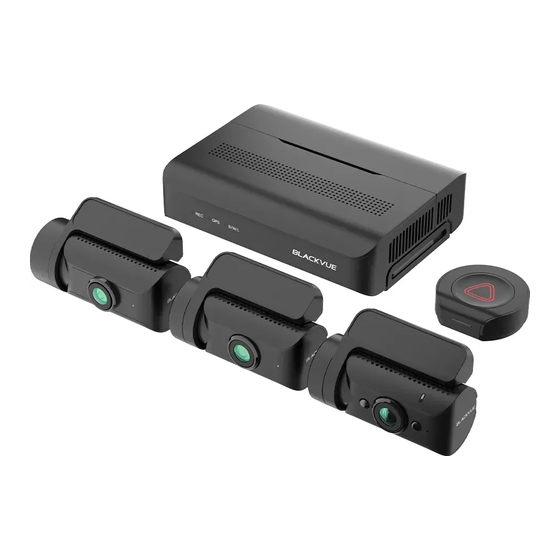
Richtlijn EMC 2014/53/EU en de RoHS richtlijn (2011/65/EU) betreffende beperking van het gebruik van bepaalde gevaarlijke stoffen in elektronische apparatuur door toepassing van EN 50581:2012 en IEC 62321-3-1:2013. De volledige tekst van de EU-conformiteitsverklaring kan worden geraadpleegd op het volgende internetadres: https://blackvue-nederland.nl/declaration-of-conformity/ Importeur Bedrijfsnaam: TJM Supplies B.V. - Page 9 In the box Check the box for each of the following items before installing the BlackVue dashcam. DR770X Box (Front + Rear + IR) Main unit Front camera Rear camera Rear Infrared camera SOS button External GPS Main unit Cigarette Lighter...
-
Page 10: Need Help
Main unit key Allen wrench Double-sided tape for the Spare screws for tamperproof Mounting Brackets cover (2EA) Need help? Download the manual (including FAQs) and the latest firmware from www.blackvue.com Or contact a Customer Support expert at cs@pittasoft.com 10 BLACKVUE... - Page 11 : Blinking green light when inserting battery for the first time. 14.5 mm : Blinking green light when button is pressed. : Blinking red and green lights when connecting to main unit. : Blinking red light when voltage is low. DR770X Box Series 11...
-
Page 12: Front Camera
Main unit connection port Mounting bracket Tamperproof case 69.4 mm Camera lens Front security LED : Lights on during (i) normal mode, (ii) an event is being recorded (impact detected), (iii) manual recording has started, or (iv) motion is detected in parking mode. 12 BLACKVUE... - Page 13 : Stays on in all recording modes but can be turned off from firmware settings. Rear truck camera 81 mm Illumination Sensor Angle Lock Screw IR LED Camera Lens Main unit External Mounting connection port Bracket 65 mm DR770X Box Series 13...
- Page 14 Insert the key in the box, rotate it counterclockwise and open the lock on the main unit. Take out the lock case and insert the micro SD card. Warning y The front camera cable must be connected to the respective port. Connecting it to rear camera port will give a warning beep sound. 14 BLACKVUE...
- Page 15 STEP1. Unscrew the back panel of the SOS Button STEP 2. Remove the battery and replace it with a new CR2450 type coin battery. STEP 3 Close and re-screw the back panel of the SOS button. DR770X Box Series 15...
-
Page 16: Front Camera Installation
Connect the front camera ('Rear' port) and the main unit ('Front') using the rear camera connection cable. Note y Please make sure that the front camera cable is connected to the “Front” port in the main unit. 16 BLACKVUE... - Page 17 Adjust the angle of the lens by rotating the body of the front camera. We recommend pointing the lens slightly downwards (≈ 10° below horizontal), so as to record video with a 6:4 road to background ratio. Tighten the screw fully. DR770X Box Series 17...
- Page 18 Use the pry tool to lift the edges of the rubber window sealing and/or molding and tuck in the front camera connection cable. Camera connection cable Power cord 18 BLACKVUE...
-
Page 19: Rear Camera Installation
In case of connecting the rear camera cable to “Rear” port the output file name will start with “R”. y In case of connecting the rear camera to “Option” port the output file name will start with “O”. DR770X Box Series 19... - Page 20 We recommend pointing the lens slightly downwards (≈ 10° below horizontal), so as to record video with a 6:4 road to background ratio. Tighten the screw fully. Use the pry tool to lift the edges of the rubber window sealing and/or molding and tuck in the rear camera connection cable. Camera connection cable 20 BLACKVUE...
- Page 21 In case of connecting the rear camera cable to “Rear” port the output file name will start with “R”. y In case of connecting the rear camera to “Option” port the output file name will start with “O”. DR770X Box Series 21...
- Page 22 Peel off the protective film from the double-sided tape and attach the rear IR camera to the front windshield. Adjust the angle of the lens by rotating the body of the rear IR camera. 22 BLACKVUE...
- Page 23 Use the pry tool to lift the edges of the rubber window sealing and/or molding and tuck in the rear IR camera connection cable. Camera connection cable Power cord DR770X Box Series 23...
- Page 24 In case of connecting the Rear Truck camera cable to “Rear” port the output file name will start with “R”. y In case of connecting the Rear Truck camera to “Option” port the output file name will start with “O”. 24 BLACKVUE...
- Page 25 GNSS Module installation and pairing Connect the GNSS Module to the box and attach it to the edge of the window. Insert the cables into the cable cover and connect them to the USB socket. DR770X Box Series 25...
- Page 26 Blackvue Connectivity Module (CM100GLTE) installation (optional) Install the connectivity module at top corner of the windshield. Remove any foreign matter and clean and dry the windshield before installation. Warning y Do not install the product in a location where it can obstruct the driver's field of vision.
- Page 27 Use the pry tool to lift the edges of the windshield trim/molding and tuck in the connectivity module cable. Note y SIM card must be activated to use LTE service. For details, refer to the SIM Activation Guide. DR770X Box Series 27...
- Page 28 Settings can be changed in the BlackVue App or Viewer. To do the hardwiring, first locate the fuse box to connect the hardwiring power cable.
- Page 29 For details refer to the vehicle owner's manual. Connect the GND cable to metal ground bolt. Connect the power cable to the DC in terminal of the main unit. BlackVue will power up and start recording. Video files are stored on the microSD card.
- Page 30 SOS button can be paired in two ways. 1. In the blackvue app, tap on Camera, choose Seamless Pairing models and select “DR770X Box“. To connect to the main unit press SOS button until you a hear a "beep" sound. Your dashcam will also be verified on the app with this step.
- Page 31 2. In the Blackvue App go to “Camera Settings” by tapping on three dots and choose “System settings” Choose “SOS Button” and tap on “Register”. To connect to the main unit press SOS button until you a hear a "beep"...
-
Page 32: App Overview
Using BlackVue app App overview *Image shown is the BlackVue app home screen Explore y See the latest product and marketing information from BlackVue. Also watch popular video uploads and live views shared by BlackVue users. Camera y Add and remove camera. Watch recorded videos, check camera status, change the camera settings and use Cloud functions of cameras added to the camera list. - Page 33 Register BlackVue account Search for the BlackVue app in the Google Play Store or Apple App Store and install it on your smartphone. Create an account (i) Select Login if you have an account, otherwise tap create account. (ii) During sign up, you will receive an e-mail with confirmation code. Enter the confirmation code to finish creating your account.
- Page 34 Add BlackVue dashcam to camera list Choose one of the following methods to add your BlackVue dashcam to the camera list. Once your camera is added, continue to the steps in ‘Connect to Blackvue Cloud’ . Add via Seamless Pairing (i) Select Camera in the Global Navigation Bar.
- Page 35 (iv) Choose your BlackVue dashcam from the detected camera list. (v) To connect to the main unit press SOS button until you a hear a "beep" sound. Add manually (i) If you want to connect to camera manually, press Add camera manually .
-
Page 36: Connect To Blackvue Cloud (Optional)
If you have a mobile Wi-Fi hotspot (also known as a portable Wi-Fi router), BlackVue connectivity module (CM100GLTE), a car-embedded wireless internet network or a Wi- Fi network near your car, you can use the BlackVue app to connect to BlackVue Cloud and see in real-time where your car is and the dashcam’s live video feed. ... - Page 37 LTE connectivity guide. Note y When the dashcam is connected to internet, you can use BlackVue Cloud features such as remote Live View and Video playback, Real-time location, push notification, Auto-upload, remote Firmware update etc. on BlackVue app and Web Viewer.
- Page 38 Choose your preferred settings. Quick settings allow you to choose your FW language, time zone, and speed unit. If you prefer to do this later, press skip. Otherwise, press next. (i) Select the firmware language for your BlackVue dashcam. Press next. (ii) Select a time zone of your location. Press next.
- Page 39 Tap your dashcam model in the camera list. To play video files, press Playback and tap the video you want to play. To change the settings, press settings. Note y For more information about BlackVue app, go to https://cloudmanual.blackvue.com. DR770X Box Series 39...
- Page 40 To experience the camera features in the Web Viewer, you must create an account and your dashcam must be connected to the Cloud. For this setup, it is recommended to download the BlackVue app and follow the instructions including optional...
-
Page 41: Using Blackvue Viewer
Download BlackVue Viewer program from www.blackvue.com > Support > Downloads and install it on your computer. Run BlackVue Viewer. To play, select a video and click on the play button or double click the selected video. To change settings, click on the button to open the BlackVue settings panel. - Page 42 Windows/macOS Viewer Note y For more information about BlackVue Viewer, go to https://cloudmanual.blackvue.com. y All images shown are for illustration purpose only. Actual program may differ from images shown. 42 BLACKVUE...
-
Page 43: Tips For Optimal Performance
Format using BlackVue Viewer (macOS): Download BlackVue Mac Viewer from www.blackvue.com > Support > Downloads and install it on your computer. Insert the microSD card into the microSD card reader and connect the reader to your computer. Launch the copy of BlackVue Viewer that is installed on your computer. -
Page 44: Product Specifications
Product specifications: Model Name DR770X Box Series Main unit : Black / Length 130.0 mm x Width 101.0 mm x Height 33.0 mm / 209 g Front : Black / Length 62.5 mm x Width 34.3 mm x Height 34.0 mm / 43 g Rear : Black / Length 63.5 mm x Width 32.0 mm x Height 32.0 mm / 33 g... - Page 45 * Windows 7 or higher, Mac Sierra OS X (10.12) or higher BlackVue Web Viewer * Chrome 71 or higher, Safari 13.0 or higher Other Features Adaptive Format Free File Management System * STARVIS is a trademark of Sony Corporation. DR770X Box Series 45...
-
Page 46: Hulp Nodig
In het vakje Vink het vakje aan voor elk van de volgende items voordat u de BlackVue-dashcam installeert. DR770X Box (voor + achter + IR) Hoofdeenheid Camera voorzijde Camera achterzijde Infrarood achtercamera SOS-knop Externe GPS Stroomkabel van Verbindingskabel voor sigarettenaansteker... - Page 47 Inbussleutel Reserveschroeven voor Dubbelzijdige tape voor de sabotagebestendige montagesteunen afdekking (2EA) Hulp nodig? Download de handleiding (inclusief Veelgestelde Vragen) en de nieuwste firmware vanaf www.blackvue.com Of neem contact op met een deskundige bij Customer Support via cs@pittasoft.com DR770X Box-serie 47...
- Page 48 : Knippert groen wanneer de batterij voor het eerst wordt geplaatst. 14.5 mm : Knippert groen wanneer de knop wordt ingedrukt. : Knippert rood en groen bij verbinding met de hoofdeenheid. : Knippert rood wanneer de spanning laag is. 48 BLACKVUE...
- Page 49 Camera voorzijde Verbindingspoort hoofdeenheid Montagesteun Sabotagebestendige behuizing 75.9 mm Cameralens Draai de schroef op de sabotagebestendige Veiligheidslampje voorzijde afdekking linksom en verwijder de : Licht op wanneer (i) in normale modus, (ii) een activiteit wordt afdekking van de camera om de kabel aan opgenomen (botsing waargenomen), (iii) handmatige opname te sluiten.
- Page 50 Verlichtingssensor V-uit (verbindingspoort hoofdeenheid) 69.4 mm Beveiligings-led achterkant Infraroodlampje : Blijft aan in alle opnamemodi, maar kan uitgezet worden vanuit de firmware- instellingen. Achtercamera voor vrachtwagen 81 mm Verlichtingssensor Hoekborgschroef Infraroodlampje Cameralens Verbindingspoort Externe hoofdeenheid montagebeugel 65 mm 50 BLACKVUE...
- Page 51 Installatie hoofdeenheid en SOS-knop Installeer de hoofdeenheid (box) aan de zijkant van de middenconsole of in het dashboardkastje. In voertuigen voor zwaar gebruik kan de box ook op het bagagerek worden geïnstalleerd. Voor sedans Voor zware voertuigen Steek de sleutel in de box, draai deze linksom en open het slot op de hoofdeenheid. Haal de slotkast eruit en plaats de micro-SD-kaart.
- Page 52 STAP 1. Schroef het achterpaneel van de SOS-knop los STAP 2. Verwijder de batterij en vervang deze door een nieuwe knoopcelbatterij van het type CR2450. STAP 3. Sluit het achterpaneel van de SOS-knop en schroef het weer vast. 52 BLACKVUE...
- Page 53 Installatie van voorcamera Installeer de camera voorzijde achter de achteruitkijkspiegel. Verwijder eventueel vuil en maak de voorruit voor het installeren schoon en droog. Haal de sabotagebestendige beugel los van de voorcamera door de schroef linksom te draaien met de inbussleutel. Verbind de voorcamera (poort “Rear”) en de hoofdeenheid (“Front”) met behulp van de verbindingskabel van de achtercamera.
- Page 54 Pas de hoek van de lens aan door de behuizing van de camera voorzijde te draaien. We raden aan de lens iets naar beneden te wijzen (≈10° onder horizontaal), om video met een 6:4 weg:achtergrond- verhouding op te nemen. Draai de schroef volledig vast. 54 BLACKVUE...
- Page 55 Gebruik de wrikker om de hoeken van de afwerking van de ruit op te tillen en duw de verbindingskabel van de voorcamera eronder. Verbindingskabel voor camera Netsnoer DR770X Box-serie 55...
- Page 56 Als de kabel van de achtercamera wordt aangesloten op de poort “Rear”, begint de naam van het uitvoerbestand met “R”. y Als de achtercamera wordt aangesloten op de poort “Option”, begint de naam van het uitvoerbestand met “O”. 56 BLACKVUE...
- Page 57 Lijn de sabotagebestendige beugel uit met de montagebeugel. Gebruik de inbussleutel om de schroef vast te draaien. Draai de schroef niet volledige vast, aangezien dit kan worden gedaan nadat de camera op de achterruit is bevestigd. Haal het beschermfolie van de dubbelzijdige tape en bevestig de camera achterzijde aan de achterruit. Pas de hoek van de lens aan door de behuizing van de camera voorzijde te draaien.
- Page 58 Als de kabel van de achtercamera wordt aangesloten op de poort “Rear”, begint de naam van het uitvoerbestand met “R”. y Als de achtercamera wordt aangesloten op de poort “Option”, begint de naam van het uitvoerbestand met “O”. 58 BLACKVUE...
- Page 59 Lijn de sabotagebestendige beugel uit met de montagebeugel. Gebruik de inbussleutel om de schroef vast te draaien. Draai de schroef niet volledige vast, aangezien dit kan worden gedaan nadat de camera op de achterruit is bevestigd. Haal het beschermfolie van de dubbelzijdige tape en bevestig de IR achtercamera aan de voorruit. Pas de hoek van de lens aan door de behuizing van de IR achtercamera te draaien.
- Page 60 Gebruik de wrikker om de hoeken van de afwerking van de ruit op te tillen en duw de aansluitkabel van de IR achtercamera eronder. Verbindingskabel voor camera Netsnoer 60 BLACKVUE...
- Page 61 Installatie van achtercamera voor vrachtwagen Installeer de achtercamera extern bovenaan de achterzijde van de vrachtwagen. Bevestig de montagebeugel van de achtercamera met behulp van de meegeleverde schroeven bovenaan de achterzijde van het voertuig. Verbind de hoofdeenheid (poort “Rear” of “Option”) en de achtercamera (“V-out”) met behulp van de waterdichte verbindingskabel van de achtercamera.
- Page 62 Installatie en koppelen van GNSS-module Sluit de GNSS-module aan op de box en bevestig deze aan de rand van het raam. Steek de kabels in de kabelafdekking en sluit ze aan op de USB-poort. 62 BLACKVUE...
- Page 63 Installatie van Blackvue-connectiviteitsmodule (CM100GLTE) (optioneel) Installeer de connectiviteitsmodule in de bovenhoek van de voorruit. Verwijder eventueel vuil en maak de voorruit voor het installeren schoon en droog. Waarschuwing y Plaats het apparaat niet op een plek waar het gezichtsveld van de bestuurder belemmerd kan worden.
- Page 64 Gebruik de wrikker om de hoeken van de afwerking van de voorruit op te tillen en duw de kabel van de connectiviteitsmodule eronder. Opmerking y De simkaart moet zijn geactiveerd om de LTE-service te gebruiken. Raadpleeg de Activeringshandleiding sim voor meer informatie. 64 BLACKVUE...
- Page 65 Het apparaat is voorzien van een voedingsonderbrekingsfunctie bij laagspanning en een parkeermodustimer die de accu van uw auto beschermt tegen ontlading. Instellingen kunnen worden gewijzigd in de BlackVue-app of Viewer. Om de bedrading te doen, zoekt u eerst de zekeringkast om de bedrade voedingskabel aan te sluiten.
- Page 66 Raadpleeg de gebruikershandleiding van het voertuig voor meer informatie. Sluit de GND-kabel aan op de metalen aardingsbout. Sluit de voedingskabel aan op de DC-ingang van de hoofdeenheid. BlackVue zal opstarten en beginnen met opnemen. Videobestanden worden opgeslagen op de microSD-kaart. Opmerking y Wanneer u de dashcam voor het eerst aanzet, zal de firmware automatisch op de microSD-kaart geïnstalleerd...
- Page 67 De SOS-knop kan op twee manieren worden gekoppeld. 1. Tik in de Blackvue-app op Camera, kies Naadloos koppelingsmodellen en selecteer “DR770X Box”. Om verbinding te maken met de hoofdeenheid, drukt u op de SOS-knop totdat u een pieptoon hoort. Uw dashcam wordt met deze stap ook geverifieerd in de app.
- Page 68 2. Ga in de Blackvue-app naar “Camera-instellingen” door op drie puntjes te tikken en kies “Systeeminstellingen”. Kies “SOS-knop” en tik op “Registreren”. Om verbinding te maken met de hoofdeenheid, drukt u op de SOS-knop totdat u een pieptoon hoort. 68 BLACKVUE...
- Page 69 BlackVue-app gebruiken Overzicht van de app *Getoonde afbeelding is het startscherm van de BlackVue-app Verkennen y Bekijk de nieuwste product- en marketinginformatie van BlackVue. Bekijk tevens populaire video-uploads en liveweergaven die zịn gedeeld door BlackVue-gebruikers. Camera y Voeg camera's toe en verwijder ze. Bekijk opgenomen video's, controleer de camerastatus, wijzig de camera-instellingen en gebruik cloudfuncties van camera's die aan de cameralijst zijn toegevoegd.
- Page 70 BlackVue-account registreren Zoek naar de BlackVue-app in de Google Play Store of Apple App Store en installeer deze op uw smartphone. Een account aanmaken (i) Selecteer Inloggen als u een account heeft; tik anders op Account aanmaken. (ii) Tijdens de registratie ontvangt u een e-mail met een bevestigingscode. Voer de bevestigingscode in om account te voltooien.
- Page 71 BlackVue-dashcam toevoegen aan de cameralijst Kies een van de volgende methoden om uw BlackVue-dashcam toe te voegen aan de cameralijst. Zodra uw camera is toegevoegd, gaat u verder met de stappen in 'Verbinding maken met Blackvue Cloud' . Toevoegen via Naadloze koppeling (i) Selecteer Camera in de algemene navigatiebalk.
- Page 72 (iv) Kies uw BlackVue-dashcam uit de lijst met gedetecteerde camera's. (v) Om verbinding te maken met de hoofdeenheid, drukt u op de SOS-knop totdat u een pieptoon hoort. Handmatig toevoegen (i) Als u handmatig verbinding wilt maken met de camera, drukt u op Camera handmatig toevoegen .
- Page 73 BlackVue- app gebruiken om verbinding te maken met BlackVue Cloud en zien waar uw auto zich op dat moment bevindt en live video van de dashcam bekijken. ...
- Page 74 BlackVue-app en Web Viewer. y De BlackVue DR770X Box-serie is niet compatibel met 5GHz draadloze netwerken. y Om de BlackVue Cloud Service te gebruiken via het LTE-netwerk, moet de simkaart correct zijn geactiveerd voor internettoegang. y Als zowel een LTE- als een wifi-hotspot beschikbaar zijn als internetverbinding, heeft de wifi-hotspot prioriteit. Als u de voorkeur geeft aan de LTE-verbinding, verwijder dan de Wi-Fi-hotspotgegevens.
- Page 75 Selecteer uw voorkeursinstellingen. Met snelle instellingen kunt u uw FW-taal, tijdzone en snelheidseenheid kiezen. Als u dit liever op een later tijdstip doet, drukt u op Overslaan. Anders drukt u op Volgende. (i) Selecteer de firmwaretaal voor uw BlackVue-dashcam. Druk op Volgende. (ii) Selecteer de tijdzone van uw locatie. Druk op Volgende.
- Page 76 Om videobestanden af te spelen, drukt u op Afspelen en tikt u op de video die u wilt afspelen. Om de instellingen te wijzigen, drukt u op Opmerking y Ga voor meer informatie over de BlackVue-app naar https://cloudmanual.blackvue.com. 76 BLACKVUE...
- Page 77 Om de camerafuncties in Web Viewer te kunnen gebruiken, moet u een account aanmaken en uw dashcam verbonden zijn met de cloud. Voor deze installatie wordt aanbevolen om de BlackVue-app te downloaden en de instructies, inclusief optionele stappen, te volgen in BlackVue-app gebruiken voordat u Web Viewer opent.
- Page 78 Download het programma BlackVue Viewer vanaf www.blackvue.com > Support > Downloads en installeer het op uw computer. Start BlackVue Viewer. Selecteer een video en klik op de afspeeltoets of dubbelklik op de geselecteerde video om deze af te spelen. Klik op de toets om het BlackVue-instellingenpaneel te openen en de instellingen te wijzigen.
- Page 79 Windows/macOS Viewer Opmerking y Ga voor meer informatie over de BlackVue Viewer naar https://cloudmanual.blackvue.com. y Alle getoonde afbeeldingen zijn uitsluitend ter illustratie. Werkelijke programma kan afwijken van de weergegeven afbeeldingen. DR770X Box-serie 79...
- Page 80 Formatteren met BlackVue Viewer (Windows): Download BlackVue Windows Viewer vanaf www.blackvue.com > Support > Downloads en installeer deze op uw computer. Steek de microSD-kaart in de microSD kaartlezer en verbind de lezer met uw computer. Start BlackVue Viewer vanaf uw computer. Klik op de Formatteer -toets, selecteer het kaartstation en klik op OK.
- Page 81 Productspecificaties: Modelnaam DR770X Box-serie Hoofdeenheid: Zwart/Lengte 130,0 mm x breedte 101,0 mm x hoogte 33,0 mm/209 g Voorzijde: Zwart/Lengte 62,5 mm x breedte 34,3 mm x hoogte 34,0 mm/43 g Achterkant: Zwart/Lengte 63,5 mm x breedte 32,0 mm x hoogte 32,0 mm/33 g Kleur/Grootte/Gewicht Vrachtwagen achter: Zwart/Lengte 70,4 mm x breedte 56,6 mm x hoogte 36,1 mm/157 g Binnen IR: Zwart/Lengte 63,5 mm x breedte 32,0 mm x hoogte 32,0 mm/34 g...
- Page 82 * Android 8.0 of nieuwer, iOS 13.0 of nieuwer BlackVue Viewer Software * Windows 7 of nieuwer, Mac Sierra OS X (10.12) of nieuwer BlackVue Web Viewer * Chrome 71 of nieuwer, Safari 13.0 of nieuwer Overige functies Aangepast formaatvrij bestandsbeheersysteem * STARVIS is een handelsmerk van Sony Corporation.
-
Page 83: Product Warranty
Product Warranty The term of this product warranty is 1 year from the purchase date. (Accessories such as an External Battery/microSD Card: 6 Months) We, PittaSoft Co., Ltd., provide the product warranty according to the Consumer Dispute Settlement Regulations (drawn up by the Fair Trade Commission). PittaSoft or designated partners will provide the warranty service upon request. - Page 84 DR770X Box Series Product | Car Dashcam including SOS Button Model Name | DR770X Box, DR770X Box Truck, EB-1 Manufacturer | Pittasoft Co., Ltd. Address | 4F ABN Tower, 331, Pangyo-ro, Bundang-gu, Seongnam-si, Gyeonggi-do, Republic of Korea, 13488 Customer Support | cs@pittasoft.com...
Need help?
Do you have a question about the DR770X Box Series and is the answer not in the manual?
Questions and answers