BlackVue DR970X-2CH LTE Plus Manual
- Quick start manual (30 pages) ,
- Quick start manual (76 pages)
Advertisement
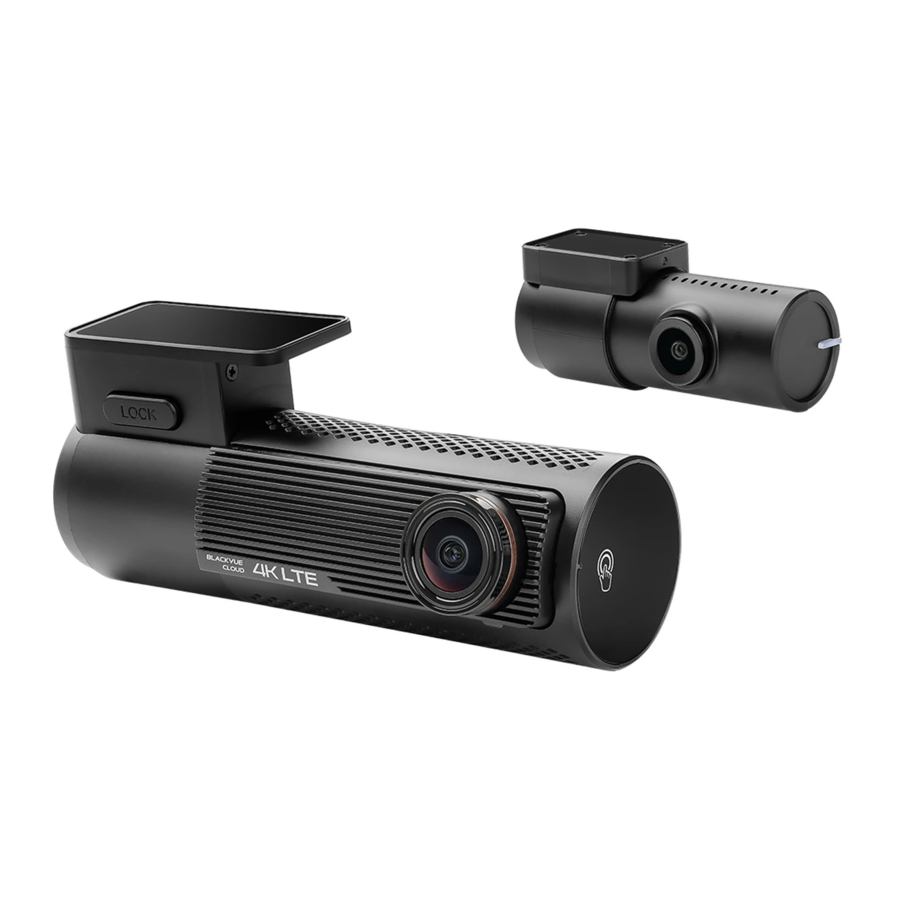
In the box
Check the box for each of the following items before installing the BlackVue dashcam.

Need help?
contact a Customer Support expert at cs@pittasoft.com
At a glance
The following diagrams explain each part of the BlackVue dashcam.
Front camera


Rear camera

Install and power up
Install the front camera behind the rear view mirror. Install the rear camera at the top of the back windshield. Remove any foreign matter and clean and dry the windshield before installation.

 Note
Note
- Make sure to peel the protective film off the front and rear camera. The cameras could be damaged from overheating if the protective film is not removed.

- Do not install the product in a location where it can obstruct the driver's field of vision.
- Turn off the engine. Open the cover of the microSD card slot, gently push the card into the slot until it locks into place and close the cover.

- To insert the SIM card, remove the bracket from the front camera. Unmount the SIM slot by using SIM eject tool. Insert the SIM card into the SIM card slot. Then, Mount the SIM Slot back into the camera.

![information]() Note
Note - BlackVue LTE series is only compatible with 4G LTE network.
- For detailed information about activation of SIM card, please visit BlackVue Help Center:https://helpcenter.blackvue.com -> SIM Activation Guide (LTE Series).
- Peel off the protective film from the double-sided tape and attach the front camera to the windshield behind the rear-view mirror.

- Adjust the angle of the lens by rotating the body of the front camera. We recommend pointing the lens slightly downwards (≈10° below horizontal), so as to record video with a 6:4 road to background ratio.
![]()
- Peel off the protective film from the double-sided tape and attach the rear camera to the back windshield. Adjust the angle of the lens by rotating the body of the camera.
![]()
- Plug the right angle connector of the rear camera connection cable to the front camera ('Rear' port).

- Use the pry tool to lift the edges of the rubber window sealing and/or molding and tuck in the rear camera connection cable.

- Plug the cigarette lighter power cable into the cigarette lighter socket and the front camera. Skip to L for Hardwiring Power Cable setup.
- Use the pry tool to lift the edges of the windshield trim/molding and tuck in the power cord.

- Turn on the engine. The BlackVue dashcam will power up and start recording. Video files are stored on the microSD card.
- Turn off the engine. The dashcam will automatically stop recording and power down. To record in parking mode while the engine is off please connect the Hardwiring Power Cable (included in the box) or install a Power Magic Battery Pack (sold separately). A Hardwiring Power Cable uses the automotive battery to power your dashcam when the engine is off. A low voltage power cut-off function and a parking mode timer to protect the automotive battery from discharge is installed in the device. Settings can be changed in the BlackVue App or Viewer.
- Locate the fuse box to connect the hardwiring power cable.
![information]() Note
Note - Location of the fuse box differ by manufacturer or model. For details, refer to the vehicle owner's manual.
- After removing fuse panel cover, find a fuse that powers on when engine is turned on (ex.cigarette lighter socket, audio, etc) and another fuse that remains powered on after the engine is turned off (ex.hazard light, interior light). Connect the ACC+ cable to a fuse that powers on after engine start, and BATT+ cable to a fuse that remains powered on after engine is turned off.
![]()
![information]() Note
Note - To use battery saver feature, connect the BATT+ cable to the hazard light fuse. Functions of fuse differ by manufacturer or model. For details refer to the vehicle owner's manual.
- Connect the GND cable to metal ground bolt.
![]()
- Connect the power cable to the DC in terminal of the front camera. BlackVue will power up and start recording. Video files are stored on the microSD card.
![information]() Note
Note - When you run the dashcam for the first time the firmware is automatically loaded onto the microSD card. After the firmware has been loaded onto the microSD card you can customize settings using the BlackVue app on a smartphone or BlackVue Viewer on a computer.


Using BlackVue app
App overview

Explore
- See the latest product and marketing information from BlackVue. Also watch popular video uploads and live views shared by BlackVue users.
Camera
- Add and remove camera. Watch recorded videos, check camera status, change the camera settings and use Cloud functions of cameras added to the camera list.
Event map
- See all the events and uploaded videos on the map shared by BlackVue users.
Profile
- Review and edit account information.
Register BlackVue account
- Search for the BlackVue app in the Google Play Store or Apple App Store and install it on your smartphone.
- Log in/Create account
- Select Get Started and then move to Log-In page.
- Select Log in with Email if you have an account, otherwise tap Create account.
- During sign up, you will receive an e-mail with confirmation code. Enter the confirmation code to finish creating your account.

![information]() Note
Note - Connect your BlackVue dashcam without Login (Wi-Fi mode).
- For detailed information about Wi-Fi mode refer to Wi-Fi mode.

Add BlackVue dashcam to camera list
- Choose one of the following methods to add your BlackVue dashcam to the camera list. Once your camera is added, continue to the steps in 'Connect to Blackvue Cloud'.
- Add via Seamless Pairing
- SelectCamera in the Global Navigation Bar.
- Find and Press+ Camera.
- SelectSeamless Pairing. Make sure smartphone's Bluetooth is turned on.

![information]() Note
Note - Bluetooth and/or Wi-Fi direct has a connection range of 10m between your dashcam and smartphone.
- Dashcam SSID is printed in connectivity details label attached on your dashcam or inside the product box.
- Choose your BlackVue dashcam from the detected camera list.
- Put your hand on the camera's touch sensor to complete seamless pairing.

- Add manually
- If you want to connect to camera manually, press Add camera manually.
- Press How to connect phone to the camera and follow the instructions.

- Add via Seamless Pairing


Connect to BlackVue Cloud
You can use the BlackVue app to connect to BlackVue Cloud and see in real-time where your car is and the dashcam's live video feed.
For more information about using the BlackVue app, please refer to the BlackVue App manual from https://cloudmanual.blackvue.com.
- Choose one of the following Cloud connection method. Once setup is complete, continue to steps in 'Quick settings'.
- Activate SIM card (BlackVue SIM card/3rd party SIM card)
There are BlackVue SIM card which is included in BlackVue SIM package and 3rd party SIM card. It will be detected automatically. Follow the below steps for SIM registration.- Insert the SIM card as shown onSTEP 1 B .
- After your camera is added, the app will give you the option to choose a cloud connection method.
- Select SIM card
- In case of BlackVue SIM card

- In case of BlackVue SIM card
- Confirm the SIM ICCID number and press Next.

- Check your free trial information and precautions, press Next.
- Input billing information and press Try 1 month free.
- BlackVue SIM card subscription is done, Check your data plan and billing date and press OK.
Once SIM card is inserted in the camera, SIM card will be activated automatically.

![information]() Note
Note - For full details, please visit BlackVue website: www.blackvue.com > Helpcenter > Sim Activation Guide (LTE Series).
- If you want to manage your billing information, press Go to SIM management.
Go to BlackVue SIM card in the main home to manage your BlackVue SIM card.

- In case of 3rd party SIM card
- SelectSIM card
- Configure the APN settings to activate the SIM card and press Done.

- Activate SIM card (BlackVue SIM card/3rd party SIM card)


Note
- To use the BlackVue Cloud Service, SIM card must be properly activated for Internet access via LTE network.
- When the dashcam is connected to internet, you can use BlackVue Cloud features such as remote Live View and Video playback, Real-time location, push notification, Auto-upload, remote Firmware update etc. on BlackVue app and PC Viewer.
- Some Cloud features may not work when surrounding temperature in high and/or LTE speed is slow.
- Wi-Fi hotspot
Make sure your BlackVue dashcam and mobile Wi-Fi hotspot are on.- SelectWi-Fi hotspot.
- Choose your Wi-Fi hotspot from the list. Enter the password and tap Save.


Note
- To add or make changes to your cloud connection methods, go to Cameras, tap
![]() next to your dashcam model and select Cloud connection settings.
next to your dashcam model and select Cloud connection settings.
Setup is complete. your dashcam will automatically establish internet connection.
If internet connection is not established, please ensure Wi-Fi information was inserted correctly. - If LTE and Wi-Fi hotspot is available for internet connection, Wi-Fi hotspot will be in priority. If LTE connection is preferred at all times, please remove Wi-Fi hotspot information.
Quick settings (optional)
- Choose your preferred settings. Quick settings allow you to choose your FW language, time zone, and speed unit. If you prefer to do this later, press skip. Otherwise, press next.
- Select the firmware language for your BlackVue dashcam. Press next.
- Select a time zone of your location. Press next.
- Select the speed unit of your preference. Press next.
 - Step 1")
- Pressmore settings to access all of the settings or press save. Your dashcam will format the SD card to apply the settings. Press OK to confirm.
- BlackVue dashcam installation is complete.
 - Step 2")
 - Step 1")
 - Step 2")
Playing video files and changing settings
After installation is complete, follow the below steps to play video files and change settings.

- Select Camera on your Global Navigation Bar.
- Tap your dashcam model in the camera list.
- To play video files, press Playback and tap the video you want to play.
- To change the settings, press
![]() settings.
settings.

Note
- For more information about BlackVue app, go to https://cloudmanual.blackvue.com.
Wi-Fi mode
What's "Wi-Fi mode"
The manual describes the "Wi-Fi mode" available on the BlackVue App, which is designed for users who do not want to create an account and log in or need to connect their dashcam directly to the App.
- How to use "Wi-Fi mode" in the BlackVue App.
- Get into the App, and you will see the Onboarding page.
- You can see the "Wi-Fi mode" button.
- Tap this button ("Wi-Fi mode"). Then you will see the Cameras list page.

- InCameras list page tap the + button.
- Select the connection methodSeamless pairing.

- Select your camera from the list.
- Verify your camera by tapping on the touch sensor.
- Congratulations! your camera is already connected.

- In the Camera list page, tap on your Camera and you will seeCamera Connection pop-up.
- TapJoin and you will get to the Video List page where you can access all the videos.

- What features are available in this mode?

- Camera Settings
Setting the dashcam's firmware setting y Basic - Time, Video, Recording mode y Sensitivity - G-sensor, Motion detection y System - LED, Text Overlay, Speed alert y Wi-Fi - Log in, Wi-Fi on/off y Cloud - Cloud on/off, network y FW language - Rename Camera To change name of the camera.
- Remote Firmware Update
To download and update the firmware of the camera. - Reboot Camera
Option to optimize dashcam performance. - Format MicroSD card
To clean the file list by removing all unwanted files. - Delete
To delete the camera from the app.
- Camera Settings
- Downloaded Videos

- Tap the "Downloaded videos" button. It will show the downloaded file list to your app's local storage.
- Then you can manage the files individually via the submenu of each file.


Using BlackVue Web Viewer
To experience the camera features in the Web Viewer, you must create an account and your dashcam must be connected to the Cloud. For this setup, it is recommended to download the BlackVue app and follow the instructions including optional steps in Using BlackVue App prior to accessing the Web Viewer.

- Go to www.blackvuecloud.comto access BlackVue Web Viewer.
- Select Start Web Viewer. Enter the login information if you have an account, otherwise press Sign up and follow the guidelines in the Web Viewer.
- To play video files after login, select your camera in the camera list and press Playback. If you have not already added your camera, press Add camera and follow the guidelines in the Web Viewer.
- Select the video you want to play from the video list.
Using BlackVue Viewer
Playing video files and changing settings
- Remove the microSD card from the dashcam.

- Insert the card into the microSD card reader and connect it to a computer.

- Download BlackVue Viewer program from www.blackvue.com > Support > Downloads and install it on your computer.
- Run BlackVue Viewer. To play, select a video and click on the play button or double click the selected video.
- To change settings, click on the
![]() button to open the BlackVue settings panel. Settings that can be changed include Wi-Fi SSID & password, image quality, sensitivity settings, voice recording on/off, speed unit (km/h, MPH), LEDs on/off, voice guidance volume, Cloud settings etc.
button to open the BlackVue settings panel. Settings that can be changed include Wi-Fi SSID & password, image quality, sensitivity settings, voice recording on/off, speed unit (km/h, MPH), LEDs on/off, voice guidance volume, Cloud settings etc.


Note
- For more information about BlackVue Viewer, go to https://cloudmanual.blackvue.com.
- The playback of 4K UHD resolution depends on your computer's hardware and software. Older computers may not support 4K UHD. If you encounter issues please check your computer's video playback capabilities.
- All images shown are for illustration purpose only. Actual program may differ from images shown.
Tips for optimal performance
- For stable operation of the dashcam, it is recommended to format the microSD card once a month.
Format using BlackVue App (Android/iOS):
Go to BlackVue App >![]() > Format microSD card and format the microSD card. Format using BlackVue Viewer (Windows):
> Format microSD card and format the microSD card. Format using BlackVue Viewer (Windows):
Download BlackVue Windows Viewer from www.blackvue.com > Support > Downloads and install it on your computer. Insert the microSD card into the microSD card reader and connect the reader to your computer. Launch the copy of BlackVue Viewer that is installed on your computer. Click the Format![]() button, select the card drive and click OK.
button, select the card drive and click OK.
Format using BlackVue Viewer (macOS):
Download BlackVue Mac Viewer from www.blackvue.com> Support > Downloads and install it on your computer. Insert the microSD card into the microSD card reader and connect the reader to your computer. Launch the copy of BlackVue Viewer that is installed on your computer. Click the Format![]() button and select the microSD card from the list of drives in the left frame. After selecting your microSD card select the Erase tab in the main window. Select "MS-DOS (FAT)" from the Volume Format drop-down menu and click Erase.
button and select the microSD card from the list of drives in the left frame. After selecting your microSD card select the Erase tab in the main window. Select "MS-DOS (FAT)" from the Volume Format drop-down menu and click Erase. - Only use official BlackVue microSD cards. Other cards may have compatibility issues.
- Regularly upgrade the firmware for performance improvements and updated features. Firmware updates will be made available for download at www.blackvue.com > Support > Downloads.
Customer Support
You can also email a Customer Support expert at cs@pittasoft.com
Product specifications
| Model Name | DR970X-2CH LTE Plus |
| LTE | Built-in 4G LTE module compatible with nano SIM |
| Color/Size/Weight | Front: Black/137.6(L) x 60.3(W) x 43(H) mm/166g Rear: Black/67.3(L) x 28(W) x 25(H) mm/25g |
| Memory | microSD Card (64 GB/128 GB/256 GB/512 GB) |
| Recording Modes | Normal recording, Event recording (when impact is detected in normal and parking mode), Manual recording and Parking recording (when motion is detected).
|
| Camera | Front: STARVIS2 CMOS sensor (Approx. 8.4 M Pixel) Rear: STARVIS CMOS Sensor (Approx. 2.1 M Pixel) |
| Viewing Angle | Front: Diagonal 146°, Horizontal 125°, Vertical 68° Rear: Diagonal 131°, Horizontal 107°, Vertical 55° |
| Resolution/ Frame Rate | Front: 4K (3840 x 2160) @ 30 fps Rear: Full HD (1920x1080) @ 30 fps
|
| Video Codec | H.265 (HEVC)/H.264 (AVC) |
| Image Quality (Mbps) | Front: Extreme(60), Highest(25), High(12), Normal(8) Rear: Extreme(10), Highest(10), High(8), Normal(6) *60Mbps bitrates only support in H.265(HEVC). |
| Video Compression Mode | MP4 |
| Wi-Fi | Built-in (802.11 a.b.g.n.ac) |
| Bluetooth | Built-in (V2.1+EDR/4.2) |
| GPS | Built-in (Dual Band: GPS, GLONASS) |
| Microphone | Built-in |
| Speaker (Voice Guidance) | Built-in |
| LED Indicators | Front: Recording LED, GPS LED, B/W/L (Bluetooth/Wi-Fi/LTE) LED, Front Security LED Rear: Rear Security LED |
| Sensor | 3-Axis Acceleration Sensor |
| Button | Touch Sensor: Pressing the touch sensor triggers manual recording depending on the firmware settings. |
| Backup Battery | Built-in super capacitor |
| Input Power | DC 12V-24V (3 pole DC Plug (Ø3.5 x Ø1.1)) to Wires (Black: GND/Yellow: B+/Red: ACC) |
| Power Consumption | Normal Mode (GPS On/Cloud On): Avg. 590mA/12V Normal Mode (GPS On/Cloud Off): Avg. 530mA/12V Parking Mode (GPS Off/Cloud On): Avg. 430mA/12V Parking Mode (GPS Off/Cloud Off): Avg. 370mA/12V
|
| Operation Temperature | -20°C − 70°C (-4°F − 158°F) |
| Storage Temperature | -20°C − 70°C (-4°F − 158°F) |
| High Temperature Cut-Off | Approx. 70°C (167°F) |
| Certifications | Front: FCC, ISED, CE, UKCA, RCM, Telec, RoHS, WEEE, KC Rear: FCC, ISED, CE, UCKA, RCM, RoHS, WEEE, KC |
| Software | BlackVue Application
|
| Others | Adaptive Format Free File Management System |
Important safety information
For user safety and to avoid property damage, read through this manual and follow these safety instructions to use the product correctly.
- Do not disassemble, repair, or modify the product yourself.
Doing so may cause fire, electric shock, or malfunction. For internal inspection and repair, contact the service center. - Do not adjust the product while driving.
Doing so may cause an accident. Stop or park your car in a safe place before installing and setting up the product. - Do not operate the product with wet hands. Doing so may cause electric shock.
- If any foreign matter gets inside the product, detach the power cord immediately. Contact the service center for repair.
- Do not cover the product with any material.
Doing so may cause external deformation of the product or fire. Use the product and peripherals in a well-ventilated location. - If the product is used outside the optimal temperature range, performance can decline or malfunctions may occur.
- When entering or exiting a tunnel, when directly facing into bright sunlight, or when recording at night without lighting the quality of recorded video may deteriorate.
- If the product is damaged or the power supply is cut due to an accident, video may not be recorded.
- Do not remove the microSD card while the microSD card is saving or reading data.
The data can be damaged or malfunctions may occur.
Documents / Resources
References
![www.blackvuecloud.com]() BlackVue Cloud — Add-on service for cloud-compatible BlackVue dashcams
BlackVue Cloud — Add-on service for cloud-compatible BlackVue dashcams![cloudmanual.blackvue.com]() BlackVue App, Viewer and Cloud Manuals – Online manuals for BlackVue App, Viewer and Cloud services
BlackVue App, Viewer and Cloud Manuals – Online manuals for BlackVue App, Viewer and Cloud services
Download manual
Here you can download full pdf version of manual, it may contain additional safety instructions, warranty information, FCC rules, etc.
Advertisement


Need help?
Do you have a question about the DR970X-2CH LTE Plus and is the answer not in the manual?
Questions and answers