
Related Manuals for BlackVue DR970X-1CH Plus


Summary of Contents for BlackVue DR970X-1CH Plus
- Page 1 Quick Start Guide DR970X-1CH Plus DR970X-2CH Plus *1CH Plus Model *2CH Plus Model ENGLISH/中文 www.blackvue.com Detailed Manual...
- Page 2 BLACKVUE DR970X-1CH Plus, 2CH Plus For manuals, customer support and FAQs go to www.blackvue.com 如需获得说明书、客户支持和常见问题解答,请访问 www.blackvue.com/cn...
-
Page 3: Important Safety Information
If the product is damaged or the power supply is cut due to an accident, video may not be recorded. y Do not remove the microSD card while the microSD card is saving or reading data. The data can be damaged or malfunctions may occur. DR970X-1CH Plus l DR970X-2CH Plus... -
Page 4: Fcc Compliance Information
This device complies with Part 15 of the FCC Rules. Operation is subject to the following two conditions: (1) This device may not cause harmful interference, and (2) This device must accept any interference received, including interference that may cause undesired operation of this device. FCC ID: YCK-DR970XP BLACKVUE... - Page 5 Contact local authorities to learn about disposal and recycling options available in your area. 2. The correct disposal of your BlackVue dashcam will help prevent potential negative consequences for the environment and human health.
- Page 6 (1) l’appareil ne doit pas produire de brouillage, et (2) l’utilisateur de l’appareil doit accepter tout brouillage radioélectrique subi, même si le brouillage est susceptible d’en compromettre le fonctionnement. Cet appareil doit etre installe et utilise avec un minimum de 20cm entre le radiateur et votre corps. BLACKVUE...
-
Page 7: Need Help
In the box Check the box for each of the following items before installing the BlackVue dashcam. Rear camera Front camera (2CH only) Cigarette lighter power Hardwiring power cable cable microSD card microSD card reader Double-sided tape Double-sided tape for the rear camera... -
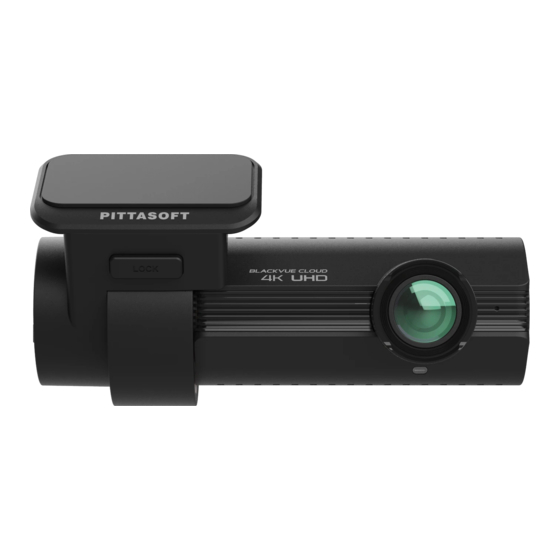
Page 8: Front Camera
At a glance The following diagrams explain each part of the BlackVue dashcam. Front camera 118.6 mm Lock button Camera lens Mounting bracket Front security LED : Lights on during (i) normal mode, (ii) an event is being recorded (impact detected), (iii) manual recording has started, or (iv) motion is detected in parking mode. - Page 9 - Default Wi-Fi SSID - Default Wi-Fi password - Cloud code - QR code Serial number label Touch sensor: Press the sensor to trigger a manual recording. *Touch sensor can be turned on/off in the firmware settings. DR970X-1CH Plus l DR970X-2CH Plus...
- Page 10 67.7 mm V out Rear security LED (Front camera : Stays on in all recording connection port) modes but can be turned off from firmware settings. Note y For 1CH user, the BlackVue rear camera is an optional accessory. 10 BLACKVUE...
- Page 11 Note y For 1CH user, the BlackVue rear camera is an optional accessory. y Make sure to peel the protective film off the front and rear cameras. The cameras could be damaged from overheating if the protective film is not removed.
- Page 12 Peel off the protective film from the double-sided tape and attach the rear camera to the rear windshield. Adjust the angle of the lens by rotating the body of the rear camera. Connect the front camera ('Rear' port) and the rear camera ('V out') using the rear camera connection cable. 12 BLACKVUE...
- Page 13 Use the pry tool to lift the edges of the windshield trim/molding and tuck in the power cord. Power cord Rear camera connection cable Turn on the engine. The BlackVue dashcam will power up and start recording. Video files are stored on the microSD card. DR970X-1CH Plus l DR970X-2CH Plus 13...
- Page 14 A low voltage power cut-off function and a parking mode timer to protect the automotive battery from discharge is installed in the device. Settings can be changed in the BlackVue App or Viewer.
- Page 15 Connect the GND cable to metal ground bolt. Connect the power cable to the DC in terminal of the front camera. BlackVue will power up and start recording. Video files are stored on the microSD card. Note y When you run the dashcam for the first time the firmware is automatically loaded onto the microSD card.
-
Page 16: App Overview
Add and remove camera. Watch recorded videos, check camera status, change the camera settings and use Cloud functions of cameras added to the camera list. Event map y See all the events and uploaded videos on the map shared by BlackVue users. Profile y Review and edit account information. - Page 17 Register BlackVue account Search for the BlackVue app in the Google Play Store or Apple App Store and install it on your smartphone. Log in / Create an account (i) Select Get Started and then move to Log-In page. (ii) Select Log in with Email if you have an account, otherwise tap Create account.
- Page 18 Add BlackVue dashcam to camera list Choose one of the following methods to add your BlackVue dashcam to the camera list. Once your camera is added, continue to the steps in ‘Connect to Blackvue Cloud’ . Add via Seamless pairing (i) Select Camera in the Global Navigation Bar.
- Page 19 Bluetooth and/or Wi-Fi direct has a connection range of 10m between your dashcam and smartphone. y Dashcam SSID is printed in connectivity details label attached on your dashcam or inside the product box. DR970X-1CH Plus l DR970X-2CH Plus 19...
-
Page 20: Connect To Blackvue Cloud (Optional)
If you don’t have a mobile Wi-Fi hotspot, BlackVue connectivity module or if you don’t want to use the BlackVue Cloud service, you can skip this step. If you have a mobile Wi-Fi hotspot (also known as a portable Wi-Fi router), BlackVue connectivity module (CM100GLTE), a car-embedded wireless internet network or a Wi-Fi network near your car, you can use the BlackVue app to connect to BlackVue Cloud and see in real-time where your car is and the dashcam’s live video feed. ... - Page 21 Auto-upload, remote Firmware update etc. on BlackVue app and Web Viewer. y To use the BlackVue Cloud Service via LTE network, SIM card must be properly activated for Internet access. y If LTE and Wi-Fi hotspot is available for internet connection, Wi-Fi hotspot will be in priority.
- Page 22 If you prefer to do this later, press skip. Otherwise, press next. (i) Select the firmware language for your BlackVue dashcam. Press next. (ii) Select a time zone of your location. Press next.
- Page 23 (iv) Press more settings to access all of the settings or press save. Your dashcam will format the SD card to apply the settings. Press OK to confirm. (v) BlackVue dashcam installation is complete. DR970X-1CH Plus l DR970X-2CH Plus 23...
- Page 24 Tap your dashcam model in the camera list. To play video files, press Playback and tap the video you want to play. To change the settings, press settings. Note y For more information about BlackVue app, go to https://cloudmanual.blackvue.com/. 24 BLACKVUE...
- Page 25 Wi-Fi mode What's "Wi-Fi mode" The manual describes the "Wi-Fi mode" available on the BlackVue App, which is designed for users who do not want to create an account and log in or need to connect their dashcam directly to the App.
- Page 26 (iv) In Cameras list page tap the + button. (v) Select the connection method Seamless pairing. (vi) Select your camera from the list. (vii) Verify your camera by tapping on the touch sensor. (viii) Congratulations! your camera is already connected. 26 BLACKVUE...
- Page 27 (ix) In the Camera list page, tap on your Camera and you will see Camera Connection pop-up. (x) Tap Join and you will get to the Video List page where you can access all the videos. DR970X-1CH Plus l DR970X-2CH Plus 27...
- Page 28 Wi-Fi - Log in, Wi-Fi on/off y Cloud - Cloud on/off, network y FW language (ii) Rename Camera - To change name of the camera. (iii) Remote Firmware Update - To download and update the firmware of the camera. 28 BLACKVUE...
- Page 29 (iv) Reboot Camera - Option to optimize dashcam performance. (v) Format MicroSD card - To clean the file list by removing all unwanted files. (vi) Delete - To delete the camera from the app. DR970X-1CH Plus l DR970X-2CH Plus 29...
- Page 30 Downloaded Videos (i) Tap the “Downloaded videos” button. It will show the downloaded file list to your app’s local storage. (ii) Then you can manage the files individually via the submenu of each file. 30 BLACKVUE...
Need help?
Do you have a question about the DR970X-1CH Plus and is the answer not in the manual?
Questions and answers
Почему не включается режим парковки при выключенном двигателе автомобиля?
Parking mode may not activate when the engine is off on the BlackVue DR970X-1CH Plus if the dash cam is not hardwired correctly. Specifically, the ACC+ cable must be connected to a fuse that powers on only when the engine is running, and the BATT+ cable must be connected to a fuse that stays powered after the engine is off. If these connections are incorrect or missing, the dash cam may not detect the vehicle is off and fail to switch to parking mode.
This answer is automatically generated