Thrustmaster T128, T248P, T128P - Racing Wheel and Magnetic Pedals Manual
- User manual (523 pages) ,
- Quick installation manual (2 pages) ,
- Manual (72 pages)
Advertisement
- 1 INTRODUCTION
- 2 TECHNICAL FEATURES
- 3 ATTACHING THE RACING WHEEL
- 4 INSTALLATION
- 5 MAPPING FOR PC
- 6 SELECTING THE GAME MODE
- 7 MODE FOR PEDAL SET
- 8 RECONFIGURING THE PEDAL SET IN DEFAULT MODE
- 9 INVERTING THE POSITION OF THE PEDALS
- 10 MANUALLY TOGGLING THE PEDAL SET FROM T2PM-T3PA-T3PM TYPE TO T-LCM TYPE
- 11 MANUALLY CHANGING THE ANGLE OF ROTATION VIA THE RACING WHEEL
- 12 OTHER FUNCTIONALITIES RELATING TO THE SETTINGS BUTTON (6)
- 13 T2PM PEDAL SET
- 14 TECHNICAL SUPPORT
- 15 SAFETY WARNINGS
- 16 Documents / Resources
INTRODUCTION

To ensure that your T128 racing wheel functions correctly with games on PlayStation®5 consoles, PlayStation®4 consoles or PC, you may be required to install the game's automatic updates (available when your console or PC is connected to the Internet).
* PC compatibility (Windows® 10/11) not tested or endorsed by Sony Interactive Entertainment.
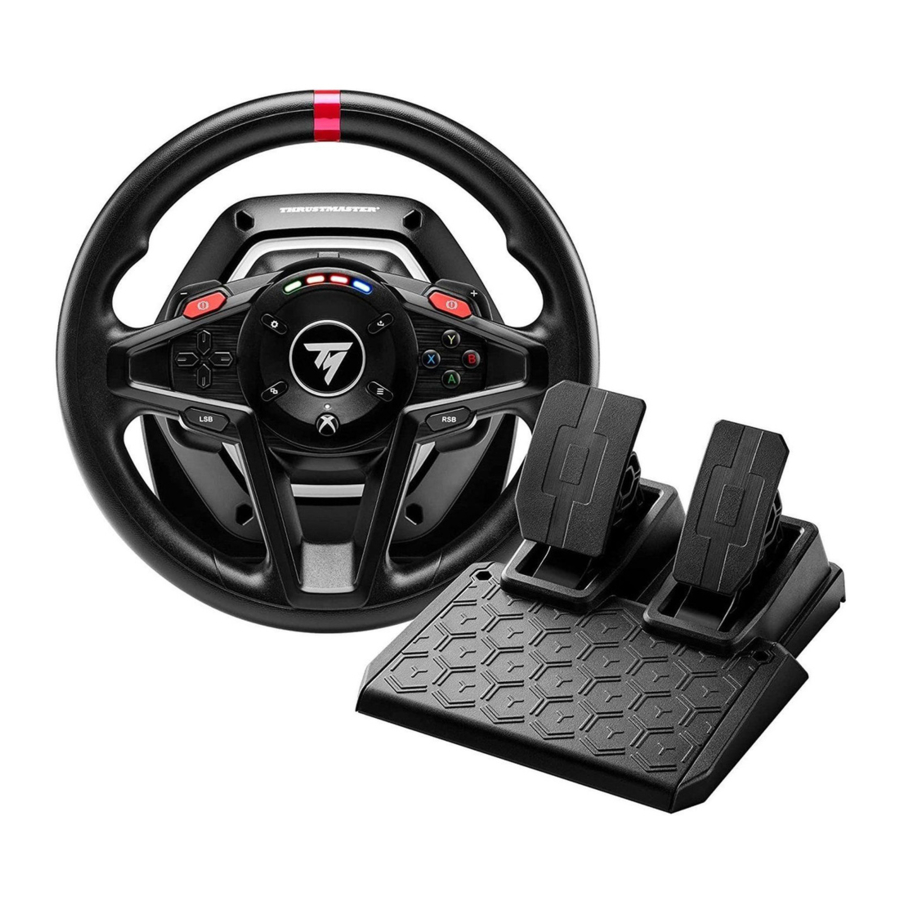
TECHNICAL FEATURES

- T128 base
- 2 magnetic paddle shifters (– and +)
- L2 and R2 buttons
- Directional buttons
- L3 and R3 buttons
- SETTINGS button
- 4 RPM LEDs (engine speed display)
- MODE button
- SHARE button on PS4™ consoles
CREATE button on PS5™ consoles - Game mode LED (blue, red or green)
- PS button
- OPTIONS button on PS4™ consoles and PS5™ consoles
- Attachment system
- Metal fastening screw
- Power cable (EU/U.S./UK...)
- Power adapter
- USB cable: USB-C (17a) – USB-A (17b)

- Large threaded hole (for attachment system and fastening screw)
- Hook-and-loop fastener cable holder
- Power adapter connector
- Racing wheel's USB-C connector
- Mini-DIN connector for Thrustmaster shifter, handbrake or hub (sold separately)
- RJ12 connector for pedal set
ATTACHING THE RACING WHEEL
Attaching the racing wheel to a table or a desktop
Start by connecting on the underside of the wheel:
- the power adapter (20);
- the quick release USB-C cable (17a) to the USB-C connector (21);
- the T2PM pedal set (23).
Make sure to follow the paths for the different cables, and attach the cables using the hook-and-loop fastener cable holder (19).

- Place the racing wheel on a table or any other horizontal, flat and stable surface.
- Insert the fastening screw (14) in the attachment system (13), then tighten the device by turning the screw counterclockwise, so that it feeds into the large threaded hole (18) located beneath the racing wheel, until the wheel is perfectly stable.


Never tighten the screw alone without the attachment system in place!
This could damage the racing wheel.
| ATTACHMENT / REMOVAL | DIRECTION |
| To tighten: Turn the screw counterclockwise |  |
| To release: Turn the screw clockwise |  |
INSTALLATION
AUTOMATIC RACING WHEEL AND PEDAL SET CALIBRATION
The wheel automatically self-calibrates when you plug the racing wheel into an electrical outlet and connect the racing wheel's USB connector to the PlayStation®5 console, the PlayStation®4 console or to the PC.
During this phase, the racing wheel will rotate quickly towards the left and the right, covering a 900degree angle, before stopping at the center.
Never touch the racing wheel during the self-calibration phase!
(This could result in improper calibration and/or personal injuries.)
Never connect the pedal set to the racing wheel's base (or disconnect it from the base) when it is connected to the PlayStation® console or to the PC or during gameplay (this could result in improper calibration).
Always connect the pedal set before connecting the racing wheel to the PlayStation®5 console, the PlayStation®4 console or to the PC.
Once the racing wheel's calibration is complete and the game has been started, the pedals are automatically calibrated after a few presses.
Never press the pedals during the racing wheel's self-calibration phase or while a game is loading!
(This could result in improper calibration.)
If your racing wheel and/or pedal set do not function correctly, or if they seem to be improperly calibrated:
- Power off your console or PC and completely disconnect the racing wheel. Then reconnect all cables (including the power supply cable and the pedal set), and restart your console (or PC) and your game.
- Reconfigure the pedal set in default mode using the procedure set out further along in this user manual.
INSTALLATION ON PLAYSTATION®4 CONSOLES OR ON PLAYSTATION®5 CONSOLES
- Connect the T2PM pedal set to the RJ12 connector (23) of the base.
- Plug the power cable and power adapter into an electrical outlet.
- Connect the USB-C cable (17a) to the USB-C port (21) of the base.
Connect the USB-A cable (17b) to a USB-A port on the PS4™ console or the PS5™ console. - Power on your PlayStation®4 console or your PlayStation®5 console. The racing wheel will self-calibrate automatically.

* Not included
- If necessary, select the game MODE in which you want to play via the procedure set out further along in this user manual.
- Press the racing wheel's PS button (11), and log in to your PlayStation™Network account in order for the racing wheel to be functional.

You are now ready to play!

MAPPING FOR PLAYSTATION®4 CONSOLES OR PLAYSTATION®5 CONSOLES

 Notes regarding PS4™ consoles or PS5™ consoles:
- The racing wheel is recognized in games as a Thrustmaster T-GT racing wheel or a Thrustmaster Advanced Racer racing wheel.
- The 4 engine speed display RPM LEDs(7) function in games compatible with the Thrustmaster SDK. The list of compatible games is available here: https://support.thrustmaster.com (in the Racing Wheels / T128 / Games settings section). This list is updated regularly.
- The list of games on PlayStation®4 consoles and PlayStation®5 consoles compatible with the T128 racing wheel is available here: https://support.thrustmaster.com (in the Racing Wheels / T128 / Games settings section). This list is updated regularly.
INSTALLATION ON PC*
* PC compatibility (Windows® 10/11) not tested or endorsed by Sony Interactive Entertainment.
- Visit https://support.thrustmaster.com to download the drivers and Force Feedback software for PC. Click Racing Wheels / T128 / Drivers.
- Connect the T2PM pedal set to the RJ12 connector (23) of the base.
- Plug the power cable and power adapter into an electrical outlet.
- Connect the USB-C cable (17a) to the USB-C port (21) of the base.
- Connect the USB-A cable (17b) to a USB-A port on your PC.
Your racing wheel self-calibrates automatically.

- Select Start / Thrustmaster / FFB Racing Wheel / Control Panel to open the Game Controllers window. The Game Controllers window displays the racing wheel name Thrustmaster Advanced Mode Racer, along with OK status.
- Click Properties to configure your racing wheel in the T128 control panel:
- Test Device tab: lets you test and view the action buttons, directional buttons and axes for the racing wheel (as well as the axes for the pedal set), and adjust the racing wheel's angle of rotation in your PC games.
- Test Forces tab: lets you test 12 Force Feedback effects.
- Adjust Forces tab: lets you adjust the power of Force Feedback effects in your PC games.
MAPPING FOR PC

Notes on PC:
- In the control panel and in games, the racing wheel is recognized with the name Thrustmaster Advanced Mode Racer.
- Always remember to completely close the Game Controllers window by clicking OK before starting your game.
- The settings and adjustments made in the Game Controllers window are only saved on your PC (and therefore will not have any effect on PS4™ consoles or PS5™ consoles).
- Your racing wheel's firmware version appears in the upper right-hand section of the T128 control panel tabs.
- The 4 engine speed display RPM LEDs (7) are functional in PC games compatible with the Thrustmaster SDK. The list of compatible games is available here: https://support.thrustmaster.com (in the Racing Wheels / T128 / Games settings section). This list is updated regularly.
SELECTING THE GAME MODE
Procedure:
- Press and hold the MODE button (8) for 5 seconds, until the LED (10) located above the PS button starts flashing.
- Without releasing the MODE button (8), simultaneously press the right-hand directional button (4) to select your choice of game mode.

LED COLOR  | GAME MODE |
| BLUE | PLAYSTATION® STANDARD COMPATIBILITY (default mode) |
| RED | PLAYSTATION® FUTURE COMPATIBILITY |
| GREEN | PC |
Once the game mode has been selected, release the buttons: your selection is saved in the racing wheel's internal memory. The racing wheel restarts and self-calibrates.
Notes:
- On PlayStation®4 consoles and PlayStation®5 consoles: in order for the T128 racing wheel to be functional following self-calibration, press the PS button (11) and log in to your PlayStation™Network account.
- The list of games compatible with the PlayStation®4 console and the PlayStation®5 console and the T128 (and the corresponding game MODE) is available here: https://support.thrustmaster.com (in the Racing Wheels / T128 / Games settings section). This list is updated regularly.
MODE FOR PEDAL SET
(Displayed each time the racing wheel restarts)
Each time the racing wheel restarts (and after its self-calibration), the 4 RPM LEDs (7) indicate the mode (position and type) in which your pedal set is configured.
Position:
- NORMAL: default position;
- or INVERTED: in this position, the accelerator and clutch pedals are inverted — this position is only possible with a 3-pedal pedal set.
Type:
- T2PM-T3PA-T3PM without Load Cell technology: default type;
- orT-LCM with Load Cell technology.
| MODE FOR PEDAL SET | FLASHING OF RPM LEDs (7) |
DEFAULT MODE
| DEFAULT MODE |
|  |
|  |
|  |
RECONFIGURING THE PEDAL SET IN DEFAULT MODE
(To be carried out if your pedal set is not functioning properly)
Procedure:
- QUICKLY press the SETTINGS button (6) 8 times.
![]()
The 4 RPM LEDs (7) flash 5 times simultaneously to indicate the reconfiguration in default mode.


INVERTING THE POSITION OF THE PEDALS
(If you are using a 3-pedal pedal set)
The T128 racing wheel comes bundled with the 2-pedal T2PM pedal set by default. This racing wheel is also compatible with the Thrustmaster T3PA, T3PM and T-LCM 3-pedal pedal sets (sold separately).
If you are using a 3-pedal pedal set, it is possible to electronically invert the accelerator and clutch pedals.
Procedure:
- Press and hold the SETTINGS button (6) for 5 seconds.
![]()

The inversion of the pedals is instantly saved in the racing wheel's internal memory, and one of the 4 RPM LEDs (7) flashes 3 times to indicate the selected position.
| ACCELERATOR AND CLUTCH PEDALS | FLASHING OF RPM LEDs (7) |
DEFAULT MODE
|  |
|  |
MANUALLY TOGGLING THE PEDAL SET FROM T2PM-T3PA-T3PM TYPE TO T-LCM TYPE
(and vice versa)
By default, the pedal set's mode is T2PM-T3PA-T3PM type.
This mode is saved in the internal memory of the racing wheel's base and always remains enabled, except for in the event that you connect a T-LCM pedal set to the RJ12 port, or you toggle the mode manually.
Procedure:
- Simultaneously press and hold the SETTINGS button (6) and the left paddle shifter (–) for 5 seconds.


| MODE | FLASHING OF RPM LEDs (7) |
DEFAULT MODE
|  |
|  |
With the T-LCM type, the T2PM, T3PA and T3PM pedal sets will not function properly.
The pedals' values will no longer reach 100%.

To function properly again (and reach 100%), you must manually toggle the mode for the racing wheel's base to T2PM-T3PA-T3PM type.
MANUALLY CHANGING THE ANGLE OF ROTATION VIA THE RACING WHEEL
(only possible in games in which the angle of rotation is not adjusted automatically)
The T128 racing wheel has an angle of rotation adjustable between 270° and 900°.
In many games, the racing wheel's angle of rotation is automatic, and adjusts on its own according to the car being used. In these games, it is not possible to manually change this angle of rotation, as this function is managed by the game and not by the user.
In other games, it is possible to manually change the angle of rotation directly via the racing wheel.
Procedure:
- Simultaneously press the SETTINGS button (6) and the right directional button (4) to increase the angle of rotation by one step; or
- Simultaneously press the SETTINGS button (6) and the left directional button (4) to decrease the angle of rotation by one step.


| 4 possible levels | |
| Selected angle of rotation | RPM LEDs (7) |
| 270° |  |
| 360° |  |
| 540° |  |
| 900° |  |

Please note: The angle of rotation modified manually via the racing wheel is not permanently saved.
This procedure must be carried out each time the game or the racing wheel restarts.
OTHER FUNCTIONALITIES RELATING TO THE SETTINGS BUTTON (6)
Please visit https://support.thrustmaster.com.
Click Racing Wheels / T128, and then FAQ.
UPDATING THE RACING WHEEL'S FIRMWARE
Visit https://support.thrustmaster.com.
Click Racing Wheels / T128 / Firmware, and follow the instructions.
VARIOUS TIPS AND FAQs
Visit https://support.thrustmaster.com.
Click Racing Wheels / T128, and then FAQ.
T2PM PEDAL SET

Before using this product, please read this manual carefully and save it for later reference.
For safety reasons, never use the pedal set with bare feet or while wearing only socks on your feet.
THRUSTMASTER® DISCLAIMS ALL RESPONSIBILITY IN THE EVENT OF INJURY RESULTING FROM USE OF THE PEDAL SET WITHOUT SHOES.
Pedal set pinch hazard when playing
- Keep the pedal set out of children's reach.
- During gameplay, never place your fingers on or anywhere near the sides of the pedals.
- During gameplay, never place your fingers on or anywhere near the pedal's rear base.
- During gameplay, never place your fingers on or anywhere near the pedal's front base.


Pedal set pinch hazard when not playing
- Store the pedal set in a safe place, and keep it out of children's reach.
ATTACHING THE PEDAL SET TO A SUPPORT OR COCKPIT
The pedal set can be attached to a variety of different supports (sold separately) using the two perforations (24) located on either side of the pedal set.

If your racing wheel and/or pedal set do not function correctly, or if they seem to be improperly calibrated:
Power off your console or PC and completely disconnect the racing wheel. Then reconnect all cables (including the power supply cable and the pedal set), and restart your console (or PC) and your game.
TECHNICAL SUPPORT
https://support.thrustmaster.com
UK: 020 3147 4889
US: (866) 889-5036
Canada: 866-889-2181
SAFETY WARNINGS
Before using this product, please read this manual carefully and save it for later reference.

Electrical shock
- Keep the product in a dry location and do not expose it to dust or sunlight.
- Do not twist or pull on the connectors and cables.
- Do not spill any liquid on the product or its connectors.
- Do not short-circuit the product.
- Never dismantle the product; do not throw it onto a fire and do not expose it to high temperatures.
- Do not use a power supply cable other than the one provided with your racing wheel.
- Do not use the power supply cable if the cable or its connectors are damaged, split or broken.
- Make sure that the power supply cable is properly plugged into an electrical outlet, and properly connected to the connector at the rear of the racing wheel's base.
- Do not open up the racing wheel: there are no user-serviceable parts inside. Any repairs must be carried out by the manufacturer, its authorized representative or a qualified technician.
- Only use attachment systems/accessories specified by the manufacturer.
- If the racing wheel is operating abnormally (if it is emitting any abnormal sounds, heat or odors), stop using it immediately, unplug the power supply cable from the electrical outlet and disconnect the other cables.
- If you will not be using the racing wheel for an extended period of time, unplug its power supply cable from the electrical outlet.
- The electrical outlet must be located near the equipment and must be easily accessible.
Use only the power supply listed in the user instructions.
Information for power supply adapter
| Information published | Value | Unit |
| Manufacturer's name or trademark, commercial registration number and address | GUILLEMOT CORPORATION S.A. 414 196 758 Rennes Place du Granier BP 97143 35571 Chantepie Cedex France | |
| Model identifier | A481-1852590D | |
| Input voltage | 100 - 240 | V |
| Input AC frequency | 50 - 60 | Hz |
| Output voltage | 18.5 | V DC |
| Output current | 2.6 | A |
| Output power | 47.9 | W |
| Average active efficiency | 87.8 | % |
| Efficiency at low load (10%) | 87.8 | % |
| No-load power consumption | 0.10 | W |
Air vents
Make sure not to block any of the air vents on the racing wheel's base. For optimal ventilation, make sure to do the following:
- Position the wheel's base at least 10 cm away from any wall surfaces.
- Do not place the base in any tight spaces.
- Do not cover the base.
- Do not let any dust build up on the air vents.
For safety reasons, never use the pedal set with bare feet or while wearing only socks on your feet.
THRUSTMASTER® DISCLAIMS ALL RESPONSIBILITY IN THE EVENT OF INJURY RESULTING FROM USE OF THE PEDAL SET WITHOUT SHOES.
Injuries due to Force Feedback and repeated movements
Playing with a Force Feedback racing wheel may cause muscle or joint pain. To avoid any problems:
- Avoid lengthy gaming periods.
- Take 10 to 15-minute breaks after each hour of play.
- If you feel any fatigue or pain in your hands, wrists, arms, feet or legs, stop playing and rest for a few hours before you start playing again.
- If the symptoms or pain indicated persist when you start playing again, stop playing and consult your doctor.
- Keep out of children's reach.
- During gameplay, always leave both hands correctly positioned on the wheel without completely letting go.
- During gameplay, never place your hands or your fingers under the pedals or anywhere near the pedal set.
- During calibration and gameplay, never place your hand or your arm through the openings in the racing wheel.
- Make sure that the racing wheel's base is properly secured, as per this manual's instructions.
Product to be handled only by users 14 years of age or older

Pedal set pinch hazard when playing.
- Keep the pedal set out of children's reach.
- During gameplay, never place your fingers on or anywhere near the sides of the pedals.
- During gameplay, never place your fingers on or anywhere near the pedal's rear base.
- During gameplay, never place your fingers on or anywhere near the pedal's front base.


Pedal set pinch hazard when not playing
- Store the pedal set in a safe place, and keep it out of children's reach.
Documents / Resources
References
Download manual
Here you can download full pdf version of manual, it may contain additional safety instructions, warranty information, FCC rules, etc.
Download Thrustmaster T128, T248P, T128P - Racing Wheel and Magnetic Pedals Manual
Advertisement


Need help?
Do you have a question about the T128 and is the answer not in the manual?
Questions and answers