Table of Contents
Advertisement
Available languages
Available languages
Advertisement
Table of Contents

Related Manuals for Thrustmaster T300RS


Summary of Contents for Thrustmaster T300RS
- Page 1 Europe, Middle East North America/ Norteamérica ENGLISH FRANÇAIS ENGLISH DEUTSCH FRANÇAIS NEDERLANDS ESPAÑOL ITALIANO Latin America/ ESPAÑOL América Latina PORTUGUÊS ENGLISH ESPAÑOL ΕΛΛΗΝΙΚΑ PORTUGUÊS TÜRKÇE Asia Paci c POLSKI 日本語 한국어 ENGLISH 中文 ENGLISH...
- Page 2 FOR P 3 – P TATION® TATION® User Manual WARNING: To ensure that your T300 RS racing wheel functions correctly with games for PlayStation 3 or PlayStation ® ® you may be required to install the games’ automatic updates (available when your console is connected to the Internet). 1/18...
-
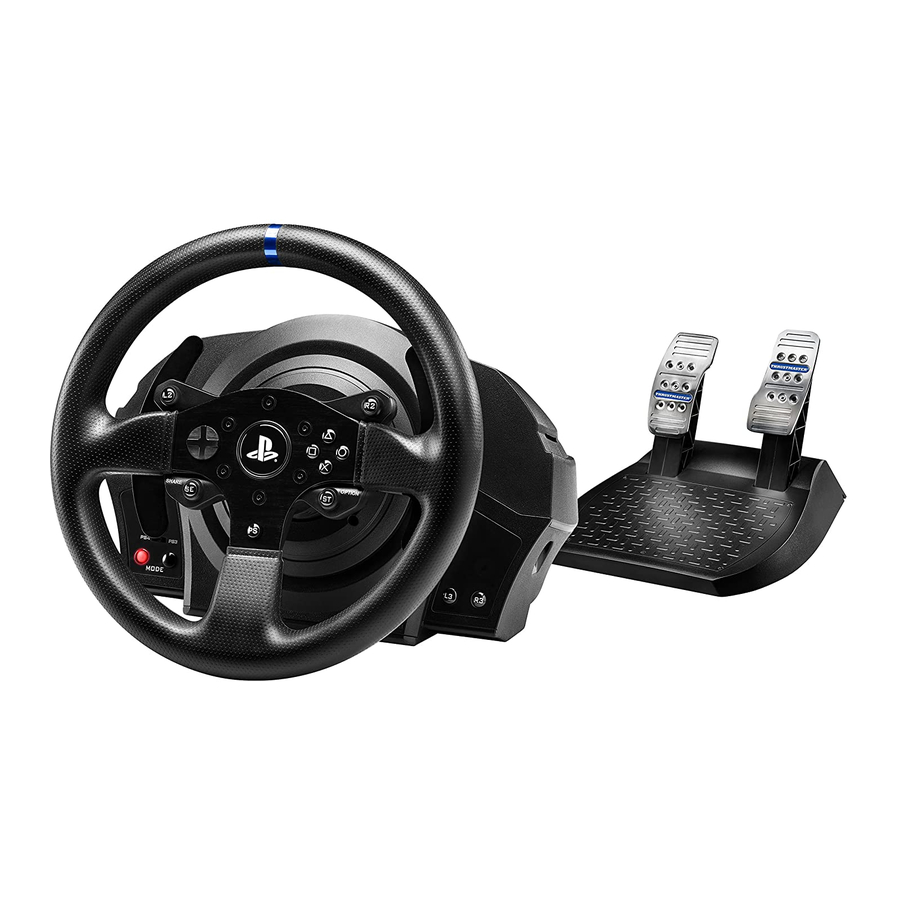
Page 3: Technical Features
6 MODE button + red/green indicator light 10 Attachment system 11 Metal fastening screw 12 Thrustmaster Quick Release 15 Racing wheel USB cable and connector 13 L3/R3 buttons 16 Shifter (gearbox) connector 14 Power supply connector (type A or B) -
Page 4: Plugging The Racing Wheel Into An Electrical Outlet: Please Read Before Proceeding
PLUGGING THE RACING WHEEL INTO AN ELECTRICAL OUTLET: PLEASE READ BEFORE PROCEEDING! Your racing wheel’s power supply varies according to the country where you purchased your device. The power supply can be: Internal, with: * a power supply unit located directly inside the racing wheel’s base, with a type A connector. - Page 5 * Do not let any dust build up on the air vents. For safety reasons, never use the pedal set with bare feet or while wearing only socks on your feet. THRUSTMASTER DISCLAIMS ALL RESPONSIBILITY IN THE EVENT OF ®...
- Page 6 Warning – Injuries due to Force Feedback and repeated movements (continued) * If the symptoms or pain indicated above persist when you start playing again, stop playing and consult your doctor. * Keep out of children’s reach. * During gameplay, always leave both hands correctly positioned on the wheel without letting it go completely.
- Page 7 To display the firmware version that your racing wheel is currently using and update it if required: on PC, visit http://ts.thrustmaster.com. In the Updates and Downloads section, click PlayStation Wheels / T300 RS, then select Driver/Firmware and follow the instructions describing the download and installation procedure.
- Page 8 Once you have installed the racing wheel, rotate it 180° (when facing the wheel, the PlayStation® logo should be upside down) to access the small attachment screw located on the ring of the Thrustmaster Quick Release (12) device. Use a large Phillips screwdriver to tighten the small attachment screw (do not use excessive force), turning it clockwise.
- Page 9 ADJUSTING THE PEDALS’ HEIGHT AND SPACING Using a Phillips screwdriver (not included), remove the 2 attachment screws holding the pedal heads to the pedal arms. Next, adjust the pedal heads’ height and spacing to suit your preferred driving style: - 6 different positions are available for the gas pedal. - 6 different positions are available for the brake pedal.
-
Page 10: Attachment / Removal
ATTACHMENT / DIRECTION REMOVAL To tighten: Turn the screw counterclockwise To release: Turn the screw clockwise 9/18... - Page 11 Layout diagrams for cockpits (for positioning the racing wheel’s base and/or the pedal set) are available at http://ts.thrustmaster.com: in the Updates and Downloads section, click PlayStation ...
- Page 12 ® ® the required position for the USB sliding switch (5) according to the game being played) is available at: http://ts.thrustmaster.com (in the Updates and Downloads section, click PlayStation / Wheels / T300 RS). This list is updated regularly.
-
Page 13: Setting Up The Racing Wheel For Pc
USB plug to your computer and complete the installation. 3. Once the installation is complete, click Finish and restart your computer. 4. Select Start / All Programs / Thrustmaster / FFB Racing Wheel / Control Panel to open the Game Controllers window. - Page 14 PC MAPPING 13/18...
-
Page 15: Automatic Racing Wheel And Pedal Set Calibration
AUTOMATIC RACING WHEEL AND PEDAL SET CALIBRATION The wheel automatically self-calibrates when you plug the racing wheel into an electrical outlet and connect the racing wheel’s USB connector to the console. During this phase, the racing wheel will rotate quickly towards the left and the right, covering a 900 degree angle, before stopping at the centre. - Page 16 When using this pedal set, make sure that the indicator light remains red, or else the gas pedal will not function properly. The T300 RS is also compatible with Thrustmaster pedal sets featuring 3 pedals (sold separately); these allow you to electronically swap the accelerator and clutch pedals.
-
Page 17: Technical Support
TECHNICAL SUPPORT If you encounter a problem with your product, please go to http://ts.thrustmaster.com and click Technical Support. From there you will be able to access various utilities (Frequently Asked Questions (FAQ), the latest versions of drivers and software) that may help to resolve your problem. If the problem persists, you can contact the Thrustmaster products technical support service (“Technical... - Page 18 Thrustmaster product according to applicable laws of the country in which the consumer was domiciled on the date of purchase of the Thrustmaster product (if no such action exists in the corresponding country, then the warranty period shall be one (1) year from the original date of purchase of the Thrustmaster product).
- Page 19 COPYRIGHT © 2014 Guillemot Corporation S.A. All rights reserved. Thrustmaster® is a registered trademark of Guillemot Corporation S.A. “ ”, “PlayStation”, “ ” and “ ” are registered trademarks of Sony Computer Entertainment, Inc. “ ” is a trademark of the same company.
- Page 20 POUR P 3 – P TATION® TATION® Manuel de l’utilisateur ATTENTION : Pour que le volant T300 RS fonctionne correctement avec les jeux PlayStation 3 ou PlayStation ® ® il peut être nécessaire d’installer les mises à jour automatiques de ces jeux (disponibles lorsque votre console est connectée à...
-
Page 21: Caractéristiques Techniques
5 Sélecteur USB PS4™ ou PS3™ 10 Système de fixation 6 Bouton MODE + Voyant lumineux rouge/vert 11 Vis de serrage métallique 12 Thrustmaster Quick Release 15 Câble et connecteur USB du volant 13 Boutons L3 / R3 16 Connecteur pour la boîte de vitesses 14 Connecteur type A ou B pour l’alimentation... -
Page 22: Relier Le Volant Au Secteur = A Lire Imperativement
RELIER LE VOLANT AU SECTEUR = A LIRE IMPERATIVEMENT En fonction du pays où vous avez acheté votre volant, l’alimentation secteur de votre volant diffère. Elle est : Soit interne avec : * Boitier d’alimentation directement dans la base du volant avec connecteur type A * Câble d’alimentation secteur 220-240V. - Page 23 * Ne laissez pas la poussière s’accumuler sur les grilles d’aération. Pour des raisons de sécurité, ne jouez pas pieds nus ou en chaussettes lorsque vous utilisez le pédalier. THRUSTMASTER DECLINE TOUTE RESPONSABILITE EN CAS DE ® BLESSURE SUITE A UNE UTILISATION DU PEDALIER SANS CHAUSSURES.
- Page 24 Avertissement – Blessures dues au retour de force et aux mouvements répétitifs (suite) * Si les symptômes ou les douleurs indiqués ci-dessus persistent lorsque vous reprenez le jeu, arrêtez de jouer et consultez votre médecin. * Laissez hors de portée des enfants. * Lors des phases de jeu, laissez toujours vos deux mains correctement positionnées sur le volant sans jamais le lâcher complètement.
- Page 25 Pour afficher la version de firmware de votre volant et le mettre à jour si nécessaire : sur PC, allez sur http://ts.thrustmaster.com, dans la section Mise à jour et téléchargement, cliquez sur PlayStation / Volant / T300 RS puis Pilote/Firmware et suivez les instructions et la procédure de...
- Page 26 être à l’envers) afin ® d’accéder à la petite vis de fixation située sur la bague du Thrustmaster Quick Release (12). A l’aide d’un gros tournevis cruciforme, vissez sans forcer la petite vis de fixation dans le sens des aiguilles d’une montre.
- Page 27 AJUSTEMENT DES PEDALES EN HAUTEUR ET EN ECARTEMENT A l’aide d’un tournevis cruciforme (non fourni), retirez les 2 vis de fixation situées sur les palettes des pédales. Ajustez à votre convenance la hauteur et l’écartement des pédales : 6 positions sont possibles pour la pédale d’accélérateur 6 positions sont possibles pour la pédale de frein Lorsque la hauteur et l’écartement des pédales sont ajustés, remettez en place et serrez les 2 vis de fixation sur les palettes des pédales.
-
Page 28: Montage / Demontage
MONTAGE / SENS DEMONTAGE Pour serrer : Vissez dans le sens inverse des aiguilles d’une montre Pour desserrer : Dévissez dans le sens des aiguilles d’une montre 9/18... - Page 29 Important : La longueur de ces 2 vis M6 ne doit pas dépasser l’épaisseur de votre support +10 mm pour ne pas endommager les composants internes au pédalier. Plan d’implantation (de la base ou du pédalier) pour les cockpits disponible sur http://ts.thrustmaster.com, (dans la rubrique PlayStation / Volants / T300 RS / Manuel – ...
- Page 30 4 compatibles avec le T300 RS (ainsi que la ® ® position nécessaire du sélecteur USB en fonction du jeu utilisé) est disponible ici : http://ts.thrustmaster.com (dans la rubrique PlayStation / Volants / T300 RS). Cette liste est régulièrement mise à jour.
-
Page 31: Installation Sur Pc
Contrôleurs de jeu. La fenêtre Contrôleurs de jeu affiche le nom du volant Thrustmaster T300 RS Racing Wheel avec l'état 5. Cliquez sur Propriétés pour configurer votre volant dans le panneau de configuration du T300 RS : •... - Page 32 MAPPING PC 13/18...
-
Page 33: Calibrage Automatique Du Volant Et Des Pedales
CALIBRAGE AUTOMATIQUE DU VOLANT ET DES PEDALES La roue du volant s’autocalibre de manière automatique une fois le volant relié au secteur et le connecteur USB connecté. Cette opération entraîne des mouvements rapides du volant de gauche à droite sur 900° avant de s’immobiliser au centre. - Page 34 • Le kit Base Fixed Paddle Shifters** : pour installer des palettes de vitesses fixes sur la base. • Les pédaliers Thrustmaster : T3PA** (Thrustmaster 3 Pedals Add-on) et le pédalier du T500RS. • Les boîtes de vitesses Thrustmaster : TH8A** et TH8RS**.
-
Page 35: Support Technique
Support Technique. Vous aurez alors accès à différents services (Foire Aux Questions (FAQ), dernières versions des pilotes et logiciels) susceptibles de résoudre votre problème. Si le problème persiste, vous pouvez contacter le support technique des produits Thrustmaster («... - Page 36 Dans les pays de l’Union Européenne, ce délai est de deux (2) ans à compter de la délivrance du produit Thrustmaster. Dans les autres pays, la durée de la période de garantie correspond au délai pour intenter une action en conformité du produit Thrustmaster selon la législation en vigueur dans le pays où...
- Page 37 COPYRIGHT © 2014 Guillemot Corporation S.A. Tous droits réservés. Thrustmaster est une marque déposée ® de Guillemot Corporation S.A. “ ”, “PlayStation”, “ ” et “ ” sont des marques déposées de Sony Computer Entertainment Inc. “ ” est une marque de la même société.
- Page 38 FÜR P 3 – P TATION® TATION® Benutzerhandbuch ACHTUNG! Um sicher zustellen, daß Ihr T300 RS Rennlenker mit Spielen für die PlayStation 3 oder PlayStation 4 korrekt funktioniert,ist es eventuell erforderlich die ® ® automatischen Aktualisierungen für das Spiel zu installieren. (Verfügbar, wenn Ihre Konsole mit dem Internet verbunden ist.) 1/18...
-
Page 39: Technische Spezifikationen
5 PS4™ oder PS3™ USB-Wahlschalter System und Feststellschraube) 6 MODE Button + Rot/Grün Leuchtanzeige 10 Befestigungssystem 11 Metallene Feststellschraube 12 Thrustmaster Quick Release 15 USB-Kabel und Stecker des Rennlenkers 13 L3/R3 Buttons 16 Getriebe-Anschluss 14 Stromanschluss (Typ A oder B) (Separat erhältlich) -
Page 40: Anschluss Des Rennlenkers An Das Stromnetz: Bitte Sorgfältig Lesen
ANSCHLUSS DES RENNLENKERS AN DAS STROMNETZ: BITTE SORGFÄLTIG LESEN! Der Stromanschluss ihres Rennlenkers variiert je nach Land in dem Sie ihr Gerät erworben haben. Der Stromanschluss kann folgendermaßen sein: Intern mit: * einer Netzstromanschluss-Buchse in der Lenkerbasis vom Typ A und einem 220-240V Stromkabel = ausschließlich nur mit 220-240V Netzspannung zu verwenden. - Page 41 * Vermeiden Sie auf jeden Fall Staubbildung an den Lüftungsschlitzen. Benutzen Sie aus Sicherheitsgründen das Pedalset niemals barfuß oder in Socken. THRUSTMASTER ® ÜBERNIMMT KEINERLEI HAFTUNG BEI VERLETZUNGEN DURCH EINSATZ DES PEDALSETS OHNE SCHUHE. Warnung - Verletzungen durch Force Feedback und wiederholte Bewegungen Spielen mit einem Force-Feedback-Lenkrad kann Muskel- oder Gelenkschmerzen verursachen.
- Page 42 Achtung – Verletzungen durch Force Feedback und wiederholte Bewegungen (Fortsetzung) * Wenn Sie wieder zu spielen beginnen und die oben beschriebenen Symptome oder Schmerzen weiterbestehen, unterbrechen Sie das Spiel und konsultieren Sie Ihren Arzt. * Außerhalb der Reichweite von Kindern aufbewahren. * Lassen Sie immer beide Hände während des Spielens am Lenkrad positioniert, ohne dieses völlig loszulassen.
- Page 43 Firmware aktualisiert werden. Um die aktuelle Version der Firmware Ihres Rennlenkers anzuzeigen und ob eine Aktualisierung eventuell verfügbar ist, rufen Sie auf Ihrem PC die Website http://ts.thrustmaster.com. auf. In der Sektion Updates und Downloads klicken Sie bitte auf PlayStation / Wheels / T300 RS. Wählen ...
- Page 44 Basisanschluss (1): Pfeil zeigt nach oben Rennlenkeranschluss (2): Pfeil zeigt nach oben Sind die Anschlüsse korrekt positioniert, drehen Sie einfach den Thrustmaster Quick Release (12) Ring des Gerätes entgegen dem Uhrzeigersinn, während Sie den Rennlenker (2) in Position halten. Drehen Sie dann den Ring, soweit Sie können. Um dies zu bewerkstelligen, halten Sie den Ring in Position und drehen den Rennlenker im Uhrzeigersinn.
- Page 45 REGULIERUNG DER PEDALHÖHE UND -ABSTÄNDE Lösen Sie die beiden Befestigungsschrauben, mit denen die Pedalplatten an den Pedalarmen festgeschraubt sind, mittels eines Kreuzschlitz-Schraubendrehers (nicht enthalten). Danach stellen Sie die Pedalhöhen und –Abstände entsprechend Ihres bevorzugten Fahrstils ein: - 6 verschiedene Positionen stehen für das Gaspedal zur Verfügung. - 6 verschiedene Positionen stehen für das Bremspedal zur Verfügung.
- Page 46 MONTAGE / RICHTUNG ABMONTIEREN Montieren: Drehen der Schraube entgegen dem Uhrzeigersinn Abmontieren: Drehen der Schraube im Uhrzeigersinn 9/18...
- Page 47 überschreiten. Längere Schrauben könnten die internen Komponenten des Pedalsets beschädigen. Layout-Diagramme für Cockpits (zur Positionierung der Rennlenkerbasis und/oder des Pedalsets) stehen auf http://ts.thrustmaster.com zur Verfügung: Klicken Sie in der Sektion Updates und Downloads auf PlayStation / Wheels / T300 RS und wählen dann Manual/Help file.
- Page 48 ® ® (zusammen mit der erforderlichen Position des USB-Wahlschalters (5) je nach Spiel) ist verfügbar auf: http://ts.thrustmaster.com (in der Sektion Updates und Downloads klicken Sie bitte auf PlayStation / Wheels / T300 RS). Diese Liste wird regelmäßig aktualisiert. 11/18...
-
Page 49: Einrichten Des Rennlenkers Für Den Pc
Installation zu komplettieren. 3. Nach Beenden der Installation klicken Sie auf Beenden und starten Ihren Computer neu. 4. Wählen Sie Start / Alle Programme / Thrustmaster / FFB Racing Wheel / Control Panel, um das Fenster für den Game-Controller zu öffnen. - Page 50 BELEGUNG (MAPPING) AUF DEM PC 13/18...
-
Page 51: Automatische Rennlenker- Und Pedalset-Kalibrierung
AUTOMATISCHE RENNLENKER- UND PEDALSET-KALIBRIERUNG Der Rennlenker kalibriert sich automatisch selbst beim Anschluss desselben an die Stromversorgung und den USB-Anschluss an der Konsole. Während dieser Phase dreht sich der Lenkkranz schnell nach rechts und links und deckt dabei einen Rotationswinkel von 900° ab. Danach stoppt der Lenkkranz in der mittigen Position. WARNUNG: Berühren Sie den Rennlenker niemals während der Kalibrierungsphase (Dies kann zu Kalibrierungsfehlern und/oder Verletzungen führen.) - Page 52 * Separat erhältlich (weitere Informationen auf http://www.thrustmaster.com/products/t300rs). HILFE UND HÄUFIG GESTELLTE FRAGEN (in diesem Handbuch nicht enthalten) Gehen Sie bitte auf http://ts.thrustmaster.com. In der Sektion Updates und Downloads klicken Sie bitte auf PlayStation / Wheels / T300 RS und gehen dann auf Manual/Help file.
-
Page 53: Technischer Support
TECHNISCHER SUPPORT Sollten Sie mit Ihrem Produkt ein Problem haben, besuchen Sie bitte die Seite http://ts.thrustmaster.com und klicken Sie auf Technischer Support. Von dort aus können Sie auf verschiedene Instrumente zugreifen (Fragen und Antworten (FAQ), die neuesten Versionen von Treibern und Software), die Ihnen bei der Lösung Ihres Problems helfen könnten. Falls das Problem weiterhin besteht, können Sie mit dem technischen Support der Thrustmaster Produkten in Kontakt... - Page 54 Kunden-Garantie-Information Guillemot Corporation S.A. (fortfolgend “Guillemot”) garantiert Kunden weltweit, daß dieses Thrustmaster Produkt frei von Mängeln in Material und Verarbeitung für eine Gewährleistungsfrist ist, die mit der Frist für eine Mängelrüge bezüglich des Produktes übereinstimmt. In den Ländern der Europäischen Union entspricht diese einem Zeitraum von zwei (2) Jahren ab Kaufdatum des Thrustmaster Produktes.
- Page 55 COPYRIGHT © 2014 Guillemot Corporation S.A. Alle Rechte vorbehalten. Thrustmaster® ist eine eingetragene Marke von Guillemot Corporation S.A. “ ”, “PlayStation”, “ „ und “ ” sind eingetragene Marken von Sony Computer Entertainment, Inc. “ ” ist eine Marke derselben Firma.
- Page 56 – VOOR P TATION® TATION® Handleiding WAARSCHUWING: Om er zeker van te zijn dat het T300 RS-racestuur correct werkt met games voor de PlayStation®3 of de PlayStation®4 moet u mogelijk de automatische updates voor de games installeren (beschikbaar wanneer de console met internet is verbonden). 1/18...
-
Page 57: Technische Specificaties
5 USB-keuzeschakelaar (PS4™ of PS3™) bevestigingssysteem en -schroef) 6 MODE-knop + rood/groen-indicator 10 Bevestigingssysteem 11 Metalen bevestigingsschroef 12 Thrustmaster Quick Release 15 USB-kabel en -connector voor racestuur 13 L3/R3-knoppen 16 Connector voor schakelpook 14 Connector voor netstroom (type A of B) -
Page 58: Het Racestuur Aansluiten Op Een Stopcontact: Lees Dit Voordat U Verder Gaat
HET RACESTUUR AANSLUITEN OP EEN STOPCONTACT: LEES DIT VOORDAT U VERDER GAAT! Het land waarin het racestuur is aangeschaft, is bepalend voor het soort netvoeding dat het stuur gebruikt. Mogelijke soorten netvoeding: Intern, met: * een voedingseenheid gemonteerd in de voet van het racestuur met een connector van het type A. - Page 59 * Zorg dat de ventilatieopeningen stofvrij blijven. Om veiligheidsredenen mogen de pedalen nooit met blote voeten worden bediend of met alleen sokken aan. THRUSTMASTER WIJST ELKE VERANTWOORDELIJKHEID AF IN GEVAL ® VAN LETSEL ALS GEVOLG VAN HET GEBRUIK VAN DE PEDAALSET ZONDER SCHOENEN AAN.
- Page 60 – Waarschuwing Mogelijk letsel ten gevolge van Force Feedback en repetitieve bewegingen (vervolg) * Stop al het gamen als de hierboven beschreven symptomen van pijn of ongemak blijven aanhouden tijdens het gamen en raadpleeg een huisarts. * Houd het stuur, de voet en de pedaalset buiten het bereik van kinderen. * Houd tijdens het gamen altijd twee handen aan het stuur op de juiste stand en laat het stuur nooit helemaal los.
- Page 61 Om de huidige versie van de firmware van het racestuur weer te geven en deze bij te werken indien gewenst: ga op een pc naar http://ts.thrustmaster.com. Klik in de sectie Updates and Downloads op PlayStation / Wheels / T300 RS, selecteer Driver/Firmware en volg de instructies voor het ...
- Page 62 Connector op stuur (2): pijl die omhoog wijst Draai zodra de connectoren correct zijn gepositioneerd de ring van de Thrustmaster Quick Release (12) op zijn plaats tegen de wijzers van de klok in terwijl u het racestuur vasthoudt (2) .
- Page 63 DE HOOGTE EN TUSSENRUIMTE VAN DE PEDALEN AANPASSEN Gebruik een kruiskopschroevendraaier (niet meegeleverd) om de twee bevestigingsschroeven te verwijderen waarmee de pedalen aan de pedaalstangen zijn bevestigd. Stel de hoogte en de tussenruimte van de pedalen zo in dat ze perfect passen bij uw rijstijl. - het gaspedaal kent 6 mogelijke standen - ook het rempedaal kent 6 mogelijke standen Wanneer de pedalen op de gewenste hoogte staan en de gewenste tussenruimte hebben, schroeft u...
- Page 64 BEVESTIGEN / RICHTING VERWIJDEREN Vastdraaien: Draai de schroef linksom vast (tegen de wijzers van de klok in). Losdraaien: Draai de schroef rechtsom los (met de wijzers van de klok mee). 9/18...
- Page 65 Langere schroeven kunnen de componenten in de pedaalset beschadigen. Schema's voor cockpits (voor het plaatsen van de voet van het racestuur en/of de pedaalset) zijn beschikbaar op http://ts.thrustmaster.com. Klik in de sectie Updates and Downloads op PlayStation / Wheels / T300 RS en selecteer Manual/Help file.
- Page 66 - De lijst met PlayStation®3- en PlayStation®4-games die compatibel zijn met de T300 RS en de daarvoor benodigde stand van de USB-keuzeschakelaar (5) is beschikbaar op: http://ts.thrustmaster.com (in de sectie Updates and Downloads, klik op PlayStation / Wheels / T300 RS).
-
Page 67: Het Racestuur Installeren Op Uw Pc
3. Klik nadat de installatieprocedure is afgerond op Voltooien om de computer opnieuw te starten. 4. Kies Start / Alle programma's / Thrustmaster / FFB Racing Wheel / Configuratiescherm om het venster Game Controllers openen. - Page 68 MAPPING OP PC 13/18...
-
Page 69: Het Racestuur En De Pedaalset Automatisch Kalibreren
HET RACESTUUR EN DE PEDAALSET AUTOMATISCH KALIBREREN Het stuur kalibreert zichzelf automatisch wanneer u het stuur op een stopcontact aansluit en de USB- connector van het stuur op de console aansluit. Tijdens deze kalibratie zal het stuur snel 900 graden linksom en rechtsom draaien voordat het stopt in de middenstand. - Page 70 VERWISSELD GROEN Meer functies van de MODE-knop Meer informatie over de MODE-knop en de indicator vindt u op http://ts.thrustmaster.com. Klik in de sectie Updates and Downloads op PlayStation / Wheels / T300 RS en selecteer Manual/Help file. COMPATIBILITEIT MET ANDERE PRODUCTEN VAN THRUSTMASTER De voet van de T300 RS is compatibele met: •...
-
Page 71: Technische Ondersteuning
TECHNISCHE ONDERSTEUNING Mocht u problemen ondervinden met dit product, ga dan naar http://ts.thrustmaster.com en klik op Technical Support. U hebt daar toegang tot verschillende onderwerpen die u helpen bij het vinden van oplossingen, zoals de FAQ (veelgestelde vragen) en de meest recente drivers en software. Als het probleem op die manier niet kan worden verholpen, kunt u contact opnemen met de Thrustmaster product technical support service (Technical Support). - Page 72 Europese Unie komt dit overeen met een periode van twee (2) jaar vanaf het moment van levering van het Thrustmaster-product. In andere landen komt de garantieperiode overeen met de tijd maximaal vereist om een restitutie/vervanging voor dit Thrustmaster-product te claimen zoals wettelijk is vastgelegd in het land waarin de koper woonachtig was op de datum van aankoop van het Thrustmaster-product.
- Page 73 COPYRIGHT © 2014 Guillemot Corporation S.A. Alle rechten voorbehouden. Thrustmaster® is een geregistreerd handelsmerk van Guillemot Corporation S.A. “ ”, “PlayStation”, “ ” en “ ” zijn geregistreerde handelsmerken van Sony Computer Entertainment, Inc. “ ” is een handelsmerk van hetzelfde bedrijf. Alle andere handelsmerken zijn het eigendom van hun respectieve eigenaren.
- Page 74 PER P 3 – P TATION® TATION® Manuale d'uso ATTENZIONE: Per far sì che il tuo T300 RS funzioni correttamente con i giochi per PlayStation®3 o PlayStation®4, potrebbe rendersi necessario installare gli aggiornamenti automatici dei giochi (disponibili nel momento in cui la tua console viene collegata a internet). 1/18...
-
Page 75: Caratteristiche Tecniche
6 Pulsante MODE + spia luminosa rosso/verde 10 Sistema di aggancio 11 Vite di fissaggio in metallo 12 Thrustmaster Quick Release 15 Cavo USB e connettore del volante 13 Pulsanti L3/R3 16 Connettore per cambio (marce) -
Page 76: Collegare Il Volante A Una Presa Di Corrente: Si Prega Di Leggere Attentamente Prima Di Procedere
COLLEGARE IL VOLANTE A UNA PRESA DI CORRENTE: SI PREGA DI LEGGERE ATTENTAMENTE PRIMA DI PROCEDERE! L'alimentatore del tuo volante varia a seconda della nazione in cui hai acquistato la tua periferica. L'alimentazione potrebbe essere: Interna, con: * Un alimentatore collocato direttamente nella base del volante, con un connettore tipo A Un cavo di alimentazione da 220-240V = compatibile solo con correnti elettriche a 220-240V. - Page 77 * Non lasciare che la polvere penetri nella prese d'aria. Per motivi di sicurezza, non utilizzare mai la pedaliera a piedi nudi o indossando solamente i calzini. THRUSTMASTER DECLINA OGNI RESPONSABILITÀ IN CASO DI INFORTUNI ® DERIVANTI DALL'USO DELLA PEDALIERA SENZA SCARPE.
- Page 78 Attenzione – Infortuni derivanti dal force feedback e dai movimenti ripetuti (seguito) * Qualora i sintomi o il dolore sopradescritti dovessero persistere anche quando ricominci a giocare, smetti di giocare e consulta il tuo medico. * Tenere lontano dalla portata dei bambini. * Nei giochi, mantieni sempre le mani sul volante in posizione corretta, senza mai lasciarlo andare completamente.
- Page 79 Per visualizzare la versione del firmware attualmente presente nel tuo volante e, se necessario, aggiornarla: su PC, collegati al sito http://ts.thrustmaster.com. Nella sezione Updates and Downloads, clicca su PlayStation / Volanti / T300 RS, quindi scegli Driver/Firmware e segui le ...
- Page 80 Dopo aver correttamente posizionato i connettori, non devi far altro che ruotare in senso antiorario l'anello del sistema Thrustmaster Quick Release (12), tenendo il volante (2) fermo in posizione. Dopodiché, stringi l'anello più a fondo che puoi; per far questo, tieni l'anello in posizione e ruota il volante in senso orario.
- Page 81 REGOLARE L'ALTEZZA E LA DISTANZA DEI PEDALI Utilizzando un cacciavite Phillips (non incluso), estrai le 2 viti che tengono le teste dei pedali attaccate alle relative staffe. Dopodiché, regola l’altezza delle teste e la reciproca distanza in base la tuo stile di guida preferito: - per il pedale dell’acceleratore è...
- Page 82 AGGANCIO / DIREZIONE RIMOZIONE Per stringere: Gira la vite in senso antiorario Per allentare: Gira la vite in senso orario 9/18...
- Page 83 I diagrammi delle configurazioni per gli abitacoli (per il posizionamento della base del volante e/o della pedaliera) sono disponibili sul sito http://ts.thrustmaster.com: nella sezione Updates and Downloads, clicca su PlayStation / Wheels / T300 RS, quindi scegli Manual/Help file.
- Page 84 - L’elenco dei giochi per PlayStation®3 e PlayStation®4 compatibili con il T300 RS (oltre alla posizione del selettore USB (5) richiesta per i vari giochi) è disponibile sul sito: http://ts.thrustmaster.com (nella sezione Updates and Downloads, clicca su PlayStation / Wheels / T300 RS).
-
Page 85: Configurazione Del Volante Per Pc
USB del tuo volante e completare l'installazione. 3. Una volta completata l'installazione, clicca su Fine e riavvia il tuo computer. 4. Seleziona Start / Tutti i programmi / Thrustmaster / FFB Racing Wheel / Pannello di Controllo per aprire la finestra Controller di Gioco. - Page 86 MAPPATURA PC 13/18...
-
Page 87: Calibrazione Automatica Di Volante E Pedaliera
CALIBRAZIONE AUTOMATICA DI VOLANTE E PEDALIERA Il volante si calibra automaticamente nel momento in cui colleghi il volante alla rete elettrica e inserisci nella console il connettore USB del volante. Durante questa fase, il volante si muoverà rapidamente a destra e a sinistra, coprendo un angolo di 900 gradi, prima di fermarsi in posizione centrale. - Page 88 Durante l'uso della pedaliera, assicurati che il led resti sempre acceso in rosso, altrimenti il pedale dell'acceleratore non funzionerà correttamente. Il T300 RS è compatibile anche con pedaliere Thrustmaster a 3 pedali (vendute separatamente); in questo modo potrai scambiare elettronicamente fra loro i pedali di acceleratore e frizione.
-
Page 89: Assistenza Tecnica
ASSISTENZA TECNICA Qualora riscontrassi un problema con il tuo prodotto, accedi al sito http://ts.thrustmaster.com e clicca su Technical Support. Da qui, potrai accedere a vari servizi ed informazioni (Risposte alle Domande più Frequenti (FAQ), le più recenti versioni di driver e software) che potrebbero esserti utili per risolvere il tuo problema. - Page 90 A livello mondiale, Guillemot Corporation S.A. (d’ora in avanti “Guillemot”) garantisce al consumatore che il presente prodotto Thrustmaster sarà privo di difetti relativi ai materiali e alla fabbricazione, per un periodo di garanzia corrispondente al limite temporale stabilito per la presentazione di un reclamo riguardante la conformità...
- Page 91 COPYRIGHT © 2014 Guillemot Corporation S.A. Tutti i diritti riservati. Thrustmaster® è un marchio registrato da Guillemot Corporation S.A. “ ”, “PlayStation”, “ ” e “ ” sono marchi registrati da Sony Computer Entertainment, Inc. “ ” è un marchio appartenente alla medesima compagnia.
- Page 92 PARA P 3 – P TATION® TATION® Manual del usuario ADVERTENCIA: Para asegurarte de que tu volante de carreras T300 RS funcione correctamente con juegos para PlayStation®3 o PlayStation®4, puede que tengas que instalar las actualizaciones automáticas de los juegos (disponibles cuando tu consola está...
-
Page 93: Características Técnicas
6 Botón MODE + luz indicadora roja/verde 10 Sistema de fijación 11 Tornillo de fijación metálico 12 Thrustmaster Quick Release 15 Conector y cable USB del volante de 13 Botones L3/R3 carreras 14 Conector de fuente de alimentación (tipo A 16 Conector del cambio de marchas (caja de o B) (varía de un país a otro) - Page 94 ¡CONEXIÓN DEL VOLANTE DE CARRERAS A UN ENCHUFE ELÉCTRICO: LEER ANTES DE CONTINUAR! La fuente de alimentación del volante de carreras varía en función del país en el que hayas comprado el dispositivo. La fuente de alimentación puede ser: Interna, con: * Una unidad de fuente de alimentación situada directamente en el interior de la base del volante de carreras, con un conector de tipo A.
- Page 95 * No dejes que se acumule polvo en las rejillas de ventilación. Por razones de seguridad, no uses nunca los pedales con los pies descalzos o únicamente con calcetines en los pies. THRUSTMASTER DECLINA TODA RESPONSABILIDAD EN CASO DE ®...
- Page 96 Advertencia – Lesiones debidas a Force Feedback y los movimientos repetitivos (continuación) * Si los síntomas o el dolor indicados anteriormente persisten cuando vuelves a jugar, deja de hacerlo y consulta al médico. * Mantén el volante fuera del alcance de los niños. * Durante el juego, mantén siempre ambas manos colocadas correctamente en el volante sin dejarlas completamente caídas.
- Page 97 Para mostrar la versión de firmware que está usando actualmente tu volante de carreras y actualizarla si es necesario: en PC, visita http://ts.thrustmaster.com. En la sección Updates and Downloads, haz clic en PlayStation / Wheels / T300 RS y, a continuación, selecciona Driver/Firmware y sigue ...
- Page 98 Conector del volante de carreras (2): Flecha apuntando hacia arriba Una vez que los conectores estén colocados correctamente, simplemente gira el anillo del dispositivo Thrustmaster Quick Release (12) hacia la izquierda, mientras sostienes el volante de carreras (2) en su posición.
- Page 99 AJUSTE DE LA ALTURA Y EL ESPACIADO DE LOS PEDALES Usando un destornillador Phillips (no incluido), quita los 2 tornillos de fijación que sujetan las cabezas de los pedales a los brazos de los pedales. A continuación, ajusta la altura y el espaciado de las cabezas de los pedales a tu estilo de conducción preferido: - Para el pedal del acelerador hay 6 posiciones diferentes disponibles.
- Page 100 COLOCACIÓN / INDICACIÓN RETIRADA Para apretar: Gira el tornillo hacia la izquierda Para aflojar: Gira el tornillo hacia la derecha 9/18...
- Page 101 Los diagramas de diseño para cabinas (para colocar la base del volante de carreras y/o los pedales) están disponibles en http://ts.thrustmaster.com: en la sección Updates and Downloads, haz clic en PlayStation / Wheels / T300 RS y, a continuación, selecciona Manual/Help file.
- Page 102 - La lista de juegos de PlayStation®3 y PlayStation®4 compatibles con el T300 RS (junto con la posición requerida del interruptor selector de USB (5) según el juego que se esté jugando) está disponible en: http://ts.thrustmaster.com (en la sección Updates and Downloads, haz clic en PlayStation / Wheels / T300 RS).
-
Page 103: Configuración Del Volante De Carreras Para Pc
USB del volante al ordenador y terminar la instalación. 3. Una vez completada la instalación, haz clic en Terminar y reinicia el ordenador. 4. Selecciona Inicio / Todos los programas / Thrustmaster / FFB Racing Wheel / Panel de control para abrir la ventana Dispositivos de juego. - Page 104 ASIGNACIÓN EN PC 13/18...
-
Page 105: Calibración Automática Del Volante Y De Los Pedales
CALIBRACIÓN AUTOMÁTICA DEL VOLANTE Y DE LOS PEDALES El volante de carreras se calibra solo automáticamente cuando enchufas el volante de carreras a la red eléctrica y conectas el conector USB del volante de carreras a la consola. Durante esta fase, el volante de carreras girará rápidamente hacia la izquierda y la derecha, cubriendo un ángulo de 90 grados, antes de detenerse en el centro. - Page 106 Al utilizar estos pedales, asegúrate de que la luz indicadora permanezca en rojo o el pedal del acelerador no funcionará correctamente. El T300 RS también es compatible con los pedales de Thrustmaster que incluyan 3 pedales (vendidos por separado) que te permitirán intercambiar electrónicamente los pedales del acelerador y el embrague.
-
Page 107: Soporte Técnico
SOPORTE TÉCNICO Si encuentras un problema con tu producto, visita http://ts.thrustmaster.com y haz clic en Technical Support. Desde allí podrás acceder a distintas utilidades (preguntas frecuentes (Frequently Asked Questions, FAQ), las últimas versiones de controladores y software) que pueden ayudarte a resolver tu problema. - Page 108 En los países de la Unión Europea, esto corresponde a un período de dos (2) años a partir de la entrega del producto de Thrustmaster. En otros países, el período de garantía corresponde al límite de tiempo para interponer una acción legal referida a la conformidad en relación con este producto de Thrustmaster según las leyes...
- Page 109 COPYRIGHT © 2014 Guillemot Corporation S.A. Todos los derechos reservados. Thrustmaster® es una marca comercial registrada de Guillemot Corporation S.A. “ ”, “PlayStation”, “ ” y “ ” son marcas comerciales registradas de Sony Computer Entertainment, Inc. “ ” es una marca comercial de la misma compañía.
- Page 110 PARA A P 3 – P TATION® TATION® Manual do Utilizador ATENÇÃO: Para garantir que o seu volante T300 RS funciona corretamente com jogos para a PlayStation®3 ou PlayStation®4, poderá ser-lhe pedido para instalar as atualizações automáticas dos jogos (disponível quando a consola de jogos está ligada à Internet). 1/18...
-
Page 111: Características Técnicas
5 Interruptor do seletor USB PS4™ ou PS3™ 10 Sistema de fixação 6 Botão MODE + luz indicadora vermelha/verde 11 Parafuso de aperto de metal 12 Thrustmaster Quick Release 15 Cabo e conector USB do volante 13 Botões L3/R3 16 Conector da alavanca de velocidades 14 Conector de alimentação (tipo A ou B) - Page 112 LIGAR O VOLANTE A UMA TOMADA ELÉTRICA: LEIA ANTES DE CONTINUAR! A fonte de alimentação do volante varia de acordo com o país onde adquiriu o seu dispositivo. A alimentação pode ser: Interna, com: * uma unidade de alimentação situada diretamente no interior da base do volante, com um conector de tipo A.
- Page 113 * Não deixe que pó se acumule nas aberturas de ventilação. Por razões de segurança, nunca utilize o conjunto de pedais com os pés descalços ou apenas com meias calçadas nos pés. A THRUSTMASTER NÃO ASSUME QUALQUER RESPONSABILIDADE NA ®...
- Page 114 Atenção – Ferimentos resultantes dos efeitos Force Feedback e dos movimentos repetidos (continuação) * Se os sintomas ou as dores acima indicados persistirem quando recomeçar a jogar, pare de jogar e consulte o seu médico. * Guarde o volante fora do alcance das crianças. * Durante o jogo, mantenha sempre ambas as mãos posicionadas corretamente no volante sem largá- lo por completo.
- Page 115 Para visualizar a versão do firmware que o volante utiliza atualmente e atualizá-la, se necessário: no PC, aceda a http://ts.thrustmaster.com. Na secção Updates and Downloads, clique em PlayStation / Wheels / T300 RS, em seguida selecione Driver/Firmware e siga as instruções que ...
- Page 116 PlayStation® deve ficar virado ao contrário) para aceder ao parafuso de fixação pequeno situado no anel do dispositivo Thrustmaster Quick Release (12). Utilize uma chave de fendas Phillips grande para apertar o parafuso de fixação pequeno (não aplique força excessiva), rodando-o no sentido horário.
- Page 117 AJUSTAR A ALTURA E O ESPAÇAMENTO DOS PEDAIS Com uma chave de fendas Phillips (não incluída), remova os 2 parafusos de fixação que prendem as cabeças dos pedais aos braços dos mesmos. Em seguida, ajuste a altura e o espaçamento das cabeças dos pedais de acordo com o seu estilo de condução preferido: - estão disponíveis 6 posições diferentes para o pedal do acelerador.
- Page 118 FIXAÇÃO / DIREÇÃO REMOÇÃO Para apertar: Rode o parafuso no sentido anti- horário Para soltar: Rode o parafuso no sentido horário 9/18...
- Page 119 Estão disponíveis esquemas de disposição para cockpits (para posicionar a base do volante e/ou o conjunto de pedais) em http://ts.thrustmaster.com: na secção Updates and Downloads, clique em PlayStation / Wheels / T300 RS e em seguida selecione Manual/Help file.
- Page 120 - A lista de jogos para a PlayStation®3 e PlayStation®4 compatíveis com o T300 RS (juntamente com a posição necessária do interruptor do seletor USB (5) de acordo com o jogo utilizado) está disponível em: http://ts.thrustmaster.com (na secção Updates and Downloads, clique em PlayStation / Wheels / T300 RS).
-
Page 121: Configurar O Volante Para O Pc
USB e completar a instalação. 3. Quando a instalação for concluída, clique em Finalizar e reinicie o computador. 4. Selecione Iniciar / Todos os Programas / Thrustmaster / FFB Racing Wheel / Painel de Controle para abrir a janela Controladores de Jogo A janela Controladores de Jogo exibe o nome T300 RS Racing Wheel e o status OK. - Page 122 MAPEAMENTO PARA PC 13/18...
-
Page 123: Calibragem Automática Do Volante E Do Conjunto De Pedais
CALIBRAGEM AUTOMÁTICA DO VOLANTE E DO CONJUNTO DE PEDAIS O volante calibra-se automaticamente quando liga o volante a uma tomada elétrica e o conector USB do volante à consola. Durante esta fase, o volante roda rapidamente para a esquerda e direita, cobrindo um ângulo de 900 graus, antes de parar no centro. - Page 124 Quando utilizar este conjunto de pedais, certifique-se de que a luz indicadora permanece vermelha, caso contrário o pedal do acelerador não funcionará corretamente. O T300 RS também é compatível com conjuntos de pedais Thrustmaster dotados de 3 pedais (vendidos à parte); estes permitem trocar eletronicamente os pedais do acelerador e da embraiagem.
-
Page 125: Suporte Técnico
SUPORTE TÉCNICO Se surgir algum problema com o seu produto, vá até http://ts.thrustmaster.com e clique em Technical Support. A partir daqui pode aceder a vários utilitários, como as perguntas mais frequentes (FAQ) ou as versões mais recentes dos controladores e do software, capazes de ajudá- lo a resolver o seu problema. - Page 126 Thrustmaster de acordo com a legislação em vigor do país no qual o consumidor residia à data de compra do produto Thrustmaster (se a dita ação não existir no país correspondente, então o período de garantia será...
-
Page 127: Direitos De Autor
DIREITOS DE AUTOR © 2014 Guillemot Corporation S.A. Todos os direitos reservados. Thrustmaster® é uma marca registada da Guillemot Corporation S.A. “ ”, “PlayStation”, “ ” e “ ” são marcas registadas da Sony Computer Entertainment, Inc. “ ” é uma marca comercial da mesma empresa. Todas as outras marcas comerciais pertencem aos respetivos proprietários. - Page 128 ДЛЯ P 3 – P TATION® TATION® Инструкция по эксплуатации ВНИМАНИЕ! Для обеспечения оптимальной совместимости рулевой системы T300 RS с играми для PlayStation®3 или PlayStation®4, может потребоваться установка автоматических обновлений для игр (их можно загрузить, подключив игровую консоль к Интернету). 1/18...
-
Page 129: Технические Характеристики
крепления и крепежного винта) 6 Кнопка MODE (Режим) + красный/зеленый 10 Cистема крепления 11 Металлический крепежный винт индикатор 12 Система крепления Thrustmaster Quick 15 USB-кабель и разъем рулевой системы Release 16 Разъем для переключателя скоростей 13 Кнопки L3/R3 (коробки передач) 14 Разъем... -
Page 130: Подключение Рулевой Системы Кэлектророзетке Сначала Прочтите Следующее
ПОДКЛЮЧЕНИЕ РУЛЕВОЙ СИСТЕМЫ К ЭЛЕКТРОРОЗЕТКЕ СНАЧАЛА ПРОЧТИТЕ СЛЕДУЮЩЕЕ! Тип блока питания рулевой системы зависит от страны приобретения устройства. Блок питания может быть одного из следующих типов. Встроенный, в следующей комплектации: * блок питания, интегрированный непосредственно в базу рулевого колеса, с разъемом... - Page 131 * ничем не накрывайте базу; * не допускайте скопления пыли на вентиляционных отверстиях. Из соображений безопасности никогда не нажимайте на педали босой ногой или ногой в носке (без обуви). КОМПАНИЯ THRUSTMASTER ОТКАЗЫВАЕТСЯ ОТ ЛЮБОЙ ® ОТВЕТСТВЕННОСТИ В СЛУЧАЕ ПОЛУЧЕНИЯ ТРАВМЫ В РЕЗУЛЬТАТЕ...
- Page 132 Внимание — риск травмирования в результате повторяющихся движений и действия силовой обратной связи Использование рулевой системы с силовой обратной связью может вызвать боль в мышцах или суставах. Советы по предотвращению проблем со здоровьем: * не проводите за игрой продолжительное время; * после...
- Page 133 Прошивку в базе рулевого колеса можно обновить до более поздней версии, содержащей усовершенствования. Для просмотра установленной в данный момент версии прошивки и ее обновления при необходимости откройте сайт http://ts.thrustmaster.com. В разделе Updates and Downloads выберите PlayStation / Wheels / T300 RS, затем откройте Driver/Firmware и выполните...
- Page 134 Разъем на руле (2): стрелка указывает вверх. После правильного позиционирования разъемов просто поверните кольцо крепежной системы Thrustmaster Quick Release (12) против часовой стрелки, удерживая на месте руль (2). Затем с максимальным усилием затяните кольцо, удерживая его на месте и поворачивая руль (по...
-
Page 135: Установка Рулевой Системы
РЕГУЛИРОВКА ВЫСОТЫ И РАССТОЯНИЯ МЕЖДУ ПЕДАЛЯМИ С помощью отвертки Phillips (не входит в комплект) открутите 2 крепежных винта, удерживающих педали на педальных рычагах. Затем отрегулируйте высоту педалей и расстояние между ними в соответствии со своими предпочтениями. - Возможно 6 различных положений для педали газа. - Возможно... - Page 136 УСТАНОВКА / НАПРАВЛЕНИЕ ДЕМОНТАЖ Фиксация Закручивайте винт против часовой стрелки Ослабление Раскручивайте винт по часовой стрелке 9/18...
- Page 137 длинные винты могут вызвать повреждение внутренних деталей педального блока. Компоновочные схемы для кокпитов (размещение базы рулевого колеса и/или педального блока) можно найти на сайте http://ts.thrustmaster.com: в разделе Updates and Downloads выберите PlayStation / Wheels / T300 RS и откройте Manual/Help file.
- Page 138 - Перечень игр для PlayStation®3 и PlayStation®4, совместимых с рулевой системой T300 RS (с указанием необходимого положения переключателя USB-входа (5) в соответствии с используемой игрой) можно найти на сайте:http://ts.thrustmaster.com (в разделе Updates and Downloadsвыберите PlayStation / Wheels / T300 RS). Этот...
-
Page 139: Настройка Рулевой Системы Для Пк
подключению USB-кабеля к компьютеру и завершению установки. 3. После завершения установки щелкните кнопку «Готово» и перезапустите компьютер. 4. Выберите «Пуск / Все программы / Thrustmaster / FFB Racing Wheel / Control Panel», чтобы открыть окно «Игровые устройства». В окне «Игровые устройства» отображается рулевая система T300 RS Racing Wheel с состоянием... - Page 140 РАСКЛАДКА ФУНКЦИЙ ДЛЯ ПК 13/18...
-
Page 141: Автоматическая Калибровка Руля И Педального Блока
АВТОМАТИЧЕСКАЯ КАЛИБРОВКА РУЛЯ И ПЕДАЛЬНОГО БЛОКА Калибровка гоночного руля выполняется автоматически при подключении рулевой системы к электророзетке и к игровой консоли через USB-разъем. Во время этой процедуры руль быстро вращается влево и вправо, совершая поворот на 900 градусов, и затем останавливается в центре. ВНИМАНИЕ! Во... - Page 142 СОВМЕСТИМОСТЬ С СЕРИЕЙ ПРОДУКТОВ THRUSTMASTER Продукты, совместимые с базой системы T300 RS: • следующие съемные рули Thrustmaster: Ferrari F1 Wheel Add-on*, Ferrari GTE Wheel Add-on*, T300 RS PS Wheel, T500RS GT Wheel*; • комплект закрепляемых на базе лепестковых переключателей Base Fixed Paddle Shifters*;...
-
Page 143: Техническая Поддержка
ТЕХНИЧЕСКАЯ ПОДДЕРЖКА При возникновении проблем, связанных с использованием контроллера, зайдите на веб- сайт http://ts.thrustmaster.com и перейдите по ссылке Technical Support (техническая поддержка). На этой странице есть доступ к различным утилитам (часто задаваемые вопросы (FAQ), самые новые версии драйверов и программного обеспечения) – это может... - Page 144 Сведения о потребительской гарантии Корпорация Guillemot Corporation S.A. (далее — «Guillemot») гарантирует своим клиентам во всем мире, что в данном изделии Thrustmaster не будет выявлено никаких дефектов материалов и производства в течение гарантийного периода, который равен сроку предъявления претензии по соответствию для...
-
Page 145: Авторские Права
АВТОРСКИЕ ПРАВА © Корпорация 2014 Guillemot Corporation S.A. Все права защищены. Thrustmaster® является зарегистрированным товарным знаком корпорации Guillemot Corporation S.A. , PlayStation, и являются зарегистрированными товарными знаками компании Sony Computer Entertainment, Inc. является зарегистрированным товарным знаком этой же компании. Все остальные товарные знаки являются собственностью соответствующих владельцев. - Page 146 ΓΙΑ P 3 – P TATION® TATION® Εγχειρίδιο χρήσης ΠΡΟΕΙΔΟΠΟΙΗΣΗ: Για να βεβαιωθείτε ότι η τιμονιέρα T300 RS λειτουργεί σωστά με τα παιχνίδια για την κονσόλα PlayStation®3 PlayStation®4, ή ίσως χρειαστεί να εγκαταστήσετε τις αυτόματες ενημερώσεις των παιχνιδιών (είναι διαθέσιμα όταν η κονσόλα παιχνιδιών είναι συνδεδεμένη στο Internet). 1/18...
-
Page 147: Τεχνικα Χαρακτηριστικα
5 Διακόπτης επιλογέα USB για PS4™ ή PS3™ 10 Σύστημα προσάρτησης 6 Κουμπί MODE + λυχνία ένδειξης με 11 Μεταλλική βίδα σύσφιξης κόκκινο/πράσινο χρώμα 12 Thrustmaster Quick Release 15 Καλώδιο USB και υποδοχή αγωνιστικού 13 Κουμπιά L3/R3 τιμονιού 14 Υποδοχή παροχής ρεύματος (τύπος A ή B) 16 Υποδοχή... -
Page 148: Συνδεση Τησ Τιμονιερασ Στο Ρευμα:διαβαστε Πριν Συνεχισετε
ΣΥΝΔΕΣΗ ΤΗΣ ΤΙΜΟΝΙΕΡΑΣ ΣΤΟ ΡΕΥΜΑ:ΔΙΑΒΑΣΤΕ ΠΡΙΝ ΣΥΝΕΧΙΣΕΤΕ! Η υποδοχή τροφοδοσίας της τιμονιέρας ποικίλλει ανάλογα με τη χώρα από την οποία αγοράσατε τη συσκευή σας. Η υποδοχή τροφοδοσίας μπορεί να είναι: Εσωτερική, με τα εξής: * μια μονάδα τροφοδοσίας ρεύματος τοποθετημένη απευθείας στο εσωτερικό της βάσης της τιμονιέρας, με... - Page 149 * Μην καλύπτετε τη βάση. * Μην αφήνετε να συσσωρευτεί σκόνη επάνω στους αεραγωγούς. Για λόγους ασφάλειας, ποτέ μην χρησιμοποιείτε το σετ των πεντάλ ξυπόλητοι ή φορώντας μόνο κάλτσες. Η THRUSTMASTER ΑΠΟΠΟΙΕΙΤΑΙ ΟΠΟΙΑΣΔΗΠΟΤΕ ΕΥΘΥΝΗΣ ® ΣΕ ΠΕΡΙΠΤΩΣΗ ΤΡΑΥΜΑΤΙΣΜΟΥ ΠΟΥ ΠΡΟΚΑΛΕΙΤΑΙ ΑΠΟ ΤΗ...
- Page 150 Προειδοποίηση – Τραυματισμοί λόγω τεχνολογίας Force Feedback και επαναλαμβανόμενων κινήσεων (συνέχεια) * Αν τα συμπτώματα ή ο πόνος που αναφέρθηκαν παραπάνω επιμένουν όταν αρχίσετε ξανά το παιχνίδι, σταματήστε να παίζετε και επισκεφτείτε τον ιατρό σας. * Κρατήστε το προϊόν μακριά από παιδιά. * Κατά...
- Page 151 ενημερώσετε αν απαιτείται: σε υπολογιστή, συνδεθείτε στον ιστότοπο http://ts.thrustmaster.com. Στην ενότητα Updates and Downloads, κάντε κλικ στις επιλογές PlayStation / Wheels / T300 RS, έπειτα επιλέξτε Driver/Firmware και ακολουθήστε τις οδηγίες που περιγράφουν τη διαδικασία λήψης και εγκατάστασης. 6/18...
- Page 152 Υποδοχή βάσης (1): Βέλος με κατεύθυνση προς τα πάνω Υποδοχή τιμονιού (2): Βέλος με κατεύθυνση προς τα πάνω Αφού τοποθετήσετε σωστά τις υποδοχές, απλώς περιστρέψτε τον δακτύλιο της συσκευής Thrustmaster Quick Release (12) αριστερόστροφα, ενώ κρατάτε το τιμόνι (2) στη θέση του.
- Page 153 ΡΥΘΜΙΣΗ ΥΨΟΥΣ ΚΑΙ ΑΠΟΣΤΑΣΗΣ ΤΩΝ ΠΕΝΤΑΛ Με ένα κατσαβίδι Phillips (δεν περιλαμβάνεται), αφαιρέστε τις 2 βίδες προσάρτησης που συγκρατούν τις κεφαλές των πεντάλ στους βραχίονες των πεντάλ. Έπειτα, ρυθμίστε το ύψος και την απόσταση των κεφαλών των πεντάλ σύμφωνα με το στυλ οδήγησης που...
- Page 154 ΠΡΟΣΑΡΤΗΣΗ/ΑΦΑΙ ΚΑΤΕΥΘΥΝΣΗ ΡΕΣΗ Για να σφίξετε: Στρέψτε τη βίδα αριστερόστροφα Για ελευθέρωση: Στρέψτε τη βίδα δεξιόστροφα 9/18...
- Page 155 εξαρτήματα που βρίσκονται μέσα στο σετ των πεντάλ. Τα διαγράμματα για τις θέσεις του οδηγού (για τοποθέτηση της βάσης της τιμονιέρας και/ή του σετ των πεντάλ) υπάρχουν διαθέσιμα στον ιστότοπο http://ts.thrustmaster.com: στην ενότητα Updates and Downloads, κάντε κλικ στις επιλογές PlayStation / Wheels / T300 RS, έπειτα...
- Page 156 - Η λίστα με συμβατά παιχνίδια του PlayStation®3 και του PlayStation®4 με το τιμόνι T300 RS (μαζί με την απαιτούμενη θέση του διακόπτη επιλογέα USB (5) ανάλογα με το παιχνίδι που παίζετε) υπάρχει διαθέσιμη στον ιστότοπο: http://ts.thrustmaster.com (στην ενότητα Updates and Downloads, PlayStation ...
-
Page 157: Ρυθμιση Τησ Τιμονιερασ Για Pc
Σε PC, ο διακόπτης επιλογέα USB (5) στη βάση της τιμονιέρας πρέπει να είναι πάντα ρυθμισμένος στη θέση PS3™. 1. Μεταβείτε στη διεύθυνση http://ts.thrustmaster.com για λήψη των οδηγών και του λογισμικού Force Feedback για PC. Στην ενότητα Updates and downloads (Ενημερώσεις και Λήψεις), κάντε κλικ στις... - Page 158 ΑΝΤΙΣΤΟΙΧΙΣΗ ΣΕ PC 13/18...
-
Page 159: Αυτοματη Βαθμονομηση Τιμονιου Και Σετ Πενταλ
ΑΥΤΟΜΑΤΗ ΒΑΘΜΟΝΟΜΗΣΗ ΤΙΜΟΝΙΟΥ ΚΑΙ ΣΕΤ ΠΕΝΤΑΛ Η βαθμονόμηση της τιμονιέρας πραγματοποιείται αυτόματα όταν συνδέετε την τιμονιέρα στο ρεύμα και την υποδοχή USB της τιμονιέρας στην κονσόλα. Στη διάρκεια αυτής της φάσης, το τιμόνι θα περιστρέφεται γρήγορα προς αριστερά και δεξιά, καλύπτοντας... - Page 160 με κόκκινο χρώμα, διαφορετικά το πεντάλ του γκαζιού δεν θα λειτουργεί σωστά. Η τιμονιέρα T300 RS είναι επίσης συμβατή με το σετ των πεντάλ της Thrustmaster που διαθέτει 3 πεντάλ (πωλούνται ξεχωριστά). Αυτά σας παρέχουν τη δυνατότητα να πραγματοποιείτε ηλεκτρονική...
- Page 161 ΤΕΧΝΙΚΗ ΥΠΟΣΤΗΡΙΞΗ Αν αντιμετωπίσετε πρόβλημα με το προϊόν σας, μεταβείτε στον ιστότοπο http://ts.thrustmaster.com και κάντε κλικ στην επιλογή Technical Support. Από εκεί μπορείτε να δείτε διάφορες χρήσιμες πληροφορίες (Συχνές ερωτήσεις, τις τελευταίες εκδόσεις οδηγών και λογισμικού) που ενδέχεται να σας βοηθήσουν να λύσετε το πρόβλημα που αντιμετωπίζετε. Αν το πρόβλημα παραμείνει, μπορείτε...
- Page 162 προϊόντος της Thrustmaster (σε περίπτωση που δεν υπάρχει τέτοια ενέργεια στην αντίστοιχη χώρα, τότε η εγγύηση θα ισχύει για ένα (1) έτος από την αρχική ημερομηνία αγοράς του προϊόντος της Thrustmaster). Κατά παρέκκλιση των παραπάνω, οι επαναφορτιζόμενες μπαταρίες καλύπτονται από περίοδο εγγύησης...
- Page 163 ΠΝΕΥΜΑΤΙΚΑ ΔΙΚΑΙΩΜΑΤΑ © 2014 Guillemot Corporation S.A. Με την επιφύλαξη παντός δικαιώματος. Η ονομασία Thrustmaster® είναι εμπορικό σήμα κατατεθέν της Guillemot Corporation S.A. Τα λογότυπα « », «PlayStation», « » και « » είναι εμπορικά σήματα της Sony Computer Entertainment, Inc. Το λογότυπο «...
- Page 164 3 – P 4 İÇİN TATION® TATION® Kullanma Kılavuzu UYARI: T300 RS Yarış Direksiyonunuzun PlayStation®3 veya PlayStation®4 oyunlarıyla düzgün çalışmasını sağlamak için, oyunların otomatik güncellemelerini yüklemeniz gerekebilir (oyun konsolunuz İnternete bağlıyken yapılabilir). 1/18...
-
Page 165: Teknik Özellikler
5 PS4™ veya PS3™ USB seçim düğmesi 10 Montaj sistemi 6 MODE düğmesi + kırmızı/yeşil gösterge 11 Metal bağlantı vidası lambası 12 Thrustmaster Quick Release 15 Yarış direksiyonu kablosu 13 L3/R3 düğmeleri konektörü 14 Güç kaynağı konektörü (tip A veya B) 16 Vites (vites kutusu) konektörü... -
Page 166: Yariş Di̇reksi̇yonunun Elektri̇k Pri̇zi̇ne Takilmasi: Lütfen Devam Etmeden Önce Okuyun
YARIŞ DİREKSİYONUNUN ELEKTRİK PRİZİNE TAKILMASI: LÜTFEN DEVAM ETMEDEN ÖNCE OKUYUN! Yarış direksiyonunuzun güç beslemesi cihazınızı aldığınız ülkeye göre değişir. Güç kaynağı şunlardan biri olabilir: Dahili: * Doğrudan yarış direksiyonu tabanının içine yerleştirilmiş, tip A konektörlü güç besleme birimi. * 220-240 V elektrik kablosu. = sadece 220-240 V elektrik şebekesi ile uyumlu. - Page 167 * Havalandırma deliklerinin üzerinde toz birikmesine izin vermeyin. Güvenlik nedeniyle pedal setini asla çıplak ayaklarla veya ayağınıza sadece çorap giyerek oynamayın. THRUSTMASTER® PEDAL SETİNİN AYAKKABISIZ KULLANILMASINDAN KAYNAKLANAN YARALANMALARDA HİÇBİR SORUMLULUK KABUL ETMEZ. Uyarı - Force Feedback ve tekrarlanan hareketlerden dolayı yaralanma Force Feedback direksiyonla oynamak kas veya eklem ağrısına neden olabilir.
- Page 168 Uyarı - Force Feedback ve tekrarlanan hareketlerden dolayı yaralanma (devamı) * Yeniden oynamaya başladığınızda yukarıda belirtilen semptomlar veya ağrı tekrar ederse oynamayı kesin ve bir doktora başvurun. * Çocukların ulaşabileceği yerlerden uzak tutun. * Oyun oynarken kollarınızı, tamamen gitmesine izin vermeden daima yarış direksiyonunun üzerinde doğru konumlandırılmış...
- Page 169 Yarış direksiyonunuzun tabanında bulunan donanım yazılımı ürün geliştirmeleri içeren daha yeni sürümlere güncellenebilir. Yarış direksiyonunuzun halihazırda kullandığı donanım yazılımı sürümünü görmek ve gerektiğinde güncellemek için: PC'de http://ts.thrustmaster.com adresine gidin. Updates and Downloads kısmında PlayStation / Wheels / T300 RS seçeneklerine tıklayın, ardından Driver/Firmware ...
- Page 170 Ardından bileziği mümkün olduğu kadar sıkın: Bunu yapmak için bileziği yerinde tutarak yarış direksiyonunu saat yönünde döndürün. Yarış direksiyonunu taktıktan sonra Thrustmaster Quick Release (12) aygıtının bileziği üzerinde bulunan küçük montaj vidasına ulaşmak için direksiyonu 180° (direksiyona bakarken PlayStation® logosu baş...
- Page 171 PEDALLARIN YÜKSEKLIK VE ARA BOŞLUĞUNUN AYARLANMASI Yıldız tornavida kullanarak (ürünle verilmez) pedal başlıklarını pedal kollarına sabitleyen 2 montaj vidasını çıkarın. Ardından pedal başlıklarının yüksekliğini ve ara boşluklarını tercih ettiğiniz sürüş stiline göre ayarlayın: - Gaz pedalı için 6 farklı pozisyon mevcuttur. - Fren pedalı...
- Page 172 MONTE ETME / YÖN SÖKME Sıkmak için: Vidayı saatin aksi yönünde çevirin Gevşetmek için: Vidayı saat yönünde çevirin 9/18...
- Page 173 Önemli: İki M6 vidanın boyu raf kalınlığı 10 mm'yi geçmemelidir; daha uzun vidalar pedal setinde bulunan dahili bileşenlere zarar verebilirler. Kokpitler için yerleşim diyagramları (yarış direksiyonunun tabanını ve/veya pedal setini konumlandırmak için) http://ts.thrustmaster.com adresinde, Updates and Downloads kısmına gelerek PlayStation / Wheels / T300 RS’ye tıklayın, ardından Manual/Help file’ı seçin.
- Page 174 * “SHARE” ve “PS” fonksiyonu direksiyonda çalışır. - T300 RS ile uyumlu PlayStation®3 ve PlayStation®4 oyunlarının listesi (oynanan oyuna göre USB seçim düğmesinin (5) olması gereken konumu ile birlikte) şu adreste mevcuttur: http://ts.thrustmaster.com (Updates and Downloads kısmında, PlayStation / Wheels / T300 RS’ye tıklayın).
-
Page 175: Pc İçi̇n Yariş Di̇reksi̇yonu Kurulumu
3. Kurulum tamamlandığında Finish düğmesine tıklayın ve bilgisayarınızı yeniden başlatın. 4. Başlat / Tüm Programlar / Thrustmaster / FFB Racing Wheel / Control Panel’i seçerek Oyun Kumandaları penceresini açın. Oyun Kumandaları penceresi, yarış direksiyonunun adını (T300 RS Racing Wheel) Tamam durumunda gösterir. - Page 176 PC EŞLEŞTİRMESİ 13/18...
-
Page 177: Otomati̇k Pedal Seti̇ Kali̇brasyonu
OTOMATİK YARIŞ DİREKSİYONU VE PEDAL SETİ KALİBRASYONU Yarış direksiyonunu elektrik prizine ve yarış direksiyonunun USB konektörünü konsola bağladığınızda yarış direksiyonu kendini otomatik olarak kalibre eder. Bu aşamada yarış direksiyonu, 900 derecelik bir açıyı kaplayıp merkezde durmadan önce sola ve sağa doğru hızlı... - Page 178 Bu pedal setini kullanırken gösterge lambasının kırmızı renkte yanık kaldığından emin olun, aksi takdirde gaz pedalı düzgün çalışmaz. T300 RS, Thrustmaster'ın 3 pedal içeren pedal setleriyle (ayrı olarak satılır) de uyumludur; bunlar, gaz ve debriyaj pedallarını elektronik olarak değiştirmenizi sağlar.
-
Page 179: Tekni̇k Destek
TEKNİK DESTEK Ürününüzle ilgili bir sorunla karşılaşırsanız, lütfen http://ts.thrustmaster.com adresini ziyaret edin ve Technical Support’u tıklayın. Sayfadan, sorununuzu çözmenize yardımcı olacak çeşitli kaynaklara (Sıkça Sorulan Sorular (SSS), sürücü ve yazılımların son sürümleri) erişebilirsiniz. Sorununuz devam ederse, Thrustmaster ürünleri teknik destek hizmeti (“Technical Support”) ile iletişime geçebilirsiniz:... - Page 180 çapında Guillemot Corporation S.A. (bundan sonra “Guillemot” olarak ifade edilecektir) garantisi altındadır. Avrupa Birliği ülkelerinde bu süre, Thrustmaster ürününün tesliminden itibaren iki (2) seneye karşılık gelir. Diğer ülkelerde garanti süresi, Thrustmaster ürünü ile ilgili olarak, Thrustmaster ürününün satın alındığı tarihte müşterinin ikamet ettiği ülkede geçerli yasalara uygun şekilde, müşterinin kusurlu ürünün ücretinin iade edilmesi veya değiştirilmesi talebinde...
- Page 181 TELİF HAKKI © 2014 Guillemot Corporation S.A. Tüm hakları saklıdır. Thrustmaster® Guillemot Corporation S.A.’nın tescilli ticari markasıdır. “ ”, “PlayStation”, “ ” ve “ ” Sony Computer Entertainment, Inc.’in tescilli ticari markalarıdır. “ ” aynı firmanın ticari markasıdır. Diğer tüm ticari markalar ilgili sahiplerine aittir. Fotoğraflar bağlayıcı değildir. İçindekiler, tasarım ve teknik özellikler önceden haber vermeksiniz değiştirilebilir ve ülkeden ülkeye farklılık gösterebilir.
- Page 182 – NA P TATION® TATION® Instrukcja obsługi OSTRZEŻENIE: W celu zapewnienia prawidłowego działania kierownicy T300 RS w grach na konsolę PlayStation®3 lub PlayStation®4 może być wymagane zainstalowanie automatycznych aktualizacji gier (dostępnych, gdy konsola ma połączenie z Internetem). 1/18...
- Page 183 śrubę mocująca) 6 Przycisk MODE + czerwona/zielona kontrolka 10 Element montażowy 11 Metalowa śruba mocująca 12 Thrustmaster Quick Release 15 Kabel kierownicy ze złączem USB 13 Przyciski L3/R3 16 Złącze skrzyni biegów 14 Złącze zasilania (typ A lub B) (do nabycia osobno) 17 Złącze zestawu pedałów...
- Page 184 PODŁĄCZANIE KIEROWNICY GNIAZDA ELEKTRYCZNEGO: PRZECZYTAĆ PRZED WYKONANIEM DALSZYCH CZYNNOŚCI! Rodzaj zasilania kierownicy zależy od kraju jej zakupu. Możliwe rodzaje zasilania: Wewnętrzne: * zasilacz znajdujący się bezpośrednio w podstawie kierownicy i wyposażony w złącze typu A – * kabel zasilania do sieci 220 240 V –...
- Page 185 * Nie przykrywaj podstawy. * Nie dopuszczaj do gromadzenia się kurzu w odpowietrznikach. Ze względów bezpieczeństwa zestawu pedałów nie wolno używać w bosych stopach ani w samych skarpetach. FIRMA THRUSTMASTER NIE PONOSI ŻADNEJ ODPOWIEDZIALNOŚCI ® ZA EWENTUALNE OBRAŻENIA CIAŁA WYNIKŁE Z UŻYWANIA ZESTAWU PEDAŁÓW BEZ OBUWIA.
- Page 186 — Ostrzeżenie ryzyko obrażeń ciała spowodowanych siłowym sprzężeniem zwrotnym i powtarzającymi się ruchami (ciąg dalszy) * Jeśli po ponownym rozpoczęciu gry opisane powyżej objawy lub ból powrócą, przerwij grę i skonsultuj się z lekarzem. * Trzymaj kierownicę z dala od dzieci. * Podczas gry zawsze trzymaj obie dłonie we właściwym położeniu na kierownicy bez jej całkowitego puszczania.
- Page 187 Aby wyświetlić wersję oprogramowania sprzętowego, z której obecnie korzysta kierownica, i w razie potrzeby ją zaktualizować, na komputerze wejdź na stronę http://ts.thrustmaster.com. W sekcji Updates and Downloads kliknij PlayStation / Wheels / T300 RS, następnie wybierz ...
- Page 188 Złącze podstawy (1): strzałka skierowana w górę Złącze kierownicy (2): strzałka skierowana w górę Po prawidłowym ustawieniu złączy obróć pierścień mechanizmu Thrustmaster Quick Release (12) przeciwnie do ruchu wskazówek zegara, jednocześnie przytrzymując kierownicę (2). Następnie maksymalnie dokręć pierścień. W tym celu przytrzymaj pierścień i obracaj kierownicę zgodnie z ruchem wskazówek zegara.
- Page 189 REGULACJA WYSOKOŚCI I ODLEGŁOŚCI PEDAŁÓW Przy użyciu śrubokręta krzyżakowego (do nabycia osobno) wykręć 2 śrubki mocujące, przy użyciu których stopki pedałów są zamocowane do ramion pedałów. Następnie wyreguluj wysokość stopek pedałów i odległość między nimi odpowiednio do preferowanego stylu jazdy: - Dostępnych jest 6 różnych położeń...
- Page 190 MOCOWANIE/ZDEJ KIERUNEK MOWANIE Dokręcanie: Obróć śrubę przeciwnie do ruchu wskazówek zegara Odkręcanie: Obróć śrubę zgodnie z ruchem wskazówek zegara 9/18...
- Page 191 Ważne: Długość dwóch śrub M6 nie może przekraczać grubości półki powiększonej o 10 mm. Dłuższe śruby mogą spowodować uszkodzenie elementów wewnętrznych znajdujących się w zestawie pedałów. Na stronie http://ts.thrustmaster.com są dostępne schematy kokpitów (ułatwiające prawidłowe ustawienie podstawy kierownicy i zestawu pedałów). W sekcji Updates and Downloads kliknij PlayStation / Wheels / T300 RS, a następnie wybierz Manual/Help file.
- Page 192 - Lista gier na konsole PlayStation®3 i PlayStation®4 zgodnych z kierownicą T300 RS (wraz z położeniem wybieraka USB (5) wymaganym w poszczególnych grach) jest dostępna na stronie: http://ts.thrustmaster.com (w sekcji Updates and Downloads kliknij PlayStation / Wheels / T300 RS). Lista jest regularnie aktualizowana.
-
Page 193: Konfigurowanie Kierownicy Pod Kątem Komputera Pc
3. Po zakończeniu instalacji kliknij Finish (Zakończ) i uruchom ponownie komputer. 4. Wybierz Start / All Programs / Thrustmaster / FFB Racing Wheel / Control Panel (Start / Wszystkie programy / Thrustmaster / FFB Racing Wheel / Panel sterowania), aby otworzyć okno Game Controllers (Kontrolery gier). - Page 194 MAPOWANIE NA KOMPUTERZE PC 13/18...
-
Page 195: Automatyczna Kalibracja Kierownicy I Zestawu Pedałów
AUTOMATYCZNA KALIBRACJA KIEROWNICY I ZESTAWU PEDAŁÓW Kierownica kalibruje się automatycznie po jej podłączeniu do gniazda elektrycznego oraz podłączeniu złącza USB kierownicy do konsoli. Podczas tej operacji kierownica obraca się szybko w lewo i w prawo (łącznie o 900 stopni), a następnie zatrzymuje się... - Page 196 W trakcie korzystania z zestawu pedałów jego kontrolka powinna świecić na czerwono. W przeciwnym razie pedał gazu nie będzie działał prawidłowo. Kierownica T300 RS jest również zgodna z zestawami pedałów Thrustmaster zawierającymi 3 pedały (do nabycia osobno). Zestawy te umożliwiają elektroniczną zamianę pedałów przyspieszenia i sprzęgła.
-
Page 197: Pomoc Techniczna
POMOC TECHNICZNA W przypadku wystąpienia problemów związanych z produktem wejdź na stronę http://ts.thrustmaster.com i kliknij Technical Support (Pomoc techniczna). Na tej stronie dostępne są różne narzędzia (często zadawane pytania (FAQ), najnowsze wersje sterowników i oprogramowania itp.), które mogą pomóc w rozwiązaniu problemu. Jeśli problem nie ustąpi, możesz skontaktować... - Page 198 Jeśli zezwala na to obowiązujące prawo, całkowita odpowiedzialność firmy Guillemot i jej podmiotów zależnych (łącznie z odpowiedzialnością za szkody wtórne) ogranicza się do naprawy lub wymiany produktu Thrustmaster. Jeśli zezwala na to obowiązujące prawo, firma Guillemot wyłącza wszelkie gwarancje pokupności i przydatności do określonego celu.
-
Page 199: Prawa Autorskie
PRAWA AUTORSKIE © 2014 Guillemot Corporation S.A. Wszelkie prawa zastrzeżone. Thrustmaster® jest zastrzeżonym znakiem towarowym firmy Guillemot Corporation S.A. „ ”, „PlayStation”, „ ” i „ ” są zastrzeżonymi znakami towarowymi firmy Sony Computer Entertainment, Inc. „ ” jest znakiem towarowym tej samej firmy. Wszystkie inne znaki towarowe stanowią własność odpowiednich podmiotów. - Page 200 3 – P ﺧﺎﺻﺔ ﺑـ TATION® TATION® ﺩﻟﻳﻝ ﺍﻟﻣﺳﺗﺧﺩﻡ :ﺗﺣﺫﻳﺭ ﺗﻌﻣﻝ ﺑﺷﻛﻝ ﺻﺣﻳﺢ ﻟﻠﺗﺄﻛﺩ ﻣﻥ ﺃﻥ ﻋﺟﻠﺔ ﺍﻟﺳﺑﺎﻕ T300RS ، ﻗﺩ ﻳ ُ ﻁﻠﺏ ﻣﻧﻙ ﺗﺛﺑﻳﺕ ﺍﻟﺗﺣﺩﻳﺛﺎﺕ ﺍﻟﺗﻠﻘﺎﺋﻳﺔ ﺃﻭ ﻣﻊ ﺃﻟﻌﺎﺏ PlayStation®4 PlayStation®3 ﻟﻸﻟﻌﺎﺏ (ﺭﻧﺕ )ﺗﺗﻭﻓﺭ ﻋﻧﺩ ﺗﻭﺻﻳﻝ ﻭﺣﺩﺓ ﺍﻟﺗﺣﻛﻡ ﻓﻲ ﺍﻷﻟﻌﺎﺏ ﺑﺎﻹﻧﺗ...
- Page 201 ﻣﻔﺗﺎﺡ ﻣﺣﺩﺩ ﺃﺩﺍﺓ ﺍﻟﺭﺑﻁ PS4™ PS3™ ﺑﺭﻏﻲ ﺗﺛﺑﻳﺕ ﻣﻌﺩﻧﻲ + ﻣﺅﺷﺭ ﺿﻭﺋﻲ ﺃﺣﻣﺭ/ﺃﺧﺿﺭ MODE ﺯﺭ ﻟﻌﺟﻠﺔ ﺍﻟﺳﺑﺎﻕ ﻛﺎﺑﻝ ﻭﻣﻭﺻﻝ Thrustmaster Quick Release (ﺍﻟﺗﺭﻭﺱ ﻣﻭﺻﻝ ﻧﺎﻗﻝ ﺍﻟﺳﺭﻋﺔ )ﺻﻧﺩﻭﻕ L3/R3 ﺃﺯﺭﺍﺭ ( ً )ﻳﺑﺎﻉ ﻣﻧﻔﺻ ﻼ (()ﺍﻟﻧﻭﻉ )ﺃ( ﺃﻭ )ﺏ ﺍﻟﺭﺋﻳﺳﻲ ﺍﻟﻁﺎﻗﺔ ﻣﺻﺩﺭ...
- Page 202 !ﻳﺭﺟﻰ ﺍﻟﻘﺭﺍءﺓ ﻗﺑﻝ ﺍﻟﻣﺗﺎﺑﻌﺔ :ﺗﻭﺻﻳﻝ ﻋﺟﻠﺔ ﺍﻟﺳﺑﺎﻕ ﺑﻣﻘﺑﺱ ﻛﻬﺭﺑﺎﺋﻲ .ﻳﺧﺗﻠﻑ ﻣﺻﺩﺭ ﻁﺎﻗﺔ ﻋﺟﻠﺔ ﺍﻟﺳﺑﺎﻕ ﺍﻟﺧﺎﺻﺔ ﺑﻙ ﻁﺑ ﻘ ً ﺎ ﻟﻠﺑﻠﺩ ﺍﻟﺗﻲ ﺍﺷﺗﺭﻳﺕ ﻣﻧﻬﺎ ﺟﻬﺎﺯﻙ :ﻳﻣﻛﻥ ﺃﻥ ﻳﻛﻭﻥ ﻣﺻﺩﺭ ﺍﻟﻁﺎﻗﺔ ﺍﻟﺭﺋﻳﺳﻲ :ﺩﺍﺧﻠﻲ، ﻣﻊ (ﺎﺷﺭ ﺓ ً ﻓﻲ ﻗﺎﻋﺩﺓ ﻋﺟﻠﺔ ﺍﻟﺳﺑﺎﻕ، ﺑﻣﻭﺻﻝ ﻣﻥ ﺍﻟﻧﻭﻉ )ﺃ ﻭﺣﺩﺓ...
- Page 203 .ﻻ ﺗﺳﻣﺢ ﺑﺗﺭﺍﻛﻡ ﺍﻷﺗﺭﺑﺔ ﻋﻠﻰ ﻓﺗﺣﺎﺕ ﺍﻟﺗﻬﻭﻳﺔ ﻻ ﺗﺳﺗﺧﺩﻡ ﻣﺟﻣﻭﻋﺔ ﺍﻟﺩﻭﺍﺳﺔ ﺑﻘﺩﻡ ﻋﺎﺭﻳﺔ ،ﻷﺳﺑﺎﺏ ﺗﺗﻌﻠﻕ ﺑﺎﻟﺳﻼﻣﺔ .ﺃﻭ ﺃﺛﻧﺎء ﺍﺭﺗﺩﺍء ﺟﻭﺍﺭﺏ ﻓﻘﻁ ﺃﻱ ﻣﺳﺋﻭﻟﻳﺔ ﻓﻲ ﺣﺎﻟﺔ ﻭﻗﻭﻉ ﺇﺻﺎﺑﺎﺕ ﻧﺎﺗﺟﺔ ﻋﻥ ﺍﺳﺗﺧﺩﺍﻡ THRUSTMASTER ® ﻻ ﺗﺗﺣﻣﻝ .ﻣﺟﻣﻭﻋﺔ ﺍﻟﺩﻭﺍﺳﺔ ﺑﺩﻭﻥ ﺣﺫﺍء ﺍﻹﺻﺎﺑﺎﺕ ﺍﻟﻧﺎﺗﺟﺔ ﻋﻥ ﻗﻭﺓ ﺭﺩ ﺍﻟﻔﻌﻝ ﻭﺍﻟﺣﺭﻛﺎﺕ ﺍﻟﻣﺗﻛﺭﺭﺓ...
- Page 204 (ﺍﻹﺻﺎﺑﺎﺕ ﺍﻟﻧﺎﺗﺟﺔ ﻋﻥ ﻗﻭﺓ ﺭﺩ ﺍﻟﻔﻌﻝ ﻭﺍﻟﺣﺭﻛﺎﺕ ﺍﻟﻣﺗﻛﺭﺭﺓ )ﻣﺗﺎﺑﻌﺔ – ﺗﺣﺫﻳﺭ .ﺇﺫ ﺍﺳﺗﻣﺭﺕ ﺍﻷﻋﺭﺍﺽ ﺃﻭ ﺍﻷﻟﻡ ﺍﻟﻣﺷﺎﺭ ﺇﻟﻳﻪ ﺃﻋﻼﻩ ﻋﻧﺩ ﺑﺩء ﺍﻟﻠﻌﺏ ﻣﺭﺓ ﺃﺧﺭﻯ، ﻓﺗﻭﻗﻑ ﻋﻥ ﺍﻟﻠﻌﺏ ﻭﺍﺳﺗﺷﺭ ﻁﺑﻳﺑﻙ .ﺗﺣﻔﻅ ﺑﻌﻳﺩ ً ﺍ ﻋﻥ ﻣﺗﻧﺎﻭﻝ ﺃﻳﺩﻱ ﺍﻷﻁﻔﺎﻝ .ﻟﻠﻌﺏ، ﺍﺗﺭﻙ ﻛﻠﺗﺎ ﻳﺩﻳﻙ ﺩﺍﺋ ﻣ ً ﺎ ﻓﻲ ﻣﻭﺿﻊ ﺻﺣﻳﺢ ﻋﻠﻰ ﻋﺟﻠﺔ ﺍﻟﻘﻳﺎﺩﺓ ﺩﻭﻥ ﺗﻣﺭﻳﺭﻫﺎ ﻣﻧﻬﺎ ﺑﺷﻛﻝ ﻛﺎﻣﻝ ﺃﺛﻧﺎء...
- Page 205 :ﻟﻌﺭﺽ ﺇﺻﺩﺍﺭ ﺍﻟﺑﺭﻧﺎﻣﺞ ﺍﻟﺛﺎﺑﺕ ﺍﻟﻣﻭﺟﻭﺩ ﻋﻠﻰ ﻋﺟﻠﺔ ﺍﻟﺳﺑﺎﻕ ﺍﻟﺧﺎﺻﺔ ﺑﻙ ﺣﺎﻟ ﻳ ًﺎ ﻭﺗﺣﺩﻳﺛﻪ ﺇﺫﺍ ﻟﺯﻡ ﺍﻷﻣﺭ Updates and downloads http://ts.thrustmaster.com ، ﺍﻧﻘﺭ ﻓﻭﻕ ﻓﻲ ﺍﻟﻘﺳﻡ ﺍﻧﺗﻘﻝ ﺇﻟﻰ T300RS / Wheels / PlayStation ﻭﺍﺗﺑﻊ ﺍﻟﺗﻌﻠﻳﻣﺎﺕ ﺍﻟﺗﻲ ﺗﺻﻑ ﺇﺟﺭﺍء Driver / Firmware ، ﺛﻡ ﺣﺩﺩ .ﺍﻟﺗﻧﺯﻳﻝ ﻭﺍﻟﺗﺛﺑﻳﺕ...
- Page 206 ﻗﻡ ﺑﻣﺣﺎﺫﺍﺓ ﻣﻭ ﺳﻬﻡ ﻳﺷﻳﺭ ﻷﻋﻠﻰ ﻣﻭﺻﻝ ﺍﻟﻘﺎﻋﺩﺓ ﻣﻭﺻﻝ ﻋﺟﻠﺔ ﺍﻟﺳﺑﺎﻕ ﺳﻬﻡ ﻳﺷﻳﺭ ﻷﻋﻠﻰ Thrustmaster Quick Release (12) ﻋﻛﺱ ﺑﻣﺟﺭﺩ ﺗﺣﺩﻳﺩ ﻣﻭﺿﻊ ﺍﻟﻣﻭﺻﻼﺕ ﺑﻧﺟﺎﺡ، ﻗﻡ ﺑﺗﺩﻭﻳﺭ ﺣﻠﻘﺔ ﺍﻟﺟﻬﺎﺯ .ﻓﻲ ﻣﻭﺿﻌﻬﺎ ﺍﺗﺟﺎﻩ ﻋﻘﺎﺭﺏ ﺍﻟﺳﺎﻋﺔ، ﻣﻊ ﺗﺛﺑﻳﺕ ﻋﺟﻠﺔ ﺍﻟﺳﺑﺎﻕ ﻟﻠﻘﻳﺎﻡ ﺑﺫﻟﻙ، ﻗﻡ ﺑﺗﺛﺑﻳﺕ ﺍﻟﺣﻠﻘﺔ ﻓﻲ ﻣﻭﺿﻌﻬﺎ ﻭﻗﻡ ﺑﺗﺩﻭﻳﺭ ﻋﺟﻠﺔ ﺍﻟﺳﺑﺎﻕ ﻓﻲ ﺍﺗﺟﺎﻩ...
- Page 207 ﺿﺑﻁ ﺍﺭﺗﻔﺎﻉ ﻭﺗﺑﺎﻋﺩ ﺍﻟﺩﻭﺍﺳﺔ .)ﻏﻳﺭ ﻣﺿﻣﻥ(، ﺃﺯﻝ ﺑﺭﻏﻲ ﺍﻟﺗﺭﻛﻳﺏ ﺍﻟﻠﺫﻳﻥ ﻳﺛﺑﺗﺎﻥ ﺭﺅﻭﺱ ﺍﻟﺩﻭﺍﺳﺔ ﺇﻟﻰ ﺃﺫﺭﻉ ﺍﻟﺩﻭﺍﺳﺔ Phillips ﺑﺎﺳﺗﺧﺩﺍﻡ ﻣﻔﻙ :ﻟﻘﻳﺎﺩﺓ ﺍﻟﻣﻔﺿﻝ ﻟﺩﻳﻙ ﺛﻡ، ﺍﺿﺑﻁ ﺍﺭﺗﻔﺎﻉ ﺭﺅﻭﺱ ﺍﻟﺩﻭﺍﺳﺔ ﻭﺍﻟﺗﺑﺎﻋﺩ ﻟﺗﻧﺎﺳﺏ ﺃﺳﻠﻭﺏ ﺍ .ﺃﻭﺿﺎﻉ ﻣﺧﺗﻠﻔﺔ ﻟﺩﻭﺍﺳﺔ ﺍﻟﺑﻧﺯﻳﻥ ﻳﺗﻭﻓﺭ .ﺃﻭﺿﺎﻉ ﻣﺧﺗﻠﻔﺔ ﻟﺩﻭﺍﺳﺔ ﺍﻟﻔﺭﻣﻠﺔ ﻳﺗﻭﻓﺭ...
- Page 208 ﺍﻻﺗﺟﺎﻩ / ﺍﻹﺯﺍﻟﺔ ﺍﻟﺗﺭﻛﻳﺏ ﻟﻠﺭﺑﻁ ﺗﺩﻭﻳﺭ ﺍﻟﺑﺭﻏﻲ ﻋﻛﺱ ﺍﺗﺟﺎﻩ ﻋﻘﺎﺭﺏ ﺍﻟﺳﺎﻋﺔ ﻟﻠﻔﻙ ﺗﺩﻭﻳﺭ ﺍﻟﺑﺭﻏﻲ ﻓﻲ ﺍﺗﺟﺎﻩ ﻋﻘﺎﺭﺏ ﺍﻟﺳﺎﻋﺔ...
- Page 209 ﺣﺩﻭﺙ ﺗﻠﻑ ﻓﻲ ﺍﻟﻣﻛﻭﻧﺎﺕ ﺍﻟﺩﺍﺧﻠﻳﺔ ﺍﻟﻣﻭﺟﻭﺩﺓ ﻓﻲ ﻗﺎﻋﺩﺓ ﻣﺟﻣﻭﻋﺔ ﺍﻟﺩﻭﺍﺳﺔ ﺗﺗﻭﻓﺭ ﻣﺧﻁﻁﺎﺕ ﺗﺧﻁﻳﻁ ﺍﻟﻣﻘﺻﻭﺭﺍﺕ )ﻟﻭﺿﻊ ﻗﺎﻋﺩﺓ ﻋﺟﻠﺔ ﺍﻟﺳﺑﺎﻕ ﻭ/ﺃﻭ ﻣﺟﻣﻭﻋﺔ ﺍﻟﺩﻭﺍﺳﺔ( ﻋﻠﻰ ، ﺍﻧﻘﺭ ﻓﻭﻕ ﻓﻲ ﻗﺳﻡ Updates and Downloads http://ts.t hrustmaster.com T300RS / Wheels / PlayStation ، ﺛﻡ ﺣﺩﺩ Manual/Help file ®4 ®3 TATION ﻭ...
- Page 210 ﺍﻟﻣﺗﻭﺍﻓﻘﺔ ﻣﻊ ﻭ ﺗﺗﻭﻓﺭ ﻗﺎﺋﻣﺔ ﺑﺄﻟﻌﺎﺏ T300RS PlayStation®4 PlayStation®3 :( ﻭﻓ ﻘ ً ﺎ ﻟﻠﻌﺑﺔ ﺍﻟﺟﺎﺭﻱ ﺗﺷﻐﻳﻠﻬﺎ( ﻋﻠﻰ ﺍﻟﻣﻁﻠﻭﺏ ﻟﻣﻔﺗﺎﺡ ﻣﺣﺩﺩ ، )ﻓﻲ ﺍﻟﻘﺳﻡ Updates and Downloads http://ts.thrustmaster.com T300RS / Wheels / PlayStation ﺍﻧﻘﺭ ﻓﻭﻕ ﻳﺗﻡ ﺗﺣﺩﻳﺙ ﻫﺫﻩ ﺍﻟﻘﺎﺋﻣﺔ ﺑﺎﻧﺗﻅﺎﻡ...
- Page 211 .ﺍﻟﻛﻣﺑﻳﻭﺗﺭ ﻭﺇﺗﻣﺎﻡ ﺍﻟﺗﺛﺑﻳﺕ .)ﺇﻧﻬﺎء( ﻭﻗﻡ ﺑﺈﻋﺎﺩﺓ ﺗﺷﻐﻳﻝ ﺍﻟﻛﻣﺑﻳﻭﺗﺭ ﺍﻟﺧﺎﺹ ﺑﻙ Finish ﺑﻣﺟﺭﺩ ﺍﻛﺗﻣﺎﻝ ﺍﻟﺗﺛﺑﻳﺕ، ﺍﻧﻘﺭ ﻓﻭﻕ )ﺍﻟﺑﺩء / ﻛﺎﻓﺔ Start / All Programs / Thrustmaster / FFB Racing Wheel / Control Panel ﺣﺩﺩ )ﻭﺣﺩﺍﺕ Game Controllers / ﻟﻭﺣﺔ ﺍﻟﺗﺣﻛﻡ( ﻟﻔﺗﺢ ﻧﺎﻓﺫﺓ...
- Page 212 ﺗﺧﻁﻳﻁ ﺍﻟﻛﻣﺑﻳﻭﺗﺭ...
- Page 213 ﺍﻟﻣﻌﺎﻳﺭﺓ ﺍﻟﺗﻠﻘﺎﺋﻳﺔ ﻟﻌﺟﻠﺔ ﺍﻟﺳﺑﺎﻕ ﻭﻣﺟﻣﻭﻋﺔ ﺍﻟﺩﻭﺍﺳﺔ ﻣﻭﺻﻝ ﺗﻌﻣﻝ ﻋﺟﻠﺔ ﺍﻟﺳﺑﺎﻕ ﻋﻠﻰ ﺇﺟﺭﺍء ﻣﻌﺎﻳﺭﺓ ﺫﺍﺗﻳﺔ ﺗﻠﻘﺎﺋ ﻳ ً ﺎ ﻋﻧﺩ ﺗﻭﺻﻳﻝ ﻋﺟﻠﺔ ﺍﻟﺳﺑﺎﻕ ﺑﻣﺻﺩﺭ ﺍﻟﻁﺎﻗﺔ ﺍﻟﺭﺋﻳﺳﻳﺔ ﻭ .ﻟﻌﺟﻠﺔ ﺍﻟﺳﺑﺎﻕ ﺑﻭﺣﺩﺓ ﺍﻟﺗﺣﻛﻡ ﺩﺭﺟﺔ ﻗﺑﻝ ﺍﻟﺗﻭﻗﻑ ﻓﻲ ﺧﻼﻝ ﻫﺫﻩ ﺍﻟﻣﺭﺣﻠﺔ، ﺳﺗﺩﻭﺭ ﻋﺟﻠﺔ ﺍﻟﺳﺑﺎﻕ ﺑﺳﺭﻋﺔ ﺑﺎﺗﺟﺎﻩ ﺍﻟﻳﻣﻳﻥ ﻭﺍﻟﻳﺳﺎﺭ، ﻭﺗﻐﻁﻳﺔ ﺯﺍﻭﻳﺔ .ﺍﻟﻣﻧﺗﺻﻑ...
- Page 214 ﺇﻣﻛﺎﻧﻳﺔ ﺍﻟﺗﺑﺩﻳﻝ MODE ﺗﻠﻣﻳﺣﺎﺕ ﺃﺧﺭﻯ ﺣﻭﻝ ﺍﻟﺯﺭ ﻓﻲ http://ts.thrustmaster.com ﻭﻣﺻﺑﺎﺡ ﺍﻟﻣﺅﺷﺭ، ﻳﺭﺟﻰ ﺍﻻﻧﺗﻘﺎﻝ ﺇﻟﻰ MODE ﻟﻣﻌﺭﻓﺔ ﺍﻟﻣﺯﻳﺩ ﺣﻭﻝ ﺯﺭ T300RS / Wheels / PlayStation Updates and Downloads ، ﺛﻡ ﺣﺩﺩ ، ﺍﻧﻘﺭ ﻓﻭﻕ ﻗﺳﻡ Manual/Help file. THRUSTMASTER ﺍﻟﺗﻭﺍﻓﻕ ﻣﻊ ﻧﻅﺎﻡ ﺍﻻﺗﺻﺎﻝ ﺍﻟﻣﺷﺗﺭﻙ ﻟﻣﻧﺗﺟﺎﺕ...
- Page 215 ﺍﻟﻔﻧﻲ ﺍﻟﺩﻋﻡ http://ts.thrustmaster.com ﻓﻣﻥ ﻫﻧﺎﻙ .ﻭﺗﺣﺩﻳﺩ ﺍﻟﻠﻐﺔ ﺇﺫﺍ ﻭﺍﺟﻬﺕ ﻣﺷﻛﻠﺔ ﻣﻊ ﺍﻟﻣﻧﺗﺞ ﺍﻟﺧﺎﺹ ﺑﻙ، ﻓﻳﺭﺟﻰ ﺍﻻﻧﺗﻘﺎﻝ ﺇﻟﻰ (ﺳﺗﺗﻣﻛﻥ ﻣﻥ ﺍﻟﻭﺻﻭﻝ ﺇﻟﻰ ﺍﻷﺩﻭﺍﺕ ﺍﻟﻣﺳﺎﻋﺩﺓ ﺍﻟﻣﺗﻧﻭﻋﺔ )ﺍﻷﺳﺋﻠﺔ ﺍﻟﺷﺎﺋﻌﺔ، ﺃﺣﺩﺙ ﺇﺻﺩﺍﺭﺍﺕ ﺑﺭﺍﻣﺞ ﺍﻟﺗﺷﻐﻳﻝ ﻭﺍﻟﺑﺭﺍﻣﺞ ﺍﻟﻣﺷﻛﻠﺔ، ﻓﻳﻣﻛﻧﻙ ﺍﻻﺗﺻﺎﻝ ﺑﺧﺩﻣﺔ ﺍﻟﺩﻋﻡ ﺍﻟﻔﻧﻲ ﻟﻣﻧﺗﺟﺎﺕ ﺇﺫﺍ ﺍﺳﺗﻣﺭﺕ...
- Page 216 ﺗﺿﻣﻥ ﺷﺭﻛﺔ ﺍﻓﻕ ﻣﻊ ﺍﻟﻔﺗﺭﺓ ﻫﺫﺍ ﺧﺎﻟ ﻳ ً ﺎ ﻣﻥ ﻋﻳﻭﺏ ﺍﻟﻣﻭﺍﺩ ﻭﻋﻳﻭﺏ ﺍﻟﺗﺻﻧﻳﻊ، ﻁﻭﺍﻝ ﻣﺩﺓ ﻓﺗﺭﺓ ﺍﻟﺿﻣﺎﻥ ﺍﻟﺗﻲ ﺗﺗﻭ Thrustmaster ﻳﻛﻭﻥ ﻣﻧﺗﺞ ﻓﻲ ﺩﻭﻝ ﺍﻻﺗﺣﺎﺩ ﺍﻷﻭﺭﻭﺑﻲ، ﻳﺳﺭﻱ ﻫﺫﺍ .ﺍﻟﻣﺣﺩﺩﺓ ﺍﻟﺗﻲ ﻳﻣﻛﻥ ﺧﻼﻟﻬﺎ ﺍﻟﻣﻁﺎﻟﺑﺔ ﺑﺎﻟﻣﻁﺎﺑﻘﺔ ﻻﺳﺗﺭﺩﺍﺩ ﻗﻳﻣﺔ ﻫﺫﺍ ﺍﻟﻣﻧﺗﺞ ﺃﻭ ﺍﺳﺗﺑﺩﺍﻟﻪ...
- Page 217 ﺣﻘﻭﻕ ﺍﻟﻧﺷﺭ ﻫﻲ ﻋﻼﻣﺔ ﺗﺟﺎﺭﻳﺔ . Thrustmaster® ﺟﻣﻳﻊ ﺍﻟﺣﻘﻭﻕ ﻣﺣﻔﻭﻅﺔ © 2014 Guillemot Corporation S.A. ﻭ “ ” ﻭ “PlayStation” ﻭ “ ” .Guillemot Corporation S.A. ﻣﺳﺟﻠﺔ ﻟﺷﺭﻛﺔ Sony Computer Entertainment, Inc. ﻫﻲ ﻋﻼﻣﺎﺕ ﺗﺟﺎﺭﻳﺔ ﻣﺳﺟﻠﺔ ﻟﺷﺭﻛﺔ “ ” .ﻛﺎﻓﺔ ﺍﻟﻌﻼﻣﺎﺕ ﺍﻟﺗﺟﺎﺭﻳﺔ ﺍﻷﺧﺭﻯ ﻣﻣﻠﻭﻛﺔ ﻷﺻﺣﺎﺑﻬﺎ ﺍﻟﻣﻌﻧﻳﻳﻥ...
- Page 218 FOR P 3 – P 4 SYSTEMS TATION® TATION® User Manual WARNING: To ensure that your T300 RS racing wheel functions correctly with games for PlayStation 3 or PlayStation 4 systems, ® ® you may be required to install the games’ automatic updates (available when your console is connected to the Internet).
-
Page 219: Technical Features
6 MODE button + red/green indicator light 10 Attachment system 11 Metal fastening screw 12 Thrustmaster Quick Release 15 Racing wheel USB cable and connector 13 L3/R3 buttons 16 Shifter (gearbox) connector 14 Power supply connector (type A or B) -
Page 220: Plugging The Racing Wheel Into An Electrical Outlet: Please Read Before Proceeding
PLUGGING THE RACING WHEEL INTO AN ELECTRICAL OUTLET: PLEASE READ BEFORE PROCEEDING! Your racing wheel’s power supply varies according to the country where you purchased your device. The power supply can be: US-Canada-Mexico Internal, with: * a power supply unit located directly inside the racing wheel’s base, with a type A connector. - Page 221 * Do not let any dust build up on the air vents. For safety reasons, never use the pedal set with bare feet or while wearing only socks on your feet. THRUSTMASTER DISCLAIMS ALL RESPONSIBILITY IN THE EVENT OF ®...
- Page 222 Warning – Injuries due to Force Feedback and repeated movements (continued) * If the symptoms or pain indicated above persist when you start playing again, stop playing and consult your doctor. * Keep out of children’s reach. * During gameplay, always leave both hands correctly positioned on the wheel without letting it go completely.
- Page 223 To display the firmware version that your racing wheel is currently using and update it if required: on PC, visit http://ts.thrustmaster.com. In the Updates and Downloads section, click PlayStation Wheels / T300 RS, then select Driver/Firmware and follow the instructions describing the download and installation procedure.
- Page 224 Once you have installed the racing wheel, rotate it 180° (when facing the wheel, the PlayStation® logo should be upside down) to access the small attachment screw located on the ring of the Thrustmaster Quick Release (12) device. Use a large Phillips screwdriver to tighten the small attachment screw (do not use excessive force), turning it clockwise.
- Page 225 ADJUSTING THE PEDALS’ HEIGHT AND SPACING Using a Phillips screwdriver (not included), remove the 2 attachment screws holding the pedal heads to the pedal arms. Next, adjust the pedal heads’ height and spacing to suit your preferred driving style: - 6 different positions are available for the gas pedal. - 6 different positions are available for the brake pedal.
-
Page 226: Attachment / Removal
ATTACHMENT / DIRECTION REMOVAL To tighten: Turn the screw counterclockwise To release: Turn the screw clockwise 9/18... - Page 227 Layout diagrams for cockpits (for positioning the racing wheel’s base and/or the pedal set) are available at http://ts.thrustmaster.com: in the Updates and Downloads section, click PlayStation ...
- Page 228 ® ® the required position for the USB sliding switch (5) according to the game being played) is available at: http://ts.thrustmaster.com (in the Updates and Downloads section, click PlayStation / Wheels / T300 RS). This list is updated regularly.
-
Page 229: Setting Up The Racing Wheel For Pc
USB plug to your computer and complete the installation. 3. Once the installation is complete, click Finish and restart your computer. 4. Select Start / All Programs / Thrustmaster / FFB Racing Wheel / Control Panel to open the Game Controllers window. - Page 230 PC MAPPING 13/18...
-
Page 231: Automatic Racing Wheel And Pedal Set Calibration
AUTOMATIC RACING WHEEL AND PEDAL SET CALIBRATION The wheel automatically self-calibrates when you plug the racing wheel into an electrical outlet and connect the racing wheel’s USB connector to the console. During this phase, the racing wheel will rotate quickly towards the left and the right, covering a 900 degree angle, before stopping at the center. - Page 232 When using this pedal set, make sure that the indicator light remains red, or else the gas pedal will not function properly. The T300 RS is also compatible with Thrustmaster pedal sets featuring 3 pedals (sold separately); these allow you to electronically swap the accelerator and clutch pedals.
- Page 233 TECHNICAL SUPPORT If you encounter a problem with your product, please go to http://ts.thrustmaster.com and click Technical Support. From there you will be able to access various utilities (Frequently Asked Questions (FAQ), the latest versions of drivers and software) that may help to resolve your problem. If the problem persists, you can contact the Thrustmaster products technical support service (“Technical...
- Page 234 Thrustmaster product according to applicable laws of the country in which the consumer was domiciled on the date of purchase of the Thrustmaster product (if no such action exists in the corresponding country, then the warranty period shall be one (1) year from the original date of purchase of the Thrustmaster product).
-
Page 235: Declaration Of Conformity
- Connect the equipment into an outlet on a circuit different from that to which the receiver is connected. - Consult the dealer or an experienced radio/TV technician for help. COPYRIGHT © 2014 Guillemot Corporation S.A. All rights reserved. Thrustmaster is a registered trademark of Guillemot ®... - Page 236 PARA SISTEMAS P 3 – P TATION® TATION® Manual del usuario ADVERTENCIA: Para asegurarte de que tu volante de carreras T300 RS funcione correctamente con juegos para sistemas PlayStation®3 o PlayStation®4, puede que tengas que instalar las actualizaciones automáticas de los juegos (disponibles cuando tu consola está...
-
Page 237: Características Técnicas
6 Botón MODE + luz indicadora roja/verde 10 Sistema de fijación 11 Tornillo de fijación metálico 12 Thrustmaster Quick Release 15 Conector y cable USB del volante de 13 Botones L3/R3 carreras 14 Conector de fuente de alimentación (tipo A 16 Conector del cambio de marchas (caja de o B) (varía de un país a otro) - Page 238 ¡CONEXIÓN DEL VOLANTE DE CARRERAS A UN ENCHUFE ELÉCTRICO: LEER ANTES DE CONTINUAR! La fuente de alimentación del volante de carreras varía en función del país en el que hayas comprado el dispositivo. La fuente de alimentación puede ser: Estados Unidos-Canadá-México Interna, con: * Una unidad de fuente de alimentación situada directamente en el interior de la base del volante de carreras, con un conector de tipo A.
- Page 239 * No dejes que se acumule polvo en las rejillas de ventilación. Por razones de seguridad, no uses nunca los pedales con los pies descalzos o únicamente con calcetines en los pies. THRUSTMASTER DECLINA TODA RESPONSABILIDAD EN CASO DE ®...
- Page 240 Advertencia – Lesiones debidas a Force Feedback y los movimientos repetitivos (continuación) * Si los síntomas o el dolor indicados anteriormente persisten cuando vuelves a jugar, deja de hacerlo y consulta al médico. * Mantén el volante fuera del alcance de los niños. * Durante el juego, mantén siempre ambas manos colocadas correctamente en el volante sin dejarlas completamente caídas.
- Page 241 Para mostrar la versión de firmware que está usando actualmente tu volante de carreras y actualizarla si es necesario: en PC, visita http://ts.thrustmaster.com. En la sección Updates and Downloads, haz clic en PlayStation / Wheels / T300 RS y, a continuación, selecciona Driver/Firmware y sigue ...
- Page 242 Conector del volante de carreras (2): Flecha apuntando hacia arriba Una vez que los conectores estén colocados correctamente, simplemente gira el anillo del dispositivo Thrustmaster Quick Release (12) hacia la izquierda, mientras sostienes el volante de carreras (2) en su posición.
- Page 243 AJUSTE DE LA ALTURA Y EL ESPACIADO DE LOS PEDALES Usando un destornillador Phillips (no incluido), quita los 2 tornillos de fijación que sujetan las cabezas de los pedales a los brazos de los pedales. A continuación, ajusta la altura y el espaciado de las cabezas de los pedales a tu estilo de conducción preferido: - Para el pedal del acelerador hay 6 posiciones diferentes disponibles.
- Page 244 COLOCACIÓN / INDICACIÓN RETIRADA Para apretar: Gira el tornillo hacia la izquierda Para aflojar: Gira el tornillo hacia la derecha 9/18...
- Page 245 Los diagramas de diseño para cabinas (para colocar la base del volante de carreras y/o los pedales) están disponibles en http://ts.thrustmaster.com: en la sección Updates and Downloads, haz clic en PlayStation / Wheels / T300 RS y, a continuación, selecciona Manual/Help file.
- Page 246 - La lista de juegos de PlayStation®3 y PlayStation®4 compatibles con el T300 RS (junto con la posición requerida del interruptor selector de USB (5) según el juego que se esté jugando) está disponible en: http://ts.thrustmaster.com (en la sección Updates and Downloads, haz clic en PlayStation / Wheels / T300 RS).
- Page 247 USB del volante al ordenador y terminar la instalación. 3. Una vez completada la instalación, haz clic en Terminar y reinicia el ordenador. 4. Selecciona Inicio / Todos los programas / Thrustmaster / FFB Racing Wheel / Panel de control para abrir la ventana Dispositivos de juego.
- Page 248 ASIGNACIÓN EN PC 13/18...
- Page 249 CALIBRACIÓN AUTOMÁTICA DEL VOLANTE Y DE LOS PEDALES El volante de carreras se calibra solo automáticamente cuando enchufas el volante de carreras a la red eléctrica y conectas el conector USB del volante de carreras a la consola. Durante esta fase, el volante de carreras girará rápidamente hacia la izquierda y la derecha, cubriendo un ángulo de 90 grados, antes de detenerse en el centro.
- Page 250 Al utilizar estos pedales, asegúrate de que la luz indicadora permanezca en rojo o el pedal del acelerador no funcionará correctamente. El T300 RS también es compatible con los pedales de Thrustmaster que incluyan 3 pedales (vendidos por separado) que te permitirán intercambiar electrónicamente los pedales del acelerador y el embrague.
- Page 251 SOPORTE TÉCNICO Si encuentras un problema con tu producto, visita http://ts.thrustmaster.com y haz clic en Technical Support. Desde allí podrás acceder a distintas utilidades (preguntas frecuentes (Frequently Asked Questions, FAQ), las últimas versiones de controladores y software) que pueden ayudarte a resolver tu problema.
- Page 252 En los países de la Unión Europea, esto corresponde a un período de dos (2) años a partir de la entrega del producto de Thrustmaster. En otros países, el período de garantía corresponde al límite de tiempo para interponer una acción legal referida a la conformidad en relación con este producto de Thrustmaster según las leyes...
-
Page 253: Declaración De Conformidad
(incluyendo, pero no de forma exclusiva, los daños causados de forma directa o indirecta por cualquier software, o por combinar el producto de Thrustmaster con cualquier elemento no adecuado, incluyendo en particular fuentes de alimentación, baterías recargables, cargadores o cualquier otro elemento no suministrado por Guillemot para este producto). - Page 254 POUR SYSTÈMES P 3 – P TATION® TATION® Manuel de l’utilisateur ATTENTION : Pour que le volant T300 RS fonctionne correctement avec les jeux PlayStation 3 ou PlayStation ® ® il peut être nécessaire d’installer les mises à jour automatiques de ces jeux (disponibles lorsque votre console est connectée à...
- Page 255 5 Sélecteur USB PS4™ ou PS3™ 10 Système de fixation 6 Bouton MODE + Voyant lumineux rouge/vert 11 Vis de serrage métallique 12 Thrustmaster Quick Release 15 Câble et connecteur USB du volant 13 Boutons L3 / R3 16 Connecteur pour la boîte de vitesses 14 Connecteur type A ou B pour l’alimentation...
- Page 256 RELIER LE VOLANT AU SECTEUR = A LIRE IMPERATIVEMENT En fonction du pays où vous avez acheté votre volant, l’alimentation secteur de votre volant diffère. Elle est : Etats-Unis-Canada-Mexique Soit interne avec : * Boitier d’alimentation directement dans la base du volant avec connecteur type A * Câble d’alimentation secteur 100-125V.
- Page 257 * Ne laissez pas la poussière s’accumuler sur les grilles d’aération. Pour des raisons de sécurité, ne jouez pas pieds nus ou en chaussettes lorsque vous utilisez le pédalier. THRUSTMASTER DECLINE TOUTE RESPONSABILITE EN CAS DE ® BLESSURE SUITE A UNE UTILISATION DU PEDALIER SANS CHAUSSURES.
- Page 258 Avertissement – Blessures dues au retour de force et aux mouvements répétitifs (suite) * Si les symptômes ou les douleurs indiqués ci-dessus persistent lorsque vous reprenez le jeu, arrêtez de jouer et consultez votre médecin. * Laissez hors de portée des enfants. * Lors des phases de jeu, laissez toujours vos deux mains correctement positionnées sur le volant sans jamais le lâcher complètement.
- Page 259 Pour afficher la version de firmware de votre volant et le mettre à jour si nécessaire : sur PC, allez sur http://ts.thrustmaster.com, dans la section Mise à jour et téléchargement, cliquez sur PlayStation / Volant / T300 RS puis Pilote/Firmware et suivez les instructions et la procédure de...
- Page 260 être à l’envers) afin ® d’accéder à la petite vis de fixation située sur la bague du Thrustmaster Quick Release (12). A l’aide d’un gros tournevis cruciforme, vissez sans forcer la petite vis de fixation dans le sens des aiguilles d’une montre.
- Page 261 AJUSTEMENT DES PEDALES EN HAUTEUR ET EN ECARTEMENT A l’aide d’un tournevis cruciforme (non fourni), retirez les 2 vis de fixation situées sur les palettes des pédales. Ajustez à votre convenance la hauteur et l’écartement des pédales : 6 positions sont possibles pour la pédale d’accélérateur 6 positions sont possibles pour la pédale de frein Lorsque la hauteur et l’écartement des pédales sont ajustés, remettez en place et serrez les 2 vis de fixation sur les palettes des pédales.
- Page 262 MONTAGE / SENS DEMONTAGE Pour serrer : Vissez dans le sens inverse des aiguilles d’une montre Pour desserrer : Dévissez dans le sens des aiguilles d’une montre 9/18...
- Page 263 Important : La longueur de ces 2 vis M6 ne doit pas dépasser l’épaisseur de votre support +10 mm pour ne pas endommager les composants internes au pédalier. Plan d’implantation (de la base ou du pédalier) pour les cockpits disponible sur http://ts.thrustmaster.com, (dans la rubrique PlayStation / Volants / T300 RS / Manuel – ...
- Page 264 4 compatibles avec le T300 RS (ainsi que la ® ® position nécessaire du sélecteur USB en fonction du jeu utilisé) est disponible ici : http://ts.thrustmaster.com (dans la rubrique PlayStation / Volants / T300 RS). Cette liste est régulièrement mise à jour.
- Page 265 Contrôleurs de jeu. La fenêtre Contrôleurs de jeu affiche le nom du volant Thrustmaster T300 RS Racing Wheel avec l'état 5. Cliquez sur Propriétés pour configurer votre volant dans le panneau de configuration du T300 RS : •...
- Page 266 CORRESPONDANCES PC 13/18...
- Page 267 CALIBRAGE AUTOMATIQUE DU VOLANT ET DES PEDALES La roue du volant s’autocalibre de manière automatique une fois le volant relié au secteur et le connecteur USB connecté. Cette opération entraîne des mouvements rapides du volant de gauche à droite sur 900° avant de s’immobiliser au centre.
- Page 268 • Le kit Base Fixed Paddle Shifters** : pour installer des palettes de vitesses fixes sur la base. • Les pédaliers Thrustmaster : T3PA** (Thrustmaster 3 Pedals Add-on) et le pédalier du T500RS. • Les boîtes de vitesses Thrustmaster : TH8A** et TH8RS**.
- Page 269 Support Technique. Vous aurez alors accès à différents services (Foire Aux Questions (FAQ), dernières versions des pilotes et logiciels) susceptibles de résoudre votre problème. Si le problème persiste, vous pouvez contacter le support technique des produits Thrustmaster («...
- Page 270 Dans les pays de l’Union Européenne, ce délai est de deux (2) ans à compter de la délivrance du produit Thrustmaster. Dans les autres pays, la durée de la période de garantie correspond au délai pour intenter une action en conformité du produit Thrustmaster selon la législation en vigueur dans le pays où...
- Page 271 (y compris, mais non limitativement, tout dommage causé directement ou indirectement par tout logiciel, ou par une combinaison du produit Thrustmaster avec tout élément inadapté, notamment alimentations électriques, batteries, chargeurs, ou tous autres éléments non-fournis par Guillemot pour ce produit).
- Page 272 PARA SISTEMAS P 3 – P TATION® TATION® Manual do Usuário ATENÇÃO: Para garantir que o seu volante T300 RS funciona corretamente com jogos para os sistemas PlayStation®3 ou PlayStation®4, poderá ser pedido para instalar as atualizações automáticas dos jogos (disponível quando o console está...
- Page 273 5 Interruptor do seletor USB PS4™ ou PS3™ 10 Sistema de fixação 6 Botão MODE + luz indicadora vermelha/verde 11 Parafuso de aperto de metal 12 Thrustmaster Quick Release 15 Cabo e conector USB do volante 13 Botões L3/R3 16 Conector do câmbio (caixa de marchas) 14 Conector de alimentação (tipo A ou B)
- Page 274 LIGAR O VOLANTE A UMA TOMADA ELÉTRICA: LEIA ANTES DE CONTINUAR! A fonte de alimentação do volante varia de acordo com o país onde você adquiriu o seu dispositivo. A alimentação pode ser: Estados Unidos-Canadá-México Interna, com: * uma unidade de alimentação situada diretamente no interior da base do volante, com um conector de tipo A.
- Page 275 * Não deixe que pó se acumule nas aberturas de ventilação. Por razões de segurança, nunca utilize o conjunto de pedais com os pés descalços ou apenas com meias calçadas nos pés. A THRUSTMASTER NÃO ASSUME QUALQUER RESPONSABILIDADE NA ®...
- Page 276 Atenção – Ferimentos resultantes dos efeitos Force Feedback e dos movimentos repetidos (continuação) * Se os sintomas ou as dores acima indicados persistirem quando recomeçar a jogar, pare de jogar e consulte o seu médico. * Guarde o volante fora do alcance de crianças. * Durante o jogo, mantenha sempre ambas as mãos posicionadas corretamente no volante sem largá- lo por completo.
- Page 277 Para visualizar a versão do firmware que o volante utiliza atualmente e atualizá-la, se necessário: no PC, acesse http://ts.thrustmaster.com. Na seção Updates and Downloads, clique em PlayStation / Wheels / T300 RS, em seguida, selecione Driver/Firmware e siga as instruções que ...
- Page 278 PlayStation® deve ficar virado ao contrário) para acessar o parafuso de fixação pequeno situado no anel do dispositivo Thrustmaster Quick Release (12). Utilize uma chave de fendas Phillips grande para apertar o parafuso de fixação pequeno (não aplique força excessiva), rodando-o no sentido horário.
- Page 279 AJUSTAR A ALTURA E O ESPAÇAMENTO DOS PEDAIS Com uma chave de fendas Phillips (não incluída), remova os 2 parafusos de fixação que prendem as cabeças dos pedais aos braços dos mesmos. Em seguida, ajuste a altura e o espaçamento das cabeças dos pedais de acordo com o seu estilo de condução preferido: - estão disponíveis 6 posições diferentes para o pedal do acelerador.
- Page 280 FIXAÇÃO / DIREÇÃO REMOÇÃO Para apertar: Rode o parafuso no sentido anti- horário Para soltar: Rode o parafuso no sentido horário 9/18...
- Page 281 Estão disponíveis esquemas de disposição para cockpits (para posicionar a base do volante e/ou o conjunto de pedais) em http://ts.thrustmaster.com: na secção Updates and Downloads, clique em PlayStation / Wheels / T300 RS e selecione Manual/Help file.
- Page 282 - A lista de jogos para os sistemas PlayStation®3 e PlayStation®4 compatíveis com o T300 RS (juntamente com a posição necessária do interruptor do seletor USB (5) de acordo com o jogo utilizado) está disponível em: http://ts.thrustmaster.com (na secção Updates and Downloads, clique em PlayStation / Wheels / T300 RS).
- Page 283 USB e completar a instalação. 3. Quando a instalação for concluída, clique em Finalizar e reinicie o computador. 4. Selecione Iniciar / Todos os Programas / Thrustmaster / FFB Racing Wheel / Painel de Controle para abrir a janela Controladores de Jogo A janela Controladores de Jogo exibe o nome T300 RS Racing Wheel e o status OK.
- Page 284 MAPEAMENTO PARA PC 13/18...
- Page 285 CALIBRAGEM AUTOMÁTICA DO VOLANTE E DO CONJUNTO DE PEDAIS O volante é calibrado automaticamente quando conectado a uma tomada elétrica e o conector USB do volante ao console. Durante esta fase, o volante roda rapidamente para a esquerda e direita, cobrindo um ângulo de 900 graus, antes de parar no centro.
- Page 286 Ao usar este conjunto de pedais, certifique-se de que a luz indicadora permanece vermelha, caso contrário o pedal do acelerador não funcionará corretamente. O T300 RS também é compatível com conjuntos de pedais Thrustmaster dotados de 3 pedais (vendidos à parte); estes permitem trocar eletronicamente os pedais do acelerador e da embraiagem.
- Page 287 Technical Support. Lá você encontra vários utilitários, como as perguntas mais frequentes (FAQ) ou as versões mais recentes dos controladores e do software, capazes de ajudá-lo a resolver o seu problema. Se o problema persistir, contate o serviço de suporte técnico dos produtos Thrustmaster (“Suporte Técnico”): Por e-mail: Para usar o suporte técnico por e-mail, primeiro registre-se on-line.
- Page 288 Thrustmaster de acordo com a legislação em vigor do país no qual o consumidor residia na data de compra do produto Thrustmaster (se a dita ação não existir no país correspondente, então o período de garantia será de um (1) ano a partir da data de compra original do produto Thrustmaster).
-
Page 289: Declaração De Conformidade
(incluindo, mas sem limitação, quaisquer danos causados direta ou indiretamente por qualquer software ou por combinar o produto Thrustmaster com qualquer elemento inadequado, incluindo, em particular, fontes de alimentação, baterias recarregáveis, carregadores ou quaisquer outros elementos não fornecidos pela Guillemot para este produto). - Page 290 PlayStation®3 および PlayStation®4 用 ユーザーズマニュアル 警告: PlayStation®3 または PlayStation®4 のシステムソフトウエアによっては、 全ての機能がお使いいただけない場合があります。 その場合は、最新のシステムソフトウエアにバージョンアップしてからご利用下さい。 システムソフトウエアのバージョン確認およびアップデートに関しましてはお使いのゲーム機 本体の取扱説明書を御覧ください。 本製品は PlayStation®2、PlayStation®および PS one®にはご使用になれません。 本製品はワイヤレスコントローラーではありません。 本製品は PlayStation®2、PlayStation®、PS one®では、ご使用になれません。 また、PlayStation®2規格のソフトウェアでの動作につきましては保証いたしかねます。 1/18...
- Page 291 保証規定 ※ 本製品を使用される前に必ずお読みください。 この度は、本製品をお買い上げいただき誠にありがとうございます。以下の保証規定をお読みいた だき内容を同意の上、本製品をご使用ください。 初期不良期間はお買い上げ日から1週間とさせていただいております。 保証期間はお買い上げ日から 1 年間です。 注意: 個人売買(インターネット等)で購入された際の購入日は、保証開始日として起算できません。 社会的信用のある販売店での購入時のみ、購入日を保証開始日としますので、個人売買の場合 は、商品の発売日から保証開始日として起算させて頂きます。 製品がユーザーマニュアル記載の通常の使用方法により正常に動作しなくなった場合は、弊社の 判断で無償にて交換/修理いたします。完売等の場合は同等品と無償で交換いたします。 交換の場合、お客様からお送りいただいた製品等は返却いたしかねます。また、修理の際に取り 外した部品等も返却いたしかねます。 保証期間内でも、次の場合は保証が受けられません。 弊社製品と判断出来ない場合。 ハードウェア自身の消耗に起因する故障または損傷(本製品は性質上、物理的な機構 の耐久性能に依存する製品寿命がございます)。 火災、地震、水害、落雷、ガス害、塩害、その他の天災地変、公害や異常電圧による故 障または損傷。 お買い上げ後の輸送、移動時の落下などお取り扱いが不適当なため生じた故障・損傷 。 ご使用時の不備あるいは接続している他の機器によって生じた故障または損傷。 ユーザーマニュアルの記載内容に反するお取り扱いによって生じた故障または損傷。 弊社以外で改造、調整、部品交換などをされた場合。 本製品の故障に起因するデータ損失などの付随する損害に関しては一切保証できませ ん。 ご使用環境との相性問題に関しての返品、返金等。 10. ゲームソフトとの相性問題に関しての返品、返金等。 11. 一般家庭以外(例えば業務用)でのご使用による故障、損傷または不具合。 12. その他、弊社が、交換を認め難い不適切な行為があると判断した場合。 13. 購入日が確認できるレシートがない場合。 2/18...
- Page 292 カスタマーサポート 本製品に異常を感じられた場合は、すぐに使用を中止し、カスタマーサポートへご相談ください。 ■保証を受ける際に用意するもの 購入店と購入した日付が分かる書類(購入時のレシート、保証書シール、保証書レシート、通販の 代引伝票など)が必要となります。 それらは決して捨てたりせずに大切に保管してください。 ご購入日付を証明する書類をご呈示いただけない場合、保証期間内であっても有償での修理対応 となりますので、あらかじめご了承下さい。 又、保証を受ける権利はご購入者以外(保証の譲渡)が所有する事はできません。 ■ご送付についてのご案内 本製品に異常が発生した場合、カスタマーサポートにご相談頂いた後に、本製品をカスタマーサポ ートまでご送付いただく場合がございます。現象、環境等の詳細をお書き添え頂き、配送業者様の 送り状(伝票)に“不良検証品”と明記の上、お買い上げ時のレシート等と共に本製品をお送りくだ さい。 発送される際は、紛失等のトラブルを防ぐため、必ず受領確認の取れる宅配便でご送付ください。 封書、郵便小包等の郵送は固くお断り申し上げます。 ※ なお、輸送中の事故については、弊社にて責任を負いかねます。あらかじめご了承ください。 ■交換/修理依頼時のご注意 以下の点をご了承の上、交換/修理をご依頼頂けますようお願いいたします。 交換/修理のご依頼について:交換/修理のご依頼は日本国内にお住まいの方とさせて頂き ます。 代替機の貸出について:交換/修理に伴う代替機の貸出等は行っておりません。 製品の交換について:修理が困難な場合には、修理せずに同等品と交換させて頂く事がござい ます。この場合、お客様にて貼られたシールなどはお返しできません。 お客様が設定されたデータについて:弊社にて修理作業を行う際にお客様が設定されたデータ を消去する場合があります。この場合は、工場出荷初期状態でお返しすることとなります。(製 品ごと交換する場合も同様です) ■送料について 初期不良期間内(お買い上げ日から1週間) :初期不良期間の送料は往復共に弊社が負担さ せていただきます。 初期不良期間終了以降~保証期間終了まで :弊社にご送付頂く際の送料はお客様にてご負 担願います。 製品を返送する際の送料は弊社にて負担させて頂きます。 カスタマーサポート連絡先 MSY 株式会社 サポートセンター 埼玉県三郷市仁蔵字深田...
- Page 293 技術仕様 1 T300RS ベース部 7 SELECT/START ボタン (PS3®) およ 2 PS ステアリングホイール び SHARE/OPTIONS (PS4™) 3 シーケンシャル パドルシフト x 2 (上下) 8 PS ボタン 4 多方向パッド 9 大きなねじ穴 (クランプ固定用) 5 PS3®/ PS4 USB セレクタスイッチ 10 固定用クランプ 6 MODE ボタン + 赤/緑インジケータランプ...
- Page 294 ステアリングホイールを電源コンセントに接続する前に: まず最初に お読みください! ステアリングホイールの電源は、ご購入いただいた国によって異なります。 主電源には以下のタイプがあります。 電源内蔵型: * 電源ユニットがステアリングホイールのベース部に内蔵されており、A タイプのコネク ターを搭載しています。 * 220~240 V 主電源ケーブル = 220~240 V の電源コンセント専用です。 絶対に 220~240V の電源ケーブルを 100~130 V のコンセントに接続しないでください!! 絶対に、このケーブルを電源アダプターに接続しない でください!! 電源内蔵型: * 電源ユニットがステアリングホイールのベース部に内蔵されており、A タイプのコネク ターを搭載しています。 * * 100~125 V 主電源ケーブル = 100~125 V の電源コンセント専用です。 絶対に...
- Page 295 に中止し、電源ケーブルをコンセントから抜き、他のケーブルもすべて抜いてください。 * 本製品を長期間使用しない場合には、主電源アダプターをコンセントから抜いてください。 排気口 ステアリングホイールのベース部にある排気口をふさがないでください。最適な排気を確保するため、下記 の事項を必ず守ってください。 * ベース部を、壁面から少なくとも 10cm 以上離してください。 * ベース部を狭いスペースに置かないでください。 * ベース部をふさがないでください。 * 排気口にホコリがたまらないようにしてください。 ペダルセットは、裸足もしくは靴下しか着用していない状態で絶対に使用しないでくだ さい。安全のため、必ず靴を着用してください。 ® THRUSTMASTER は、靴を着用せずにペダルセットを使用したことによって生じた いかなるケガについても一切責任を負いません。 警告 – フォースフィードバック、および繰り返しの動きによる負傷の可能 性 フォースフィードバック対応ステアリングホイールを使ったゲームプレイは、筋肉や関節の痛みなどの症状 を引き起こす恐れがあります。この危険性は、次のような予防措置をとることによって減らすことができま す。 * 長時間のプレイは避けてください。 * 1 時間ごとに 10~15 分の休憩をとるようにしてください。 * 手、手首、腕、足を始めとする身体の部位に疲れや痛みを感じたときはプレイをただちに中止し、再開 する前に数時間の休憩をとるようにしてください。 6/18...
- Page 296 警告 – フォースフィードバック、および繰り返しの動きによる負傷の可能性 (続き) * 休憩後にプレイを再開しても、上記の症状や痛みがとれない場合は、プレイを中止して 医師に相談してください。 * 本製品は、お子様の手の届かない場所で使用してください。 * ゲーム中は常に、ステアリングホイールの正しい位置に両手を置いて使用してください。 ステアリングホイールから両手を完全に離さないでください。 * ゲームプレイ中は、ペダルの下およびペダルセット付近に指を絶対に置かないでください 。 * 調整中およびゲームプレイ中は、絶対に手や腕をステアリングホイールのすき間に置か ないでください。 * ステアリングホイールが、マニュアルの記載どおりにベース部に正しく固定されているこ とを確認してください。 重量注意 本製品の対象年齢は16 歳以上です。 本製品を、自分や人に落とさないよう にご注意ください! 正 誤 誤 7/18...
- Page 297 ア ッ プ デ ー ト を 行 う に は 次 の URL に ア ク セ ス し て く だ さ い (PC か ら ): http://ts.thrustmaster.com 。 [Updates and downloads] から [PlayStation / Wheels / T300RS] をクリックし、[Driver / Firmware] を選択してファームウェアのダウンロードおよ びインストール手順にしたがってください。...
- Page 298 PS ステアリングホイールをベース部に固定する 矢印を使って、コネクターの位置を合わせます。 ベース部 コネクター:上向き矢印 ステアリングホイール コネクター:上向き矢印 (12) コネクターを正しい位置にセットしたら、Thrustmaster Quick Release デバイスのリング を、ステアリングホイール の位置を固定しながら反時計方向に回します。 次に、リングをできるだけきつく締めます。リングの位置を固定した状態で、ステアリングホイ ールを時計方向に回してください。 PS ステアリングホイールを装着したら、180°回転させることで (ステアリングホイールを正 面から見たとき、PlayStation® family markが逆さになります)、Thrustmaster Quick Release (12) デバイスのリング部に打ちこまれている小さな固定ねじが見えますので、大きなプラスド ライバーで、固定ねじを時計方向に回して締めます (締めすぎ注意)。 (プラスドライバーで)小さな固定ねじを締める際には、力の入れすぎにご注意ください。 少し抵抗を感じたら、それ以上ねじを回さないでください。 9/18...
- Page 299 ペダルの高さと間隔の調整 プラスドライバー (付属していません) で、ペダルヘッドをペダルアームに固定している 2 本の取り付けネジを外します。 次に、ペダルヘッドをお好みの高さと間隔に調整します。 - アクセルペダルには、6 段階のセッティングが用意されています。 - ブレーキペダルにも、6 段階のセッティングが用意されています。 お好みの高さと間隔にセッティングしたら、ペダルヘッドをペダルアームに固定していた 2 本の取り付けねじを戻して締めます。 ステアリングホイールを取り付ける ステアリングホイールをテーブルまたは机に取り付ける 1. ステアリングホイールを、テーブルなど平らで水平かつ、安定した場所に置きます。 (10) (11) 2. 固定用クランプ にクランプ固定ねじ を差し込み、ねじを反時計方向に回して 、ステアリングホイール底面の大ねじ穴 に締め込みます (コントローラーがしっか りと固定されるまで)。 正 誤 警告:絶対に、アタッチメントシステムを取り付けずにねじだけを閉めないでください。 (ステアリングホイールが損傷する恐れがあります) 10/18...
- Page 300 取り付け / 取り外 方向 し 締めるとき: ねじを 反時計方向に回す 取り外すとき: ねじを 時計方向に回す 11/18...
- Page 301 重要:使用する 2 本 の M6 ねじの長さが、コックピットの厚さ +12 mm を超えないよ うにしてください。それよりも長いねじを使用すると、ペダルセットの内部部品が破損 する恐れがあります。 (ステアリングホイールのベース部およびペダルセットのセッティングの際に使用する) コ ックピットのレイアウト図を参照するには、http://ts.thrustmaster.com にアクセスし、 [Updates and downloads] か ら [PlayStation / Wheels / T300RS] を ク リ ッ ク し 、 [Manual/Help file] を選択してください。 PlayStation®3 および PlayStation®4 用コントロールレイアウト 12/18...
- Page 302 * ステアリングホイールの PS ボタン を押さないと、ステアリングホイールを使用できません。 * このステアリングホイールは、多くのゲームで T500 RS として認識されます。 * ステアリングホイールは、互換性のあるゲームおよびゲーム機のメニューで使用できます。 * “SHARE” および “PS” ボタンが使用可能です。 T300RS と互換性のある PlayStation®3 および PlayStation®4 用ゲームの一覧 (および各ゲームで必 要な USB セレクタスイッチのポジション設定) は、以下の URL でご確認いただけます: http://ts.thrustmaster.com ([Updates and downloads] で [PlayStation / Wheels / T300RS] をクリックしてください。 この一覧は定期的に更新されます。...
-
Page 303: レーシングコントローラーを Pc 用にセットアップする
ックし、[Drivers] を選択してください。 2. ダウンロードが完了したらインストールを開始し、画面上の指示にしたがってレーシングコ ントローラーの USB コネクターをコンピュータに接続してください。これでインストールは終了 です。 3. インストールが終了したら、[終了] をクリックしてコンピュータを再起動します。 4. [スタート] > [すべてのプログラム] > [Thrustmaster] > [FFB Racing Wheel] > [Control Panel] を選択し、[ゲーム コントローラ] ダイアログを開きます。 [ゲーム コントローラ] ダイアログが開き、レーシングコントローラーの名前「T300 RS Racing Wheel」とステータス「OK」が表示されます。 5. [プロパティ] をクリックし、 T300 RS コントロールパネルでレーシングコントローラーの設定 を行います。... - Page 304 PC 用コントロールレイアウト 多方向パッド 15/18...
- Page 305 ステアリングホイールとペダルセットの自動調整 ステアリングホイールを電源コンセントにつなげて、ステアリングホイールの USB コネクターをゲー ム機に接続すると、ステアリングホイールの自動調整が実行されます。 自動調整では、ステアリングホイールが左右方向に合計 900° すばやく回転し、最後にセンター で停止します。 警告: 自動調整が行われている間は、絶対にステアリングホイールに触れないでください。 (調整が正しく行われなかったり、ケガをしたりする恐れがあります。) ペダルセットの自動調整 ステアリングホイールがゲーム機に接続されている状態、もしくはゲームプレイ中は、絶対にペダ ルセットをステアリングホイールのベース部に接続 (またはベース部から取り外したり) しないでくだ さい。調整が正しく行われない場合があります。 ペダルセットは必ず、ステアリングホイールをゲーム機に接続する前に、ステアリングホイールに接 続してください。 ステアリングホイールの調整が完了してゲームが起動した後、ペダルを数回踏むとペダルは自動 的に調整されます。 警告: ステアリングホイールの自動調整が行われている間、およびゲームのローディング中は絶対にペダ ルを踏まないでください! (調整が正しく行われない可能性があります) ステアリングホイールやペダルセットが正しく動作しない、あるいは調整が正しくないと思わ れる場合: ゲーム機の電源を切り、ステアリングホイールのすべてのケーブル (電源アダプターとペダルセッ ト) を抜いてから、ゲームをもう一度起動してみてください。 内部温度センサー ハンドルの冷却システムはヒートシンクとファンで構成されています。 • サーモスタットがステアリングホイールの内部温度をモニターします。 • ゲームでステアリングホイールを使用時には: ハンドルが一定の温度に達すると冷却ファンが始動します。(使用するフォースフィードバッ ク効果がどれほど強いかによりますが、通常はゲーム開始の 2、3 分後)。 フォースフィードバックの効果は、ハンドルの温度がかなり高くなると直ちに自動的に小さく...
- Page 306 T300RS は、以下の Thrustmaster 製各種オプションと組み合わせ、操作の幅やリアリティ を広げることができます。: • 以下の脱着式 Thrustmaster ステアリングホイール: “Ferrari F1 Wheel Add-on*”、“ Ferrari GTE Wheel Add-on*”、“ T300RS PS Wheel”、“ T500RS GT Wheel*”。 • “Base Fixed Paddle Shifters*” キット (ベース部に固定パドルシフトを設置できます)。 • 以下の Thrustmaster ペダルセット: “T3PA*” (Thrustmaster 3 Pedals Add-on) および...
- Page 307 ヘルプ ファイルとよくある質問 (本マニュアルには記載されていません) http://ts.thrustmaster.com にアクセスし、[Updates and downloads] から [PlayStation / Wheels / T300RS] をクリックし、[Driver / Firmware] を選択してください。 著作権 © 2014 Guillemot Corporation S.A. All rights reserved. Thrustmaster® は、Guillemot Corporation S.A. の登録商標です。" "、"PlayStation"および"PS3"は株式会社ソニ ー・コンピュータエンタテインメントの登録商標です。また、"PS4"および"PSN"は同社の 商標です。その他、本書に記載の登録商標およびブランド名は、それぞれの所有権者 に帰属します。本書に含まれるイラストには法的拘束力はありません。 本書に含まれる 内容、設計および仕様は、事前の通告なしに変更される場合があり、また、各国で異な る場合があります。Made in China.
- Page 308 3 – P 4 용 TATION® TATION® 사용설명서 경고: PlayStation 3 또는 PlayStation 4 용 게임에서 T300 RS 레이싱 핸들의 ® ® 기능이 올바로 발휘되도록 하려면, 게임의 자동 업데이트를 설치해야 할 수도 있습니다 콘솔이 인터넷에 연결되면 자동 업데이트 기능을 사용할 수 있습니다...
- Page 309 5 PS4™ 또는 PS3™ USB 슬라이딩 스위치 사용) 6 MODE (모드) 버튼 + 적색/녹색 표시등 10 부착 시스템 11 금속 조임나사 12 Thrustmaster (트러스트마스터) 퀵 릴리즈 15 레이싱 핸들 USB 케이블 및 커넥터 13 L3/R3 버튼 16 시프터 (변속기) 커넥터 별도 판매...
- Page 310 레이싱 핸들을 전기 콘센트에 연결하기: 연결하기 전에 읽어 주십시오! 레이싱 핸들의 전원공급장치는 기기를 구매한 국가별로 다릅니다. 한국의 경우 전원공급장치: 내부: * 전원공급장치 (C 형 커넥터) 가 레이싱 핸들 베이스 내부에 위치. * 220-240 V 전원 공급 케이블. = 220-240 V 전원만 사용 가능. 케이블을...
- Page 311 * 베이스를 덮지 마십시오. * 공기 환기구에 먼지가 쌓이지 않게 하십시오. 안전한 사용을 위해 페달 세트를 절대 맨발 또는 양말만 신은 상태에서 조작하지 마십시오. ® 는 신발 없이 페달 세트를 조작함으로써 발생하는 부상에 대해 어떠한 책임도 THRUSTMASTER 지지 않습니다. 4/16...
- Page 312 경고 – 포스 피드백 (충격 또는 진동 체감) 및 반복적인 움직임으로 인한 부상 위험 포스 피드백 (게임 기기에서 충격 또는 진동을 실제로 체감하는 기능) 레이싱 핸들을 이용해서 게임하는 경우 근육이나 관절의 통증을 가져올 수 있습니다. 이러한 문제를 예방하려면 다음 사항을 준수하십시오.
- Page 313 레이싱 핸들 베이스에 포함된 펌웨어는 제품을 개선시킨 최신 버전으로 업데이트할 수 있습니다. 레이싱 핸들이 현재 사용 중인 펌웨어 버전을 표시하고 필요한 경우 버전을 업데이트 하려면 PC에서 다음 사이트에 연결합니다. http://ts.thrustmaster.com. Updates and Downloads (업데이트 및 다운로드) 부분에서 PlayStation/Wheels/T300 RS (PlayStation/핸들/T300 RS) 을 클릭한...
- Page 314 그 다음에 링을 최대한 조입니다. 링을 최대한 조이려면 링을 제 위치에 고정시킨 상태에서 레이싱 핸들을 시계 방향으로 돌립니다. 레이싱 핸들을 장착한 후에는 Thrustmaster 퀵 릴리즈 장치 (12) 의 링에 있는 소형 부착 나사에 손이 닿을 수 있도록 핸들을 180° 회전시키십시오 (핸들을 마주봤을 때 PlayStation로고의 위아래가 뒤집힌...
- Page 315 페달 높이 및 간격 조정 십자 드라이버 (제품에 포함되지 않음) 를 이용해서 페달 헤드를 페달암에 고정시키고 있는 2개의 부착 나사를 빼냅니다. 그 다음에 페달 헤드의 높이와 간격을 다음과 같이 원하는 드라이브 스타일에 맞도록 조정합니다. 가속 페달에는 6개의 서로 다른 위치를 사용할 수 있습니다. 브레이크...
- Page 316 부착/제거 방향 조이기: 나사를 시계 반대 방향으로 돌립니다 풀기: 나사를 시계 방향으로 돌립니다 9/16...
- Page 317 선반 두께 를 초과하면 안 됩니다 ‘ + 10mm’ 조종석 배치도 레이싱 핸들 및 또는 페달 세트 위치 결정용 는 에서 구할 http://ts.thrustmaster.com 수 있습니다 업데이트 및 다운로드 부분에서 . Updates and Downloads ( PlayStation/Wheels/T300 핸들 을 클릭한 후 사용설명서...
-
Page 318: Play Station®3 또는 Play Station®4 용 레이싱 핸들 설정
및 실행 중인 게임에 따라 T300 RS PlayStation PlayStation 슬라이딩 스위치 에 필요한 위치에 관한 내용 은 다음 웹사이트에서 확인할 수 있습니다 http://ts.thrustmaster.com 업데이트 및 다운로드 부분에서 (Updates and Downloads ( PlayStation /Wheels/T300 RS 핸들 을 클릭하십시오)... - Page 319 PC 의 경우, 레이싱 핸들 베이스에 있는 USB 슬라이딩 스위치 (5) 는 반드시 PS3™ 위치로 설정되어 있어야 합니다. 1. PC 용 드라이버와 포드 피드백 소프웨어를 다운로드 하려면 http://ts.thrustmaster.com 으로 이동하십시오. Updates and Downloads (업데이트 및 다운로드) 부분에서 PC/Wheels/T300 RS (PC/핸들/T300 RS) 을 클릭하십시오.
- Page 320 PC 매핑 13/16...
- Page 321 레이싱 핸들 및 페달 세트 자동 보정 레이싱 핸들을 전원 콘센트에 연결하고 레이싱 핸들의 USB 커넥터를 콘솔에 연결하면 핸들은 자동으로 자가보정됩니다. 이 과정에서 레이싱 핸들은 왼쪽에서 오른쪽으로 신속하게 회전하여 900 도 각도를 커버한 후 중앙에서 멈춥니다. 경고: 자가보정 하는 동안 절대 레이싱 핸들을 건드리지 마십시오! 이...
- Page 322 THRUSTMASTER 제품군과의 호환성 T300 RS 의 베이스와 호환되는 제품. • 다음과 같은 착탈식 Thrustmaster 핸들: “Ferrari F1 Wheel Add-on* (페라리 F1 핸들 애드온) ”, “Ferrari GTE Wheel Add-on* (페라리 GTE 핸들 애드온) ”, “T300 RS PS Wheel (T300 RS PS 핸들) ”, “T500 RS GT Wheel* (T300 RS PS 핸들) ”.
- Page 323 COPYRIGHT © 2014 Guillemot Corporation S.A. 모든 권리 보유. Thrustmaster ® 는 Guillemot Corporation S.A.의 등록상표입니다. “ ”, “PlayStation”, “ ”, “ ”은 Sony Computer Entertainment, Inc 의 등록상표입니다. “ ”는 Sony Computer Entertainment, Inc 의 상표입니다. 다른 모든 상표는 해당 소유자의 자산입니다. 도면은 법적 구속력이 없습니다. 설명서의 내용, 설계 및...
- Page 324 FOR P 3 – P TATION® TATION® User Manual WARNING: To ensure that your T300 RS racing wheel functions correctly with games for PlayStation 3 or PlayStation ® ® you may be required to install the games’ automatic updates (available when your console is connected to the Internet). 1/16...
-
Page 325: Technical Features
6 MODE button + red/green indicator light 10 Attachment system 11 Metal fastening screw 12 Thrustmaster Quick Release 15 Racing wheel USB cable and connector 13 L3/R3 buttons 16 Shifter (gearbox) connector 14 Power supply connector (type A or B) -
Page 326: Plugging The Racing Wheel Into An Electrical Outlet: Please Read Before Proceeding
PLUGGING THE RACING WHEEL INTO AN ELECTRICAL OUTLET: PLEASE READ BEFORE PROCEEDING! Your racing wheel’s power supply varies according to the country where you purchased your device. In Korea, the power supply is: Internal, with: * a power supply unit located directly inside the racing wheel’s base, with a type C connector. - Page 327 * Do not let any dust build up on the air vents. For safety reasons, never use the pedal set with bare feet or while wearing only socks on your feet. THRUSTMASTER DISCLAIMS ALL RESPONSIBILITY IN THE EVENT OF ®...
- Page 328 Warning – Injuries due to Force Feedback and repeated movements (continued) * If the symptoms or pain indicated above persist when you start playing again, stop playing and consult your doctor. * Keep out of children’s reach. * During gameplay, always leave both hands correctly positioned on the wheel without letting it go completely.
- Page 329 To display the firmware version that your racing wheel is currently using and update it if required: on PC, visit http://ts.thrustmaster.com. In the Updates and Downloads section, click PlayStation Wheels / T300 RS, then select Driver/Firmware and follow the instructions describing the download and installation procedure.
- Page 330 Once you have installed the racing wheel, rotate it 180° (when facing the wheel, the PlayStation® logo should be upside down) to access the small attachment screw located on the ring of the Thrustmaster Quick Release (12) device. Use a large Phillips screwdriver to tighten the small attachment screw (do not use excessive force), turning it clockwise.
- Page 331 ADJUSTING THE PEDALS’ HEIGHT AND SPACING Using a Phillips screwdriver (not included), remove the 2 attachment screws holding the pedal heads to the pedal arms. Next, adjust the pedal heads’ height and spacing to suit your preferred driving style: - 6 different positions are available for the gas pedal. - 6 different positions are available for the brake pedal.
- Page 332 ATTACHMENT / DIRECTION REMOVAL To tighten: Turn the screw counterclockwise To release: Turn the screw clockwise 9/16...
- Page 333 Layout diagrams for cockpits (for positioning the racing wheel’s base and/or the pedal set) are available at http://ts.thrustmaster.com: in the Updates and Downloads section, click PlayStation ...
- Page 334 ® ® the required position for the USB sliding switch (5) according to the game being played) is available at: http://ts.thrustmaster.com (in the Updates and Downloads section, click PlayStation / Wheels / T300 RS). This list is updated regularly.
-
Page 335: Setting Up The Racing Wheel For Pc
USB plug to your computer and complete the installation. 3. Once the installation is complete, click Finish and restart your computer. 4. Select Start / All Programs / Thrustmaster / FFB Racing Wheel / Control Panel to open the Game Controllers window. - Page 336 PC MAPPING 13/16...
-
Page 337: Automatic Racing Wheel And Pedal Set Calibration
AUTOMATIC RACING WHEEL AND PEDAL SET CALIBRATION The wheel automatically self-calibrates when you plug the racing wheel into an electrical outlet and connect the racing wheel’s USB connector to the console. During this phase, the racing wheel will rotate quickly towards the left and the right, covering a 900 degree angle, before stopping at the centre. - Page 338 When using this pedal set, make sure that the indicator light remains red, or else the gas pedal will not function properly. The T300 RS is also compatible with Thrustmaster pedal sets featuring 3 pedals (sold separately); these allow you to electronically swap the accelerator and clutch pedals.
- Page 339 COPYRIGHT © 2014 Guillemot Corporation S.A. All rights reserved. Thrustmaster® is a registered trademark of Guillemot Corporation S.A. “ ”, “PlayStation”, “ ” and “ ” are registered trademarks of Sony Computer Entertainment, Inc. “ ” is a trademark of the same company.
- Page 340 3 – P TATION® TATION® 使用者說明書 警告: 為了確保遊玩 PlayStation®3 或 PlayStation®4 的遊戲時,您的 T300 RS 賽車方向盤機能正常運作,請安裝遊戲的自動更新程式 (主機與網際網路連線即可下載程式)。 1/18...
- Page 341 3 2 數位排檔 (上 & 下) 8 PS 按鈕 4 方向按鈕 9 大螺栓孔(供固定裝置及固定螺桿使用) 5 PS4™ / PS3™ USB 滑動開關 10 固定裝置 6 MODE(模式)按鈕+紅/綠 狀態指示燈 11 金屬固定螺桿 12 Thrustmaster 快速拆卸裝置 15 賽車方向盤 USB 連接線與接頭 13 L3/R3 按鈕 16 排檔(齒輪箱)接頭(另售) 14 電源線接頭(type A/B) 17 腳踏板組接頭 (配合不同國家種類) 2/18...
- Page 342 將賽車方向盤的電源插頭插入電源插座: 進行前請先閱讀以下事項! 賽車方向盤之電源線會依您購買產品的國家而有所不同。 電源線可能為: 中國大陸-内部电源: * 电源装置直接安装于方向盘底座内部,带有 A 型连接器 *220-240 V 电源电缆 = 仅兼容 220-240 V 电源。 将 220-240 V 电缆连接到 100-130 V 电源插座!切勿将此电缆连 切勿 接到电源适配器! 臺灣-内部电源: * 电源装置直接安装于方向盘底座内部,带有 A 型连接器 *100-125 V 电源电缆 = 仅兼容 100-125 V 电源。 切勿将 100-125 V 电缆连接到 220-240 V 电源插座! 切勿将此电缆 连接到电源适配器!...
- Page 343 香港-内部电源: * 电源装置直接安装于方向盘底座内部,带有 G 型连接器 *220-240 V 电源电缆 = 仅兼容 220-240 V 电源。 将 220-240 V 电缆连接到 100-130 V 电源插座! 切勿将此电缆连 切勿 接到电源适配器! 重要提示:如果您不知道方向盘使用地的供电电压,请咨询您当地的供电商。 注意 使用本產品前,請仔細閱讀本說明書,並妥善保存以備不時之需。 注意 – 慎防觸電 *請將此產品存放在乾燥通風處,切勿暴露在灰塵或日光下。 *請勿捲曲或拉扯連接頭及連接線。 *請勿讓任何液體潑濺到本產品或其連接頭上。 *請勿讓本產品發生短路情況。 *禁止拆卸本產品;請勿將之與火接觸或暴露在高溫環境下。 *除了賽車方向盤隨附的電源線,請勿使用其他電源線。 *當電源線或接頭有損傷、斷裂或破損時,請勿使用。 *請確認電源線之插頭正確地插至壁面的插座上,並與賽車方向盤的底座正確連接。 *請勿分解賽車方向盤,內部沒有可供用戶使用的零件。若發生任何需要維修的問題, 請洽製造商、授權代理商或技術人員維修。 *請只使用製造商指定的固定裝置/周邊配件 *當方向盤之動作異常(如發出異常聲音、發熱或有異味時),請立即停止使用並拔除...
- Page 344 散熱孔 請務必讓方向盤底座所有散熱孔保持通暢,並遵循下述規範保持散熱良好: * 底座需距離任何壁面至少 10 cm 以上。 * 請勿將底座置於狹窄處。 * 請勿以任何物品覆蓋底座。 * 請勿讓灰塵堵塞散熱孔。 為確保安全,請勿赤腳或僅穿襪子使用踏板組。 使用踏板組時若因未穿鞋而導致受傷,THRUSTMASTER® 概不負責。 注意 – Force Feedback(力回饋)及進行反覆性動作可能造成之損傷 遊玩力回饋方向盤可能會造成肌肉或關節疼痛。 請遵循下列規範避免造成損傷: * 避免長時間遊玩。 * 每遊玩一小時請至少休息10至15分鐘。 * 若您的雙手、手腕、手臂、雙腳或腿部感到疲勞或疼痛,請停止遊玩並休息幾小 時後再繼續遊玩。 * 若再次遊玩時仍有上述症狀或感到疼痛,請停止遊玩並接受醫生的診療。 * 請放在兒童拿不到的地方保管。 * 遊玩時請將雙手正確地置放於方向盤上,避免讓方向盤隨意動作。 * 遊玩時請勿將雙手或手指伸入腳踏板內或靠近腳踏板組。 *在校準與遊玩時,請勿將雙手或手臂穿過方向盤。 * 請確認方向盤底座已按照使用說明書之指示正確安裝。...
- Page 345 重物 使用者需年滿16歲以上 請小心勿讓本產品掉落至 您或任何人身上! 常保 禁止 禁止 注意 – 遊玩時請小心勿被腳踏板夾傷 * 請將腳踏板放在兒童拿不到的地方保管。 * 遊玩時,請勿讓您的手指靠近腳踏板的邊緣。 * 遊玩時,請勿讓您的手指靠近腳踏板的後方。 * 遊玩時,請勿讓您的手指靠近腳踏板的上方。 禁止 禁止 禁止 注意 – 非遊玩時亦請小心勿被腳踏板夾傷 * 請將腳踏板放在兒童拿不到的安全處保管。 6/18...
- Page 346 若 要 確 認 或 更 新 所 使 用 的 賽 車 方 向 盤 目 前 的 韌 體 版 本 , 請 使 用 個 人 電 腦 前 往 http://ts.thrustmaster.com 網站,在「Updates and Downloads」(更新與下載)項目 點擊「PlayStation®/Wheels / T300 RS」,並選擇「Driver/Firmware」 (驅動程式/...
- Page 347 將賽車方向盤安裝至底座 依照箭頭方向對準接頭位置: 底座 (1) 接頭:箭頭方向往上 賽車方向盤 (2) 接頭: 箭頭方向往上 接頭插入正確位置後,請將方向盤(2)固定在正確位置上,並逆時針旋轉Thrustmaster 快速拆卸裝置(12)的裝置環。 接著盡可能轉緊裝置環:將裝置環固定在正確位置並順時針旋轉。 完成賽車方向盤的安裝後,請旋轉180°(面朝方向盤時,PlayStation®標誌為顛倒狀態) 來調整至位在Thrustmaster快速拆卸裝置(12)的裝置環上的小型安裝螺栓。 使用大型的十 字螺絲起子朝順時針旋轉來轉緊小型安裝螺栓(請勿過度用力)。 使用十字螺絲起子轉緊小型安裝螺栓時請勿過度用力! 轉動中感到有阻力時,請停止繼續轉緊螺栓。 8/18...
- Page 348 調整腳踏板的高度與位置 使用十字螺絲起子(不隨附)拔除固定踏板頭與踏板臂上的2顆安裝螺栓。 接著可依照您習慣的駕駛方式,來調整踏板頭的高度與位置。 -油門踏板有6種位置可供調整。 -煞車踏板有6種位置可供調整。 調整到您喜愛的高度及位置後,請重新裝上並鎖好用來固定踏板頭與踏板臂的2顆安裝螺栓。 如何安裝賽車方向盤 將方向盤固定在桌面上 1. 將方向盤放置在桌子或其他保持水平、平坦且穩定的平面上。 2. 將固定螺桿(11)插入固定裝置(10)後,往逆時針方向將螺桿鎖入方向盤下方的大螺栓孔(9), 直到與方向盤完全穩固。 常保 禁止 注意: 未放置固定裝置時,請勿將螺栓單獨鎖住! (此舉動將會損壞方向盤) 9/18...
- Page 349 組裝/ 拆解 方向 鎖緊: 逆時針轉入 放鬆: 順時針轉出 10/18...
- Page 350 2. 將 2 顆 M6 螺栓(不隨附)穿過駕駛座框架,並鎖入腳踏板組下方的 2 個小螺栓孔中。 重 要 : 所 使 用 之 2 顆 M6 螺 栓 長 度 不 得 大 於 10mm+ 框 架 的 厚 度 , 過長的螺栓可能會造成方向盤底座內部的零件損傷。 若要參閱駕駛座的配置圖(用於設置賽車方向盤的底座或腳踏板組),請前往 http://ts.thrustmaster.com,進入「Updates and Downloads」(更新與下載)項目, 點擊「PlayStation®/Wheels / T300 RS」,並選擇「Manual/Help file」 (說明書/ 輔助資料)。 11/18...
- Page 351 ®3 和 P ®4 示意图 TATION TATION 方向按 12/18...
- Page 352 *方向盤會無法使用「SHARE」與「PS」的機能。 -使用 PlayStation®4 主機時,若將 USB 滑動開關(5)設在 PS4™的位置: *若要使用方向盤,請切記按下賽車方向盤的 PS 按鈕(8)。 *大多數遊戲會將本方向盤辨識為 T300RS 方向盤。 *方向盤可在支援的遊戲與主機選單正常操作。 *方向盤可使用「SHARE」與「PS」的機能。. - 有 關 支 援 T300 RS 方 向 盤 ( 配 合 所 遊 玩 的 遊 戲 將 USB 滑 動 開 關 (5) 設 定 在 適 當 位 置 後 ) 的...
- Page 353 在 PC 上設定遊戲賽車軚盤 重要說明: 在 PC 上,遊戲賽車軚盤上的 USB 滑動開關 必須總是置於 PS3™ 位置。 1.請登入 http://ts.thrustmaster.com 下載 PC 版驅動程式及 Force Feedback 軟體。在 「Updates」(更新)及「Downloads」(下載)部分,按下 PC / 「Wheels」(軚盤)/ T300 RS,然後選擇 Drivers(驅動程式)。 2.下載後開始安裝,並按照螢幕上的指示,將軚盤上的 USB 插頭連接至電腦並完成安裝。 3.安裝完成後,按下「 Finish」(完成)並重啟電腦。 4.選擇「Start」(開始)/「All Programs」(所有程式)/Thrustmaster / 「FFB Racing Wheel 」 ( FFB 賽 車 輪 盤 ) / 「 Control Panel 」 ( 控 制 台 ) 以 開 啟 「 Game Controllers」(遊戲控制器)視窗。...
- Page 354 PC 對應 方向按 15/18...
- Page 355 賽車方向盤與腳踏板組的自動校準 將賽車方向盤插頭插入電源插座,並將賽車方向盤的 USB 接頭連接至主機時, 方向盤 會自動進行校準。 校準時方向盤會快速左右旋轉 900° ,然後固定於中央位置。 注意: 賽車方向盤進行自動校準時,切勿觸碰方向盤! (否則可能會導致校準不良及/或讓身體受傷) 腳踏板組的自動校準 當腳踏板組連接至主機或正在遊玩時,切勿將腳踏板組連接至賽車方向盤底座 (或從 底座拔除),否則可能會造成校準不良。 在將賽車方向盤連接至主機前,請先連接腳踏板組。當賽車方向盤校準完成並已啟動, 踩下幾次腳踏板,腳踏板也會自動進行校準。 注意: 在賽車方向盤自動進行校準操作、或正在載入遊戲時,請勿踩踏腳踏板! (否則可能會導致校準不良) 若您的賽車方向盤或腳踏板組無法正常操作,或是有校準不良的情形: 關閉主機電源並完全拔除賽車方向盤的所有連接線,再重新連接所有連接線 (包含電 源線與腳踏板組),並重新啟動主機與遊戲。 內部溫度感測器 方向盤的冷卻系統由一台散熱器與風扇組成。 ‧具備恆溫器監控方向盤的內部溫度。 ‧當您使用方向盤遊玩遊戲: -若方向盤溫度升高至一定程度(遊戲遊玩一段時間後,根據力回饋效應強度), 冷卻風扇會啟動。 -若方向盤的溫度過高,力回饋效應強度會自動減低(為了保護馬達)。 當溫度 緩降之後,力回饋效應會再自動回升。 ‧當您遊完結束:由於馬達的熱慣性,冷卻風扇會持續運作直到溫度低於風扇啟動 的 溫度為止。本方向盤被設計為易於散熱,以達到保護馬達的作用(依據使用方向盤遊 玩遊戲時溫度升高的程度,冷卻可能需要 5 至 45 分鐘)。 16/18...
- Page 356 THRUSTMASTER 產品系列的相容性 T300 RS 的底座可支援: ‧以下可拆式 Thrustmaster 方向盤:「Ferrari F1 Wheel Add-on*」、「Ferrari GTE Wheel Add-on*」、「T300 RS PS Wheel」、「T500 RS GT Wheel*」。 ‧「Base Fixed Paddle Shifters」套組,讓您可安裝底座上已固定的換檔器。 ‧以下的 Thrustmaster 腳踏板組:「T3PA*」(Thrustmaster 3 Pedals Add-on) 與 T500RS 賽車方向盤的踏板組。 ‧以下的 Thrustmaster 換檔器(齒輪箱):「TH8A*」與「TH8RS*」。 *另售(更多詳細資訊,請前往 http://www.thrustmaster.com/products/t300rs) 輔助資料與常見問題(不包含在此說明書內) 請前往 http://ts.thrustmaster.com 網站,在「Updates and Downloads」(更新與...
- Page 357 COPYRIGHT © 2014 Guillemot Corporation S.A. All rights reserved. Thrustmaster® is registered trademark Guillemot Corporation S.A. “ ”, “PlayStation”, “ ” and “ ” are registered trademarks of Sony Computer Entertainment, Inc. “ ” is a trademark of the same company. All other trademarks are the property of their respective owners.
- Page 358 FOR P 3 – P TATION® TATION® User Manual WARNING: To ensure that your T300 RS racing wheel functions correctly with games for PlayStation 3 or PlayStation ® ® you may be required to install the games’ automatic updates (available when your console is connected to the Internet). 1/18...
- Page 359 6 MODE button + red/green indicator light 10 Attachment system 11 Metal fastening screw 12 Thrustmaster Quick Release 15 Racing wheel USB cable and connector 13 L3/R3 buttons 16 Shifter (gearbox) connector 14 Power supply connector (type A or B)
- Page 360 PLUGGING THE RACING WHEEL INTO AN ELECTRICAL OUTLET: PLEASE READ BEFORE PROCEEDING! Your racing wheel’s power supply varies according to the country where you purchased your device. The power supply can be: Mainland China: internal, with: * A power supply unit located directly inside the racing wheel's base, with a type A connector *A 220-240V mains power supply cable = compatible only with a 220-240V electrical supply.
- Page 361 Hong Kong: internal, with: * A power supply unit located directly inside the racing wheel's base, with a type G connector *A 220-240V mains power supply cable = compatible only with a 220-240V electrical supply. Never connect the 220-240V cable to a 100-130V power outlet! Never connect this cable to a mains power adapter! WARNINGS Before using this product, please read this manual carefully and save it for later reference.
- Page 362 * Do not let any dust build up on the air vents. For safety reasons, never use the pedal set with bare feet or while wearing only socks on your feet. THRUSTMASTER DISCLAIMS ALL RESPONSIBILITY IN THE EVENT OF ®...
- Page 363 HEAVY PRODUCT Product to be handled only by users Be careful not to drop the product on 16 years of age or older yourself or on anyone else! ALWAYS NEVER NEVER Warning – Pedal set pinch hazard when playing * Keep the pedal set out of children’s reach. * During gameplay, never place your fingers on or anywhere near the sides of the pedals.
- Page 364 To display the firmware version that your racing wheel is currently using and update it if required: on PC, visit http://ts.thrustmaster.com. In the Updates and Downloads section, click PlayStation Wheels / T300 RS, then select Driver/Firmware and follow the instructions describing the download and installation procedure.
- Page 365 Once you have installed the racing wheel, rotate it 180° (when facing the wheel, the PlayStation® logo should be upside down) to access the small attachment screw located on the ring of the Thrustmaster Quick Release (12) device. Use a large Phillips screwdriver to tighten the small attachment screw (do not use excessive force), turning it clockwise.
- Page 366 ADJUSTING THE PEDALS’ HEIGHT AND SPACING Using a Phillips screwdriver (not included), remove the 2 attachment screws holding the pedal heads to the pedal arms. Next, adjust the pedal heads’ height and spacing to suit your preferred driving style: - 6 different positions are available for the gas pedal. - 6 different positions are available for the brake pedal.
-
Page 367: Attachment / Removal
ATTACHMENT / DIRECTION REMOVAL To tighten: Turn the screw counterclockwise To release: Turn the screw clockwise 10/18... - Page 368 Layout diagrams for cockpits (for positioning the racing wheel’s base and/or the pedal set) are available at http://ts.thrustmaster.com: in the Updates and Downloads section, click PlayStation ...
- Page 369 ®3 AND P 4 MAPPING TATION TATION® 12/18...
- Page 370 ® ® the required position for the USB sliding switch (5) according to the game being played) is available at: http://ts.thrustmaster.com (in the Updates and Downloads section, click PlayStation / Wheels / T300 RS). This list is updated regularly.
- Page 371 USB plug to your computer and complete the installation. 3. Once the installation is complete, click Finish and restart your computer. 4. Select Start / All Programs / Thrustmaster / FFB Racing Wheel / Control Panel to open the Game Controllers window.
- Page 372 PC MAPPING 15/18...
- Page 373 AUTOMATIC RACING WHEEL AND PEDAL SET CALIBRATION The wheel automatically self-calibrates when you plug the racing wheel into an electrical outlet and connect the racing wheel’s USB connector to the console. During this phase, the racing wheel will rotate quickly towards the left and the right, covering a 900 degree angle, before stopping at the centre.
- Page 374 When using this pedal set, make sure that the indicator light remains red, or else the gas pedal will not function properly. The T300 RS is also compatible with Thrustmaster pedal sets featuring 3 pedals (sold separately); these allow you to electronically swap the accelerator and clutch pedals.
- Page 375 COPYRIGHT © 2014 Guillemot Corporation S.A. All rights reserved. Thrustmaster® is a registered trademark of Guillemot Corporation S.A. “ ”, “PlayStation”, “ ” and “ ” are registered trademarks of Sony Computer Entertainment, Inc. “ ” is a trademark of the same company.
Need help?
Do you have a question about the T300RS and is the answer not in the manual?
Questions and answers