Advertisement
Quick Links
Advertisement

Related Manuals for Thrustmaster T300 RS


Summary of Contents for Thrustmaster T300 RS
- Page 1 ENGLISH...
- Page 2 FOR P 3 – P TATION® TATION® User Manual WARNING: To ensure that your T300 RS racing wheel functions correctly with games for PlayStation 3 or PlayStation ® ® you may be required to install the games’ automatic updates (available when your console is connected to the Internet).
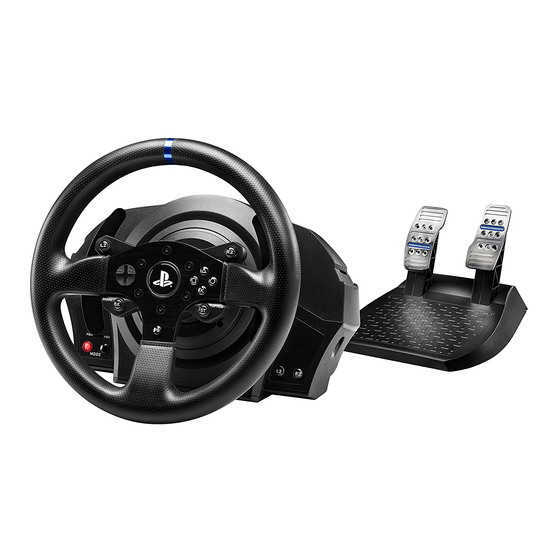
- Page 3 TECHNICAL FEATURES T300 RS base SELECT/START buttons on PS3™ and PS wheel SHARE/OPTIONS on PS4™ 2 sequential paddle shifters (Up & Down) PS button Directional buttons Large threaded hole (for attachment PS4™ or PS3™ USB sliding switch system and fastening screw)
- Page 4 PLUGGING THE RACING WHEEL INTO AN ELECTRICAL OUTLET: PLEASE READ BEFORE PROCEEDING! Your racing wheel’s power supply varies according to the country where you purchased your device. The power supply can be: Internal, with: a power supply unit located directly inside the racing wheel’s base, with a type A connector.
-
Page 5: Air Vents
For safety reasons, never use the pedal set with bare feet or while wearing only socks on your feet. ® THRUSTMASTER DISCLAIMS ALL RESPONSIBILITY IN THE EVENT OF INJURY RESULTING FROM USE OF THE PEDAL SET WITHOUT SHOES. Warning – Injuries due to Force Feedback and repeated movements Playing with a Force Feedback racing wheel may cause muscle or joint pain. - Page 6 Warning – Injuries due to Force Feedback and repeated movements (continued) If the symptoms or pain indicated above persist when you start playing again, stop playing and consult your doctor. Keep out of children’s reach. During gameplay, always leave both hands correctly positioned on the wheel without letting it go completely.
- Page 7 To display the firmware version that your racing wheel is currently using and update it if required: on PC, visit http://support.thrustmaster.com. Click Racing Wheels / T300 RS, then select Firmware and follow the instructions describing the download and installation procedure.
- Page 8 Once you have installed the racing wheel, rotate it 180° (when facing the wheel, the PlayStation® logo should be upside down) to access the small attachment screw located on the ring of the Thrustmaster Quick Release (12) device. Use a large Phillips screwdriver to tighten the small attachment screw (do not use excessive force), turning it clockwise.
- Page 9 ADJUSTING THE PEDALS’ HEIGHT AND SPACING Using a Phillips screwdriver (not included), remove the 2 attachment screws holding the pedal heads to the pedal arms. Next, adjust the pedal heads’ height and spacing to suit your preferred driving style: 6 different positions are available for the gas pedal. 6 different positions are available for the brake pedal.
- Page 10 ATTACHMENT / DIRECTION REMOVAL To tighten: Turn the screw counterclockwise To release: Turn the screw clockwise 9/16...
- Page 11 Attaching the racing wheel’s base to a cockpit Place the racing wheel’s base on the cockpit shelf. Drive two M6 screws (not included) through the cockpit shelf, then feed them into the two small screw threads located on the underside of the racing wheel. Important: The length of the two M6 screws must not exceed the thickness of the shelf + 12 mm;...
- Page 12 * Don't forget to press the racing wheel’s PS button (8) in order to be able to use the wheel. * The wheel is recognized in most games as a T300 RS wheel. * The wheel is functional in compatible games and in console menus.
- Page 13 SETTING UP THE RACING WHEEL FOR PC* * PC compatibility not tested nor endorsed by Sony Interactive Entertainment Europe. For more information, visit http://support.thrustmaster.com. AUTOMATIC RACING WHEEL AND PEDAL SET CALIBRATION The wheel automatically self-calibrates when you plug the racing wheel into an electrical outlet and connect the racing wheel’s USB connector to the console.
- Page 14 Thrustmaster product according to applicable laws of the country in which the consumer was domiciled on the date of purchase of the Thrustmaster product (if no such action exists in the corresponding country, then the warranty period shall be one (1) year from the original date of purchase of the Thrustmaster product).
-
Page 15: Additional Warranty Provisions
Thrustmaster product according to applicable laws of the country in which the consumer was domiciled on the date of purchase of the Thrustmaster product (if no such action exists in the corresponding country, then the warranty period shall be one (1) year from the original date of purchase of the Thrustmaster product). -
Page 16: Technical Support
During the warranty period, Guillemot shall not provide, in principle, any spare parts, as Technical Support is the only party authorized to open and/or recondition any Thrustmaster product (with the exception of any reconditioning procedures which Technical Support may request that the consumer carry out, by way of written instructions –...
Need help?
Do you have a question about the T300 RS and is the answer not in the manual?
Questions and answers