
Related Manuals for Häfele PP9100


Summary of Contents for Häfele PP9100
- Page 1 User manual Scan Code For Warranty Registration & Policy Products Applied: Digital Door Lock PP9100 Products Applied: 912.20.698...
- Page 2 Product specification and component Features Basic Specification 6 unlocking ways User Capacity Face ID Unlocking Way Face ID + Fingerprint + Password + Card + Mechanical Key + Remote Controller Biometric fingerprint reader Burglary alarm function Voice guide language English Random security coding Power Battery...
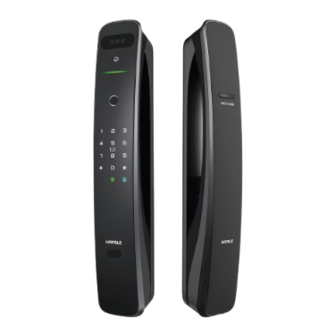
- Page 3 Front panel Back panel Type-C power port Face ID sensor Door Bell Upper cover, Open/ Close Button: Long press to lock Bluetooth module, Fingerprint with privacy mode Reset button. sensor enabled. Touchkeypad Single press to open. Card reader area Battery cover Body detector sensor Key cylinder...
-
Page 4: Installation Steps
Installation steps Drawing lines on the door as the template marked, the suggested distance between handle and the floor is 1m-1.2 m. Then drill the holes as required. Change latch direction, disassemble the faceplate of the mortise and rotate the latch bolt 180°. Then reinstall the faceplate. - Page 5 Installation steps Insert mortise into the door and use 4 pcs of M5*10 crosshead screws to fix the mortise. (ST4.2*25 self-tapping counter sunk screws for Wooden Door). Install transmission rod on the front panel as shown above. Please adjust the transmission rod to the position as shown below. Center line Transmission rod...
- Page 6 Installation steps Install 5pcs threaded sleeves on the front Pass 2 cables through the top hole: Make sure the transmission rod trough the mortise. Then use panel. 2 screws fix the front panel with mounting plate. Connect front panel cable and mortise cable Use 3 screws to fix back panel to the front panel.
-
Page 7: Emergency Power Supply
Installation steps After finished installation, please reset the lock to match the front and back panel by using paper clip and keep pressing the reset button for 3 sec. Reset Button Module Instructions Emergency Power Supply When the battery voltage is too low and the lock cannot be opened from outside, connect a 5V power supply via USB Type-C port at the front. - Page 8 Instructions Keyboard operation instructions Face Recognition NOTE: # = * = Doorbell Button Indicator Fingerprint Reader Touch keypad Card reader area Confirm - Exit and delete Face ID button - Mute mode (Press this button twice) Indicator Meaning Lock status indicator The light flashes green when verification succeeded.
- Page 9 Instructions How to lock/ unlock at the door Lock the door The door will be locked automatically after closing. (Auto lock) Note: This lock has no manual lock function. Unlock from outside Face ID: Touch the keypad to wake up the lock and press the Face ID button to activate the sensor. If automatic face ID function is enabled, just stand in front of the lock 30-50 cm.
-
Page 10: Operating Process
Instructions How to change batteries FIG.1 FIG.2 Remove the battery Change new batteries cover (as shown). and cover it. Operating process Demo mode Note: Any fingerprint, keycard or password can open the door. Touch the Choose one way to unlock: Green light: succeeded (Touchscreen) fingerprint/ password/ IC card... - Page 11 Face recognition function Note: • The smart lock must be equipped with eight batteries before using the face ID function. • Make sure no one is behind you when you register your face, otherwise, face ID registration may fail. • Face ID function consumes more power fast. It may reduce battery life time depends on operatin frequently.
- Page 12 Delete registered user Note: Input O1 will prompt deletion failure. When the battery power is low, the face recognition function will turn off and the face information cannot be deleted. Touch the Double click (#) to Identify the administrator Press “2” to enter Input the ID to be deleted (Touchscreen) enter setting mode...
- Page 13 Fingerprint trial 1. Default setting, this function is enabled. If enter wrong user ID 5 times in 5 minutes, lock will suspend 90 seconds. 2. When this function is disabled, there will no suspend function when you enter the wrong fingerprint only. Touch the Double click (#) to Identify the administrator...
- Page 14 Featured Operations Type of user ID 1. Administrator (01) can open the door and manage lock data information.In special cases, the administrator user has the highest authority. We recommend only the households and leadership to use this leve function. 2. Common user (02-99) can open the door only. Key function 1.
- Page 15 Burglar alarm 1. If someone tries to break in, the lock will sound an alarm. 2. To turn off the alarm: Touch the keypad and identify with the authorized ID. Prevent mischief and hacking If enter wrong user ID 5 times in 5 minutes, lock will suspend 90 seconds with alarming, after that the lock will activate again.
-
Page 17: Hướng Dẫn Sử Dụng
HƯỚNG DẪN SỬ DỤNG Quét Mã Để Đăng Ký Bảo Hành & Chính Sách Bảo Hành PRODUCT NAME - SERIES NO.: Tên Sản Phẩm: Khóa Thông Minh PP9100 Mã Sản Phẩm: 912.20.698... - Page 18 Thông số kỹ thuật và cấu tạo sản phẩm Tính Năng Thông số kỹ thuật cơ bản 6 cách mở khóa Số lượng người dùng ID khuôn mặt (Face ID) Cách mở khóa ID khuôn mặt+ Vân tay + Mật khẩu + Thẻ + Chìa khóa cơ...
- Page 19 Mặt trước Mặt sau Cổng nguồn USB-C Cảm biến khuôn mặt ID Chuông cửa Nắp trên, Nút OPEN/CLOSE: Nhấn lâu để kích hoạt Bluetooth module, Cảm biến chế độ riêng tư nút Reset vân tay Phím nhấn Nhấn một lần để mở Khu vực đầu đọc thẻ...
- Page 20 Các bước lắp đặt Vẽ các đường trên cửa theo như đánh dấu trong tờ rập khóa, khoảng cách đề xuất giữa tay nắm và sàn nhà là 1m-1,2 m. Sau đó khoan các lỗ theo đúng vị trí đánh dấu. Thay đổi hướng chốt, tháo rời tấm ốp của thân khóa và...
- Page 21 Các bước lắp đặt Chèn ổ khóa vào cửa và sử dụng 4 vít đầu chữ thập M5*10 để cố định thân khóa. (Vít chìm ST4.2*25 tự ta rô dành cho Cửa Gỗ). Lắp trục khóa vào mặt trước, sau đó điều chỉnh trục khóa về vị trí như hình bên dưới. Đường tâm Trục khóa...
- Page 22 Các bước lắp đặt Lắp 5 ống ren vào mặt trước của khóa Luồn 2 dây cáp qua lỗ trên cùng: Đảm bảo trục khóa xuyên qua lỗ. Sau đó sử dụng 2 vít cố định mặt trước với khoen cài. Kết nối các sợi cáp của mặt trước và...
- Page 23 Các bước lắp đặt Sau khi lắp đặt xong, phải reset lại khóa cho mặt trước và sau khớp với nhau bằng cách sử dụng kẹp giấy ấn và giữ nút reset trong 3s. Nút Reset Module Hướng dẫn Cấp nguồn khẩn cấp Khi điện áp pin quá...
- Page 24 Hướng dẫn Keyboard operation instructions Nhận dạng LƯU Ý: # = khuôn mặt * = Nút Chuông cửa Đèn cảnh báo Đầu đọc vân tay Phím Khu vực đầu đọc thẻ Xác nhận - Thoát và xóa Nút ID khuôn mặt - Chế...
- Page 25 Hướng dẫn Cách khóa/mở khóa cửa Khóa cửa Cửa sẽ tự động khóa sau khi đóng. (Tự động khóa) Lưu ý: Khóa này không có chức năng khóa thủ công. Mở khóa từ bên ngoài ID khuôn mặt: Chạm vào bàn phím để đánh thức khóa và nhấn nút Face ID để kích hoạt cảm biến. Nếu bật chức năng nhận diện khuôn mặt tự...
- Page 26 Hướng dẫn Cách thay pin HÌNH 1 HÌNH 2 Tháo nắp pin (như hình) Thay pin và đậy nắp lại Quy trình vận hành Chế độ demo Lưu ý: bất cứ dấu vân tay, thẻ từ hay mật khẩu nào cũng có thể mở được khóa. Chạm vào Chọn một cách để...
- Page 27 Chức năng nhận dạng khuôn mặt Lưu ý: • Khóa phải được lắp đủ 8 viên pin trước khi sử dụng chức năng Face ID. • Đảm bảo không có ai ở phía sau bạn khi bạn đăng ký khuôn mặt, nếu không, việc đăng ký...
- Page 28 Xóa người dùng đã đăng ký Lưu ý: Đầu vào O1 sẽ nhắc không thể xóa lỗi. Khi pin yếu, chức năng nhận dạng khuôn mặt sẽ tắt và không thể xóa thông tin khuôn mặt. Chạm vào Chạm hai lần (#) để Nhận dạng vân tay/mật Nhấn “2”...
- Page 29 Thử dấu vân tay 1. Cài đặt mặc định, chức năng này được bật. Nếu nhập sai ID người dùng 5 lần trong 5 phút, khóa sẽ tạm dừng trong 90 giây. 2. Khi chức năng này bị tắt, sẽ không có chức năng tạm dừng khi bạn nhập sai dấu vân tay. Chạm vào Chạm hai lần (#) để...
- Page 30 Cách vận hành chi tiết Loại ID người dùng 1. Quản trị viên (01) có thể mở cửa và quản lý thông tin dữ liệu khóa. Trong trường hợp đặc biệt, người dùng quản trị viên có quyền cao nhất. Chúng tôi khuyến nghị chỉ chủ nhà mới sử dụng chức năng này. 2.
-
Page 31: Thận Trọng
Báo động chống trộm 1. Nếu ai đó cố đột nhập, khóa sẽ phát ra âm thanh báo động. 2. Để tắt báo động: Chạm vào bàn phím và nhận dạng bằng ID đăng ký. Ngăn chặn hành vi nghịch ngợm và hack Nếu nhập sai ID người dùng 5 lần trong 5 phút, khóa sẽ... - Page 32 Häfele VN LLC. Phone: (+8428)39 113 113 Email: info@hafele.com.vn...
Need help?
Do you have a question about the PP9100 and is the answer not in the manual?
Questions and answers