
Related Manuals for Häfele PP8100


Summary of Contents for Häfele PP8100
- Page 1 Digital door lock Model PP8100 PP8100 Installation guide * The contents of this user manual are subject to change without prior notice to the user in order to enhance performance of the products.
- Page 2 Contents Product specification…………………………………………………………………………………...2 Components………….…………………………………………………………………………………3 Prepare for installation………….………………………………………………………………………4 Installation…………………………….…………………………………………………………………6...
-
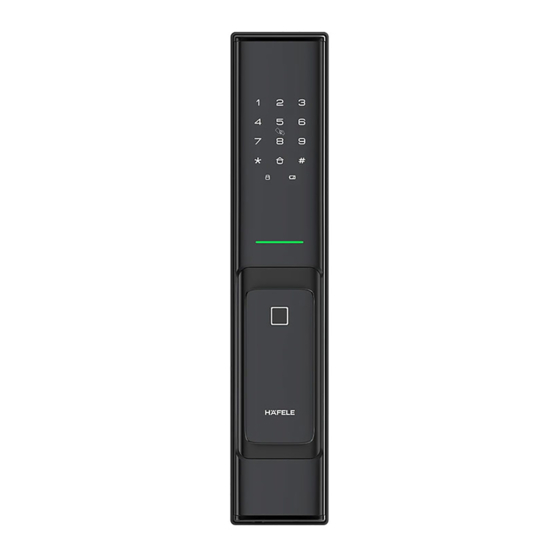
Page 3: Product Specification
Product specifications Outside panel Inside panel Battery cover Touch keypad Card reader area CLOSE/OPEN button Safe handle Fingerprint sensor switch Push pull handle Push pull handle Key cylinder Emergency power port Reboot button Key cylinder Emergency power port Reboot button Mortise lock Sensor latch Deadbolt... -
Page 4: Components
Components 1. Outside panel assembly (1 pc) 7. Mounting screw (1 pc) 13. Rubber plug (1 pc) 2. Pressure spring (2 pcs) 8. Battery cover (1 pc) 14. Strike assembly 3. Connecting screw bolt (1 pc) 9. Connecting screw bolt (4 pcs) - Left strike plate (1 pc) 4. -
Page 5: Prepare For Installation
Preparing for installation Check door open direction This product fits for all door open directions-Left-in/Left-out/Right-in/Right-out Indoor Indoor Outdoor Outdoor Indoor Indoor Outdoor Outdoor... - Page 6 Preparing for installation Change open direction (Inside panel assembly) Please change the screw position according to door open direction. Arrow Arrow direction direction Right-in Left-in Screw Screw Screw Screw Arrow Arrow direction direction Right-out Left-out Screw Screw Screw Screw Check door thickness 1.
-
Page 7: Installation
Installation 1. Mark and drill bores by using the installation 2. Tighten the 2 screws to fix the mortise in the template first, then fix the mortise into the door door. frame. Indoor Indoor Do not make the mortise deadbolt come out 4. - Page 8 Installation 5. Install the mounting plate with fixing screw tightly 6. Place square shaft in the back panel in proper against the door surface. order. Indoor Indoor Square shaft 7. Install the connecting wires of front panel into the 8. Tighten the 2 fixing screws. related sockets of the back panel.
- Page 9 Installation 9. Install the batteries and battery cover. Cover the screw 10. Please check push-pull handle, safe handle hole with rubber plug, then install then strike assembly switch and mechanical key for proper operation. to finish installation. Indoor Battery cover Screw hole cover After installing the strike assembly, please check if the lock works smoothly...
Need help?
Do you have a question about the PP8100 and is the answer not in the manual?
Questions and answers