
Related Manuals for Häfele DL6500


Summary of Contents for Häfele DL6500
- Page 1 Digital door lock Model DL6500 DL6500 User manual * The contents of this user manual are subject to change without prior notice to the user in order to enhance performance of the products.
-
Page 2: Product Features
Read before using Product features Warnings Three way solution * Read and understand all instructions before use. Three electronic locking modes: PIN code, APP and * If damage is caused by failure to follow this instructions, the warranty emergency key. does not apply. -
Page 3: Product Specifications
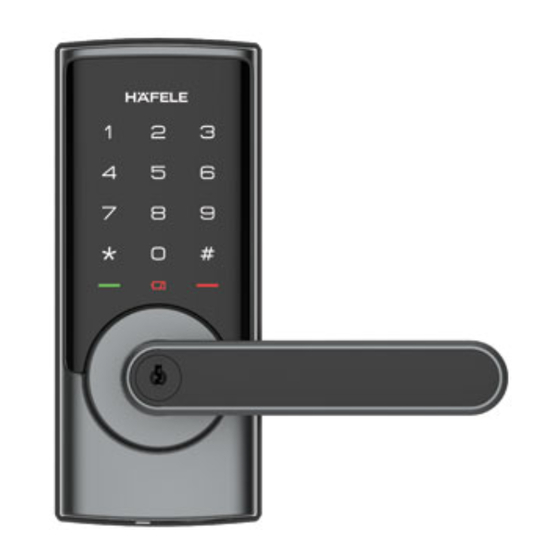
Read before using Product specifications Outside panel Inside panel Battery cover Touch keypad Network module socket Key cylinder Reset button Manual mode switch Emergency power port Reboot button 1. You can follow the voice guide by multi-language (English/Spanish/Portuguese/French/Chinese). 2. Master PIN code(4~10 digits): Default master PIN code is “12345678”, please modify it after installation. 3. -
Page 4: Factory Default Settings
Read before using Quick setup guide Factory default settings Settings Factory defaults Master PIN code Master PIN code* 12345678 Speaker Enabled User PIN code Wrong code entry limit 10 times Shutdown time 3 minutes Star key, return to previous menu Voice guide language English *Important: First step is to set your own master PIN code. - Page 5 Lock operation Add/Change access data How to change master PIN code (4–10 digits) (first setting use 12345678) (confirm) Before changing default master PIN code, all other setting menu will be disabled.You have to change master PIN code first, then do other lock settings. How to add user PIN codes (4–10 digits) (4–10 digits)
- Page 6 Lock operation Delete access data How to delete user PIN code (4–10 digits) (4–10 digits) 1. When deleting user PIN codes, the user number must be entered within 10 seconds. 2. At any time you can return to the previous menu by pressing the “*” key. 3.
-
Page 7: Bluetooth Settings
Lock operation Additional lock features Bluetooth settings Enable Bluetooth (4–10 digits) Disable Bluetooth (4–10 digits) 1. The default setting for Bluetooth is disabled. 2. Bluetooth will shut down in 2 mins after touch keypad lights off for energy saving, it will back to work when touch keypad wakes up. Network module (Optionally available) Join network Log off network... -
Page 8: Menu Table
Lock operation Additional lock features Menu table Manual mode Press[1] Modify master PIN code 1. Enable: Move the switch Press[2] 1.Add user PIN code position to enable manual mode. Press[3] 1.Delete user PIN code 1.Modify master PIN code 2. Disable: Move the switch 1.English 2.User setting position to disable... - Page 9 How to use Open & Lock the door How to open the door from outside PIN code Mechanical key 1. Touch keypad 1. Insert the key into key hole and rotate it with proper angles. by palm to lighten 2. Press down handle to open the door. keypad.
-
Page 10: Service Features
How to use Service features Micro USB emergency power supply When the battery voltage is too low and cannot be opened from outside, connect a 5V power supply via Micro USB port at the front. Then unlock the door and replace all batteries immediately. Power bank (Micro USB) Emergency power port Reset to factory default settings... - Page 11 How to use Service features Reboot button Network module Press the reboot button to restart the lock, when the system is unresponsive. Network No user data is deleted. module interface Network module Reboot (optionally available) button Access master mode and press [ 8 ] for function extension, Replace batteries which is reserved for wireless communication and other smart home interfaces.
- Page 13 Digital door lock Model DL6500 DL6500 Installation guide * The contents of this installation guide are subject to change without prior notice to the user in order to enhance performance of the products.
- Page 14 Product specifications Outside panel Inside panel Battery cover Touch keypad Key cylinder Reset button Manual mode switch Emergency power port Reboot button Latch lock Shaft socket...
- Page 15 Product specifications Battery cover Inside panel Mounting plate Mounting screws(2 pcs) Outside panel Handle screw(1 pcs) Cross bolt Mounting Handle screw screws(3 pcs) (1 pcs) Cover screws(2 pcs) Mechanical key...
-
Page 16: Preparing For Installation
Preparing for installation Check door open direction This product fits for all door open directions Left-in / Left-out / Right-in / Right-out. Indoor Indoor Outdoor Outdoor Left-in Left-out Indoor Indoor Outdoor Outdoor Right-in Right-out... - Page 17 Preparing for installation Change the faceplate (If necessary) Check the type of door frame sockets to be installed. No change necessary Type 1 Type 2 Follow the 3 steps to complete the faceplate replacement. Adjust the backset This latch lock can be adjust the backset from 60 mm to 70 mm by following the below picture. 2-3/4”...
-
Page 18: Installation
Installation 1. Mark and drill bores by using the installation template first, then fix the latch lock into the door frame. Angle Type 1 Type 2 Wood Block (Not included) Make sure latch angle face door jamb. 2. Install strike plate onto door jamb. Jamb... - Page 19 Installation 3. Fix cross bolt on the front panel. 5. Pass the connection wire through the mounting plate and install the mounting plate with fixing screws tightly against the door surface. 4. Pass the connection wire through the top bore. 6.
- Page 20 Installation 7. Make the back panel fit against the door closely. 9. Install the exterior and interior handle, then tighten Then tighten fixing screws. the fixing screw. 8. Install the batteries and the battery cover. 10. Please check handle and mechanical key for proper operation. Test if mechanical key works smoothly after installation.
Need help?
Do you have a question about the DL6500 and is the answer not in the manual?
Questions and answers